
My Force USA G6 review will tell you everything you need to know about this all-in-one gym. I’ll help you make an informed decision on whether or not to buy this unit.
The Force USA G6, formerly known as the Force USA Monster G6, is one of seven models in the Force USA all-in-one gym product line. It is one of the best models overall because it has such a desirable mix of high-value features.
| Model | Pros & Cons | Rating |
|---|---|---|
Force USA G6 All-In-One Trainer | Pros:
| Rated 4.7 out of 5 in All-In-Ones |

It’s hard to call it “the best” now that the G20 has been released, but it certainly holds its own.
I’ll start this Force USA G6 review with a high-level overview of this all-in-one gym. Then I’ll get into the nitty-gritty of each major feature. I’ll wrap things up with my thoughts on who should or should not buy the Force USA G6.
RELATED POSTS:
- Force USA G3 in-depth review
- Force USA G9 in-depth review
- Force USA G10 in-depth review
- Force USA G12 in-depth review
- Force USA G15 in-depth review
- Force USA G20 in-depth review
- Force USA G3, G6, G9, G10, G12, G15 and G20 comparison & buying guide
- Force USA C20 review
Use the table of contents below to jump to any section of this Force USA G6 review:
Table of Contents
What Comes with the Force USA G6?
The Force USA G6 is a 9-in-1 machine. It has the ability to be upgraded to an 11-in-1 machine with an optional upgrade kit.
Buy the Force USA G6 – Use KING5 for 5% OFF »
The G6 comes standard with the following exercise stations:
- Power rack
- Functional trainer
- Smith machine
- Vertical leg press
- Chin up station
- Dip station
- Core trainer / Landmine station
- Suspension trainer ring
- Lat pulldown (includes leg holder attachment for the cable column, which can also double as a makeshift footplate for low rows)
In November 2022, Force USA introduced an optional G6 upgrade kit, which includes 2 additional attachments/stations:
- Jammer arms
- Leg curl/extension attachment
Force USA G6 Dimensions
| External Width | 72” |
|---|---|
| External Depth | 63” |
| External Height | 91″ |
| Internal Width (Between Uprights) | 41” |
| Internal Width (Smith Machine) | 36″ |
| Internal Depth | 34” (incorrectly listed as 37″ on the product page) |
| Internal Height | 85” |
Force USA G6 Review: Features
Minimal Footprint
The Force USA G6 fits 9 training stations into 1/3 of the footprint that would be required if you had a dedicated piece of equipment for each station.
This is one of the main draws of an all-in-one home gym and functional trainer like the Force USA G6. It’s perfect for people with limited room who don’t want to sacrifice on exercise variety.
The alternative would be buying separate pieces of dedicated weight training equipment. Of course, who wouldn’t want to have a dedicated piece of equipment for each exercise station? Dedicated equipment will always give you extra benefits because it’s specialized…
…But many people don’t have a ton of extra space to fit several large machines. When you choose an all-in-one gym like the Force USA G6, you still get most of the key benefits that the dedicated equipment gives you. You may lose out on the marginal benefits. But you gain the major benefits of convenience and space efficiency.
I assume convenience and a compact footprint are high on your priority list if you’re in the market for an all-in-one gym.
Cost Efficient Setup
Similar to how the Force USA G6 will save you space, it will save you money, too.

You save hundreds if not thousands of dollars when you buy the Force USA G6 instead of separate, specialized equipment of similar quality.
You’ll still have to set aside a chunk of change for the G6. It costs $3,499. But the point is you’re paying much less than the alternative. More money in the bank is always a good thing.
It’s best to think of the G6 as an investment. Because that’s what it is. Luckily, it’s a one-time investment because it comes with almost everything included (remember, you can get the upgrade kit to add jammer arms and leg curl/extension).
Furthermore, you won’t need to buy any other machines in the future since you have all the major exercise stations you need in this one unit (which, by the way, has a lifetime warranty).
The only other major items you may need are a barbell, a flat or adjustable bench and weight plates — Many people will have that equipment already. Smaller accessories you may want in order to get the most out of the G6 are resistance bands to use on the band pegs, and a suspension trainer to use on the suspension trainer ring.
Versatile Design
Versatility is the name of the game when it comes to an all-in-one home gym like the Force USA G6. You’ll have no shortage of exercise possibilities among the 9 different stations.
You can do hundreds of exercises on this machine. Here’s an idea of the number of exercises you can do on each station:
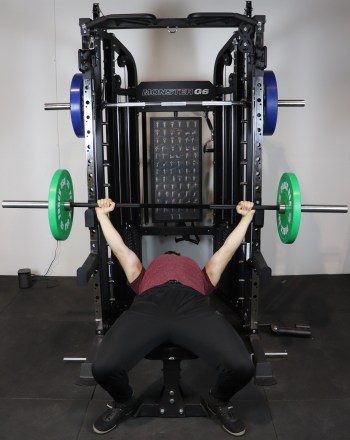
- Virtually all of the barbell movements you can do in a full sized power rack are possible in the Force USA G6 power rack. Squat and bench press are just the beginning. 40+ barbell exercises is a conservative estimate.
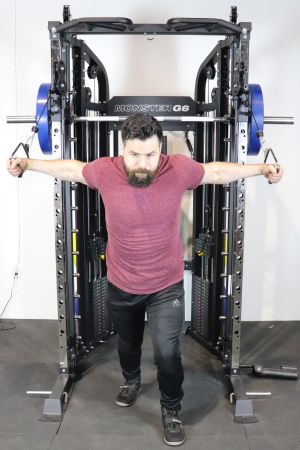
- The functional trainer component gives you the ability to do 75+ different cable exercises. Your creativity is the limit on this exercise station. Many more than 75 exercises variations are possible thanks to the flexibility inherent in its design.
- On the Smith machine, you can do most of the exercises you can do in the power rack; plus some unique to just the Smith machine. Consider that another 30+ Smith machine movements.
- There’s easily 30+ landmine exercises you can do, including a few row variations, a ton of core movements and several landmine variations of more traditional movements (squats, deads, etc.).
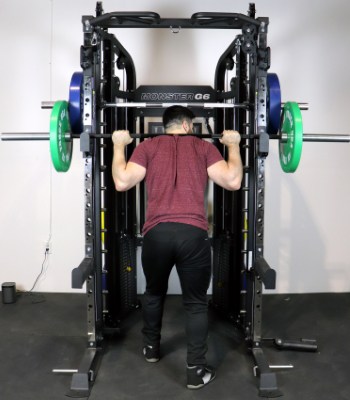
- The multi-grip chin up bar gives you the ability to do 9 pull up variations just with the different grip configuration combinations. Even more are possible if you get creative.
- The dip station gives you access to 2 basic dip exercises (wide grip and narrow grip). Though, many less conventional dip variations are possible, too.
- The suspension trainer ring gives you access to a whopping 80 suspension trainer exercises assuming you have a TRX or other suspension trainer unit to hang on it.
- The vertical leg press gives you access to 3 leg press variations (narrow, normal, and wide stance).
- The jammer arms are a powerful addition to a power rack, providing access to 20+ lever-style exercises. These attachments can be adjusted to various heights and allow weight to be swung on a lever. This gives you the ability to recreate many movements that would otherwise require different dedicated lever-style machines like the ones you’ll find in commercial gyms.
- The leg curl/extension attachment gives allows you to do 3 leg exercises. Most notably, this includes the isolation exercises of standing hamstring curls (single-leg) and seated leg curls (single-leg or bilateral). But you can also use this attachment for hip thrusts.
I’ll provide specific exercise examples when I discuss each exercise station in depth in the following sections of my G6 review:
Power Rack
The Force USA G6 power rack is technically a “half rack” since it’s not fully enclosed with uprights in the front and the back. Nevertheless, it gives you the ability to do just about every barbell exercise you can do in a full sized power rack. And it does so in a smaller footprint.
Here’s a sample of the many barbell exercises you can do in the Force USA G6 power rack:
- Squat
- Band squat
- Box squat
- Pin squat
- Lunge
- Split squat
- Bulgarian split squat
- Bench press
- Band bench press
- Pin press
- Rack lockout
- Floor press
- Incline bench press
- Decline bench press
- Seated shoulder press
- Overhead press
- Z-press
- Romanian deadlift
- Rack pull
- Band deadlift
- Yates row
- And many more!
The Force USA G6 has a max weight capacity rating of 992 lbs. This is the same rating as all the other Force USA all-in-one gym models.
Unless you’re an elite level powerlifter, this is more than strong enough for you on all lifts. If you are an elite level powerlifter, you surely know you should be looking for a full-sized power rack instead.
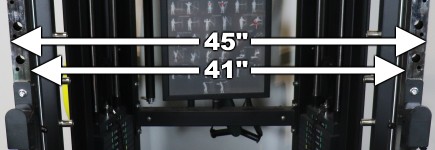
The Force USA G6 power rack is the narrowest of all the G-Series models. First off, I want to stress that the width measurement of “36 inches” listed on Force USA’s website does NOT refer to power rack upright dimensions. I initially thought this was the case, which made me falsely think the G6 would be way too narrow for most lifters. Thankfully, the 36″ width dimension refers to the distance between the chrome pegs on either side of the Smith machine…
…The Force USA G6 power rack’s actual internal width, or distance from the inside of each upright, is 41″. Its external width is 45″.
In comparison:
- The Force USA G3 power rack dimensions are 44″ of internal width and 48″ of external width.
- The Force USA G9 and G12 both have 48″ of space inside the uprights and 52″ outside the uprights — though their effective internal and external widths are 45″ and 49″, respectively. This is because each of their j-hooks and spotter arms is “indented” 1.5″ so you can rack and unrack the bar with enough clearance on either side for the inner collars.
- The Force USA G10 and G15 power racks both have a 44″ internal width and 48″ external width.
- The Force USA G20 power rack dimensions are 44.5″ of internal width and 48.5″ of external width.
The G6’s 41″ internal width is plenty wide for almost all lifters. Most full sized power racks have 42-43 inches of internal width; up to 44″ if you count the width gained if the rack has sandwich j-hooks.
So, you’re only missing out on 1-2″ inches of width with the Force USA G6. Would it be ideal to have that extra width. Sure. It could come in handy to have a little extra clearance on a somewhat uncommon exercise like snatch grip rack pulls. Or if you need to space your hands super far apart on squats because you have terrible shoulder mobility. Other than these outlier situations, 41″ is fine.
You may be wondering, “Is the internal width to narrow to safely bench press with a wide grip?”
Good question — Virtually all lifters who use a wide grip on bench press won’t have to worry about pinching their fingers on the j-hooks. I know because I have long arms (6’4” wingspan) and have recently been using an extra wide bench press grip in my training (~38” from pinky to pinky). So, I made sure to confirm this when I was testing the G6. Indeed, I had sufficient clearance with room to spare.
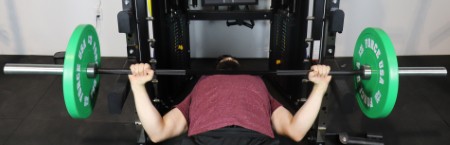
Unless you’re in the tiny minority of lifters who use a significantly wider bench press grip than me, these uprights are far enough apart to bench safely. If you think you might have an issue, you can simply measure your grip width to confirm. If need be, you can choose any of the other Force USA all-one-gym models with greater internal width.
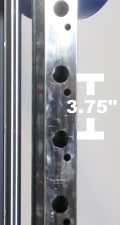
As I’ve already alluded to, the power rack comes with j-hooks and spotter arms. You can install these in any of the 1″ diameter holes on the uprights in height increments of 3.75″. I’ll talk more about the spotter arms, j-hooks and hole spacing below.
Buy the Force USA G6 – Use KING5 for 5% OFF »
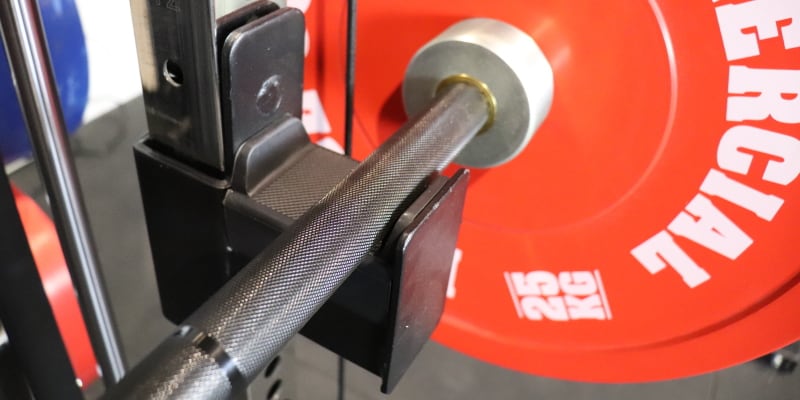
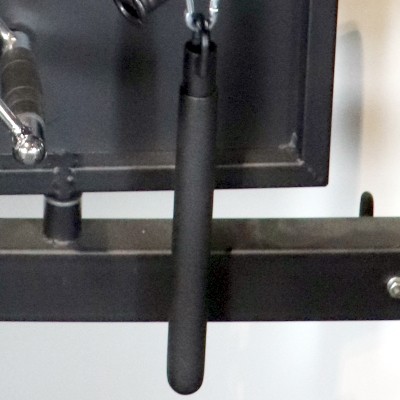
Spotter Arms
The Force USA G6 comes with a pair of safety spotter arms to catch the bar at the bottom of the range of motion in case you fail.
One small feature unique to the G6 spotter arms is a pop-pin locking mechanism on the back of the spotters. While the spotters would be safe without this, it provides an additional layer of security and ensures the spotters remain completely stable. More security and stability is always a plus when it comes to safety!
The spotter arms have 15” of usable length. This length is adequate. It will keep you safe on squats. However, I personally think an extra 2-3”+ of length would be ideal. I say this because I usually squat in a power rack with ~30″ internal depth. So I’m used to taking a longer step back when walking out my squat.
I had to take a shorter step back and stand closer to the uprights when squatting on the G6. That’s not a huge deal. It’s just something you have to be aware of when starting out. You’ll get used to it after a couple sessions.
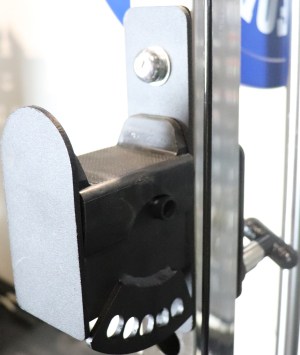
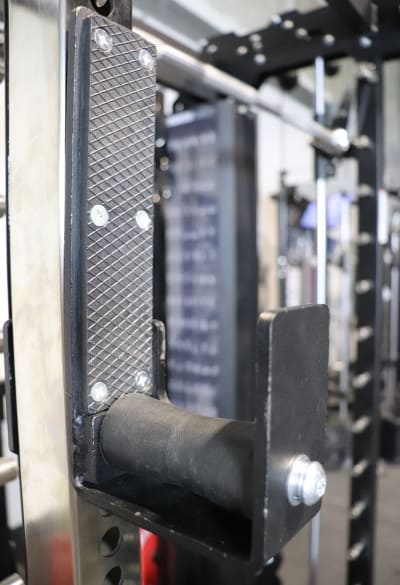
J-Hooks
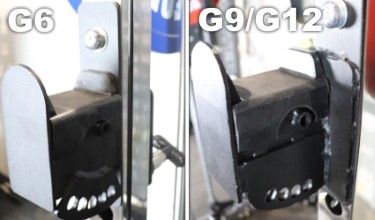
The Force USA G6 j-hooks are most similar to the G9, G10, G12 and G15 j-hooks, but with a few differences:
- The G9 and G12 j-hooks are indented, or offset, to ensure the j-hooks aren’t too far apart on these wider units.
- The G10 and G15 j-hooks don’t have a protruding bolt on the upper portion.
- The G6 j-hooks have a pop-in mechanism (just like the G6 spotter arms) to provide an extra layer of security. This is a welcome bonus since there’s no such thing as “too stable” or “too secure” when it comes j-hooks.
What I don’t like about the G6 (and G9/G10/G12/G15) j-hooks is that they only have a protective rubber insert on the bottom surface of the j-hook. There is no protective material on the upper portion.
On top of that, there’s a bolt head sticking out of it. You should be aware of this when racking the bar after a set if you want to avoid scratching your barbell. Luckily it’s easy to avoid hitting the back of the j-hook since the bottom portion extends out so far.
In this respect, the Force USA G3 j-hooks are a bit better. They have protection on the top and bottom.
The Force USA G20 j-hooks are the best of all units. They are roller j-hooks with a taller back and decent protection.
If you’re hyper-sensitive about keeping your barbell in pristine condition, you can do a pretty easy DIY project to cover the bolt head. Here are a couple of ideas:
- The simplest solution would be to lay foam tape over it. This will last for a while but will eventually need to be reapplied.
- A more long-term solution would be to get some cheap rubber bumpers — Simply cut the bolt head shape into one of the bumpers and apply it atop the bolt head. Then stick another bumper on top if you want additional padding.
Feel free to ignore these ideas if you’re not as neurotic about maintaining your barbells as I am! (Yes, I know most people don’t care about this as much.)
The last thing to mention about the j-hooks are the 5 holes on the underside of each. These are to adjust the height of the lat pulldown pad when you attach it to the j-hook. I’ll talk more about the lat pulldown pad later in this Force USA G6 review.
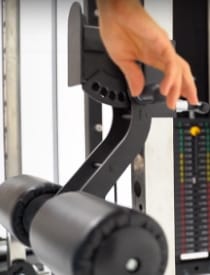
Hole Spacing
The Force USA G6 power rack has 16 holes with 1″ diameters, spaced 3.75″ apart — just like on the G9 and G12.
You can install the j-hooks, spotter arms and dip attachment into any of these 16 holes on the G6.
I generally prefer closer hole spacing because it allows you to be more precise in where you install the j-hooks and safeties. Closer spacing lets you maximize efficiency and technique because you can always rack and unrack the bar from the ideal position.
However, tight hole spacing isn’t everything. I consider anything under 4″ of hole spacing to be adequate for safety and performance. Not perfect, but it gets the job done. Even in the worst case scenario for an exercise — where you have to set the j-hooks ~3″ below your ideal position — any wasted efficiency from the extra range of motion when unracking is minimal.
Sub-4″ hole spacing is also acceptable for the spotter arms, because it still allows you to find a position that’s not too far below your range of motion. When you have more than 4″ spacing, that’s when you’ll run into situations where the spotters will either prevent full range of motion, or they’ll be so far below the bottom of the range of motion that they don’t protect you sufficiently if you fail.
Additionally, tight hole spacing is quite low on the list of priorities for many lifters. The people who care about it most are usually serious about powerlifting. That is just one small segment of the lifting population. Even within that segment, not everyone considers close hole spacing a prerequisite.
That said, I know close hole spacing is a must-have for some lifters. If you’re in this camp, then you should consider the Force USA G3, G10, G15 or G20. They’re the only Force USA all-in-one gym models with Westside hole spacing (1″ in the bench press zone; 2″ in the squat zone).
When you install the j-hooks or spotters in the highest hole on the G6, the distance from the floor to the bottom of the bar is 69″. Unless you’re in the 7-foot height range, you won’t have any issues with the bar being too low for squats or any other power rack exercise…
…When you install the j-hooks or spotters in the lowest hole, the distance between the floor to the bottom of the bar is ~12″. This measurement is relevant if you’re wondering about the lowest height you can do rack pulls at.
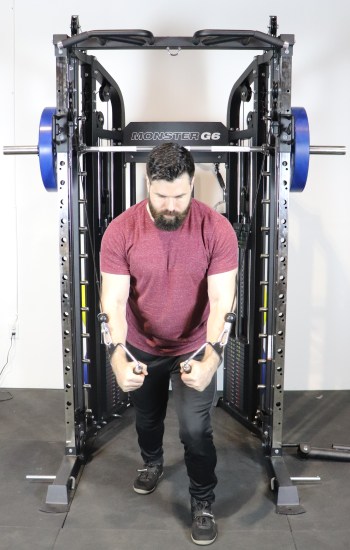
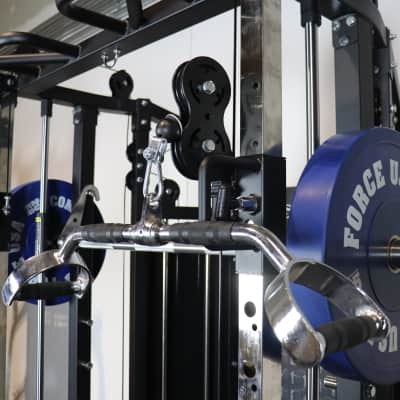
Functional Trainer
The functional trainer is the primary exercise station that the Force USA G6 all-in-one gym is built around. It consists of two adjustable-height cable pulleys on the power rack’s uprights. The cables are attached independently to two weight stacks in the rear of the unit.
Buy the Force USA G6 – Use KING5 for 5% OFF »
You can adjust the pulleys to any of the 19 height settings on each of the columns. In comparison, the G3, G10 and G15 all have 22 height settings, the G9 and G12 each have 16 and the G20 has 19.
The pop-pin pulley adjustment mechanism is designed for easy adjustment with just one hand. The G9, G10, G12, G15 and G20 have the same design, but the G3’s mechanism is more easily adjusted with two hands. This is a minor design detail, but it’s adds a little bit of convenience to every workout.
IMPORTANT:
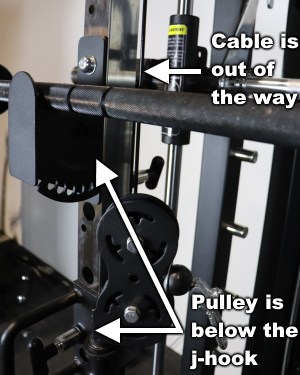
I want to call attention to an awesome design feature that’s built into the Force USA G6. Most of the other Force USA all-in-one gym models don’t have anything like this: The Force USA G6 pulleys are positioned to the inside of the uprights. This means the cable will be out of the way of the j-hooks and safety spotter arms. So, you can install the attachments above or below the pulley.
Only the G10 and G15 have a similar design. The only difference is that their pulleys and cables are positioned to the outside. But the result is the same — the cable doesn’t get in the way of attachments.
Whereas, the Force USA G3, G9, G12 and G20 models have their pulleys positioned such that the cables will be directly in front of the uprights. This means you should always have the pulley height set higher than the j-hooks and safety arms on the G3, G9, G12 and G20. Otherwise, the cable is right in front of the upright holes, preventing you from installing and using the j-hooks and safeties (though, there’s a caveat to this, explained below).
- NOTE: On the G3/G9/G12/G20, you can technically move the cable to the outside just enough to install the j-hooks in either of the uppermost holes because there is a little bit of slack in the cable. There’s also enough slack for the cable to move back with the barbell when you rack the bar after a set. However, I only recommend using this trick on the G9 and G12 for if you need to use j-hooks in one of the top 2 holes — So basically that means any guy over 6’5″ doing barbell squats, lunges, etc on the G9 or G12. Even then, it’s something that should be done sparingly…
…This is because if you do this regularly, you risk wearing down the cable sheath over time from the barbell’s knurling rubbing against it. So, if you have a very tall friend who you occasionally train with, you’ll probably be fine using this trick because it’s only every once in a while. But if you’re the tall guy, you’ll probably want to get the G6, G20 or G3, which can accommodate much taller lifters without issue. Of course, you don’t have to worry about this workaround at all on the G6. It gives you the flexibility to install the attachments above OR below the pulleys by design!
Putting the pulleys to the inside on the Force USA G6 makes everyday use more seamless than these other models.
For example, let’s say you’re transitioning from low-to-high cable flyes to barbell bench press. You don’t have take the time to move the pulleys up so the cable is out of the way. Instead, you can leave them where they are and install the j-hooks and safeties without issue.
Being able to install the j-hooks above the pulley also makes it possible to use ALL 16 holes on the G6 power rack without issue, including the uppermost ones. On the other models, you can only use all of the holes if you use the workaround described in the note above (i.e. setting the pulleys lower and moving the cables aside to fit the j-hooks in the uppermost holes).
The fact that the Force USA G6 uses a selectorized weight stack system instead of a plate-loaded weight carriage is a major plus. The Force USA G12, G15 and G20 are the only other units that share this feature.
A weight stack is so much more convenient than a plate-loaded setup. You simply move the pin higher or lower in the weight stack to decrease or increase the weight. You don’t have to walk around to each side of the machine, and swap plates between the plate-loaded carriage and the weight storage holders.
It’s not that plate-loaded units are less effective. It’s just that selectorized weight stacks can make your workouts flow so much more efficiently.
You waste less time and energy calculating how much weight to add or remove, carrying plates around, and stripping them on and off. You can focus more on your workout and less on tedious preparation tasks.
Plus, you can do supersets and drop sets more effectively with a selectorized system. You can change the resistance immediately after your first set so you can start the next set right away.
Although the weight stack feature is by no means a necessity, it is a highly desirable luxury. It will make each and every workout a little more efficient and enjoyable.
Selectorized weight stacks for functional trainers are typically only found on commercial quality equipment. The ones you do find on home gym quality equipment are usually shoddy in quality and operation. The one on the Force USA G6 is well-made and operates effortlessly.
As you might imagine, a “luxury” feature like this will cost you extra. That’s why the G6, which is a home use model, costs more than the G9, which is a heavier-duty unit that uses a plate-loaded mechanism. Depending on your needs and preferences, getting the selectorized weight stack feature can be well worth the extra cost.
The pulley action on the G6 feels just as smooth as on the G9, G10, G12, G15 and G20. I felt it was smoother than on the G3, though the G3’s smoothness is still adequate.
The Force USA G6 functional trainer has a 2-to-1 pulley ratio. You get 1 pound of resistance for every 2 pounds selected on the weight stack. So if you insert the selector pin at 80 lbs, it will feel like you’re lifting 40 lbs. A 2-to-1 ratio is typical of most functional trainers on the market. The G3, G10, G15 and G20 also have a 2-to-1 ratio (the G10 and G15 also have a 4-to-1 ratio option).
However, some functional trainers, including the Force USA G9 and G12 have a 1-to-1 pulley ratio. Every pound you select or load on translates directly to 1 pound of resistance. This lets you lift more total weight.
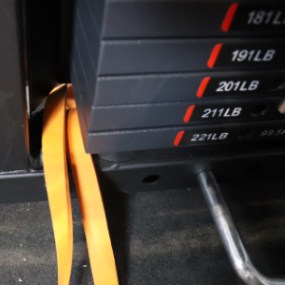
Each Force USA G6 weight stack has 221 lbs of plates. The 2-to-1 ratio means you can achieve up to 110.5 lbs of resistance if you lift the whole stack. This is plenty for many lifters. However, stronger lifters will find that it’s too light for certain exercises (e.g. cable rows; lat pulldowns; cable bench press using both stacks). If this is the case for you, don’t worry just yet.
Your first option is to simply upgrade to the Force USA G12, which has two 202 lb weight stacks with a 1-to-1 pulley ratio. However, the G12 does cost an extra thousand dollars and you do lose out on the band peg holes.
Your next option is to upgrade to the Force USA G20. It has two 289 lb weight stacks with a 2-to-1 pulley ratio (max resistance of 144.5 lbs) with built-in mini band pegs on the stacks for adding band resistance. Plus, the G20 has a third weight stack available with a 1-to-1 ratio if you get the optional G20 Lat Row Upgrade. Of course, the G20 costs $2,500 more than the G6.
If you don’t want to go the G12 or G20 route, you have other ways of increasing the weight stack resistance on the Force USA G6:
- Add band resistance. As I’ll discuss later my Force USA G6 review in the section on band peg holes, you can use the band pegs to wrap resistance bands over the weight stack. This will create tension and greatly increase the max resistance of each weight stack.
- Buy a weight stack plate holder like the GymPin or the Bare Steel Equipment Stacked Weight Pin. These are super innovative tools that allow you to add more weight to your weight stack. To use them, you first select the entire weight stack. Then you stick the weight stack plate holder into the middle of the stack. Once installed, you slide Olympic plates onto the holder.
- The following idea is a cheaper and less efficient version of using a GymPin/Stacked Weight Pin — Add a second pin to the weight stack and hang an extra weight plate on it. This an old school trick that not many people know about, but it works great. You can buy a cheap weight stack selector pin from Amazon. It should have a 3/8″ or 10mm diameter and be at least 4″ long (longer pins will let you hold more/thicker plates).
See below for a video of me using my 10mm BSE Stacked Weight Pin on the G6 to go beyond the max resistance of the weight stack. (Note: It’s only possible to use 35 lb and smaller plates. If you use 45 lb plates, the diameter is too large and it will bump into the G6’s frame.)
TIP: If you only need extra resistance for low rows or lat pulldowns, you can do double pulley variations of these exercises. That is, you use the long bar attachment or the two stirrup attachments to utilize both weight stacks while you position yourself in the middle of the unit. This gives you a max resistance of 221 lbs without having to use any of the workarounds listed above.
The cable accessories included with the Force USA G6 functional trainer include the following:
- Metal Stirrup Handles: These are used for a ton of unilateral or bilateral exercises, such as chest flyes, rows, curls, lateral raises and many more.
- Cable Crunch Attachment: Most lifters won’t know about this attachment. It’s meant to be held on either side of your head, against your torso. This is more efficient and comfortable than using a triceps rope for cable crunches.
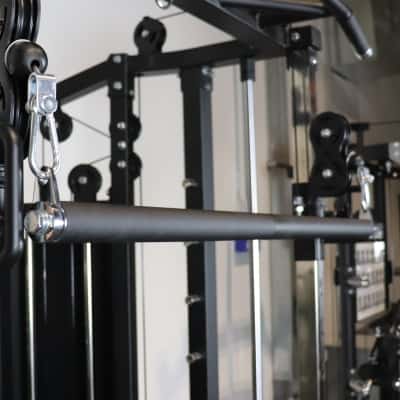
- Long Straight Bar: This bar is similar to the ones for the G9, G12 and G20, in that is thicker in diameter compared to the thinner ones that come with the G3, G10 and G15. It is excellent for chest pressing, rows, biceps curls and triceps pressdowns. It’s also a great way to do heavy lat pulldowns because it allows you to use both weight stacks.
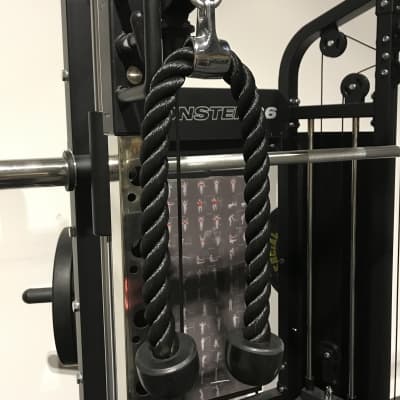
- Triceps Rope: The triceps rope is, of course, ideal for triceps pushdowns. It’s also good for face pulls, curls, and overhead triceps extensions, among other exercises.
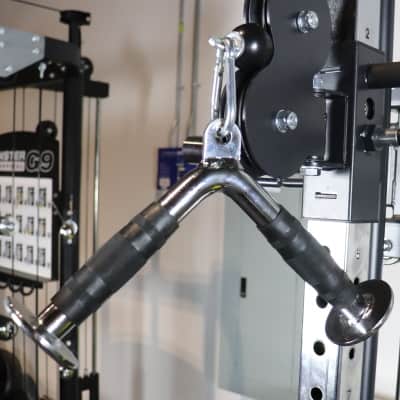
- Triceps V-Bar Handle: This is another excellent attachment for triceps pushdowns. It also can be used for curls and some row variations.
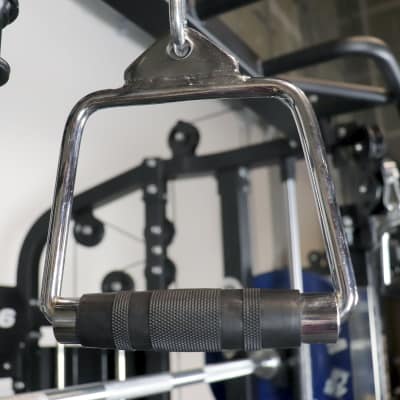
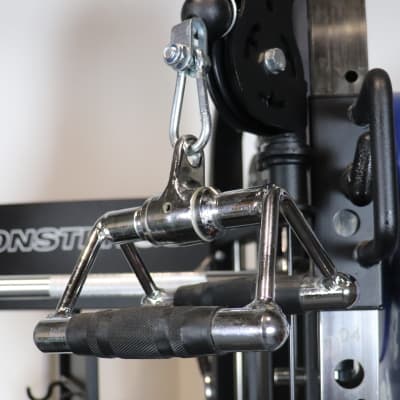
- Close Grip Row Handle: This is by far my favorite cable attachment for low rows. It’s also excellent for close grip lat pulldowns.
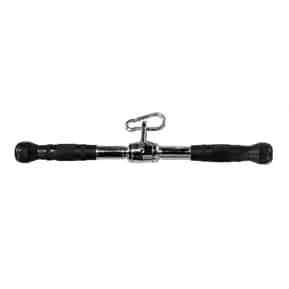
- Short Straight Bar: This handle is ideal for biceps curls, triceps pushdowns, upright rows and underhand low rows.
- Sports Handle: This attachment is one you might’ve never seen before, but it’s pretty cool if you’re into core movements. You can use it for cable woodchops and cable rotation variations. It’s also a cool way to do cable hammer curls.
- Lat Pulldown Bar: Obviously, this attachment will be your go-to for lat pulldowns. It’s also perfect for doing wide grip rows.

It should be noted that the Force USA G6 cable accessories are a step above the ones that come with the Force USA G3. They’re on par with the quality of the accessories for the G9, G10, G12, G15 and G20 units.
Buy the Force USA G6 – Use KING5 for 5% OFF »
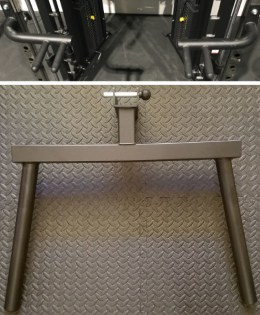
Lat Pulldown Leg Holder
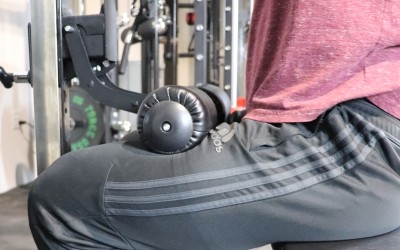
In order to perform lat pulldowns most effectively, you should have your thighs held down to keep your butt on the seat. The Force USA G6 has a leg holder attachment that does just this.
It includes two cushioned roller pads with commercial-grade vinyl upholstery to protect the foam pads from damage. You can attach it to either of the two j-hooks and use it on the left or right column. This is the same type of attachment that’s used on the G9, G10, G12, G15 and G20 for lat pulldowns.
There are five holes on the bottom of the j-hook. These are micro-adjustment settings for raising or lowering the pad height so you can achieve a precise fit: You want the pad pressing firmly against your thighs.
It does not include a built-in seat, like the Force USA G3’s dedicated lat pulldown seat attachment. Rather, it’s designed to be used with your weight bench. You position your bench in front of the cable column and set the j-hook/leg holder attachment height to thigh level. Then use the micro-adjustment mechanism if needed for a precise fit.
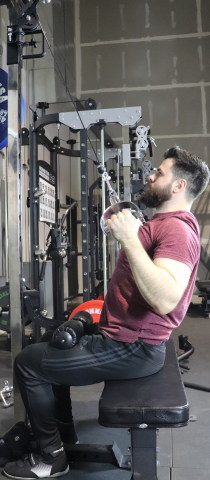
The G3’s seat is more convenient because it’s an all-in-one seat/leg holder solution. But the G6’s leg holder attachment gives you a more stable experience because you’re sitting on a bench that’s rock solid. Whereas, the G3’s seat has a small amount of flex to it if you lean back during the movement.
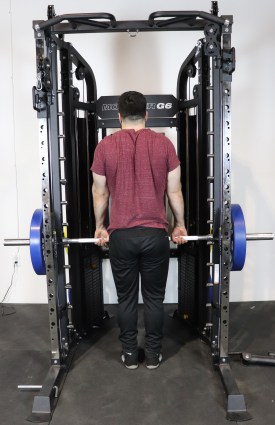
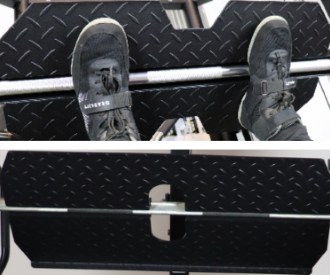
The leg holder attachment has another use outside of lat pulldowns: You can use it for cable rows by installing the j-hook on the lowest hole on the uprights. You press your feet against the pads to stabilize your body as you perform the rowing movement:
While the Force USA G9’s dedicated low row station with its solid steel foot plate is obviously a better solution, the leg holder does a surprisingly good job.
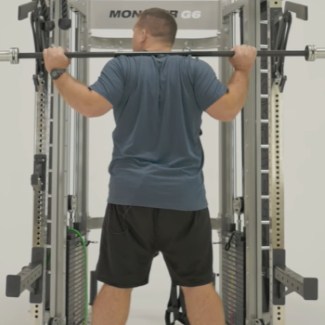
Smith Machine
The Force USA G6 Smith machine allows you to do virtually all of the same exercises you can do with a free weight barbell. The big difference is that barbell on a Smith machine is on a fixed vertical track.
This makes it better for certain exercises, while other exercises are generally best done with a free weight barbell. It also allows you to do certain exercises that are not possible with free weights.
I believe most major compound lifts should be performed with a regular barbell since it allows for a more natural range of motion. But there are tons of exercises that are at least as effective, if not more so, when done on the Smith machine.
Here’s a list of just a few of the best Smith machine exercises you can do on the Force USA G6 Smith machine:
- Smith machine hack squat
- Smith machine front squat (not back squat)
- Smith machine split squat
- Smith machine shrugs
- Smith machine power shrugs
- Smith machine incline press
- Smith machine RDL
- Smith machine upright row
- Smith machine one arm row
- Smith machine calf raise (seated and standing)
- Smith machine
- Smith machine hip thrust
- Smith machine donkey kick
- Incline push ups (with Smith machine in fixed position)
The Force USA G6 Smith machine has a 770 lb weight capacity rating, which is the same as on the other Force USA G-Series models. This is significantly more weight than almost anyone would need to use on a Smith machine.
Each sleeve has 12″ of loadable length, just like the other units. If you’re a strong guy and you’re using extra thick bumper plates, it’s possible to run out of room for plates on certain heavy lifts. This is not a problem for the G6. You can use the band pegs to add extra resistance to the Smith machine bar.
The up and down sliding action of the Force USA G6 Smith machine is VERY smooth. Check out the clip below to see just how smooth it is:
It has the same smoothness as the Force USA G9, G10, G12, G15 and G20 units. They all use the same linear bearing system, which gives you a zero-drag feel.
In comparison, the Force USA G3 uses a standard wheel and ball bearing system. This type of system is perfectly functional, but it does give you a small amount of drag.
The Force USA G6 Smith machine, like the Force USA G20 Smith machine, is not counterbalanced. This means there is no mechanism that reduces the weight of the bar. So when the Smith machine is empty, it weighs the full 45 lbs that the bar itself weighs.
Only the G9, G10, G12 and G15 have counterbalanced Smith machines, which counteract the weight of the barbell so that the starting weight with no plates on the bar is 0 lbs. This lets people do exercises with less than 45 lbs. Of course, most people considering the G6 are probably strong enough that they’d never need such light resistance on any Smith machine exercises.
However, you may prefer the G9, G10, G12 or G15 for their counterbalanced Smith machines if you’re planning to use your all-in-one gym in a physical therapy practice for rehab or in a personal training studio for training out-of-shape clients.
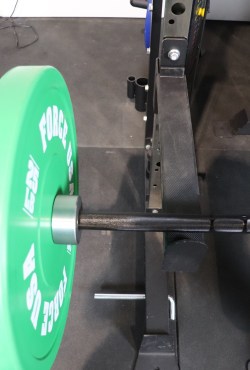
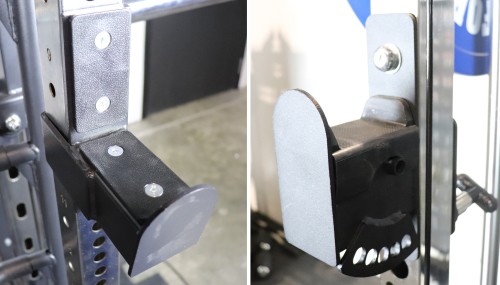
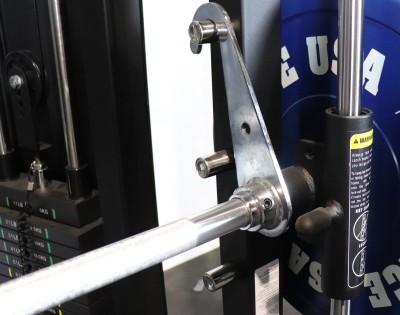
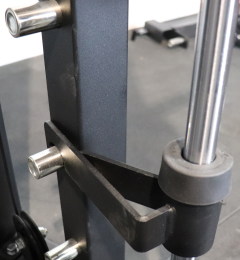
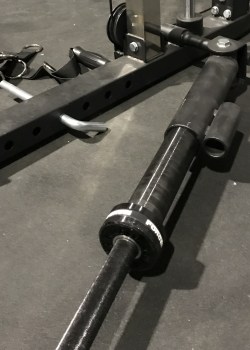
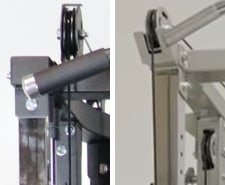
The Force USA G6 Smith machine has an important safety feature: Adjustable safety catches that you can slide up and down the Smith track.
You set them at the desired height (at or just below the bottom of the range of motion) by putting the metal bar portion atop the chrome pegs on the column in front of the Smith track. These are the same chrome pegs used to rack the Smith bar hooks on.
It’s smart to use these safety hooks anytime you’re doing a Smith machine exercise where you could potentially get stuck underneath the bar if you failed — Even if you’re using light weight. The point is to make using them a habit so you don’t forget the one time you accidentally use too much weight. Safety first!
Note that the G6 Smith machine has the narrowest internal width compared to the other models. It’s listed as 36 inches, which is the distance between the chrome pegs on the left and right side. It’s also same as the actual “grip-able” length of the Smith bar shaft. While a couple extra inches would be nice, 36″ is sufficient for most people.
In comparison, the G3, G9 and G12 have a larger internal width/Smith bar shaft length of 43″. The internal width/Smith bar shaft length for the G10, G15 and G20 is 40″.
The Force USA G6 Smith machine is used to hold the vertical leg press attachment. I’ll discuss this attachment in the next section of this Force USA G6 review.
Buy the Force USA G6 – Use KING5 for 5% OFF »
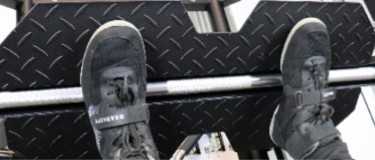
Vertical Leg Press
The Force USA G6 comes standard with a vertical leg press attachment.
One also comes standard on the G9, G12 and G20. A similar style of leg press is available for the G10 and G15, but it’s sold separately (bundled with several other attachments) in an optional upgrade kit. A leg press attachment is also available for the G3, but it’s a different design and it’s sold separately.
The vertical leg press attachment for the Force USA G6 is virtually the exact same design as the ones for the G9, G10, G12, G15 and G20. There are only a couple of differences:
- The G9, G10, G12, G15 and G20 leg press plates are designed to fit onto longer Smith machine bars (the G6 Smith bar shaft is shorter).
- The G10 and G15 leg press plates have 3 angle settings. You adjust the angle of the plate by using a pop-pin that goes into one of 3 holes on each of the Smith machine hooks. This allows you to use a more comfortable ankle position.
Here’s how it works: It has pop-pins that easily and securely connect it to the hooks on the ends of the Smith machine bar. Unlike on the G10 and G15, there is just one hole for the pop-pin to go in.
The leg press plate measures 29.5″ across, as do the plates for the G9, G10, G12, G15 and G20. The Force USA G3 plate is nearly the same width at 29″.
It allows you to do three basic variations of the vertical leg press: narrow, medium and wide. You can’t do extra wide (sumo) stance leg presses, but that’s also not a common exercise in the first place.
Having the ability to perform the leg press in an all-in-one gym is awesome. This is one my favorite parts of all the G-Series racks. It’s something that I wouldn’t have even considered as a possibility before researching these machines. But it works surprisingly well.
Here’s how to use it:
- Install the leg press plate on the Smith bar.
- Set the Smith machine safety catches at the bottom the range of motion so that you’ll be safe in the event you fail.
- Setup a flat weight bench positioned in the interior of the machine.
- Get on the bench so that you’re facing the back of the machine, then lay down.
- Put your feet flat against the plate and unrack it by pressing the plate up and removing the Smith machine hooks from the chrome pegs.
- Perform as many reps as desired, then rack the weight — you’re done!
I don’t have a video clip of the leg press plate in action on the G6 — BUT, I do have a clip of me using it on the G9, which looks and works just like the G6 plate. Here’s that clip:
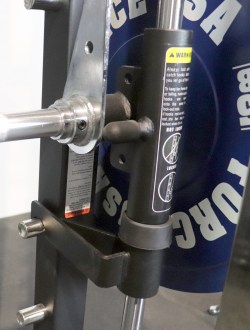
Here’s a closer look at the safety catch mechanism on each side of the Smith machine. Setting these at or just below the range of motion ensures the bar won’t be able to go any lower in the unlikely case you fail at the bottom of the rep. Even if you’re using weight you think you can handle, it’s always a smart idea to set the safeties anyway.
Dip Station
The Force USA G6 all-in-one gym comes standard with a dual-grip dip station. It has two sets of handles that give you the option to use a narrower grip (21” between handles) or a wider grip (27.5″ between handles).
- Narrower grip dips emphasize the triceps
- Wider grip dips emphasize the chest
Each handle has textured rubber coverings for comfort and better grip.
The dip attachment comes in two pieces. One side goes on the left power rack upright and the other goes on the right upright. They install the same way as the G6 j-hooks and spotter arms. This includes using a pop-pin to lock the dip attachment in place for additional stability.
You can install the dip attachments at whichever height setting you like on the power rack, just as you would with the j-hooks and spotters.
Having the attachment split into two pieces is nice because it allows you to do dips in the middle of the unit; between the two uprights. This allows you to lean forward as much as you want without bumping into anything. In comparison, the Y-dip bar attachment on the previous version of the G6 attached to a single upright — You would bump into the upright if you leaned forward too much.
Doing dips in the middle of the unit also gives you more options when it comes to using bands on dips:
- You can do band-assisted dips by attaching a band to the suspension trainer ring. Then put your foot into the bottom loop of the band and perform a dips. The band tension reduces your bodyweight.
- You can do band-resisted dips using the power rack band pegs. You attach a band to the pegs, then attach the band to yourself (either by clipping it on a dip belt, or by looping it around your legs or shoulders).
Lastly, this dip setup makes it easy to do incline push ups. You set the dip attachment near the base of the power rack. Then grab onto whichever handles you prefer, and begin.
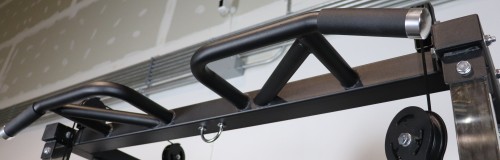
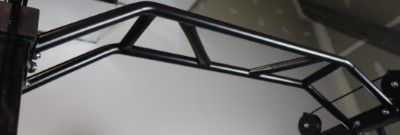
Chin Up Station
The Force USA G6 has a multi-grip chin up station with 4 short parallel segments, 2 diagonal segments and 2 segments that together make up a wide grip angled bar portion.
This type of bar setup gives you access to a bunch of different chin up and pull up variations, including the following:
- Close pronated grip
- Close supinated grip
- Close semi-pronated grip (using diagonal and straight segments)
- Normal width pronated grip
- Normal width supinated grip
- Normal width semi-supinated grip
- Wide pronated grip
- Wide neutral grip
- Close neutral grip
This is the same type of chin up bar used on the G9, G10, G12 and G15, and on the front of the G20. The G20 also has a second chin up station on the sides that have a globe-grip style.
The Force USA G3 chin up bar has a different style than the Force USA G6. It is a “Monkey style” chin up bar. You can do most of the same chin up variations on it as you can on the G6 chin up bar…
…Except — you can’t do the close neutral grip chin ups on the G3. But you can do normal width pronated grip chin ups on the G3. Whereas, normal width pronated chin ups are more difficult on the G6 chin up bar since you have to grasp the chin up bars from the back, and the big steel tube can potentially get in the way.
There are rubberized grips on the angled wide grip portion of the Force USA G6 chin up handles. This gives you better grip when doing wide grip pull ups, which are one of the harder variations to hold on.
If I had the choice, I would have preferred the entire chin up station have knurled steel grips instead. But that’s mostly a personal preference. The rubberized grips do a good job. You can simply use chalk if you need additional grip on any other parts of the bar.
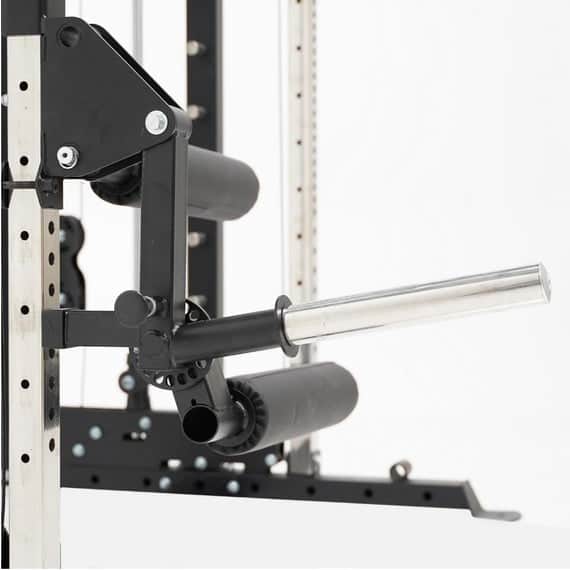
Landmine / Core Trainer
The Force USA G6 landmine / core trainer attachments includes:
- the landmine unit that holds one end of the bar
- a handle that you can optionally use on the other end of the bar
The handle is really only used on t-bar rows, which is one of the most common uses of landmines. It’s also my favorite exercise to do on a landmine.
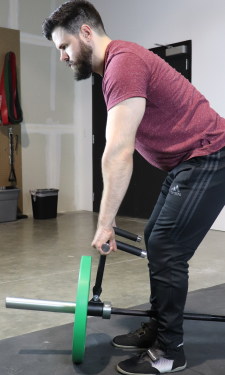
The landmine is permanently attached on the base of the machine, just behind the power rack upright on the right side (when facing the unit). The landmine has two sleeves on it: one to hold an Olympic barbell and another that can hold a standard barbell.
Other than t-bar rows, there are dozens of landmine exercises you can perform. Many of them focus on the core. Others are variations of traditional weight training movements. Here’s a few of the many possibilities:
- Landmine anti-rotation
- Landmine windmill
- Landmine half-kneeling press
- Landmine tall-kneeling press
- Landmine one arm press
- Landmine one arm row
- Landmine squats
- Landmine hack squats
- Landmine thrusters
- Landmine RDL
- Landmine split squat
- Landmine Bulgarian split squat
The landmine is on the outside of the unit so it shouldn’t be in the way during other exercises. To make it take up even less space when not in use, you can flip it up or to the side.
Buy the Force USA G6 – Use KING5 for 5% OFF »
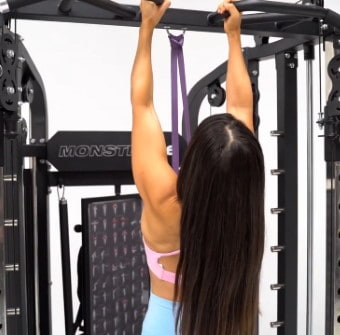
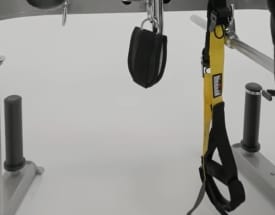
Suspension Trainer Ring
The Force USA G6 has a ring designed specifically for hanging a suspension trainer like the TRX.
Note that the suspension trainer itself does not come with the Force USA G6. However, it’s a relatively inexpensive purchase that can give you access to 80+ body weight resistance exercises.
To install it on the ring, you clip the suspension trainer’s carabiner onto the mounting ring and/or loop the suspension trainer’s extension strap through the ring to achieve the ideal height. Then you’re ready to go!
As I mentioned there’s over 80 exercises you can do with the suspension trainer, but I’d like to highlight a few of my favorites:
- Suspension trainer inverted row
- Suspension trainer chest fly
- Suspension trainer biceps curl
- Suspension trainer triceps extension
- Suspension trainer dip
- Suspension trainer push up
- Suspension trainer feet-elevated push up
- Suspension trainer hamstring curl
- Suspension trainer Bulgarian split squat
Suspension trainers are not the only thing you can use the suspension trainer ring for. Another common use is to loop resistance bands through the ring. This lets you put your foot in the band so you can do band-assisted pull ups and dips:
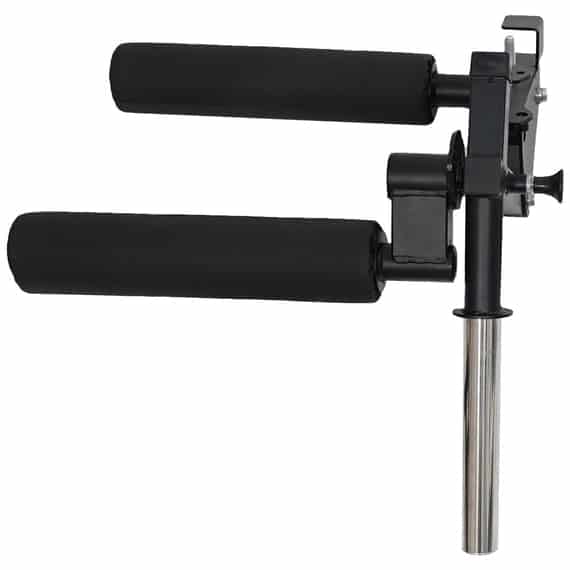
Jammer Arms
You can now buy jammer arms for the G6 as part of the optional G6 upgrade kit that was released in November 2022.
These G6 jammer arms are nearly identical to the jammer arms that were originally designed for the newer G10 and G15 models. The biggest difference is that G10 and G15 jammer arms were designed to fit into the smaller 5/8″ holes on the uprights with 1″ hole spacing.
However, as you know, the G6 uses larger 1″ holes and 3.75″ hole spacing. The jammer arm design was modified to work with these measurements. Part of this design change was making it install more like a j-hook.
Installing the jammer arms is a straightforward process.
- First, identify the height at which you want to install the jammer arms (it depends on the exercise you’re doing)
- Then, tilt the jammer arm at an angle so that you can insert the 1″ pin on the back of the arm through the upright hole.
- Next, allow the jammer arm bracket to tilt back down into place around the upright.
- Finally, insert the included pin to prevent the jammer arm from rotating on the upright during use.
After installing the jammer arms on the power rack, you’re almost ready to begin. But first, you’ll need to add weight to the 12″ long weight horns. These horns provide more than enough length even for heavier movements.
Once the weight is added, you’re ready to begin using the jammer arms.
If you’re unfamiliar with what exactly they do, it’s pretty basic. The arms swing on a hinge and move in an arc, through a fixed path. This is the closest way to replicate the lever-style bodybuilding machines that you’ll find in any commercial gym.
It’s great for hypertrophy (muscle building) training because you don’t have to stabilize the load like with free weights. You just need to focus on you target muscle group to move the weight.
Some people also use the jammer arms to train power/explosiveness. This is usually done by doing jammer arm variations of the overhead press movements or snatch movements with light weight at a rapid speed.
Your creativity is the limit when it comes to exercise possibilities on the G6 jammer arms. Here are some of my favorites:
- Jammer Arm Push Press
- Jammer Arm RDL
- Jammer Arm Flat Bench Press
- Jammer Arm Standing Overhead Press
- Jammer Arm One Arm Row
- Jammer Arm Incline Press
- Jammer Arm Front Squat
One of the key features that differentiate these jammer arms from others on the market is the approx. 30-degree bend in the arm. This design gives you the ability to prop the jammer arms on the spotter arms, making it possible to perform exercises where the jammer arms must start in a fully extended position. This is particularly useful for exercises where the weight is positioned directly above the user (e.g. jammer arm flat bench press).
Additionally, these jammer arms are equipped with built-in rubber stopper pads on the back to prevent damage, whether they are used on the spotter arms or against the uprights.
The jammer arms have rubber-coated U-shaped handles. This handle design allows for a neutral grip, as well as two different straight grips for different leverage options. When you use the straight grip segment closer to the rack, the weight feels heavier. When you use the one further away, the resistance decreases.
Another way to manipulate the resistance on the jammer arms is to use to attach bands from the weight horn to one of the band pegs on the base of the rack. This let’s you use accommodating resistance where the resistance is greatest at the top of the range of motion. This is a great technique for busting through plateaus, or just making things more fun.
The jammer arms can enhance any workout routine, but the installation process can be somewhat time-consuming. Finding the right height for installation may require some trial and error, and may take multiple adjustments before getting the proper setting.
To make the adjustment process easier, record the hole number for the preferred installation height for your most commonly used exercises in your training log. Or better yet, apply small stickers next to the holes as a reminder.
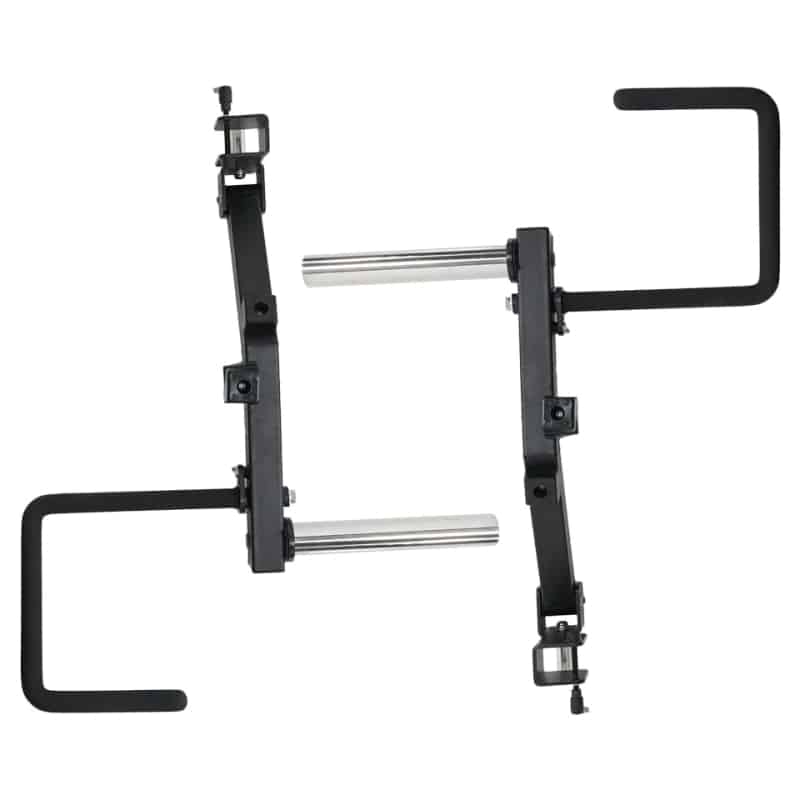
Leg Curl/Extension
The leg curl/extension attachment is another new attachment that became available for the Force USA G6 in November 2022 when the G6 upgrade kit was launched.
The only difference between this leg curl/extension attachment and the one for the G3, G10, G15 and G20 is that it’s designed to fit into the larger 1″ holes on the G6 rather than smaller 5/8″ holes on those other models. The peg that inserts into the upright hole is thicker.
This attachment 100% identical to the leg curl/extension attachments that are available for the G9 and G12 since they’re also designed to fit into 1″ holes.
This attachment is made up of:
- A frame that attaches to the power rack
- A lever that attaches to the frame
- A weight plate holder extending straight forward from the bottom of the lever
- Two high-density foam rollers with sweat-resistant covers
- A pop-pin adjustment mechanism for adjusting the bottom roller.
It installs sort of like a j-hook: You insert it through whichever hole you want on the power rack upright. The bracket wraps around the upright on opposite sides which provides a pretty secure fit.
To add an extra layer of security, there’s also a removable pin that you insert through one side of the bracket, which abuts the upright. This keeps the attachment from rotating while in use.
To add weight, simply slide plates on or off the weight horn as needed.
While I don’t currently have any photos of the leg curl/extension attachment installed on the G6, you can see the G20 version in action below (they function the exact same for both models):
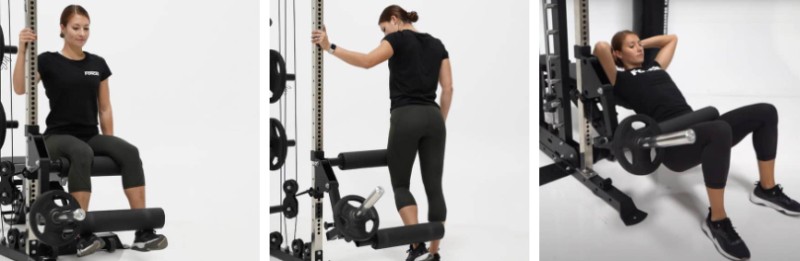
As you can see from the photos above, you can do three exercises with attachment, including:
- Seated Leg Extensions: To perform seated leg extensions using this attachment, set up a weight bench or plyo box and adjust the height of the leg curl/extension. This attachment allows for both bilateral (both legs) and unilateral (one leg) leg extensions. It is recommended to perform unilateral leg extensions as bilateral may result in uneven resistance between legs due to the weight being off-centered.
- Single-leg Standing Leg Curls: This attachment does not support lying leg curls, but you can still work your hamstrings effectively by training one leg at a time while standing. This approach may not be as efficient, but there’s a plus side: this leg curl variation prevents the stronger leg from compensating for the weaker leg, ensuring a balanced workout.
- Hip Thrusts: To perform hip thrusts on this attachment, remove the top roller pad. Then position your back on a bench and get your hips under the bottom roller. One downside of using this attachment for this exercise is the limited weight capacity. You can only fit so many plates on the plate holder. This will eventually limit your progress. Once you get strong enough, you’ll have to switch to barbell hip thrusts.
Accessory Storage
The Force USA G6 has the coolest accessory storage area of all the racks. It has a swivel board with storage hooks on one side and a functional trainer exercise chart on the opposite side.
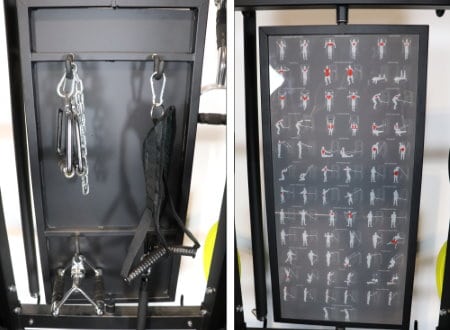
You can flip the board around to show the exercise chart and hide the accessories when you don’t need them. When you need to switch out accessories, just flip it around and take what you need.
I really like this feature because you can make your entire setup look a lot cleaner by putting the unused accessories out of sight. Plus, it’s always handy to have an exercise chart to reference if you’re trying out a new cable movement.
There are 4 hooks on this storage board. You also have 4 hooks on the back of the Force USA G6 frame, including 2 above the swivel board and 2 below it. That’s 8 hooks in total, which is more than enough to hang all the included cable handles and any other training accessories you may have lying around your gym.
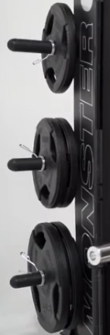
Weight Plate Storage
The Force USA G6 comes with a dedicated weight plate storage on the rear frame columns.
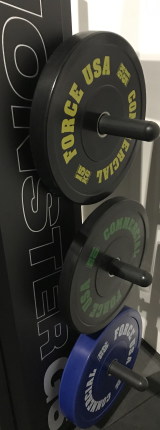
It consists of 6 weight storage pegs total, with 3 on the left and 3 on the right. The storage pegs measure 8 inches long. This is the same for all Force USA all-in-one gym models.
Six pegs gives most people enough space to store all of their plates with room to spare.
It also provides enough space to organize the plates by weight (e.g. 55s/45s on the bottom, 35s/25s in the middle, everything else on top). This makes your training sessions more efficient because you can quickly get to the plate size you need, when you need it.
Compare this to the old version of the G6, which had 2 weight storage holders that stood vertically at the base of the rack. With that design, you’d often have to remove all the top plates just to get to the plate you need at the bottom.
The Force USA G6 weight holders fit Olympic plates by default. But you can optionally remove the outer peg to reveal a narrower diameter inner peg that will hold 1” diameter standard weight plates. Not everyone will care about this feature. But it is handy if you have a bunch of standard weight plates in your home gym from a spinlock dumbbell and/or barbell set. It gives you a convenient place to store them out of the way.
The only negative about this is that the Olympic storage sleeves may slip a bit if the plate catches when you’re removing it. Though, this usually only happens if the set screw is not tightened sufficiently.
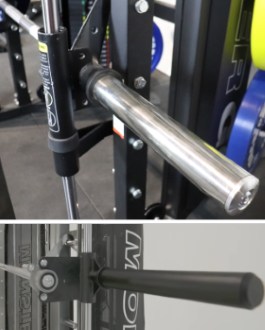
Barbell Storage
The Force USA G6 has vertical barbell storage on one side at the base of the rack, toward the rear. This storage area has one storage sleeve for an Olympic barbell (~2” diameter) and another for a standard barbell (~1” diameter).

Note that you need more ceiling clearance than the max height of the unit to store a full sized Olympic bar. The bar will be slightly above the top of the machine when it’s stored. You also need to account for a few additional inches of clearance for raising the bar into and out of the storage sleeve.
You should be able to use this feature as long as you have 92” (7ft 8in) tall ceilings.
If your ceilings are too short, it’s not a big deal. You can buy a cheap wall-mounted barbell holder (e.g. vertical storage hook or a horizontal rack) or just keep your bar on the j-hooks after finishing your workout.
Olympic AND Standard Compatibility
The Force USA G6 is fully compatible with both Olympic and standard plates and bars. As mentioned in the above two sections, this applies to barbell and weight storage…
…But even the Smith machine is compatible with standard plates. The Olympic sleeves on the Smith bar are removable. When you take them off, there’s a smaller diameter sleeve underneath that lets you load on standard plates.
Even the landmine attachment has two sleeves: one to hold an Olympic bar and another to hold a standard bar.
Many people will only use the Olympic options. However, this dual compatibility can come in handy if you already have a ton of standard weights in your gym.
Band Peg Holes
One of my favorite features on the Force USA G6 is the inclusion of band peg holes on the base of the rack. The G6, G10, G15, G20 and G3 also have band peg holes on at least some portion of their rack feet.
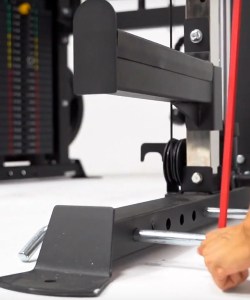
The band peg holes are located in the front of the unit in the free weight area, and in the rear by the weight stack. The front band peg holes allow you to add tension to power rack exercises with a free weight barbell. This includes movements like band squat, band bench, band deadlift and band hip thrusts, just to name a few.
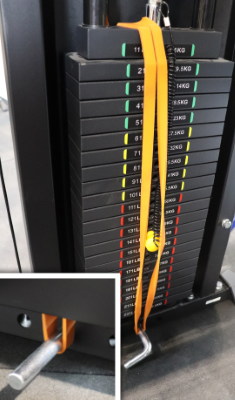
The holes in the rear actually let you add tension to the weight stack by looping the band up and over the weight stack. This lets you increase the max resistance far beyond the 110.5 lbs per stack. This is clutch if you’re a stronger lifter and need a lot of weight for lat pulldowns, rows or other heavier cable movements.
Buy the Force USA G6 – Use KING5 for 5% OFF »
The other benefit of adding bands to the weight stack is that you can train explosiveness better on cable movements since the resistance is greatest at the top of the range of motion.
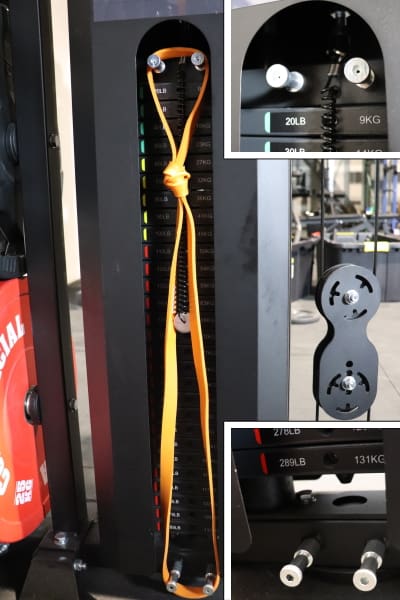
TIP: It’s easiest to get the resistance band to the outside of the weight stack by threading it through the gap in the bottom corner of the weight stack shield, as shown below. Then you loop it over the top of the stack and secure each end to the peg.
Doing this trick is easier with the G20. It actually has mini band pegs integrated into the weight stacks themselves. However, you likely won’t need to add band resistance on the G20 to go beyond the max weight of 289 lbs per stack unless you’re incredibly strong. Rather, you could use it simply to make the movement more challenging at the top of the range of motion.
Unlike the G3, G10, G15 and G20, the Force USA G6 has no band peg holes in the middle section of the rack where the Smith machine is. However, this does NOT mean you can’t add band resistance to the Smith machine.
You simply have to use one band peg in the front section and one in the rear. Then you attach the band around those two pegs before attaching it to the Smith barbell.
Notably, while the G10 and G15 do have band peg holes in the middle (Smith machine area), they lack band peg holes in the front (power rack area) and rear (weight stack/plate-loaded carriage area).
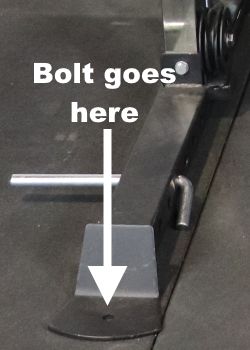
Bolt-down Option
You can bolt the Force USA G6 rack into the floor for additional stability.
While not required, it can give you extra peace of mind that it will remain rock solid even under the most intense of training — such as doing band squats with high tension resistance bands.
Plus, it ensures the unit doesn’t slowly shift on your floor over the course of weeks and months, until one day you notice it’s slightly crooked.
New Force USA G6 vs Old Force USA G6
In 2019, Force USA came out with a completely redesigned version of the Force USA G6. There have been several upgrades, including:
- Better smith machine sleeves
- A better dip attachment that now comes standard
- A better vertical leg press attachment that comes standard
- Much more weight storage with a significantly improved design
- A better accessory storage area
I want to discuss these and other changes in my Force USA G6 review because a lot of the information you can find online is about the old model. My goal is to clarify any confusion between the two versions.
New vs Old G6: Chin Up Bar Knurling
The previous G6 version had knurling on the chin up bar, but the newest version does not.
The new version does have a powder coated finish on the chin up bar. This gives you a dry and tacky surface, which provides a much better grip than a non-knurled metallic finish. Also, there are rubber grips in the wide grip section of the new G6 chin up bar for a comfortable and grippy feel.
That being said, I will always prefer having knurling because of the secure feel that it provides even if I don’t “need” the extra grip.
New vs Old G6: Color
The old G6 was grey. The new G6 is black. Both look great, but I think the black color makes the new one look sleeker.
New vs Old G6: Dimensions
The internal working space and footprint are smaller on the new G6 vs the old G6.
New vs Old G6: Accessory Storage
The accessory storage area is better on the new Force USA G6. It has 8 storage hooks compared to 6 on the old model.
Plus, the new model has a cool swivel board with storage hooks on one side and an exercise chart on the other side.
New vs Old G6: Hole spacing
The new version has 3.75” hole spacing. The old G6 model had Westside hole spacing similar to the current G3, G10, G15 and G20.
New vs Old G6: Hole Size
The new Force USA G6 model uses 1” holes on the uprights. The old Force USA G6 model used 5/8” holes, which allowed you to use some of the Force USA MyRack power rack attachments like the MyRack j-hooks, safety arms and monolift.
The benefit of the larger holes on the new G6 is that the j-hooks and safety spotter arms are more robust. They have a thicker peg that inserts into the upright.
Of course, the benefit of the 5/8” holes on the old G6 allowed for the more precise Westside hole spacing.
New vs Old G6: Dip Station
The new Force USA G6 has a superior dip station. It includes two separate pieces. You install one on each upright. This lets perform dips in between the uprights. This gives you more room to lean forward. Plus, it keeps the whole machine more stable since your weight is in the middle of the rack.
The old Force USA G6 model used a Y-dip bar that attached to a single upright. You had to keep your torso more vertical or your head would rub up against the upright. The dip bar for the new G6 comes standard. You had to buy the dip attachment separately for the old G6.
New vs Old G6: Leg Press Attachment
The old Force USA G6 had a leg press plate similar to the one for the current Force USA G3. It had a more rectangular shape, whereas the one for the new G6 is more angular. Additionally, the old G6 leg press plate would sit atop the Smith machine bar, secured by two lock pins that go through holes bar.
The new Force USA G6 leg press plate has a more stable feel to it. This is thanks to the pop-pins that lock into each end of the Smith machine bar.
Also, the new leg press plate comes standard with the current G6 model. It was an optional attachment on the old G6 model that you had to buy separately.
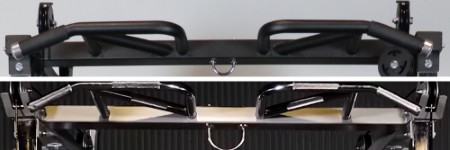
New vs Old G6: Smith Machine
The new Force USA G6 Smith machine has steel sleeves that are aligned with the bar shaft but not the Smith machine track.
The old Force USA G6 model had plastic weight sleeves that were aligned with the track, but not with the bar shaft. It’s similar to the current G3 Smith machine design.
The new G6’s Smith machine design is closer to what you’d see on a Smith machine in a commercial gym.
New vs Old G6: Weight Plate Storage
The new Force USA G6 model has 6 weight plate holders conveniently located on the rear frame columns.
Whereas, the previous G6 model had just 2 weight pegs in the rear, at base of the rack. They were vertical pegs, meaning you had to stack the weights on top of each other.
The old weight storage setup was very inconvenient because you’d sometimes need to take all the plates off to get a plate at the very bottom. Not to mention it’s an easy way to pinch your fingers! Plus, 2 weight pegs will fill up fast.
Thankfully, the new version has plenty of storage space with 6 horizontally oriented storage pegs. You’ll be able to store all your plates and even organize them by size.
New vs Old G6: Pulley Position
The old Force USA G6 had its pulley positioned directly in front of the upright. This would mean you’d have to always position the pulleys higher than the j-hooks and safety spotters. Otherwise, the cable would be in the way.
The new version thwarted this design trap by having the pulleys just to the inside of the uprights. This allows you to use the j-hooks and safeties even when the pulley height is set below them…
…So let’s say you finish doing cable low rows and are moving onto barbell overhead press as your next exercise. This means you don’t have to take the extra time to raise the pulleys to the top before installing the j-hooks.
Instead, you can leave the pulleys where they are and just install the j-hooks before you start overhead pressing. Or you can save even more time by installing the j-hooks, putting the bar on them and loading the plates, before you finish all your low row sets!
New vs Old G6: MyRack Attachment Compatibility
The old Force USA G6 was compatible with some of the MyRack attachments.
In fact, it included some of them standard: The deluxe j-hooks and the spotter arms were the same as the ones used on MyRack. The j-hooks had better protection than the ones on the new G6. And the spotter arms were longer than the ones for the new G6 (15″ vs 19.5″ of usable length).
One non-standard MyRack attachment you could buy for the old G6 was the MyRack monolift. This was a cool option to have; one that’s not available on the new Force USA G6. That said, a monolift is more of a “nice to have” attachment than a “need to have” attachment.
The other MyRack attachment that was compatible with the old Force USA G6 was the MyRack Y-dip attachment.
The reason you had this compatibility with the old G6 is because it had the same Westside hole spacing, 5/8″ hole size and 2.4″ x 2.4″ upright tube size as the MyRack. The new G6 doesn’t have any of these in common.
Force USA Training App
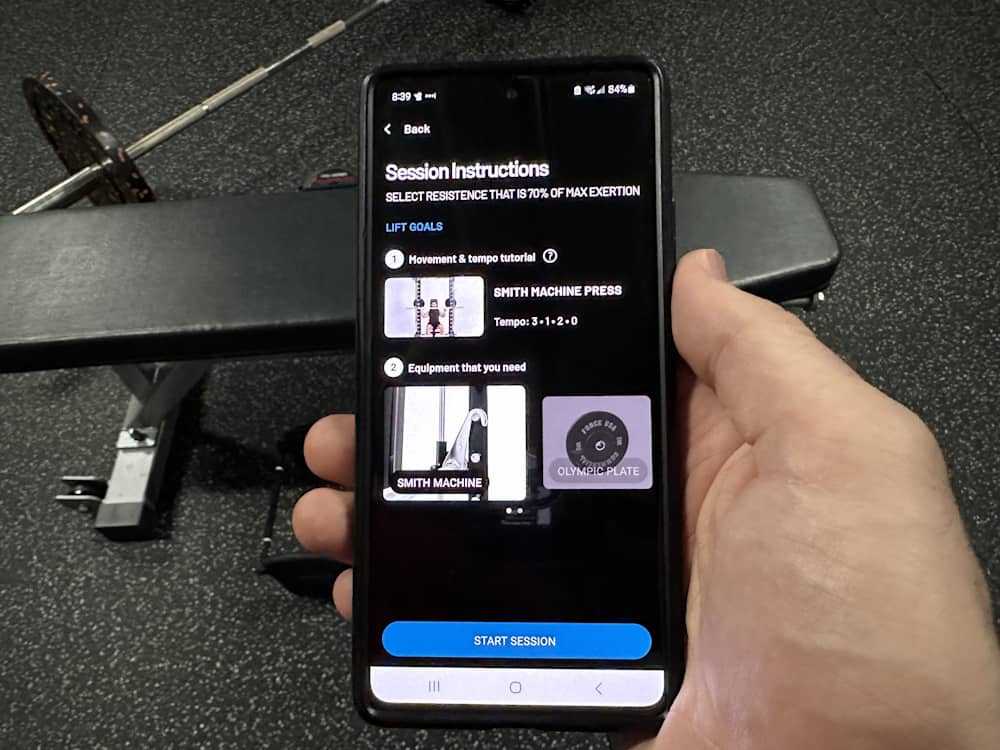
For many, the prospect of the Force USA G6, with its extensive exercise options, can be overwhelming.
Some potential buyers remain uncertain of the machine’s full capabilities, leading them to hesitate in their purchase. Others who do buy often don’t exploit its full potential.
The Force USA Training App does a good job of addressing these concerns. Not only does it show you all the exercises you can do on the G6, but it also offers goal-specific workout programs that use the various exercise stations.
My assessment of this app was positive. It genuinely caters to the user’s needs with a piece of software that is actually pleasant to use. According to Force USA, they built this app from scratch. It isn’t a mere rebranded generic tool, which is common in the fitness space.
Here are the app’s main features:
- Workout Program Library: There’s a wide range of pre-designed workout programs available, each targeting different goals and levels of experience.
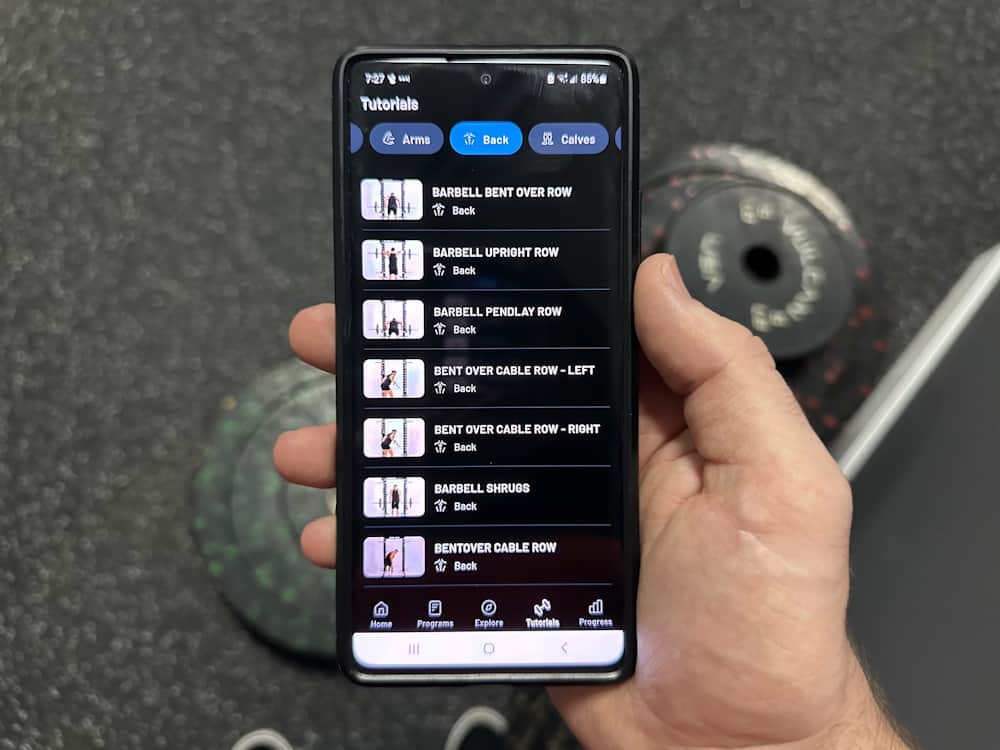
- Exercise Tutorial Library: There’s a large and growing collection of video exercise demos to show you what’s possible on an all-in-one trainer like the G6. This is great if you’re looking for inspiration. It’s a handy tool if your program calls for a specific movement you’re not familiar with.
- Progress & Performance: The app keeps a record of all your workouts, allowing a retrospective glance at your training journey. Using this data, the app showcases your top performances on your main lifts. The “Program Pyramid” on the home screen offers a visual representation of your consistency and performance in your current program.
- User-Friendly Design: Its intuitive design ensures ease of navigation, promoting more regular usage. The interface looks sleek. And I personally haven’t run into any glitches in my testing.
- Guided Workout Flow: Once you start your workout, the app provides a step-by-step guide through each set and exercise. You can easily adjust the amount of weight and reps, but otherwise, you’re just tapping a button to move through the workout.
- Rest Timer: Seamlessly incorporated into the workout flow, a timer indicates the duration of rest after each set, ensuring you maintain a steady pace without distractions.
It’s worth noting the app doesn’t permit the creation of workout routines from scratch. If you have a specific program that’s not in their library, this will be a limitation. However, you can still delve into the exercise library to explore the G6’s range.
I can’t use the app in my regular training because I have a personalized routine. Plus, I’ve been recording workouts in Google Sheets for years and that works well for me.
However, the app undoubtedly has immense value for some Force USA G6 owners, especially those who are newer to lifting.
For those without a G-Series or X-Series machine, you can still use the app as long as you have access to comparable exercise stations.
Shipping
US Shipping
In the US, the Force USA G6 is sold exclusively through ForceUSA.com and ships to the 48 contiguous US states. The shipping costs $249. This is quite a low rate given the large size and heavy weight of Force USA G6 shipment.
The G6 ships by LTL freight. The shipment comes on a pallet with one large crate containing the frame, hardware and attachments, and another crate for the weight stacks. The total shipping weight is 940 lbs.
It’s shipped via freight because it’s much more economical than traditional ground shipping and it reduces the likelihood of damage in transit.
The freight shipping company will call you ahead of time to schedule a date and time for delivery. You’ll need to be there to sign for the shipment. Be sure to inspect the shipment for damage prior to signing.
Delivery is curbside, which means the guys in the truck won’t bring it inside your home.
International Shipping
Shipping to Australia
I originally wrote this review for American customers who buy through ForceUSA.com. However, I’ve since realized the G6 is also available in other countries. It’s particularly popular in Australia where Force USA has a big presence.
I learned this after getting tons of messages from Australian readers about all of the different G-Series models. So I reached out to the biggest Australian retailer of Force USA products, Gym and Fitness, to see if they’d match the same 5% off discount code that I have for my American readers…
…And they did! So if you’re an Australian who wants to buy the Force USA G6, you too can save 5% when you use code KING5 on GymAndFitness.com.au.
I have a few things I’d like to share with you regarding shipping from Gym and Fitness:
- Shipping cost varies greatly depending on which region of Australia you’re shipping to. I asked Gym and Fitness for some data on this and they obliged. First off, the regions, from least to most expensive are ranked as follows: QLD, ACT, NSW, SA, VIC, NT, TAS. I also have the data on average shipping costs for all G-Series units (not just the G6), and the range is from $180 to $480 — Again, the actual amount depends on the unit you buy and your exact shipping destination.
- PRO TIP: As long as you’re not shipping to the Northern Territory, Western Australia or Tasmania, you can get FREE shipping if sign up for the Gym and Fitness loyalty program.
- Consider adding VersaFit rubber gym mats to your order to save on shipping compared to if you bought them separately. If you need a flooring solution anyway, this is a smart way to do it.
Shipping to Canada
If you live in Canada, the best and only place to purchase the G6 is on ForceUSA.ca. This is Force USA’s official Canadian site where you can buy any of the G-Series models as well as their other equipment.
My KING5 discount code also works on the ForceUSA.ca site for 5% off your order.
Shipping to the Middle East
If you live in any of the Gulf countries, then you can order the G6 or any other G-Series model through Garner.ae or Alqudra.sa. You can use code KING5 for 5% off on both of these sites as well.
Garner has an office in Dubai and ships throughout the UAE. Plus they can export to Kuwait, Bahrain, Oman, Qatar and Saudi Arabia (if needed).
Alqudra has a physical location in Saudi Arabia and can ship anywhere in that country. Additionally, they can export to Kuwait, Bahrain, Oman and the UAE (if needed).
Who Is the Force USA G6 Best for?
The Force USA G6 is an excellent choice for a few different groups of people.
Most notably, the Force USA G6 is great for lifters with a more bodybuilding-focused training style. Here’s why:
- Bodybuilders will appreciate the band pegs because their training involves a lot of strength-focused work. Band pegs allow them do any band resisted barbell exercise (band squat/bench/deadlift), which are traditionally seen as powerlifting style training, but can be very effective tools for building muscle. Moreover, they also allow bodybuilders to do more targeted muscle building exercises with band tension, such as band-resisted dips and pull ups.
- They will LOVE having a selectorized weight stack instead of a plate-loaded system. This is because it lets you rapidly change the resistance on the cable pulleys. You just change the pin position higher or lower to select a lighter or heavier weight. There are many situations were changing the weight rapidly is essential for effective bodybuilding training. For example, bodybuilders commonly integrate drop sets. This involves performing one set, reducing the weight as fast as possible, then immediately performing another set. It’s a great technique for maximizing muscular fatigue (and getting a sick pump!). Then there’s supersets, which involve performing a set of an exercise for one muscle group (e.g. biceps curls), followed by another exercise that targets the opposing muscle group (e.g. triceps extensions). This helps pack in more training volume in less time. Lastly, rest between sets is usually much shorter with bodybuilding style training compared to powerlifting style training for normal work sets (e.g. 1-2 min vs 3-5 min). Saving time with faster weight changes on cable exercises means you’ll always be ready for your next set on time. Plus, you’ll have more time to actually rest before your next set.
Tall lifters are another group that should strongly consider the Force USA G6. It is one of the best choices (along with the G3 and G20) for tall lifters. Here’s why:
- First off, its internal height is 85″ (as is the G3’s; the G20’s is 84″). So even a 7’0″ tall guy would have enough headroom to do standing work inside the G6.
- The G6 also provides one of the highest max height for the j-hooks because all 16 of the j-hook holes are accessible — unlike the on G9 and G12 where the uppermost holes are blocked by the pulleys. This matters for any tall guys who want to squat in the power rack. The max height you can set the bar on the j-hooks is 69″ from the floor to the bottom of the barbell; compared to 67″ for the G20, 66″ for the G3, and just 60″ for the G9 and G12. This translates to anyone up to ~7’2″ tall being able to squat from a comfortable height. You should have no worries about the rack being too short unless you’re an NBA center! Only the G10 and G15 have a higher max j-hook height (70″), but they have a notably shorter internal and overall height than the G6.
The Force USA G6 is my #2 pick for the best overall Force USA G-Series model. It has an impressive mix of high-value features. The G6 was my #1 pick until the Force USA G20 came out and took the top spot. Of course, not everyone can justify the hefty price of the G20 — In which case, it’s hard to go wrong with G6.
Overall Rating
Force USA G6 All-In-One Trainer
The Force USA G6 is the best value all-in-one trainer for bodybuilders and personal trainers thanks to its selectorized weight stack system and mid-range (though not cheap) price tag.
Product Brand: Force USA
Product In-Stock: InStock
4.8
Buy the Force USA G6 – Use KING5 for 5% OFF »
Force USA G6 vs G3 vs G9 vs G10 vs G12 vs G15 vs G20
I hope you’ve enjoyed my Force USA G6 review!
If you still can’t make a decision on which Force USA all-in-one gym model is best for you, then be sure to read my comparison guide on the Force USA G3, G6, G9, G10, G12, G15 and G20 for more information.
You can check out all the Force USA all-in-one gym models on by clicking the link below:
Check Current Prices – Force USA G3, G6, G9, G10, G12, G15 & G20 »
Remember! You can use my discount code KING5 for 5% off your entire order:
Reminder: Australian and Canadian readers — you can also take advantage of my KING5 discount code if you order your G6 through GymAndFitness.com.au (for Australia) or ForceUSA.ca (for Canada).

Hey thanks so much for the in-depth review of all 4 of the racks. I’ve been debating between the 6, 9, and 12, so this has been really helpful. Do you happen to have the dimensions of the new upright tubing size? Although the 2.4 x 2.4″ MyRack attachments aren’t compatible, I was wondering if maybe attachments from other manufacturers would fit if they have similar dimensions.
The upright tubing size is 2″x2″. This is smaller than most racks, but most racks don’t double as a functional trainer pulley system. These smaller tubes, though, are still strong enough to give all the racks their ~1000 lb weight capacity because of the reinforcement plates at the tops and bottoms of the frame. Unfortunately, though, you’ll have trouble finding 3rd party accessories due to the uncommon upright size.
Do you think a machine like the Force Monster G6 is enough to replace going to a commercial gym? I’ve been lifting 6 days a week for years but my time is fairly limited nowadays and I’m looking for something to replace my home basic power rack with. This looks like it has it all to replace almost all the equipment at my local gym
In short, YES, it can replace the need to go a commercial gym. Of course, there are some specialty machines at some gyms that it can’t replicate. But the G6 does let you hit all the muscles at any angle, or through any plane of motion, which is why it gives you all the major training capabilities that you’d have in a commercial gym.
If budget and space allowed and you were a regular gym goer looking to replace the gym altogether, would you recommend a unit such as this over say a separate cage and cable crossover set up, or are you making compromises to save space and money?
If I had unlimited budget and space, I’d get all individual equipment. There are compromises with any all-in-one unit; they’re minor compromises, but are compromises nonetheless. Of course, the benefits you get in exchange for those compromises are, as you mentioned, saved money and space.
Also, to fully replace the of the G6 or other Monster G-Series units, you’d need to also get a leg press machine and a Smith machine.
Hi Alex,
Thanks a lot for your in depth review of the G6.
I am considering buying this machine and your review was really helpful to me.
I have some questions regarding the smith machine though.
1. Do you think that the width of the smith machine is enough, or would it be better to choose the G12 instead?
2. You listed various exercises that can be performed using the smith machine, but you did not mention the back squat. Why is that: is it impossible to perform back squat using the smith machine? Can you perform lunges with the smith machine?
Thanks a lot again.
Best regards.
Jeremy
Hi Jeremy,
1. The vast majority of people will be fine with the G6 Smith Machine’s width. It really depends on your height/wingspan and what you plan to use the Smith machine for. For example, if you have a really wide wingspan and plan to bench on the Smith machine, then the G12 would be a safer bet. Of course, you can always measure your bench grip width (and shoulder press grip width to be safe), and see if it’s under 36″.
2. I didn’t list back squats under the Smith machine section just because I’m not a fan of doing traditional back squats on the Smith machine, since the bar path is not optimal when you’re using the fixed track on a Smith machine. However, you can still do them if you want to. I personally recommend the Smith machine “hack squat” variation instead. And yes, you can perform lunges on the Smith machine, too.
Hi, I own a G6 and I’m just starting to assemble it.
Before I go too far (and can’t move it), I was interested to know if you have any suggested room layouts/orientations/minimum clearance spec’s.
Many thanks
That’s a hard questions to give a straight answer to. Of course, the more space, the better. But it can depend on each user. Out the back I would recommend having at least a foot of clearance. Off the smith machine, I would want 2 feet of clearance, but you could get away with less. So just add these clearances to the unit’s external width of 72″ and its external depth of 63″. Hope that helps!
Hi Jeremy.
I have one question. Monster G6 or Armortech F100? I am going to buy one of these and while there a a few reviews on the G6 there is little on the F100.
Hard to say since I’ve only tested the G6 and can vouch for it. The Armortech is probably decent, but I can’t say for sure. Wish I could be more helpful!
I’ve been debating between the G6 and G12 and I would like to know which one is better for full on bodybuilding, I’m talking muscle mass increase and shredded physique that can be done with a home gym. The G12 looks tempting due to its width but the G6 seems to have uniqueness to itself. Overall which one do you think is best for the fitness goals I have?
They’re BOTH great for bodybuilding, since they both have selectorized weight stacks. However, since the G12 has the 1:1 pulley ratio, you can load almost 2x as much weight per side on the G12 as you can on G6. This means you can progressively overload the muscles more easily with heavier cable lifts over time before maxing out the stacks. Sure, you miss out on band pegs on the G12, but the heavier weight stacks are more important for a bodybuilder in my opinion. Again, it’s very close but I give the G12 the slight edge for your needs.
Hi
For the smith machine safety bars, can these go below the lowest safety catch that is demonstrated, for instance when doing the hip thrust can I obtain sufficient range of motion for the movement.
I have seen some machines where the lowest possible position is just about at full extension of the hip thrust.
Kind regards 🙂
You can go below the lowest “racking” point on the smith machine by swinging the Smith safeties out of the way (i.e. they won’t be hooked onto the chrome pegs). When you do this, the lowest possible point the Smith bar can go is 12 inches above the floor.
Customer support and quality control are lacking. I purchased a new force fitness unit. It arrived damaged. Customer service told me that they would refund the shipping and leave me with the damaged unit. Later they just stopped answering e-mails and left me with no recourse other than legal routes. Not worth my time so I’ll buy a unit from a “hopefully” more reputable outfit.
Hey Russ, sorry to hear that! Just checking — which product was this for? Was it for the Force USA G6? And also, did you buy it from ForceUSA.com?
I’m asking since it’s rare to hear this about their customer service. That’s one of things they been best at in my experience. Of course, they know me/my site, but I also regularly follow up with other readers who leave comments on my Force USA reviews, as well as on Instagram, to hear about their experience with the product and customer service. It’s been pretty positive across the board.
Obviously I don’t know the details of the situation, but maybe I can ask my contact over there?
In any case, I hope you’re able to get a resolution or at least get some type of equipment that meets your needs.
Thanks for offering to help. I appreciate it!
Turns out the customer service rep was on vacation. He replied and offered me a 10% discount or a replacement for the damaged part. I chose the discount because I can hammer out the bent part.
The G6 unit is very solid. I’ve had a few smith machines/racks and this is better than all except for an old Parabody smith machine. The Parabody was very solid but only functioned as a smith machine.
Following up to share a few minor modifications for the G6 and some different exercises that I have found useful.
1. I put an 18” x 5/8” steel bar through some holes in the rack. I attached it with 5/8” collars (if the bar is threaded then nuts/washers should work nicely). Simple foot rest when I do low cable rows.

2. The weight stack doesn’t go up quite heavy enough for cable rows so I bought an extra weight stack pin and simply attach a 25 or 35 lb plate.

3. I like landmine exercises but wanted a stand so that I don’t have to struggle getting the weights on and squat down every time I start a set. So I used a couple of the included posts with collars for a landmine that I bought separately. As a bonus I can use the high post to get the bar out of the way when I’m not using it.

4. I don’t feel much activation when I do inverted rows so I hook the included bar up to both weight stacks and lie on the ground, pulling the bar to me. I can add more weight on the stacks and then put a 45 lb plate on my stomach to hold myself down. Note: Usually I go for higher reps with a good squeeze of the shoulder blades at the bottom – at higher rep ranges I don’t need to add weights to the stacks and I don’t need to hold myself down with a 45.

5. I don’t like doing heavy barbell rows. In my 20s I injured my lower back doing cable rows and now I have to watch it. Chest supported barbell rows are good but are awkward for me (I’m 6’ 3”). So what I do now is chest supported cable rows. The bench tends to slide a little so I’m going to get a 48” x 5/8” bar and hook it up similar to the foot rests. And then stabilize the bench against it.

Note from Alex / KingOfTheGym.com: The images in this comment have been provided to me and embedded in this comment at the commenter’s request.
Hey mate.
Been reading through your amazing and detailed reviews which are really helping to narrow down what my wife an I need at home.
Problem is my wife is an introductory lifter and not terribly strong yet. I would love the G20 but I worry about her not being able to use the Smith machine as its carriage weight is 45pounds.
Is there a way to add bands to take the weight off the unloaded bar?
Another question, you mention about the G20 being able to take clip on weights on the stacks but the Australian retailer isn’t convinced there is enough space to do so.
Really appreciate if you have the time to answer these questions