If you buy through a link on my site, I may earn an affiliate commission at no extra cost to you. I also sometimes receive free products to review, but I always give my honest opinion based on real-world testing. Learn more.
In this Force USA G3 review, I’ll tell you all about this unit. I’ll give you an overview of this all-in-one gym, followed by a deep dive into its features, and end with a discussion of who should or shouldn’t buy the G3.
The Force USA G3, previously called the Force USA Monster G3, is one of seven models in the Force USA all-in-one gym product line. It is the lowest-cost model, making it an attractive choice for anyone on a budget.
A 5-in-1 machine that you can upgrade to an 10-in-1 machine (plus other non-exercise station attachments)
Lowest-cost G-Series model.
Ability to buy (most) optional attachments separately instead of bundled in a kit.
It has 2 separate plate-loaded weight carriages (one per side). You can use each side independently, which is useful if training with a partner.
Precise Westside hole spacing (1" & 2") lets you position the j-hooks/spotters exactly where you want.
The only G-Series model with an actual seat attachment for lat pulldowns.
Band peg holes are located across the entire depth of the rack on the rack’s feet (power rack, Smith machine and plate-loaded areas)
Compatible with the G20 optional upgrade kit, which includes jammer arms, dip bars and a leg curl/extension attachment
Cons:
When using both sides of the functional trainer simultaneously (e.g. cable crossover), it's easiest if you have 4 of each type of plate for even loading (e.g. for 20 lbs on each side, you need 4 x 10 lb plates; 1 per peg)
It takes twice as long to load/unload vs other plate-loaded models (e.g. G9, G10) since you have 2 plate-loaded carriages vs 1
The plate-loaded pegs are only 6" long. This is adequate for many lifters, but longer would be nicer. If you're stronger, get thinner cast iron plates instead of bumper plates to fit more weight.
IMPORTANT UPDATE: In February 2023, Force USA updated the design of the G3. It wasn’t a complete overhaul, but there have been several changes — some minor, others significant. I’ll lay out all of the differences between the original G3 vs new G3 below. I’ve also updated the rest of the review to reflect the changes (though some images may still show the original G3).
Feel free to jump to any section of my Force USA G3 review by using the table of contents below:
Table of Contents
What Comes with the Force USA G3?
Base Unit
The Force USA G3 base unit can be expanded with multiple optional upgrades, which I’ll discuss shortly. But first, I’ll tell you about the G3 base unit, which is a 6-in-1 machine that comes standard with these exercise stations:
Power rack
Functional trainer
Smith machine
Chin up station
Core trainer / Landmine station (with handle)
Suspension trainer station
There are several cable accessories that come with the Force USA G3 for use on the functional trainer. I’ll cover those in the later section of this G3 review when I discuss the functional trainer feature.
You can build upon the Force USA G3 base unit’s capabilities by purchasing the optional attachments. There are three optional G3 upgrades, including a leg press plate attachment and two different upgrade kits, each with its own bundle of attachments.
If you buy all three of these options, you’ll double the capabilities of the G3 from a 6-in-1 machine all the way to a 12-in-1 machine!
I’ll provide a quick overview of all three optional upgrades below:
This is the same style of leg press attachment on all of the other G-Series models. It uses pop-pins to attach to the hooks on each end of the Smith machine. With this, you’re able to convert your Smith machine into a vertical leg press station.
Upgrade Kit: Lat Pulldown Seat, Low Row Footplate & More
You can purchase the G3 upgrade kit to gain access to these attachments:
Lat Pulldown Seat Attachment: The Force USA G3 is the only unit with a dedicated lat pulldown seat attachment, as opposed to just a knee pad/leg holder. If you love training lats and want to do lat pulldowns, you should strongly consider this attachment.
Low Row Footplate Attachment: This is the same basic footplate design that’s available on all other G-Series models except the G6. It attaches to either of the rack feet and gives you a stable place to plant your feet and stabilize your body when doing cable rows.
Lat Pulldown Bar: This is a basic, long lat pulldown bar included for use with the lat pulldown seat. The bar angles downward at its ends to allow for a more comfortable wide grip. Notably, it has a rubberized cover for comfort and grip.
Close Grip Row Handle: This can be used with both the lat pulldown seat or the low row footplate. It allows for a narrow grip width. This handle uses rubberized covers with textured grip markings to enhance grip.
Upgrade Kit: Jammer Arms, Leg Curl/Extension, Dip Bars
In November 2022, Force USA released the G20 optional upgrade kit. The cool thing is that this kit is 100% compatible with the new (Gen 2) version of the G3 (and mostly compatible with the original Gen 1/pre-2023 version)!
If you buy it, you’ll expand the G3’s capabilities even further with the following attachments that are bundled together in the kit:
Dip bars: The dip bars attach to each side of the power rack and allow you to perform dips in the middle of the rack.
Leg Curl/Extension: This attachment installs on one of the power rack uprights. It allows you to do seated leg extensions (while seated on a weight bench or plyo box) and standing single-leg leg curls. The ability to do these popular isolation leg exercises without buying a larger dedicated machine is a big win. You can also use this attachment to do hip thrusts if you remove the top roller.
Jammer Arms: Jammer arms are really cool because they let you mimic the lever-style machines (e.g. Hammer Strength) that you often find in commercial gyms. It’s a great tool for hypertrophy because it keeps you in a fixed path, which lets you focus more on contracting the muscle and less on stabilizing the load.
IMPORTANT: If you have the original Gen 1 (pre-2023) version of the G3, you can only install jammer arms on the 1″ hole spacing region of the uprights (i.e. the lower and middle section). You can’t install them in 2″ hole spacing region (i.e. the upper region). Still, this gives you a lot of exercise options.
Updated G3 vs Original G3: What’s Different?
The original (Gen 1) Force USA G3 was launched in January 2018. Five years later, in February 2023, it received an updated design (Gen 2).
It’s not a complete design overhaul. If you glance at the product image, it looks very similar. But if you look a bit closer, you’ll notice some significant changes.
Overall, it’s definitely a positive improvement. However, there are a couple of design elements that I’m sad to see go.
In this section, I’ll tell you everything that has changed, including the minor and major updates.
Update #1: Hole Spacing
The original G3 had Westside hole spacing with 1″ hole spacing in the lower and middle portion of the rack and 2″ hole spacing in the upper portion. This gave plenty of precision for positioning the j-hooks and other power rack attachments.
However, the new G20 design goes a step further and uses uniform 1″ hole spacing throughout the entire height of the rack. You can’t get more precise than that.
Another benefit of the uniform 1″ hole spacing is that the G20 jammer arms (sold in the G20 upgrade kit) will fit anywhere on the uprights. On the original G3, the G20 jammer arms wouldn’t fit on the 2″ spacing portion.
Update #2: Suspension Trainer Station
The original G3 model didn’t have a suspension trainer ring. That made it the only G-Series model without one. This was because there was no front crossmember to install it on.
A suspension trainer has been added to the new G3 on the underside of the front crossmember that the new chin up bar is connected to.
Now, you can more easily attach a suspension trainer to the G3, or use it for band-assisted chin ups and dips.
Update #3: New Chin Up Bar Design
The most obvious visual difference you’ll notice when comparing the original and new G3 designs is the chin up bar.
The original G3 design used the monkey-style multi-grip chin up bar shown below:
It has been replaced with a more low-profile style of multi-grip chin up bar. It’s the same design used on all of the other G-Series models.
Functionally, there’s not a major difference with this change. You can do virtually all of the same wrist position and grip width combinations on both bars. The main difference is that this chin up bar style made it possible to easily add the suspension trainer ring, as discussed above.
Update #4: New Leg Press Station Design
One of the biggest functional differences between the original G3 and new G3 is the leg press station.
It has been completely changed. The new model uses the same type of leg press design used on all of the other G-Series models.
The video below shows the G20 leg press in action — it works exactly the same as the new G3’s leg press:
Here’s what made the original G3 leg press different than the new one:
The original G3 plate shape was rectangular. Whereas, the new one is more angular. This is mostly an aesthetic difference.
The original G3 leg press plate was attached through the Smith bar. It had two pins that insert through the plate, then into two holes in the Smith bar, then through the other side of the plate. The new G3 leg press plate uses pop-pins to snap into the hooks on the ends of the Smith bar. Both methods worked, but there was a small amount of play if you wiggled the old G3 plate with your hand. The new design eliminated that.
The motion of the original G3 leg press wasn’t as smooth as the new G3 leg press. This is simply a result of an improved Smith machine design, which I’ll discuss in the next section.
The original G3 had a very useful hand spotter rail system. You could rotate the rails in to catch the bar when you rack the weight. And you could rotate them out of the way when you unrack. This was in addition to the ability to rack and unrack the weight by rotating the plate with your feet so that the Smith machine hooks latched into the catch slots. But the beauty of this system was that it was easier and arguably safer to use the hand spotters. Additionally, if you failed in the middle of the rep, you could swing the rails in right away. Lastly, this system allowed you to optionally lock the leg press plate in place so there was no rotating of the Smith bar during leg presses. The new G3 leg press system is still safe and effective — it gives and leg workout and has safeties at the bottom. But you lose out on the convenience and versatility of hand spotters and the ability to lock the plate in place.
UPDATE: Thanks to John who commented on this review and pointed out that the Gen 1 G3 spotter rails actually do work on the Gen 2 G3 unit. You’ll still have to buy the Gen 2 G3 leg press plate, but the old rails will work on the new unit with the new plate. If you want this setup, get the rails while you still can because they’ll likely be phased out altogether. See the photos below that John sent me and read his comment here.
The Gen 1 G3 hand spotter rails on the Gen 2 G3 unit
The Gen 1 G3 hand spotter rail on the Gen 2 G3 unit (closeup shot)
Below, I’ll include the some photos of the old Gen 1 G3 leg press plate and spotter system on the Gen 1 G3 unit:
This is how the original G3 leg press plate attached to the Smith machine bar
This is how the original G3 leg press plate attached to the Smith machine bar
Here is the hand spotter rail system on the original G3
This is how you could make the leg press plate stay in a fixed position on the Smith bar
For reference, here’s how the leg press system worked on the original G3 model:
Update #5: New Smith Machine Design
The Smith machine was totally revised on the new G3. Below, I’ll give you a rundown of the differences.
On the original G3 Smith machine, the safety catches and the Smith bar hooks for racking/re-racking would latch into slots on a frame post behind the bar. On the new G3, the hooks and safeties latch onto pegs connected to the inside of a frame post. These are just two ways of doing the same thing; ones not necessarily better. However, the new design does take up more space inside the machine, making the internal width effectively a couple of inches narrower.
Original G3
New G3
The original G3 Smith machine used a standard wheel and ball bearing system. The new G3 Smith machine uses a better linear bearing system, which makes for a smoother Smith bar motion.
The sleeves on the original G3 were angled slightly up. This prevented any weights from slipping off if you had the sleeve fully loaded, but it also took a bit more effort to put plates on. The new G3 Smith machine design uses traditional horizontal bar sleeves.
Original G3
New G3
Additionally, the Smith machine sleeves can no longer be removed to fit standard weight plates (i.e. ~1″ hole diameter plates).
Previously with the original G3, the attachments were sold individually. You could pick and choose exactly which attachments you wanted. This set it apart from all the other G-Series models that offered optional attachments because they would be offered in bundled upgrade kits.
Now, the new G3 has joined with the other models. Most of the optional attachments available for the new G3 model are sold in optional upgrade kits, bundled together. The exception is the G3 leg press plate attachment, which is available for sale individually.
While most other G-Series models have just one upgrade kit, the new G3 has two different upgrade kits available.
The first upgrade kit is the G3 upgrade kit, which contains these attachments:
Lat pulldown seat: This was offered on the original G3, but the design has changed slightly. I’ll discuss the differences in one of the following sections.
Low row footplate attachment: This is something the original G3 never had. You had to do some crazy workarounds to do low rows on the original G3. This is a great attachment and I’m glad they have it available for the new G3.
Lat pulldown bar and close grip row handle: You can use both of these cable handles for pulldowns and low rows.
The other upgrade kit is actually the G20 upgrade kit — it is in fact fully compatible with the new G3 model. It has these attachments:
Jammer arms: These allow you to do plate-loaded lever-style exercises on the power rack.
Leg curl/extension attachment: This attaches to the rack and lets you do leg curls, leg extensions and hip thrusts.
Dip bars: These individual handles attach to either side of the rack so you can do dips.
The original G3 didn’t have access to the above three attachments. However, if you’re an owner of the original G3, you can still buy the G20 upgrade kit and it will be mostly compatible with your setup. The only caveat is that the jammer arms won’t work on the 2″ hole spacing portion of the power rack.
Update #7: New J-hook & Spotter Arm Designs
The spotter arms and j-hooks on the original G3 were unique among those on the other G-Series models. In fact, I would say they were superior to the others (with the exception of the G20’s j-hooks being the best).
Both the spotter arms and j-hooks on the original G3 had permanently affixed nylon/PVC protective inserts. The other G-Series models all use removable rubber inserts on the j-hooks and spotter arms (excluding the G20’s j-hooks).
The j-hooks on the original G3 had protective inserts on both the lower surface and the upper surface. Whereas, the j-hooks on the other G-Series models (except the G20) don’t have any protective insert on the upper surface.
Original G3 j-hooks
New G3 j-hooks
Original G3 spotter arms
New G3 spotter arms
Additionally, the spotter arms on the original G3 were 2.5″ longer than the ones on the other G-Series models (17.5″ vs 15″), which was preferable.
Now, the updated G3 design now uses the same j-hooks and spotter arms as the other G-Series models, with removable rubber inserts and no protective backing on the upper j-hook surface.
While the new G3’s j-hooks and spotter arms serve their purpose effectively, I prefer the original designs.
Update #8: New Lat Pulldown Seat Design
The optional lat pulldown seat has had some subtle but meaningful design tweaks.
Original G3 Lat Pulldown Seat
New G3 Lat Pulldown Seat
Here’s a listing of the key design changes:
A more compact frame: The underside of the frame takes up less space. This is a big deal because you can install the seat even lower on the upright. This means that taller lifters can get achieve range of motion on lat pulldowns.
A knob instead of a pop-pin: The leg holder height is secured with a knob now instead of a pop-pin like before. This means it takes longer to adjust, but it will also give you a more secure fit with less wiggle.
Better end caps on rollers: The leg holder rollers are secured with larger, better looking end caps.
Update #9: Different Cable Accessories
Here’s a comparison of the cable accessories for the original G3 vs the new G3:
Cable Accessory
Original G3
New G3
Long Straight Bar
Yes
Yes
Short Straight Bar
Yes
Yes
Triceps Rope
Yes
Yes
Cambered (EZ) Bar
Yes
No
Close Grip Row Handle
Yes
Optional
Nylon Stirrup Handles
No
Yes
Adjustable Nylon Stirrup Handles
Yes
No
Lat Pulldown Bar
No
Optional
Ankle Strap
Yes
No
Carabiners
Yes
Yes
Extension Chain
Yes
No
Some of the designs of the cable attachments are also different between the original and new models. For example, the original long straight bar was thinner, non-knurled and black powder coated. The new version is thicker, knurled and chrome-coated.
Update #10: Longer Weight Pegs on Functional Trainer
One of the common complaints on the original G3 was that the weight horns on the functional trainer’s weight carriage were too short. They were just 6″ long, which was easy to max out considering the 2:1 ratio, particularly if you were using bumper plates.
Now, the new G3 design uses 8″ long pegs, which gives you a more reasonable amount of space for loading plates.
Update #11: More Accessory Storage Hooks
The original Force USA G3 design had just two storage hooks. The updated G3 model has double that with a total of four storage hooks. Each storage hook allows you to hang multiple cable attachments or other gym accessories.
It’s worth noting that the original G3 design also had 2 storage hangers specifically designed to hold the cambered (EZ) cable attachment and the long straight bar attachment.
However, the two hangers have been removed from the new G3 design. This was done because there’s no longer a cambered bar attachment and the long straight bar has a different design that makes it better suited to be stored on a hook.
Overall, the accessory storage changes are positive. You’ll be able to store many more accessories than before.
Update #12: No More Stabilizer Bar Attachment
The stabilizer arm was an optional attachment for the original G3 model. It is not available for the new design.
I thought the stabilizer arm was a cool attachment. It let you get more out of the functional trainer by allowing you to prop your body against it to get into positions that you couldn’t achieve on your own. However, I realize this is more of a niche feature that many people wouldn’t use often.
There were also some negatives like the fact that it took up valuable space inside the rack. It could sometimes prevent you from putting your bench far enough back.
Considering the negatives and the overall lack of interest, I get why Force USA scrapped this attachment.
Update #13: Fewer Band Peg Holes
The original G3 model had a total of 12 band peg holes in three regions. This included four in the front, four in the middle and four in the rear. This allowed you to easily attach bands for power rack exercises, Smith machine exercises and cable exercises.
Now, there are just six band peg holes in two regions. This includes three in the front and three in the back.
While this may seem like a downgrade, it isn’t. The holes are still spread out such that you can still attach bands for power rack, Smith machine and cable movements.
Update #14: Miscellaneous Design Tweaks
There are a few other, pretty minor differences between the original and new G3 models. I’ll use this section to quickly mention them:
The t-bar row handle for the landmine attachment is improved on the new G3. It allows for both a neutral grip and an overhand grip. The original G3’s t-bar row handle only allowed for a neutral grip.
The original G3 landmine attachment one was permanently bolted to front of either upright. The new one is now removable and is installed on the front right rack foot.
The original G3 had 22 pulley height settings. The new one has 16.
The original G3 came with 12 Olympic spring clips. The new G3 comes 10.
The original G3 came with 12 standard spring clips. The new G3 comes with none.
The new G3 is a bit narrower. This includes the Smith bar width (78″ vs 80″) and the width inside the Smith area (40.5″ vs 43″). However, the power rack dimensions haven’t changed (44″ between uprights).
The new G3 has a shorter internal height (79″ vs 85″) because the new chin up bar is lower than the original.
The new G3 is deeper internally (49.5″ vs 34″) and externally (60.5″ vs 55″)
Force USA G3 Dimensions
External Width (Smith Bar Length)
78″
External Depth
60.5″
External Height
87″
Internal Width (Between Uprights)
44″
Internal Width (Smith Machine)
40.5″
Internal Depth
49.5”
Internal Height
79″
Force USA G3 Review: Features
Space Saving Footprint
The Force USA G3 all-in-one home gym and functional trainer is a space-efficient solution for combining several different training stations into one.
The G3 takes up a fraction of the floor space that you’d need if you bought dedicated equipment for each of the 6 possible G3 exercise stations. This makes it an ideal solution for home gym or garage gym owners who want a lot of exercise variety but have very limited space.
At the same time, you lose the benefit of having dedicated pieces of equipment. In an ideal world, you’d be able to have a separate piece of equipment for each of the exercise stations in the G3. Specialized equipment obviously has benefits over multi-purpose equipment. Of course, we don’t live in an ideal world. You have to consider floor space and budget restrictions. The Force USA G3 gives you a solution that works within these restrictions.
You still get most (though not all) of the benefits of having separate, specialized equipment. As long as you understand the trade-off, you’ll be happy with your decision.
Cost-Saving Concept
The Force USA G3 won’t just save you space, it will also save you money. You will save hundreds if not thousands of dollars compared to if you purchased a dedicated piece of equipment of comparable quality for each exercise station.
Although the G3 will save you money compared to the alternative, it’s not “cheap” in absolute dollars. The Force USA G3 provides great value for everything you get. However, you do need a reasonable budget set aside for this purchase.
Remember that you’re buying an all-in-one home gym setup, which has a more complex design than, say, just a power rack or just a functional trainer. This translates to higher design, material and manufacturing costs, which all add to the price you pay.
The Force USA G3 nevertheless gives you A LOT of bang for your buck. It is the lowest-priced model in the Force USA G-Series lineup. It starts at $1,999.
The next least expensive models are the G9 and G10, both costing $2,999 and that’s before you consider the optional costs of their respective upgrade kits. Even if you buy all optional attachments for the G3 (leg press + two upgrade kits), you still save compared to the base prices for the G9 and G10.
Most people will end up paying more than $1,999 for the G3 since they’ll want some optional attachments.
Remember — you can always buy just the base unit now and save up for the leg press and upgrade kits later if your budget is tight.
Or maybe you’re fine without any extras, in which case the base price is all you’ll ever need to pay!
The Force USA G3 is built for versatility. It is an all-in-one gym, after all.
As mentioned, it comes standard with 6 exercise stations. You can add one more station if you buy the vertical leg press plate attachment separately. You can add two more stations with the G3 upgrade kit (lat pulldown seat, low row footplate) and another three with the G20 upgrade kit (jammer arms, dip bars, leg curl/extension).
All of these stations give you access to a ton of exercise variety. From free weight to bodyweight movements, and from cable to Smith machine exercises, all your bases are covered.
All of the stations in the Force USA G3 give you access to hundreds of possible exercise variations. Here’s an estimate of the number of exercises you can do on each station:
The power rack easily gives you access to 40+ barbell movements, assuming you also have a barbell and a flat or adjustable weight bench.
The functional trainer component alone allows you to do 75+ cable exercises.
This includes the various lat pulldown and cable row variations you can do if you get the lat pulldown seat and low row footplate attachments.
You can do 30+ Smith machine exercises.
The chin up station lets you do 9 different basic chin up variations based on the different grip width and wrist orientation combinations.
The core trainer station is particularly versatile. When you consider the various back/pulling exercises and many core movements, you can do 30+ landmine exercises.
The vertical leg press station lets you do 3 leg press variations: narrow, normal and wide leg press.
The jammer arms give you access to 20+ lever-style exercises.
The leg curl/extension attachment gives you access to 3 popular leg exercises including standing leg curls, seated leg extensions and hip thrusts.
The dip handles give you the ability to do 2+ dip exercises, including wide grip and narrow grip dips. Many other dip variations are possible if you get creative.
Power Rack
The Force USA G3 power rack (technically a “half rack”) lets you do nearly all of the barbell exercises you could do in a full-sized power rack. It has a max weight capacity rating of 992 lbs, which is strong enough for virtually any lifter.
The top two exercises most people will want to do in the Force USA G3 power rack are squats and bench press.
However, you can do so much more than just these two exercises. Here are just a few of the many other exercises you can do in the G3 power rack:
The Force USA G3 power rack comes with j-hooks so you can rack and unrack the bar. And it has safety spotter arms so you can dump the bar and not get pinned underneath if you fail. It has uniform 1″ hole spacing, so you can set the j-hooks and spotters exactly where you need them to maximize safety and performance.
Below, I’ll talk in-depth about the spotter arms, j-hooks and hole spacing.
Spotter Arms
The G3 uses the same basic safety spotter design as all of the other G-Series machines.
The spotter arms have 15″ of usable length. This is shorter than spotter arms on traditional power racks and half racks, which typically are between 20-24″ long.
So if you’re used to squatting in a traditional rack, you may have to adjust your walkout on squats to be shorter. You want to make sure the spotters will be beneath the barbell in case you fail on squats.
After a few workouts, you’ll become accustomed to the shorter 15″ spotter arm length.
Notably, the G3 spotter arms have band peg holes in them. If you’re the type of lifter who likes to get creative with bands and exercise selection, you’ll find multiple ways to use them. One possibility is to string a band between the spotter arms to do band-assisted dips or pull ups.
All the other G-Series models except the G6, G9 and G12, have band peg holes in their spotter arms.
J-hooks
The j-hooks are very similar to the j-hooks on all other G-Series models except for the G20, which has roller j-hooks:
The G20’s roller j-hooks
The Force USA G3 j-hooks do their job in terms of securely holding a heavily loaded barbell. That’s a must-have and these j-hooks check that box, no problem.
However, they could be improved. For one, they don’t have a protective insert on the upper portion to protect your bar when you rack it. I will say, though, it’s an upgrade over the G6, G9 and G12 j-hooks, which have a large bolt-head protruding out of the top surface.
This is a j-hook on the G12. Note the protruding bolt. The G6 and G9 also have this issue.
Additionally, the lower portion has a removable rubber insert. I would prefer a permanently attached UHMW plastic insert. That’s the industry standard.
Uniform 1″ Hole Spacing
The Force USA G3 has precise 1″ hole spacing throughout the entire height of the uprights.
One-inch hole spacing gives you as much precision as you need to adjust the j-hooks and safeties to the ideal height, particularly when benching.
Some may consider this to be “Westside hole spacing.” But typically, Westside spacing refers to 1″ hole spacing in middle for bench pressing and 2″ hole spacing below and/or above for other exercises. The idea is that you need the most precise hole spacing for bench press (and other exercises like cleans).
However, the G3 gives you that extra level of precision at any height.
So you’ll be able to position your j-hooks, spotter arms and other rack attachments exactly where you want them, whether it’s for bench, squat, rack pulls or any other power rack movement.
When you can get the optimal j-hook and spotter position, you maximize your safety AND performance.
The G3 holes have laser-etched numbering every 5 holes on the uprights.
The G3’s 1″ hole spacing is the same as on the G20, G15 and G10.
This is a big contrast to the much more spaced out holes on the G6, G9 and G12, which all have 3.75″ hole spacing. While 3.75” still allows you to do all lifts safely and effectively, it’s not ideal. There will be some situations where you’ll feel like your j-hooks or spotter arms are just a bit too low or high.
There are a total of 62 power rack holes in each upright on the Force USA G3. However, the top four holes are inaccessible for j-hooks (or other rack attachments). Let me explain…
…The pulley trolley always needs to be set higher than the j-hooks. You can’t install the j-hooks above the pulley because the pulley cable will block the hole. When the pulley is at the highest setting, it actually covers the top three holes. And the fourth hole, while not covered, is still inaccessible because the j-hook would hit the bottom of the pulley trolley if you tried to install it.
So, the highest you can install the j-hooks is the fifth hole from the top. Although this is inconvenient and makes you wonder why the extra holes were even included, most people wouldn’t ever use these holes even if they could.
When the j-hooks are installed in the highest accessible hole, the distance from the floor to the bottom of the barbell shaft is 66.5″, or 5’6.5″. This height should allow anyone as tall as ~6’10″ to squat to get under the bar for squats. The exact max user height depends on where the user holds their bar on their back, their stance width an body proportions.
The bar is 26″ above the floor when the spotter arms are in the lowest possible position on the uprights. FYI, this doesn’t mean the spotter arms are installed in the bottommost hole; they can’t be because the frame on the underside of the spotter arms takes up some vertical space.
In any case, it’s helpful to know the lowest possible spotter arm height in case you wanted to know the minimum height you could do rack pulls at.
The functional trainer is the centerpiece of the Force USA G3 all-in-one home gym. It consists of two pulleys on the front uprights connected by cables to two independent plate-loaded weight carriages.
Each of the two plate-loaded weight carriages has two weight pegs to hold the weights. Each weight peg is 8″ long. This is a full 2″ longer than on the original Gen 1 version of the G3.
You can adjust each pulley up or down to any of the 16 possible height settings. Here is how the other units compare:
G6: 19 pulley height settings
G9: 16 pulley height settings
G10: 22 pulley height settings
G12: 16 pulley height settings
G15: 22 pulley height settings
G20: 19 pulley height settings
The Force USA G3 functional trainer has a 2:1 pulley ratio. This means that you get 1 pound of resistance for every 2 pounds loaded on. So if you load 90 pounds on one of the pulleys, it will feel like 45 pounds.
This is typical for many functional trainers on the market, including the G20, G6, G10 and G15 (the G10 and G15 can also be switched to a 4:1 ratio).
However, some — like the Force USA G9 and G12 — have a 1:1 ratio, where the amount loaded on the pulley is the same as the resistance you feel.
This means you just have to load on more weights if you want to lift heavier on the Force USA G3 functional trainer. At the same time, it means you can achieve smaller weight increments and the cable has a longer max travel length.
The functional trainer comes standard with four cable accessories, with another two optional accessories available in the G3 upgrade kit. The accessories include:
Long Straight Bar
Short Straight Bar
Nylon Stirrup Handles
Triceps Rope
Close Grip Row Handle (optional)
Lat Pulldown Bar (optional)
Long Straight Bar
Short Straight Bar
Nylon Stirrup Handles
Triceps Rope
Close Grip Row Handle (optional)
Lat Pulldown Bar (optional)
The functional trainer and the included accessories give you access to 75+ cable exercises. Really, your imagination is the limit when it comes to this station. It provides incredible versatility in terms of exercise selection.
I can’t possibly list all of the functional trainer exercise variations, but I’ll list the most popular ones as well as some of my personal favorites:
Low to high cable chest fly
High to low cable chest fly
Cable chest press
Cable shoulder press
Cable stirrup shrug
Cable lateral raise
Cable rear delt raise
Cable upright row
Lat pulldown
Cable low row
Triceps pushdown
Lying cable triceps extension
Cable biceps curl
Cable pullthroughs
Cable glute kickbacks
Cable squat
And many, many more!
The functional trainer’s quality of movement, or “smoothness,” is adequate. Check it out in the video below (Note: this clip shows the Gen 1 G3, but the cable system is the same as the current model):
While the smoothness is good for home-use equipment and is perfectly fine for most people, it’s important to realize that it’s not as smooth as on the more expensive units (i.e. G6, G9, G10, G12, G15, G20).
The main reason for the difference in smoothness is that the G3’s weight carriages slide along a single square tube. Whereas, the other units use double guide rods, which provide a more balanced setup with less friction.
To maximize the smoothness of the G3 cables, you should evenly load the left and right weight horns on the weight carriage (e.g. 20 lbs on one weight horn, 20 lbs on the other). The greater the imbalance between the weight holders, the greater the drag.
You will also experience some drag on the G9 and G10 plate-loaded models if you unevenly load their weight horns, but it takes a much bigger weight imbalance to be noticeable compared to the G3. The selectorized models (G6, G12, G15 and G20) never experience this issue since they have weight stacks, which necessarily are always balanced.
I want to point something out about the G3 as it relates to the topic of even loading: It can be a challenge to evenly load both weight carriages evenly when you’re doing double pulley exercises IF you have just one pair of all the weight plate sizes. Let me explain:
You won’t have any issues with even loading on a single pulley exercise if you have just one pair of each plate size because single pulley exercises only require loading plates onto just two weight pegs.
However, you will *sometimes* need more plates when doing a double pulley exercise (e.g. cable crossovers) because that involves loading weight evenly over four weight pegs…
Each pulley is evenly loaded, with one 35 lb plate on each of the four pegs. If I didn’t have two pairs of 35’s, I’d have to improvise to find a way to achieve even loading. (Note: This shows the Gen 1 G3 model)
…I say “sometimes” because you can often get the desired weight on both pulleys by combining weight plates — Here’s what I mean, as an example: You can load 70 lbs of plates (equating to 35 lbs of resistance) evenly on each column by using a 35 lb plate on the left weight horn and a 25 lb plate + a 10 lb plate on the right horn; and do the same on the opposite column.
Of course, there will be some weight increments you can’t achieve this way if you only have a single weight plate set with no duplicate plates (though many people have duplicate plates of the heaviest weight plate in their set i.e. 45 lbs or 55 lbs depending on your set).
Obviously, this isn’t ideal since you can’t be as precise with the resistance. You also need to do a little extra mental math on fly. Plus, you have to take the time to grab more plates and put them on all four weight horns.
My point is that you can get away with having just one pair of each weight plate size, but it would be more efficient to have two pairs of every plate size when doing double pulley exercises on the Force USA G3.
TIP: If you want to go heavier on cable exercises, I recommend buying thinner plates (i.e. NOT bumper plates). Remember that each weight peg is only 6″ long. Thinner plates let you load more weight.
One of the most unique features of Force USA G3 functional trainer is that both pulley cables can extend a full 130 inches (10’10”) in front of the rack. This is MUCH further than you can extend the pulleys on the other models:
The Force USA G6 cables extend just 60 inches (5 ft).
The Force USA G9 cables extend only 51.5 inches (4.3 ft) if you use both pulleys at the same time. If you use just one pulley, the cable will extend 103 inches (8.6 ft).
The Force USA G10 cables extend 60 inches (5 ft) with the 2:1 ratio and 120 inches (10 ft) with the 4:1 ratio.
The Force USA G12 cables extend just 53 inches (4.4 ft).
The Force USA G15 cables extend 60 inches (5 ft) with the 2:1 ratio and 120 inches (10 ft) with the 4:1 ratio.
The Force USA G20 cables extend 106 inches (8.8 ft).
Having so much usable distance for the cables gives you the ability to do some creative exercises, such as:
Walking cable lunges
Cable sled pulls
Cable squat walks
Lateral cable squat walks
And many others
As a side note, you may want to invest in a sled harness or functional training vest to get the most out of these types of cable exercises. The video below shows several more functional trainer exercises you can do with a vest and a long cable:
UPDATE: The stabilizer bar was an optional attachment for the original G3 design. This attachment is not available for the new G3 design, which was launched in February 2023. This attachment had some pretty cool capabilities, but it was likely scrapped due to a relative lack of popularity and taking up valuable space inside the rack.
I will keep this section of the G3 review for people who may be buying the original G3 (from a third-party retailer or on the used equipment market). So when you’re reading the paragraphs below, keep in mind that it’s in regards to the Gen 1 G3.
The G3 is the only G-Series model with a stabilizer bar. When looking at the attachment options at first, I didn’t think much of the stabilizer bar. Well, that’s because I’ve never used one. Once I was able to try it in person on the G3, I instantly saw the appeal.
If you’re not familiar with this handy piece of equipment, let me fill you in…
…The bar has a pad on the end. You can extend, retract, raise or lower the bar. This lets you position the pad exactly where you need it for a given cable exercise. You lean against the pad to support your body in positions that would otherwise require a great deal of core stability.
The stabilizer bar allows you to execute certain cable exercises with greater efficiency and intensity. You can focus 100% on the target muscles.
Here are a few examples of my favorite exercises that use this attachment:
Low to high cable flyes, which target the upper pecs. You’re able to lean your torso back so you can efficiently achieve the ideal incline motion.
Any chest pressing cable movement, with either individual stirrup handles or a single long handle attachment. If you were cable pressing without a stabilizer bar, you’d need to really lean forward in a staggered stance. But when you’re cable pressing with the stabilizer pad against your back, it keeps you from moving backward, leaning forward or using an uneven stance. The stabilizer lets you press much more weight this way, at any angle you want: low, straight out or incline.
Chest-supported cable movements. You can turn around and put your chest up against the pad to keep your torso in place while you perform rowing movements. I’m a huge fan of chest supported rows because they really let you isolate the back by removing momentum. Usually this requires a dedicated machine. But getting creative with the stabilizer arm and the cable pulleys lets you mimic several variations of the chest supported row.
And many more exercises. The above are just a few examples. You can get very creative with it.
There’s an additional “hidden” use of this attachment that I discovered when testing out the Force USA G3. You can extend it out and down so the pad holds your knees against the weight bench while performing lat pulldowns with a double pulley attachment.
Note that the stabilizer arm doesn’t fully replace the utility of the G3’s optional lat pulldown seat. The seat attachment allows you to do lat pulldowns on either column using any single pulley attachment for lat pulldowns (e.g. close grip row handle, short bar, rope).
Lat Pulldown Seat
The Force USA G3 is the only G-Series model that offers a dedicated lat pulldown seat attachment. That is, the attachment includes the leg holder pad and the seat all in one. It is available in the optional G3 upgrade kit.
The G6, G9, G10, G12, G15 and G20 all have lat pulldown leg holder attachments where you put your bench under the leg holder to create a seat.
You can see the Force USA G3 lat pulldown seat in action below:
This G3 lat pulldown seat is sold separately. It’s definitely a worthwhile attachment if you like lat training.
If you’re familiar with the Force USA MyRack power rack, it has a similar lat pulldown seat that attaches to its cable crossover attachment. That seat is not the greatest, mostly because it attaches to a single freestanding column, which would sway back slightly. But also, it had no covering over the foam pads on the leg holder…
This is NOT the Force USA G3 lat pulldown seat. It’s for the Force USA MyRack, which goes on its cable crossover attachment. It has several flaws. Whereas, the G3’s seat is more stable and better constructed.
…Luckily all those issues are fixed on the G3 lat pulldown seat.
Most importantly, the uprights that it connects to won’t sway forward since they’re not freestanding; the uprights are rock solid because they’re part of the enclosed frame of the G3.
However, you may still notice a very slight amount of “sinking” when using this attachment if you’re heavier and are using some momentum. This is simply a result of it being a 2″x2″ piece of equipment that’s extended straight out. It creates a lever that you’re sitting on the end of.
It’s not overbuilt like the 3″x3″ lat pulldown seat available for the Force USA X15 and X20 multi-trainers. Those seats have no sway/sinking whatsoever.
A nice feature of the G3 seat is that the underside of the frame doesn’t take up much vertical space. This was actually one of the noteworthy improvements between the lat pulldown seat on the original G3 vs the one for the current Gen 2 G3.
With the new G3 seat design, the seat surface is 18.75″ high in the lowest possible position. This is a couple inches lower than the original G3 seat design. This means the new G3 seat allows for a slightly taller max user height for full range of motions lat pulldowns.
The tallest user height for the lat pulldown is 6’1″ or possibly 6’2″ depending on arm length. Any taller and you’ll have to lean back significantly to get a full stretch. Note that this max user height estimate is for using a wider grip on lat pulldowns. Using a narrow grip reduces the max user height by a couple of inches.
Remember, you also have the option to do lat pulldowns from the floor if you’re too tall.
New (Gen 2) G3 lat pulldown seat
Original (Gen 1) G3 lat pulldown seat
The only reasons not to consider this attachment would be if:
You don’t care much for doing lat pulldowns
You have a weight bench with its own knee holder attachment or a decline leg/foot holder attachment
You’re too tall (i.e. over 6’1″-6’2″) and likely won’t be able to do full range of motion pulldowns even if you put the seat as low as possible.
The Force USA G3 lat pulldown seat inserts into a rack hole just like a j-hook would. You then secure it with a pop-pin that goes into a lower hole. Since it installs on the power rack uprights, you can adjust it in 1″ height increments.
There’s a secondary adjustment pin for increasing or decreasing the height setting of the leg holder pads. This lets anyone get a firm fit against their thighs, whether they have tree trunk quads or toothpick legs.
The knee holder pad adjustment pin isn’t a pop-pin; rather it’s a manual screw pin with a knob that you turn until it’s secure. This takes a bit longer to adjust than a pop-pin, but you can get a tighter fit, so there’s no wiggle.
The leg holder pads have commercial-grade vinyl upholstery to protect the foam inside from rips and tears.
Smith Machine
The Force USA G3 Smith machine works great for most people’s needs. It does exactly what it needs to do: Hold plenty of weight so you can move it up and down on a fixed vertical track.
You can use the Force USA G3 Smith machine for tons of exercises — including almost any lift you can use a free weight barbell for. However, I personally like to do all the main compound lifts with free weights.
That said, I’ve come to appreciate Smith machines over the years for several different exercises. Here are some of my favorites:
Smith machine shrugs
Smith machine incline press
Smith machine RDL (though it should be noted that you may want to get a stable box/platform to stand on for the G3 to get more range of motion since its lowest point is relatively high — for me, it was around knee level)
Smith machine hack squat
Smith machine standing calf raise
Smith machine seated calf raise
Smith machine rear delt row
Smith machine one arm row
Inverted row (using Smith machine to hold onto)
And I know many women LOVE to use Smith machines for any number of “booty” exercises, like hip thrusts and glute kickbacks, among others.
The Force USA G3 Smith machine also makes it possible to do vertical leg presses if you buy the optional leg press plate attachment.
The sleeves on the Force USA G3 Smith machine are 12″ long. It has a 772 lb max weight rating, which is more than enough for almost anyone.
The Force USA G3 Smith machine uses a linear bearing system, as do the Smith machines on all of the other G-Series models. This is how the bar is able to slide up and down. Not all Smith machines use linear bearings, but the better ones (including commercial machines) do.
The linear bearings ensure a smoother gliding action. You won’t notice any drag.
This was the big upgrade to the G3’s Smith machine between the original and current design. The original G3 Smith machine had a quad wheel and ball bearing system. It was adequate, but there was a bit of drag.
You can see the gliding action of the Force USA G3 Smith machine in the video below:
The Force USA G3 Smith machine is not counterbalanced. This means the empty bar weighs as much as a free weight barbell (i.e. 45 lbs). The Force USA G6 and Force USA G20 Smith machines are also not counterbalanced.
The G9, G10, G12 and G15 have counterbalanced Smith machines, which reduce the starting weight to zero pounds. This is particularly helpful if it will be used by beginners or people recovering from injury who need super light weight on certain Smith machine exercises.
While the counterbalanced feature is nice, it’s not important unless you see yourself needing to use less than 45 lbs on the Smith machine.
Before I close out this section, I wanted to share some G3 Smith machine measurements that you might find helpful to know:
Smith bar height when stored in the highest rackable position: 69″
Smith bar height when pressed as high as possible (can’t go further): 75.5″
Smith bar height in the lowest possible position (not in the Smith safeties): 19
The vertical leg press attachment is my favorite optional attachment on the Force USA G3. If leg training is important for you, this should be your #1 pick among the various optional attachments, in my opinion.
It’s an excellent way to train your quads, hamstrings and glutes with heavy loads without loading your spine. If you only train legs with exercises that axially load the spine (e.g. barbell squats), your results can be limited by your lower back strength and/or lower back recovery.
I’ve personally had great success in the past by training legs 2+ times per week; doing heavier barbell squats earlier in the week with leg press later in the week. This approach ensures performance on the leg press isn’t limited by the lower back, which may still be recovering from the heavy squat session.
Similarly, you can squeeze more leg volume into a single workout session by doing leg press after heavy squats. You can continue to get as much out of your quads/hams/glutes without being limited by a fatigued lower back.
The G3 leg press plate is 29.5” wide. It works great for leg pressing with anything from a narrow stance to a standard shoulder-width stance to a wide stance.
The only thing you can’t do is an extra wide (i.e. sumo) stance. This shouldn’t be a problem for most people. It’s not common to perform leg presses with a sumo stance. I’ve personally never used such a wide stance.
The G3 leg press plate attaches to the Smith bar with pop-pins that snap into the hooks on the ends of the Smith bar.
You rack and unrack the leg press by rotating the Smith bar hooks with your feet. Also, when pressing the weight, you need to control your ankle position to avoid knocking the hooks into the racking pegs.
This requires a bit of ankle control. It might feel awkward at first, but you’ll get used it after a while.
To leg press safely, remember to set the Smith machine safeties at the appropriate level: at or just below the bottom of your range of motion. This will save you from getting stuck under the plate in case you fail and can’t re-rack the Smith bar.
Chin Up Station
The G3 has the same style of multi-grip chin up bar as the rest of the G-Series models.
The original (Gen1) G3 design used to have a “Monkey-syle” chin up bar (shown below).
Swapping this old chin up bar for the new one was one of the biggest visual differences between the Gen 1 and Gen 2 versions of the G3.
This current chin up bar configuration includes a straight portion, which tuns in an angled-down wide grip segment. There are also close and wide neutral grip bar segments. Lastly, there’s a diagonal segment for a semi-supinated grip.
With all of these different bar segments, you can do all of these exercises:
Close pronated grip
Close supinated grip
Close semi-pronated grip (with a close neutral segment & a straight segment)
The wide grip portion of the chin up bar has rubber covers for enhanced grip. All other bar segments are knurled for improved grip as well. It’s light knurling but it provides enough friction for a secure grip in most cases.
Only the G10 and G15 also have knurling on the steel segments of their chin up bars. The other models only have the smooth powder coating.
Landmine / Core Trainer
The core trainer station comes standard with the Force USA G3.
It includes a landmine attachment, which you insert one end of the barbell into. A t-bar handle also comes with it. This handle attaches to the other end of the barbell and is only needed for some landmine exercises.
The landmine attaches to the front right foot of the rack. You can flip the landmine back when not in use so it doesn’t trip you up. However, if you want it completely out of your way, you can easily uninstall it in a couple of seconds.
The landmine is small and simple yet highly versatile. There are dozens of possible exercise variations you can do on a landmine. My personal favorite is the t-bar row, which involves using the included handle.
Here are just a few of the many landmine exercise possibilities:
A major change with the 2023 redesign of the G3 was the inclusion of an optional low row footplate attachment. It is available as part of the G3 upgrade kit.
This was a much-needed addition because there was no efficient way to perform low rows on the original G3 design.
There were only makeshift solutions such as using band pegs as a footplate as shown in the photo and video clip below:
The footplate attachment for the new Gen 2 G3 model is obviously far superior since it’s designed specifically for cable rows, as shown below:
It installs on the left foot of the rack. Line it up with one of the band peg holes and insert the band peg through to secure it. You can choose which band peg hole to install it in, so that it’s either closer to or further away from the cable column. Uninstalling it is as simple as removing the band peg.
Note how the band peg keeps the plate attached to the foot of the rack.
There will be some play if you try to jiggle the footplate because it’s only attached with a band peg. However, that won’t really affect performance once you’re actually using it. It will feel stable when you’re pressing your feet against during rows.
It features a 22″x9″ steel plate, which provides plenty of surface area for anyone to assume a comfortable stance. The plate has a “diamond plate” grip pattern to stop your feet from sliding.
You’ll notice there’s a cut-out piece in the center of the plate. This ensures the cable doesn’t rub against the plate during rows. It also serves as a convenient place to hold your cable attachment between sets, keeping it easily within reach.
One detail I appreciate about the footplate is that it has three adjustable angle settings. To make the adjustment, pull out the pop-pin, tilt the plate forward or backward, then release the pop-pin.
Having the ideal tilt for your ankle and foot preferences can make the setup just a tad more comfortable.
The only other G-Series units with adjustable footplate angle settings are the G10 and G15. The G9, G10 and G20 all have a default fixed angle. The G6 has no footplate attachment at all.
Dip Bars
For the longest time, the G3 didn’t have dip bars. Force USA had told me some time ago that they would eventually make some available — and now they’re here!
In order to get them, you need to buy the G20 upgrade kit. Yes, even though it’s made for the G20, it works on the G3.
These are the same basic style of dip bars available on all of the other G-Series models. They include two separate handles that attach to both sides of the power rack. This allows you to do dips in the middle of the rack so you can face either to the front or back without worrying about your feet hitting the uprights.
There are two grip width options:
Narrow Grip: Spaced 20″ apart, this grip width option is ideal if you have narrower shoulders or if want to emphasize your triceps more than your chest.
Wide Grip: Spaced 26.5″ apart, this grip width option is best suited for lifters with broader shoulders or those who want to emphasize the chest more than the triceps.
The handle grips have a rubberized covering, which makes for a no-slip experience.
Each handle grip measures 30mm (1-3/16″) in diameter. That’s just 1mm larger than a standard powerlifting barbell. This thickness is comfortable for most lifters and provides a secure grip without digging into the palms.
The dip bars can be used for a variety of exercises beyond narrow and wide grip dips, such as inverted rows, incline push ups, neutral grip pull ups (if you install it high on the uprights), scap dips, band-assisted dips and many other dip variations.
Leg Curl/Extension
If you want the leg curl/extension attachment for the G3, you can buy the G20 optional upgrade kit which also features jammer arms and dip bars. As mentioned earlier, the attachments in the G20 upgrade kit also work on the G3.
The photos below show this attachment in action on the G20. It works exactly the same on the G3:
This attachment’s design is relatively novel, as there are currently only a few companies like Kingbox and BLK BOX (both UK-based) and some DIY versions of the same concept.
The attachment consists of a frame that attaches to the power rack, a lever that attaches to the frame, a weight horn on the bottom/front of the lever, two high-density foam rollers with sweat-resistant covers, and a pop-pin adjustment mechanism for adjusting the bottom roller.
It installs to a single power rack upright at the desired height. It mounts almost like a j-hook. The frame bracket wraps around opposite sides of the upright for a secure fit. For an added level of security, there is a pin that you’re supposed to insert through the side of the bracket, which prevents the attachment from rotating during exercise.
Adding resistance is as simple as putting on or taking off weight plates as needed.
You can use the attachment for the following exercises:
Seated leg extensions (unilateral or bilateral): To do seated leg extensions, you’ll need to set up a weight bench or a plyo box to sit on, then set the height of the leg curl/extension accordingly. You can do leg extensions with both legs or one leg at a time with this attachment. I generally recommend doing unilateral (i.e. single-leg) leg extensions on this attachment. This is because if you do bilateral leg extensions (both legs simultaneously), you’ll notice a slight variation in resistance between your left and right leg. This is due to the weight being placed on one side, rather than being centered. As a result, the leg closer to the weight will experience less resistance compared to the leg further away.
Single-leg standing leg curls: Lying leg curls are not possible with this design. And since you’re standing, you can obviously only use one leg at a time. While it may not be as efficient to train one leg at a time, you’ll still get a very effective hamstring workout. Plus, training one leg at a time prevents you from using your stronger leg from compensating for your weaker leg.
Hip thrusts: In order to do hip thrusts, you must first remove the top roller pad. The main downside of doing hip thrusts with this attachment is that you can only load so much weight onto the plate holder. Eventually, you’ll outgrow it and will need to switch to barbell hip thrusts to continue progressing in strength.
Jammer Arms
You can optionally purchase jammer arms, which give you the ability to emulate a wide variety of lever-style machine exercises.
To get the jammer arms, you’ll need to buy the G20 upgrade kit. Although this kit is labeled for use with the G20, the jammer arms are 100% compatible* with the G3 as well.
* IMPORTANT: If you own the original (Gen 1, pre-2023) version of the Force USA G3, then the jammer arms are only partially compatible with your unit. The jammer arms will only work on 1″ hole spacing. The original G3 has 1″ in the lower and middle sections, but 2″ hole spacing in the upper section. So the jammer arms won’t work in the upper portion.
The jammer arms look like this:
The jammer arms attach to the power rack uprights at the desired height.
The actual installation process is pretty straightforward:
Insert the threaded pin on the back of the jammer arm through a hole in the upright.
Secure it on the other side of the upright with an included star knob.
Once attached, you add weight to the pegs. Then you use the handles to perform any number of pushing or pulling exercises. The arms swing out on a hinge.
This setup is the closest thing you’ll get to recreating many of the machines you’ll find in commercial gyms.
I love using jammer arms for hypertrophy training because the fact that the arms travel through a fixed path means you don’t have to worry about stabilizing the load. Rather, you can focus mind-muscle connection.
Some people also use jammer arms for training explosiveness. This is most commonly seen on standing push press and snatch jammer arm variations.
Here are a few examples of some great jammer arm exercises:
Jammer Arm Bent Over One Arm Row
Jammer Arm Flat Bench
Jammer Arm Incline Press
Jammer Arm Seated Shoulder Press
Jammer Arm Standing Shoulder Press
Jammer Arm Push Press
Jammer Arm Chest Supported Row
Jammer Arm Shrugs
Jammer Arm Lunges
What sets these jammer arms apart from others on the market is the slight (~30 degree) bend in the arm.
Unlike most jammer arms which are straight, this bend allows for easy propping on the spotter arms, enabling exercises where the jammer arms need to start in a completely straight-out position. This is beneficial when performing exercises where the weight is directly above the user.
Additionally, these jammer arms come with built-in rubber stopper pads on the back to prevent damage, whether they are used on the spotter arms or against the uprights.
The jammer arms feature large, rubber-coated U-shaped handles with a grippy surface. This handle design allows for a neutral grip as well as two pairs of straight grip segments.
The straight grip segments provide two different leverage options. The weight feels heavier when you use the straight grip segment closer to the rack. When you use the one further away, the resistance decreases.
One cool thing to play with is using the band peg feature on the G3 to add band resistance to the jammer arms. It’s a great way to mix up your workout and give your body a different training stimulus compared to just using weight plates all the time.
Speaking of weight plates, you won’t have an issue fitting enough of them on the jammer arms. Each jammer arm has a 12″ long sleeve for loading plates. That is more than enough space to add enough weight for any jammer arm exercise, especially if you have regular cast iron plates. Even if you use extra-thick bumper plates, you’ll be fine.
While the jammer arms are a great addition to any workout routine, they can be time-consuming to install. Determining the correct height for installation can be a bit tricky and may require some adjustments before finding the right fit.
Here’s my tip for making installation easier: In your training log, write down the hole number of the preferred installation heights for your most frequently used jammer arm exercises. You can even place small stickers next to the holes as a reminder. This will save time and effort in the long run.
Accessory Storage
The functional trainer comes with several cable attachments. You may also have your own cable attachments that you’ve bought elsewhere. Not to mention other gym accessories you may have, like resistance bands, a weight lifting belt, straps and wraps.
You need a place to store all these items when they’re not in use.
That’s where the accessory storage area comes into play on the G3. It’s located on the inside of the G3, on the two horizontal posts that make up the back of the frame.
The accessory storage includes four storage hooks. You can typically fit two or three accessories per hook, which will suffice for the average home gym owner.
Keep in mind that you can also drape any bands, chains, belts, wraps and other flexible accessories you may have over the horizontal support beam that the hooks are connected to.
There’s a sort of “hidden” feature in the storage area that lets you store the j-hooks and safety spotter arms. It’s a pretty creative solution. There are four 5/8″ holes on the lower crossbar that the pins on these attachments can insert into. It’s a big space saver and no other model has a similar feature.
If you have more accessories than the G3 can handle and a compact storage solution, I recommend investing in some pegboard from Wall Control:
Weight Plate Storage
Having a place to store your plates is essential for keeping your training area safe, tidy and efficient. The Force USA G3 has this feature built-in.
It has six plate storage pegs on the rear frame columns; three on the left side and three on the right.
Having this many pegs allows you to at least separate the plates by weight, to a degree. That is, you’ll be able to have 45s on one level, 35s on another level and 25s + all the lighter plates on the third level.
It would be ideal to have four or even five levels of storage pegs to better organize the plates so you don’t have to combine as many plate sizes together. The G6, G9 and G12 also have three levels of plate storage. The G10 and G15 have four levels and the G20 has five.
Each sleeve is 8″ long. This sleeve length, combined with the number of weight pegs, provides enough space for most people to store all of their plates.
You can optionally remove the outer portion of the plate holder pegs. There’s a smaller diameter (1”) peg underneath that will fit standard plates, in case you have any. If you don’t have any standard plates, you won’t care about this feature
The G3 plate holders stick out to the rear instead of to the sides. Only the G20 shares this feature. All other units have plate holders that stick out to side.
This rear-facing plate holder orientation is part is a space-saving design element for the G3.
As you can see in the image above, the weight carriage on the pulley track would interfere with weight storage holders if the weight storage holders were on the side of the rack.
Barbell Storage
The Force USA G3 has a barbell storage attachment on the rear of the machine, near the base. It can hold one Olympic bar (~2” diameter sleeve) and one standard bar (1” diameter sleeve).
The bars are stored vertically, by inserting the bar sleeve into the holder sleeve.
Note that you’ll need more ceiling clearance than the Force USA G3’s listed 87” max height to use this. The barbell will be slightly taller than the top of the unit when it’s stored. Plus you need additional clearance to lift the bar in and out of the sleeve.
As long as your ceiling is at least 98” (8’2″), you’ll be able to use the vertical bar storage feature.
You’re in luck if you happen to have some standard-sized weight plates and bars in your gym.
As I touched upon previously in this Force USA G3 review, several parts of the G3 are compatible with both Olympic bars and plates (~2″ dia.) AND standard bars and plates (1” dia.):
You can store any standard bar in the bar storage area, whether that’s a straight standard bar, EZ curl standard bar or any other type of standard bar.
The weight storage pegs can hold standard plates if you remove the outer peg.
You can remove the outer pegs on the plate-loaded weight carriages to use standard plates on the pulley system.
The only part of the Force USA G3 that’s not compatible with standard plates is the Smith machine.
A lot of people won’t care about the ability to use standard plates because most home gym owners have only Olympic bars and plates.
However, there are surely a few lifters out there who will appreciate it. I know many home gym lifters have spin-lock dumbbells with lots of standard plates to go along with them.
Bolt-down Capability
The feet on the Force USA G3 have holes that let you bolt them to the floor. This is not required, but you have the option if you want the rack to be as stable as possible.
Bolting it down can be helpful if you plan on doing heavy band work (e.g. band squats, band bench, band deadlifts). It will ensure the rack doesn’t shift around.
It is possible to do band work without bolting the rack down. But you may want to weigh the rack down by keeping some plates on the storage pegs if you’re using a lot of band resistance.
The Force USA G3 has a total of six band peg holes. It comes with four band pegs for said holes.
There are three band peg holes in the front (power rack region) and three holes toward the rear (closer to the plate-loaded carriage region).
This band peg hole configuration makes it easy to add band resistance to barbell exercises in the power rack area. Similarly, if you get the jammer arms and want to add band resistance, you’d use the same band peg holes in the front section.
It’s also possible to add band resistance to the pulley system, but it can be a bit tricky. If you plan on doing this, be sure to distribute the tension evenly between the left and right weight pegs on the plate-loaded carriage. If you don’t, you’ll notice some drag.
It’s pretty easy to attach band resistance to the Smith machine even though there are no band peg holes directly below it. Simply attach the band to one band peg in the front section, another in the rear section, and then pull it over the Smith machine sleeve.
Four other G-Series models also have band peg holes, including the G6, G10, G15 and G20. Here’s how they compare to the G3’s band peg hole setup:
The G6’s band peg hole configuration is similar to the G3. It has holes in the front section and the rear section.
With the G10 and G15, you can only add band tension to the Smith machine (or the jammer arms if you get the optional upgrade kit). It’s not possible to add band tension to free weight barbell movements or to cable exercises with these two units.
The G20 has the best hole configuration. It features a total of 7 band peg holes evenly spread out from the power rack region to just in front of the weight stacks in the rear. The weight stacks themselves have built-in mini band pegs so it doesn’t need band peg holes to add band resistance to cable exercises.
Force USA Training App
Many people considering the G3 or those who already own it will get overwhelmed by the number of exercise options. Or, they don’t even what’s possible in the first place.
This prevents some people from buying the unit in the first place. And for those who do buy it, they don’t use it to its full potential.
The Force USA Training App addresses these issues by showing you virtually everything you can do with the G3 (or any other G-Seires or X-Series model). It goes a step further by offering workouts for your specific goals, designed to be done on an all-in-one gym like the G3.
In evaluating this app, I found it to be more beneficial than expected. While it’s common for companies to roll out generic apps, this one stands out with a clear focus on the user’s needs. And when talking with Force USA, they told me it was built from scratch. It’s not a white-labeled, out-of-the-box piece of software.
Here are the highlights of the app in my view:
Workout Program Library: The app offers a variety of pre-made workout plans catering to different objectives and skill levels.
Exercise Library: The app boasts a comprehensive and growing set of videos, demonstrating both routine and more specialized exercises achievable with an all-in-one trainer.
Progress & Performance Tracking: All your workouts are logged in the app so you can review your training history. Leveraging this, the app highlights your best lifts for different exercises. Additionally, the “Program Pyramid” on the main page visually conveys your adherence to your chosen routine.
Intuitive User Experience: The app is designed for simplicity. Navigating through it and accessing desired sections is straightforward. That means you’ll be more likely to consistently use it.
Workout Flow: Upon initiating your workout, the app efficiently walks you through each exercise, set by set. You can change the weight and reps completed if needed. Otherwise, you just tap next to move on to the next set or exercise.
Rest Timer: Integrated into the workout flow, a timer starts once you complete each set for the prescribed rest period. This keeps you productive and dissuades you from getting distracted.
I should note, however, that the app lacks the functionality to craft an entirely custom workout. So if you’re committed to a specific regimen, this might not be for you. Though, you can still use the exercise library to see the G3’s capabilities.
I personally have a custom routine so I’ve been sticking to my tried-and-true tracking method of logging workouts in Google Sheets.
However, after testing the app, I can see it has a lot of potential for owners of the G3 (or any other G-Series/X-Series trainers) — especially those who may not be advanced lifters.
Even if you don’t have a G-Series or X-Series machine, you can still use the app as long as you have access to gym equipment with similar capabilities.
Shipping
US Shipping
The Force USA G3 ships via ForceUSA.com to the lower 48 states in the US.
The shipping cost for anything on ForceUSA.com is $149 for anything from $1,000 – $1,999.99 pre-tax. The G3 base unit currently costs $1,999.99, so you’ll pay $149 if you get just the base unit. If you put anything else in your cart, you’ll pay $249 for shipping.
The shipping cost bumps up to $349 only if your total is $3,000+. Most people won’t spend that much unless they’re getting all of the optional attachments plus other equipment (e.g. bench, weight plates, etc.).
Most people will get at least one optional upgrade so the average G3 will end up spending $249 for shipping. And that rate is quite fair considering the heavy weight and large physical dimensions of the shipment.
The G3 ships via LTL freight and the base unit is package inside a single large crate, on a pallet.
The shipping weight is 476 lbs for the G3 base unit. The weight will increase if you buy any optional G3 attachments:
The leg press attachment adds 29 lbs to the shipping weight.
The G3 upgrade kit adds 45 lbs to the shipping weight.
The G20 upgrade kit (compatible with the G3) adds 100 lbs to the shipping weight.
These extras will be added to the same pallet carrying the G3 base unit. A second pallet may be used if you’re also buying a weight set or other equipment from Force USA.
In terms of logistics, the freight shipping company will coordinate with you ahead of time to set a delivery date and time. You’ll need to be there in person to sign for the delivery. Remember to inspect the shipment to check for damage before you sign.
Note that this is a curbside delivery, so the shippers won’t bring it into your home.
Force USA does offer an assembly service add-on where professional third-party installers will assemble the entire thing for you once it’s in your house. If your time is very valuable, this is a worthwhile option.
International Shipping
Shipping to Australia
Although most people reading this article are based in the USA and would be buying from ForceUSA.com, I know there are a large number of international readers interested in the G3 as well. In particular, I get A LOT of messages from Australians asking about the G-Series units.
With that in mind, I reached out to the largest retailer of Force USA products in Australia: Gym and Fitness. I was able to get them to match the discount code I have for US customers. So now Aussie readers can also save 5% with code KING5 if they order through GymAndFitness.com.au!
A few notes on shipping from Gym and Fitness:
Depending on where you are in Australia, shipping costs can vary quite a bit. I asked Gym and Fitness for data on shipping prices and they provided me with the average shipping costs for all G-Series units (not just the G3) for each region. The average range was from $180 to $480. The ranking of regions from lowest to highest shipping cost was: QLD, ACT, NSW, SA, VIC, NT, TAS.
PRO TIP: Sign up for their loyalty program to get FREE shipping. Just note that this offer isn’t available for the Northern Territory, Western Australia and Tasmania.
If you’re going to need gym flooring anyway, you may want to add some VersaFit gym mats to your order. They’re quality thick rubber mats and you’ll save on shipping if you buy them together with the G3.
Shipping to Canada
If you live in Canada, you’re in luck. Force USA recently created ForceUSA.ca to give the Canadian market access to the G-Series lineup and other Force USA products. You can use my KING5 discount code for 5% off your order.
Shipping to the Middle East
If you’re in any of the Gulf countries, you can purchase the G3 from Garner.ae or Alqudra.sa, both of which are owned by the same company. My KING5 code will work on both sites to give you 5% off.
Garner has a showroom in Dubai. They ship throughout the UAE and can export to Kuwait, Bahrain, Oman, Qatar and Saudi Arabia (if needed).
Alqudra’s showroom is in Saudi Arabia. They ship throughout Saudi Arabia and can export to Kuwait, Bahrain, Oman and the UAE (if needed).
Who Is the Force USA G3 Best for?
First and foremost, the Force USA G3 is also perfect for any type of fitness enthusiast looking for a more budget-friendly all-in-one gym solution. The G3 is the lowest-cost G-Series option. Most importantly, it delivers A LOT of bang for the buck.
Additionally, the Force USA G3 is a solid all-in-one gym option for lifters that care about strength or powerlifting-style training. There are two main reasons for this:
The Force USA G3 has 1″ hole spacing: Having 1″ hole spacing is beneficial if you’re serious about maximizing strength on the powerlifts. You’ll always be able to execute any lift from the ideal starting and ending point. You’ll never have to worry about losing ANY performance or efficiency from the j-hooks being set a little too high or low. While the G10, G15 and G20 also have the same hole spacing, the G3 is ~$1,000-4,000 less expensive. The other models (G6/G9/G12) have much less precise 3.75″ hole spacing.
The Force USA G3 has band peg holes: The band peg holes in the base of the G3 allow you to do band-resisted exercises like band squats, band bench and even band deadlifts. Powerlifters commonly perform these banded movements to become stronger on the non-banded versions. The band tension trains explosiveness and gets you used to heavier loads at the top of the range of motion. Only the G3, G6 and G20 have this powerlifting-friendly feature (the G10 and G15 also have band peg holes, but only in the Smith machine area, which isn’t as useful for powerlifters).
Overall Rating
Force USA G3 All-In-One Trainer
The Force USA G3 All-In-One Trainer is the ideal choice for lifters seeking a more budget-friendly all-in-one gym setup and/or are focused on powerlifting-style training.
Force USA G3 vs G6 vs G9 vs G10 vs G12 vs G15 vs G20
I hope you found my Force USA G3 review super helpful!
But if you’re still not sure if the Force USA G3 is the right model for you, don’t worry! You can learn more about the differences between all the different Force USA all-in-one gym units by reading my Force USA G3, G6, G9, G10, G12, G15 and G20 review and buying guide.
You can see all of the Force USA G-Series models by clicking below:
Don’t forget you can save 5% off your entire order with code KING5 regardless of which unit you buy.
P.S. To any Australian or Canadian readers — remember you can also take advantage of my 5% off code KING5 if you order through GymAndFitness.com.au (for Australia) or ForceUSA.ca (for Canada).
Hey! My name is Alex and I'm the founder and author of King of the Gym. I've been lifting weights seriously since 2005 in high school when I started a home gym in my parents' basement. I started writing about fitness in 2009. Then, in 2014, I got into writing home gym equipment reviews and I haven't looked back. My current home gym is in my own house and it's constantly growing and evolving. My goal is to help you build the home gym of your dreams! Read more about me here.
54 thoughts on “Force USA G3 Review: All-In-One Home Gym”
Impressive website. I just landed on it while doing a search for older men bodybuilding. I trained for a BB contest in my 40s, I am now 10 yrs older, and am still loving the challenge. I hope to visit your website again to see what it has for a guy like me, but keep up the great work. Saludos!
Does the Smith machine have a locking mechanism on both side ends to secure it from moving when using the leg press plate? I didn’t even know it had this feature. How much play or movement was there when it was all locked into place?
Hi Jason, I assume you’re talking about the feature shown in the image below, where you can insert the pins through the machine hooks to prevent the Smith bar and leg press plate from rotating — correct?
If so, then the answer is YES. There are 2 pins, and you can insert one on each end of the Smith bar.
If you were to try to rotate the Smith bar with no weight on it, there would be only a very small amount of play. When you have weight on it and are using the leg press, you won’t feel any play there. It’s very secure.
I also didn’t know about this feature until one of the Force USA guys pointed it out to me, and I was pleasantly surprised. It’s a smart design element and a handy little feature to have.
With the roller bearing system. I’ve never seen this type of system before , only linear bearings personally. I do wonder how they feel, and the level of drag is difficult to get a sense of without using it. You did already say there’s a small difference from linear systems, could you elaborate any further on that if possible?
It’s hard to describe. But I’ll try. When you’re pulling the G3 Smith bar up, you can basically feel the rollers the spinning. It is not a type of “drag” where the bar is catching or skidding intermittently on the track. Rather, it’s more of a “soft friction” that’s consistent throughout the motion.
It’s almost like it adds a very light tension to the bar…but it’s a consistent light tension throughout the range of motion. You could almost call it a “smooth drag”, even if that term is kind of an oxymoron. This consistent friction/tension makes it non-disruptive to your lifts. Of course, a bearing system would have no added tension because of less friction, but the roller bearing system is decent and definitely gets the job done.
Also, it’s worth noting that the drag is less apparent as you load on more weight.
Hopefully, this description gives you a better idea of the G3 Smith machine’s feel!
That wouldn’t really work, since the grip width would be too narrow if you put the barbell in the j-hooks, and too wide if you put the barbell on the safety spotter. On top of that, the Smith bar would likely be either slightly lower or slightly higher than the barbell, depending on which height you set them.
It might work better if you had two barbells, and you put one on either end of the safety spotters. Though, even that might be too narrow.
I’m sure Force USA will release the G3 dip attachment soon. But in the meantime, there’s always bench dips!
Well, I didn’t personally test it, but the MyRack Dip Handle could potentially be retrofitted (if you know what you’re doing) to work on the G3, because:
It uses the same hole/pin size (5/8″) as the Monster G3
It is built for the MyRack’s 2.4″x2.4″ uprights, whereas the G3 has 2″x2″ uprights. So the attachment would fit over the G3’s uprights, but there would obviously be extra space on the front and sides. You’d have to install some type of padding or wedges on the dip attachment to make it fit securely on the 2″x2″ uprights. Since it’s not designed or safety tested for use on smaller uprights, I’m sure Force USA wouldn’t recommend it. But at least in theory, it seems like it could work.
You also mentioned the “Force USA Dip Handle.” I Googled that and found a dip handle that looks like it uses 1″ diameter peg to install onto a rack. If that’s the one you were referring to, there’s no way it could work since the G3 has 5/8″ holes.
Lastly, as you may already know, Force USA is working on a G3 dip attachment. It’s currently in development and will be released in the not-so-distant future (no date announced as of yet). So, another option is to get the G3 unit now, then buy the official dip attachment when it’s available. Of course, I understand wanting to find a DIY workaround if dips are essential to your training 😀
The G3 leg attachment that you show in your review looks a lot wider than the one offered on the website for the G3. Did they change the width of the leg attachment?
The leg press plate you’d receive is the wider looking one that’s shown in my review. It is 29″ x 16″. The video on the Force USA site shows an older version of the G3 unit, which had a smaller leg press plate. And as for the picture on their site, it’s either the angle of the photo that makes it look smaller (or possibly it’s a shot of the older version).
In any case, I reached out to Force USA and confirmed that anyone who orders the leg press attachment will indeed receive the large (29″ x 16″) plate.
Fantastic review, very comprehensive. I am seriously thinking of upgrading my current force USA rack to a G3 (or an Armortech F30 Pro functional trainer) and you’ve certainly cleared up a few queries I had about it.
Do you happen to know the weight rating on the side pegs? I have done a bit of research but cant seem to find it.
Thanks, Matt. When you say “side pegs” are you referring to the Smith machine? If so, the Smith machine’s total weight capacity is 770 lbs. So, to get the weight capacity for each side, you’d just divide by 2 (i.e. 385 lbs per side).
But maybe you mean the weight holder pegs on the pulley system? If so, I don’t think there is a stated weight capacity rating for those. But they’ll definitely be able to hold as many weight plates as you can fit them — Each peg is 6 inches long, and each pulley has 2 pegs, so it can hold at least as much weight as you can fit on that. If this is what you were asking about, let me know and I’ll see if I can reach out to Force USA to see if they have an actual number for weight capacity on this. Though it’s not a common spec on any system.
Hi Alex,
Thanks so much for your reply. I was referring to the pegs on the pulley system, I was a little unclear sorry. I was just thinking about when using it for last pull downs. If the pegs are 6 inches deep and I could get 3x25kg plates each side that’s a total of 150kg (330lb) which at a 2:1 ratio would feel like 75kg which is sufficient for me. My preference is for single pulley pull downs so I can utilise the lat pull down seat. Thanks again for answering my question and a great review.
Hi, love the review. Does the Smith machine bar security hooks have a handle? Or do you need to actually grab the hooks with your fingers (if you know what I mean)
There is a handle, which you would use if you performed the leg press laying on the floor, since the handle is located at the bottom. See the handle below:
However, if you prefer to do leg presses lying on a bench, then you would grab the hook itself. It’s very easy to do this as there’s plenty to hold onto and it’s not hard to swing the hooks in and out of place. As far as safety, you would simply want to grab onto the hooks below where you’ll be racking the weight so you don’t accidentally pinch a finger — though, you would naturally grab the hook at a lower position since your legs will be extended when racking/unracking.
King, I’d just like to say thank you for this in depth review and appreciate you getting back to me with all my questions. I love how you are detailed about things as am I.
I’ve told others about you and how you are friendly and informative about things.
I had so many questions and you def made my decision on purchasing the G3 with a clear view on things. Cheers brother. Melbourne Australia. Antonio’s (Hercules) 🙂
Can someone work the smith machine side, say doing squats while another person works with the cables? I ask because my wife and I like to workout together and want to make sure its possible. We have a marcy system now and would like to upgrade but do not have a ton of space.
This is the BEST WEBSITE EVER!! Thank you for replying back to my comments on YouTube. Super helpful info on the pulley row exercise workaround. One more question – you mention that the cables can extend farther than the other models. If you just want to do cable cross overs or something that does not require distance, will it sustain tension or do you have to pull it out all the way? I ask this because my garage is small and I will not have that extended space if I have to pull all the way out in front of the rack. Thanks again!!!
Thanks! If you just want to do cable crossovers (or any other exercise that doesn’t require the full cable length), yes it will sustain the full tension of whatever you select on the weight stack. You don’t have to pull the cable out all the way to feel the full resistance. So you won’t have an issue in your small space.
Great review, I’ve been eyeing this for awhile and your review was the most comprehensive. I’m sold! We just bought a house with three car garage So this would be perfect!
Great review – do you know if you can move the Smith machine pole out of the way when doing free weight barbell bench presses and having someone spot you? It looks like the smith bar would be in the way of someone spotting you.
Yes, you can rack it at the highest setting near the top of the machine. That will allow your spotter to get behind you for free weight flat barbell bench press.
I’ve already asked a question previously, but ill say again….Great review!
I have actually gone ahead and purchased a G3 and am just awaiting delivery. Have you any suggestions on doing dips on it?, seems like a missed opportunity that they didn’t initially include a dip attachment and haven’t since come up with one.
Yeah, I know they said previously that a dip bar in was in development. Of course, I’m sure all the craziness with increased demand / supply issues has thrown off some of these plans. In any case, my best advice for simulating dips on the G3 would be to use the functional trainer. Basically, you’d stand or sit on bench in between the 2 cable columns. Using a d-handle on each side, you’d start with your arms back and elbows at 90 degrees like the position you’d be in at the bottom of a dip. Then press the handles down to mimic the motion of a dip, before returning to the start position. Angle your torso more forward or more upright to emphasize the chest or triceps more.
Hi Alex, thanks the reply :). That’s great advice on how to do a dip style exercise, I hadn’t thought of that! Once my G3 (finally) arrives I’ll be sure to try it. Thanks again.
Matt
Recently purchased the G3 and love it overall. However, I’m getting uneven drag when I use the included lat pulldown bar and attach to both pulley systems. Even if I load weights evenly across all four horns, the right side drags. Any thoughts about how to address this? (Love this site, BTW.)
Great review. How would you rate this unit in terms of build quality? It seems very reasonably priced for the number of features, particularly when comparing to other manufacturers. Eg., Is it a tank or does it wobble? Does it feel sturdy?
Also, what are your thoughts on using the smith for bench press, squats, and dead lifts? My son is just getting into lifting and I want to get him something that’s safe but let’s him do all the necessary exercises. The smith concept appeals to me in terms of safety, but I get that it’s a straight movement and so might not be perfectly natural or require use of stabilizing muscles. I’m also in my 40s and think I’ll be more inclined to do exercises on a smith than a free barbell. Am I making sense or am I thinking about this wrong?
Hey Daniel, overall the build quality is good as for as home gym equipment goes. It’s not to the level of commercial quality equipment, as it’s not designed for those environments.
As far as the rack/main unit, no it does not wobble, and is quite a sturdy unit. As I mentioned in the review, you’ll notice some sway on the lat pulldown seat as you lean back during lat pulldown reps. Example of other areas where you’ll notice the less-than-commercial quality are the plastic Smith machine sleeves; and the weight holder brackets for the pulleys are on a square tube, which makes it less smooth compared to the double guide rods you see on the other G-Series units as well as commercial cable units.
That said, the pulley motion on the G3 is NOT “rough”; in fact, most home gym lifters will be very happy with the smoothness of the G3 cables. But it’s nonetheless not as smooth than the other G-Series units as well as commercial cable units.
As far as using the Smith machine goes for exercises like bench press, squats and deadlifts go, it’s possible to do, but let me tell you my thoughts/insights:
As far as deadlifts go on the G3 Smith machine in particular, you can not achieve full range of motion. This is because the lowest it will go is to just below knee level — it’s still effective for back/traps and some glutes/legs, but it’s a different movement than traditional full ROM deadlifts (if you wanted to use full ROM, you’d have to find a sturdy box/platform you could stand on so the bar around mid-shin at the bottom of the rep).
For bench press, this is certainly doable. You just have to find the position under the bar that gives you the most comfort in your shoulders throughout the range of motion, since it’s a fixed bar path and you don’t want to force your shoulders into an awkward position.
For squats, I’m not a fan of trying to replicate traditional squat form on a Smith machine since it’s just not a natural bar path. Instead, I prefer to do the Smith machine “hack squat” variation, which basically involves bringing your feet in front of the bar, which mimics the hack squat machine.
In general, I am a fan of Smith machine exercises, but I find them more effective as accessory movements to my main barbell movements. I understand some of this comes down to your personal training style and preferences, but I always encourage some free weight barbell training if at all possible! 😀
Thanks so much Alex! Keep
Up the great work on the site. You have a real talent for this and believe it or not it is hard to come by such thorough, clear, and unbiased reviews.
I just bought the g3 a few weeks ago. Asked customer service if the leg extension attachment will work with my device because on their website it only says for g9, g20 and other models but not g3. They said no. In your review you said it works, can you confirm that for me? Really confused and really want to buy the g20 dip bars, arm jammers and leg enhancement attachments. Thank you!
Hi Taylor, great question. I double-checked with my contact there, Dan, the product manager. He confirmed that the G20 upgrade kit will work on your G3 unit. The only thing to keep in mind, which you may have already read in this review, is that the jammer arms won’t fit on the uprights in the 2″ hole spacing region of the power rack. They will fit on the 1″ hole spacing area. So basically, you can’t use the jammer arms on the upper portion, but you can use them on the middle and lower portions. This means no standing overhead jammer arm exercises. There are no such compatibility restrictions with the dip bars and the leg curl/extension attachment.
Great review! Do you know if the FORCE USA G3 UPGRADE KIT works with the Gen 1 model? Will the gen 2 lat pulldown upgrade work with the gen 1 model? Thank you.
Hey Ryan, the Gen 2 lat pulldown seat will work on the Gen 1 G3 since the uprights only changed on the top half in terms of hole spacing. I reached out to the Force USA product manager to verify the compatibility since I noticed that the upgrade kit product page said “Compatible only with Gen 2 / 2023 model” — but he confirmed it will indeed work on the Gen 1. Hopefully they update the verbiage on that page to reflect that.
Hey Ryan, the Gen 2 G3 low row footplate is also compatible with the Gen 1 G3. The way it attaches is with a band peg while straddling the foot of the rack, which did not change between models.
The leg press hand spotters from gen 1 do fit on the newer G3 and everything lines up properly.
Because the new leg press plate is so wide, there is less than 1″ clearance on each side between the retracted hand spotters and the edge of the plate but it still works beautifully.
I bought mine by accident not realizing it was for the older G3, but I am glad I did. I had to spend extra $ to get the new leg press plate, but having the hand spotters as well is so worth it.
The G3 V2 Smith machine only accepts Olympic-sized plates (~2″/50mm diameter), though you can use standard-sized plates on the G3 V2’s pulley system. On the old G3 V1, you could remove the smith machine sleeve sheaths and load standard plates, but that’s no longer possible on the newer version of the G3.
Please note that the holes in the G3 v1 are not 5/8″ (16mm) but 5/9″ (14mm).
I noticed this when I tried to mount the Jammer Arms on it. The 16mm pin supplied with it did not fit into the holes at all….
For your information, I measured everything with a caliper.
Yes, this is important information. The entire article needs to be corrected. People will be misled into thinking that the G3 v1 has standard holes. Most accessories on the market are 5/8″, so this is an excellent reason to buy the V2 rather than the V1.

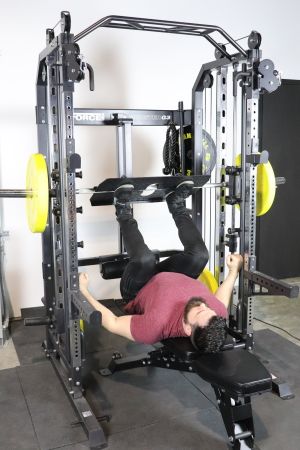

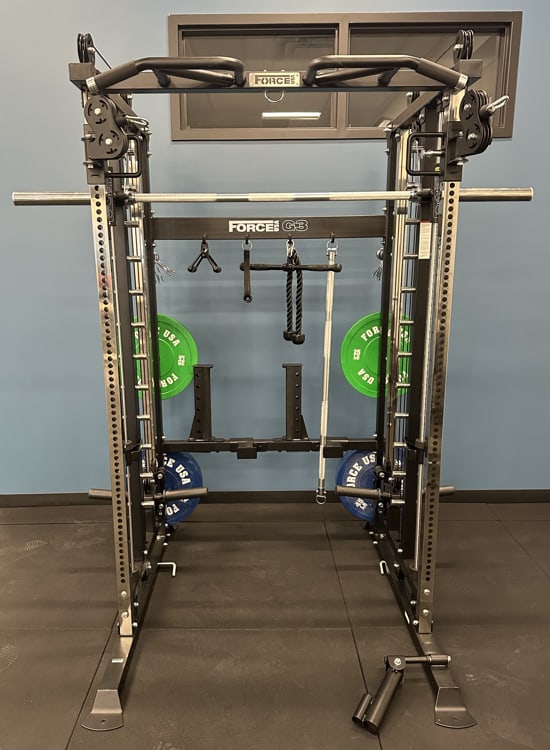
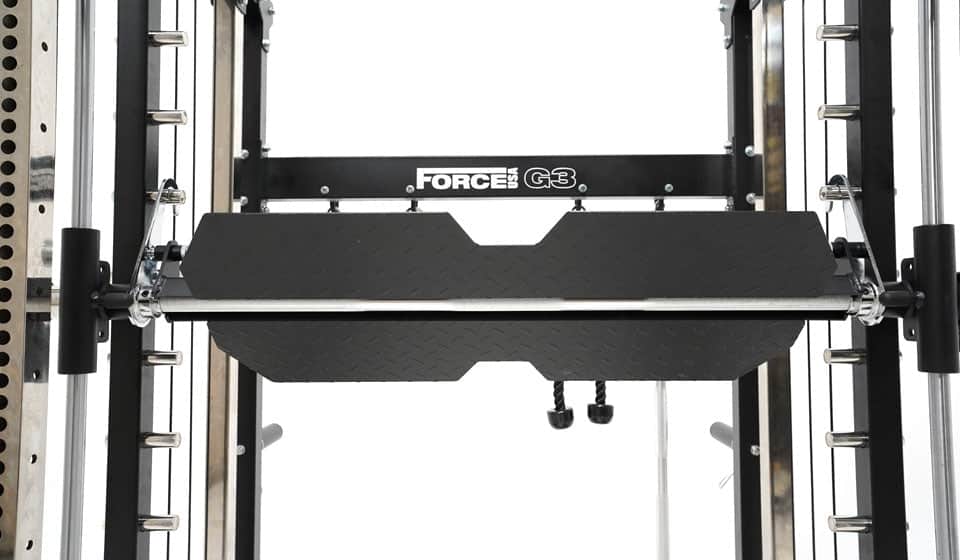
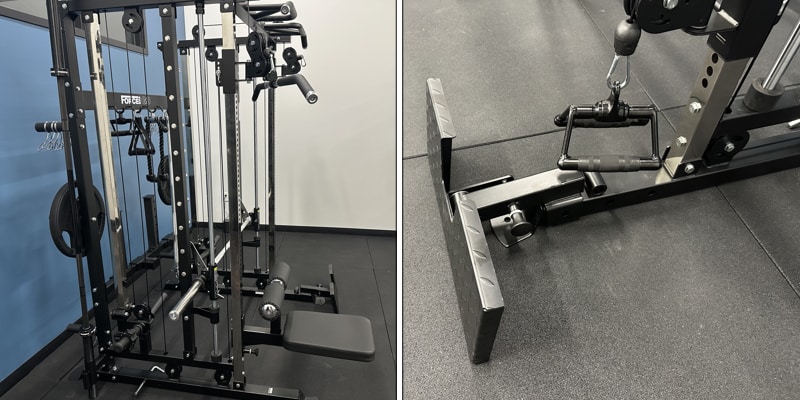

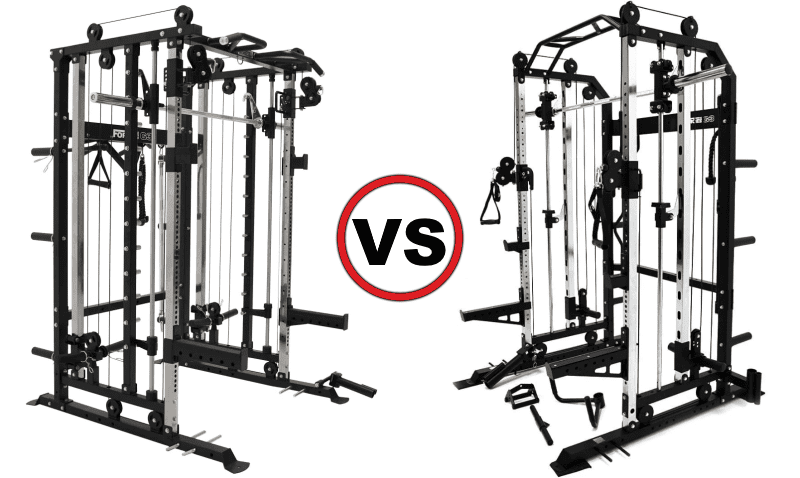

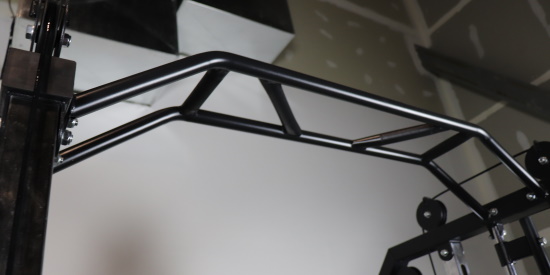
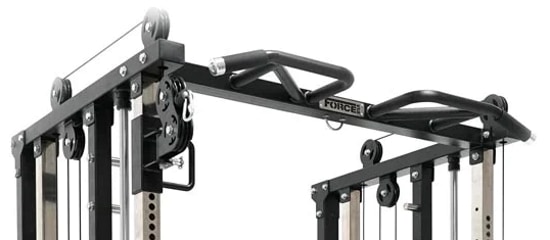
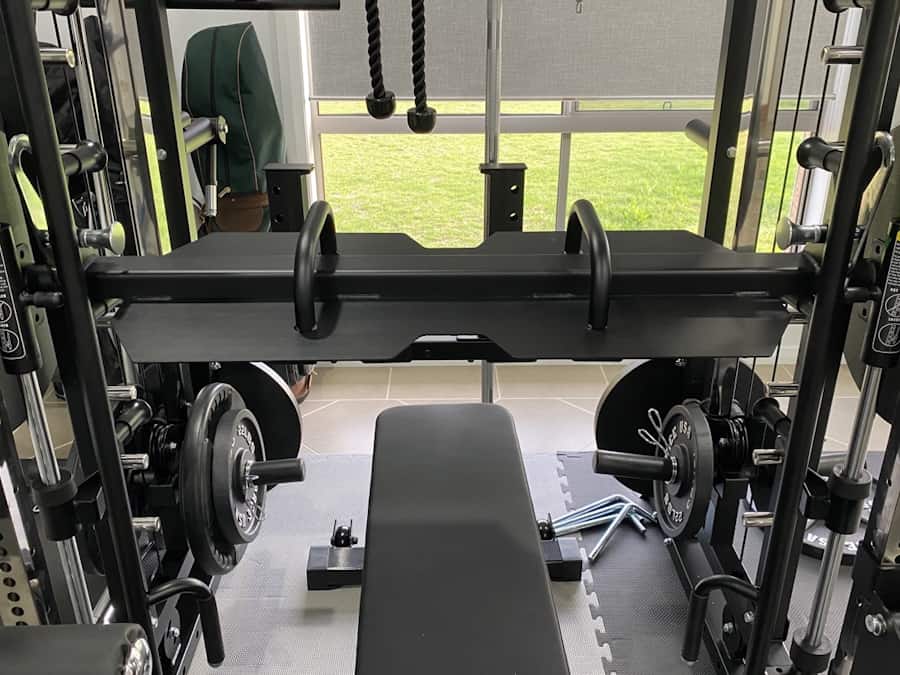
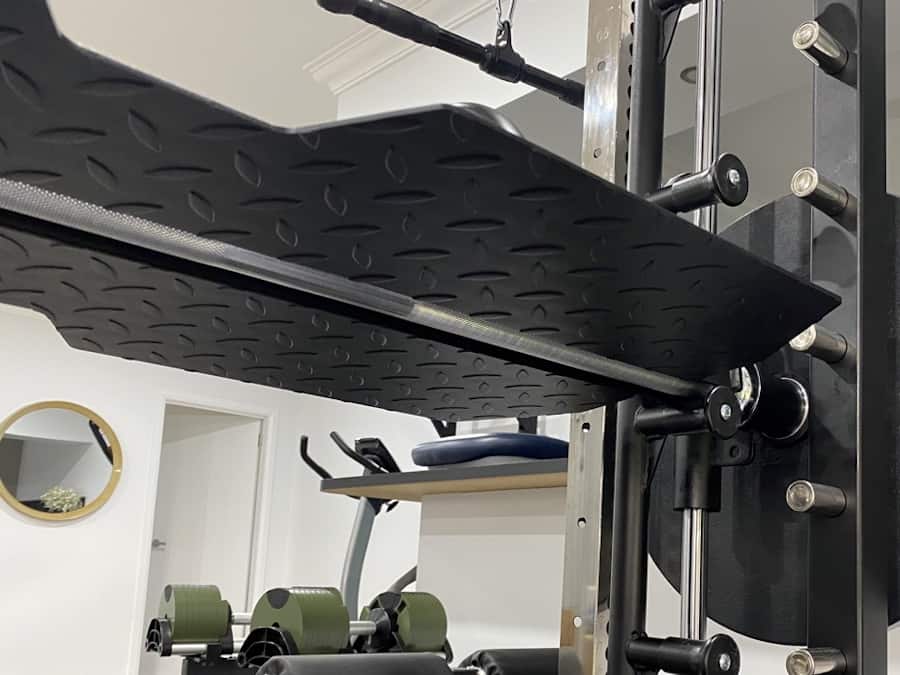
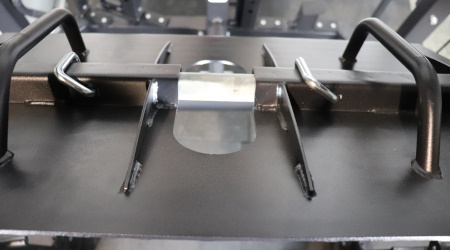
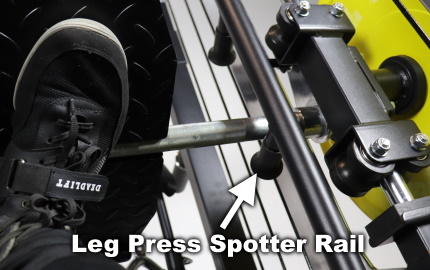
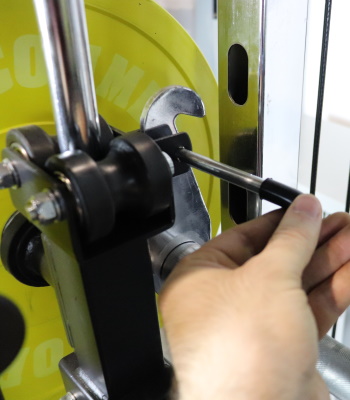
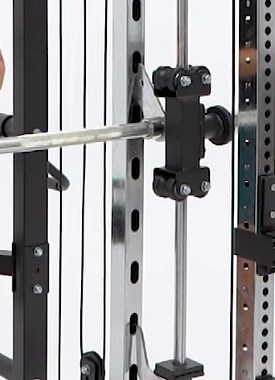
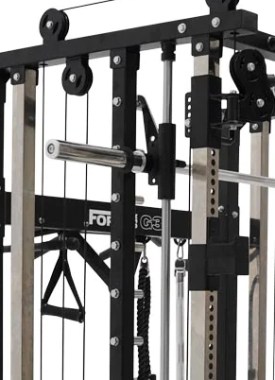
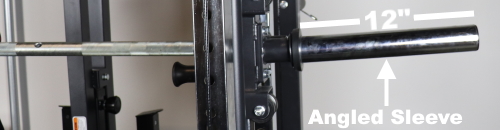
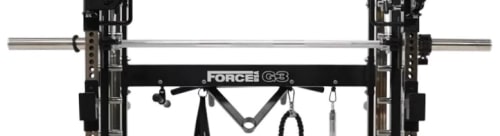
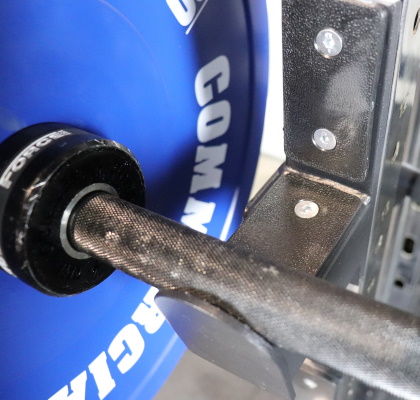
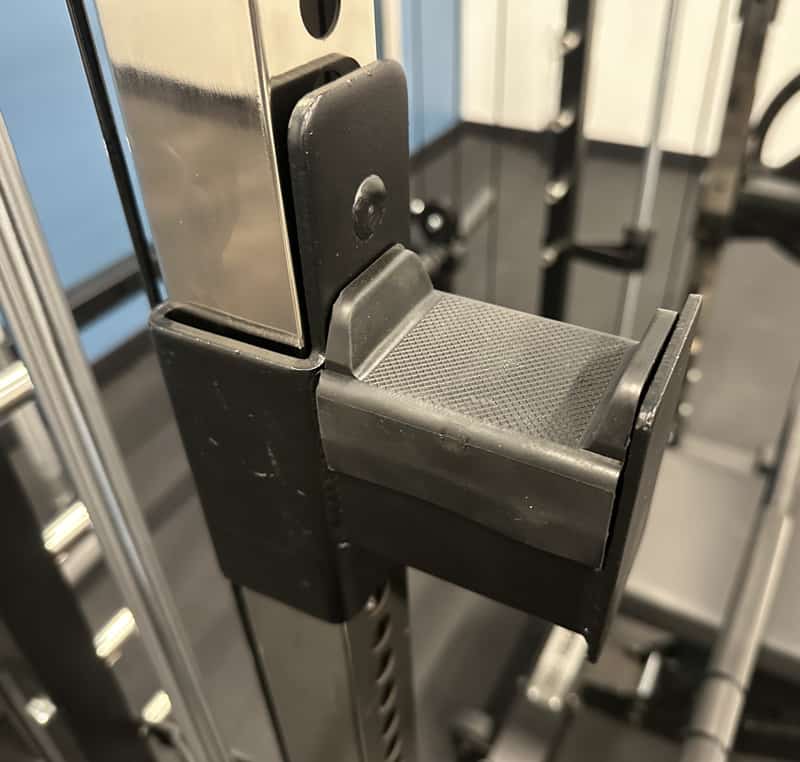
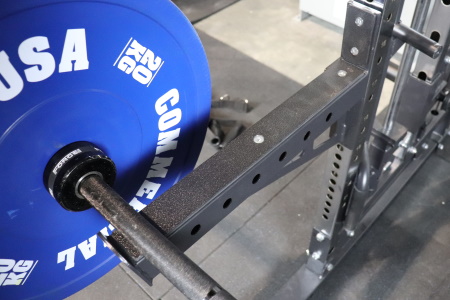
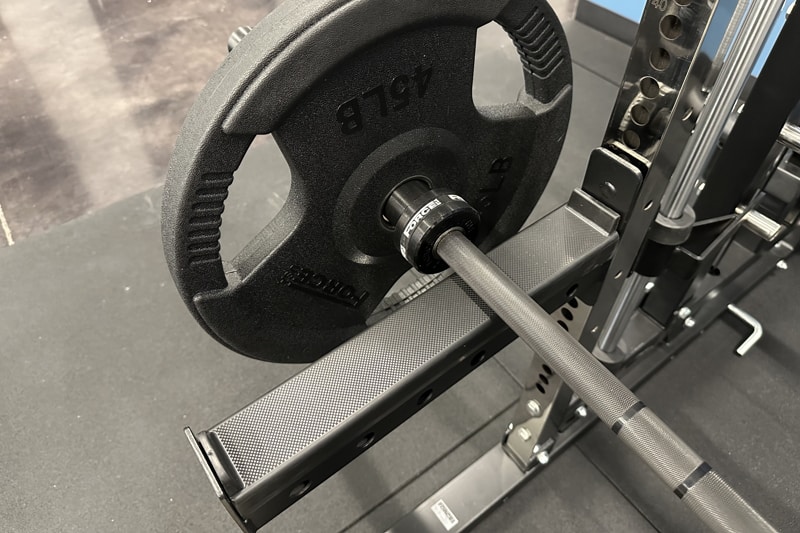
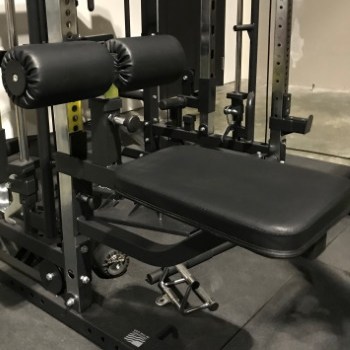
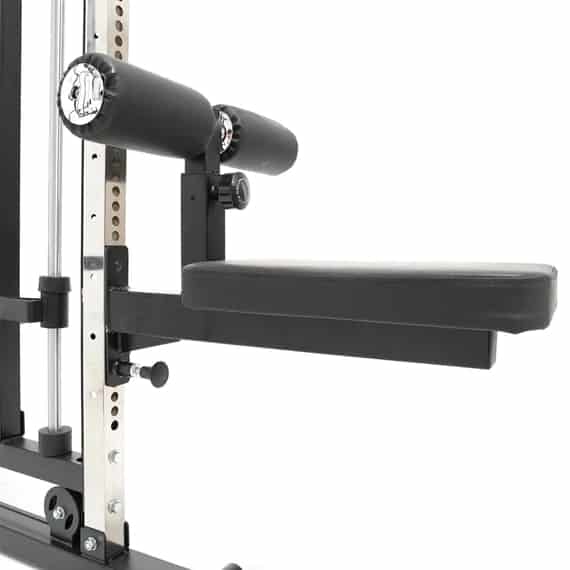
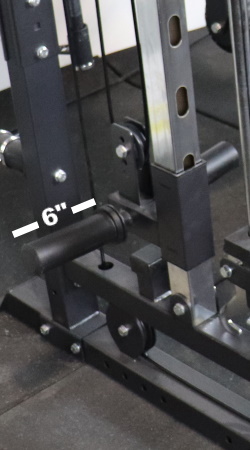
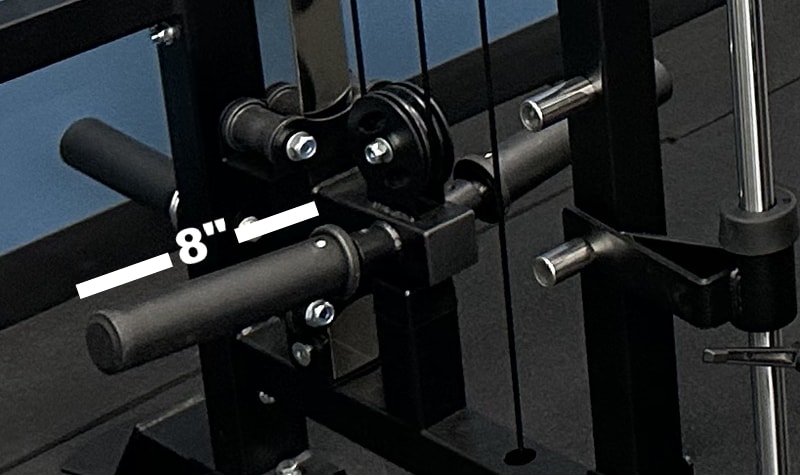
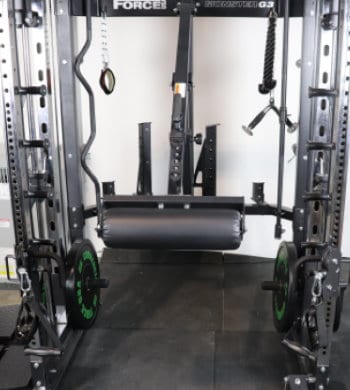

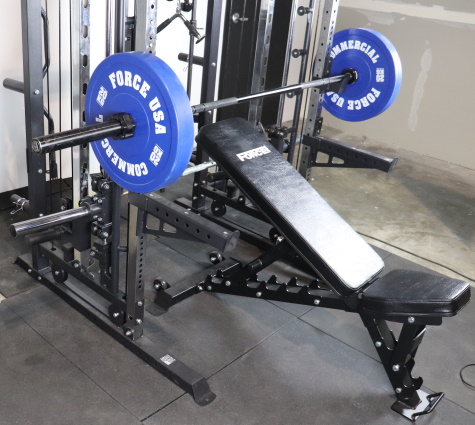
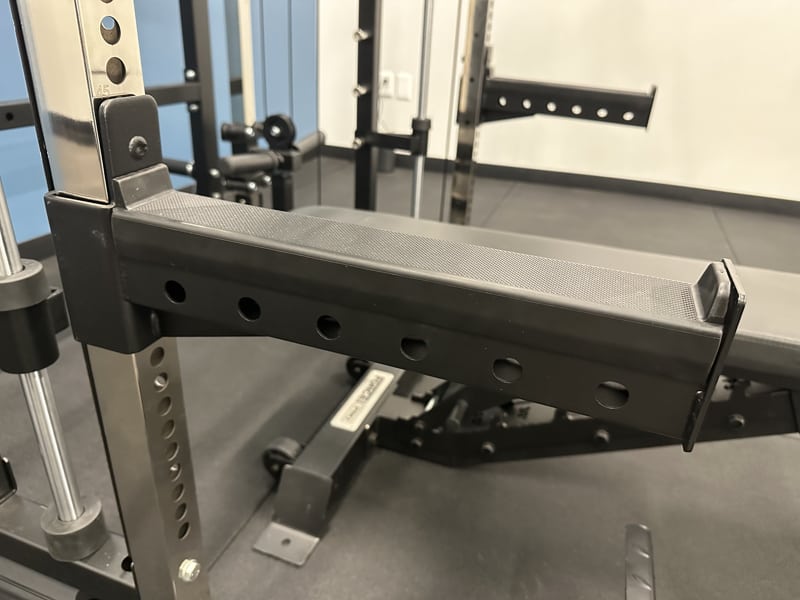
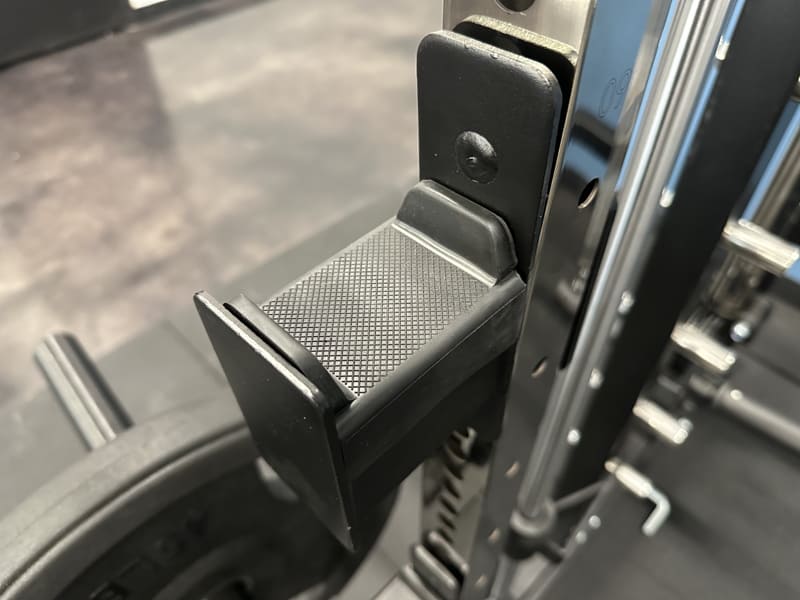
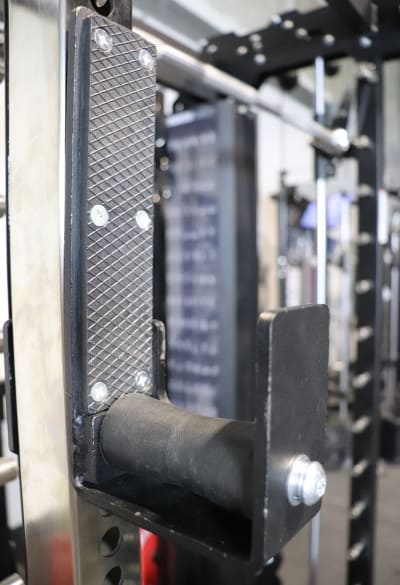
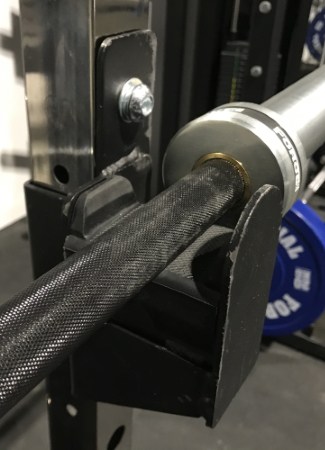
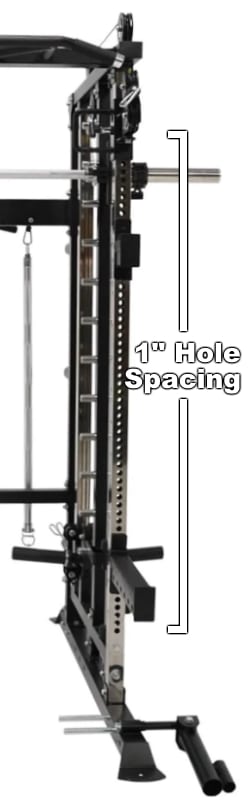
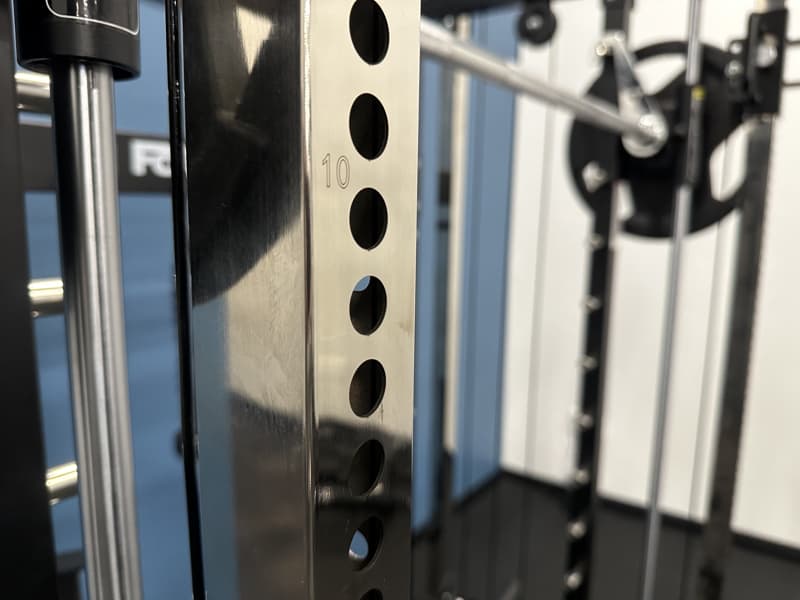
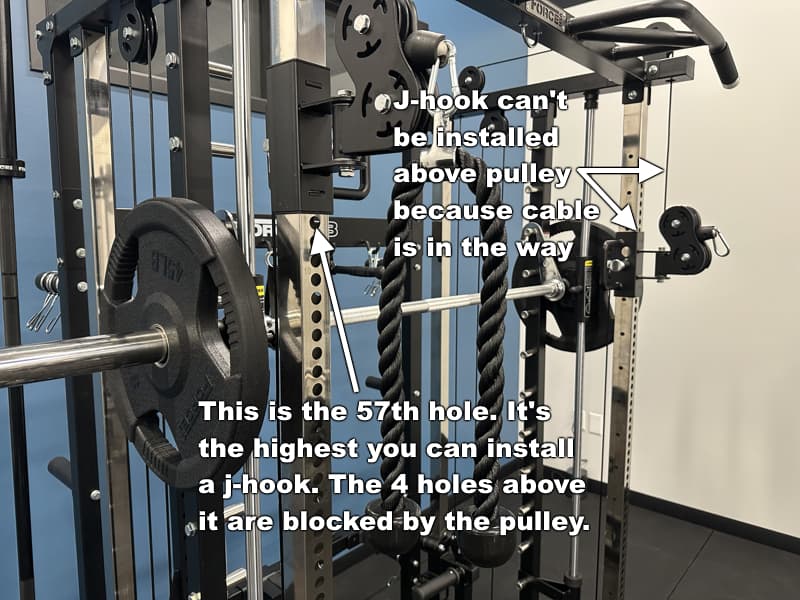
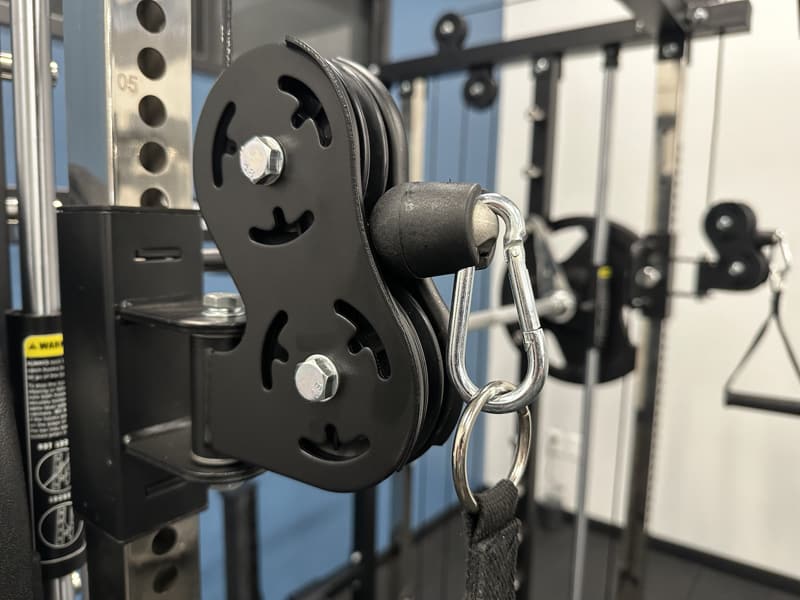
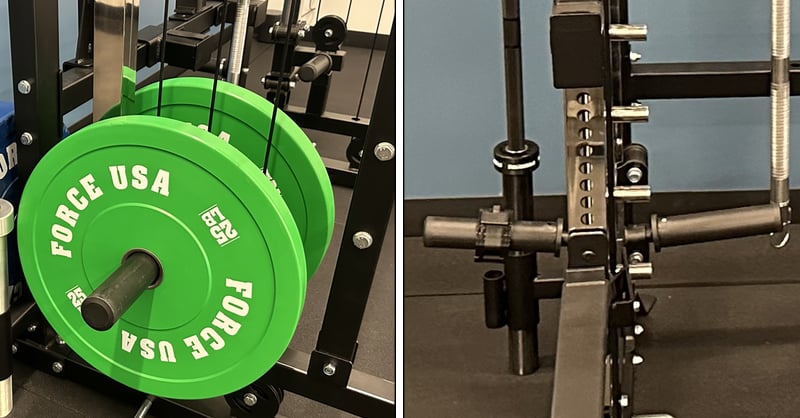
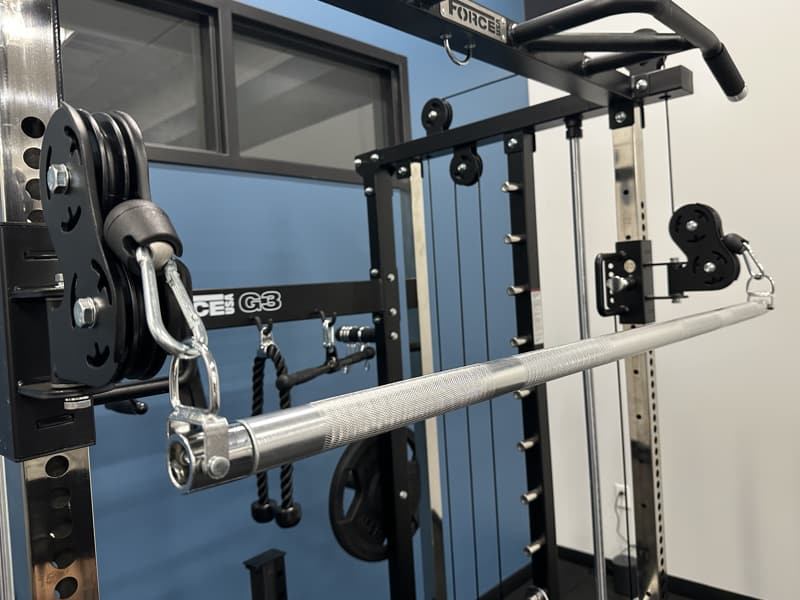
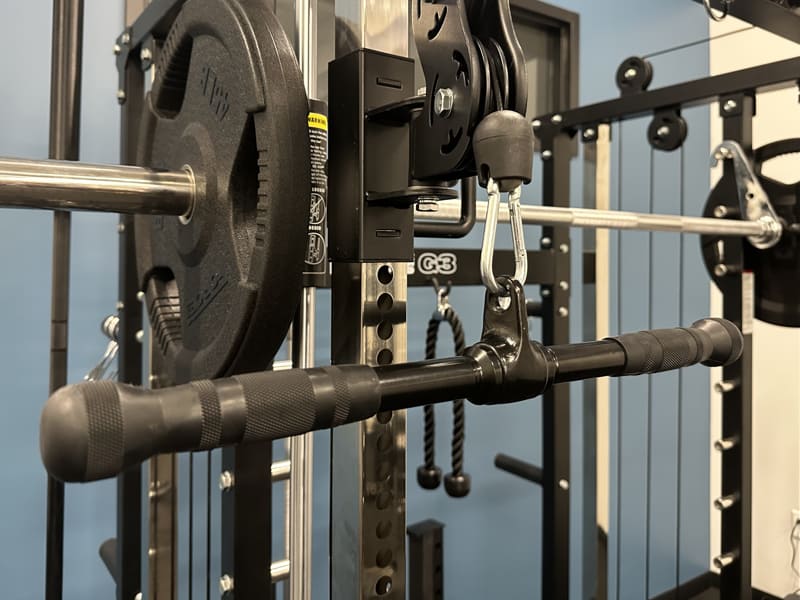
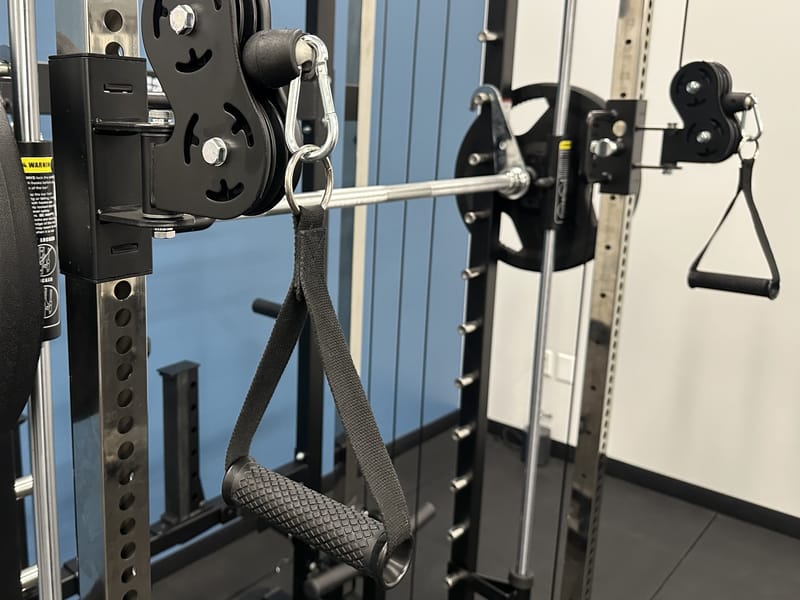
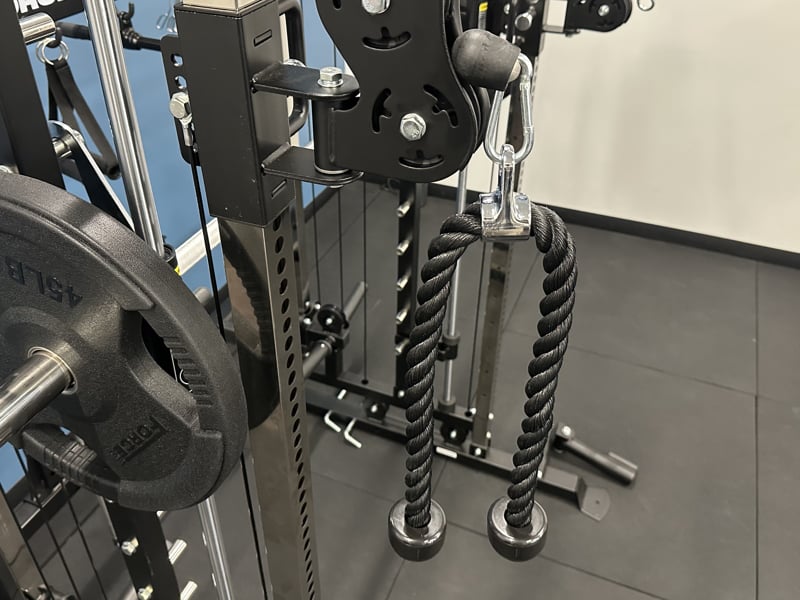
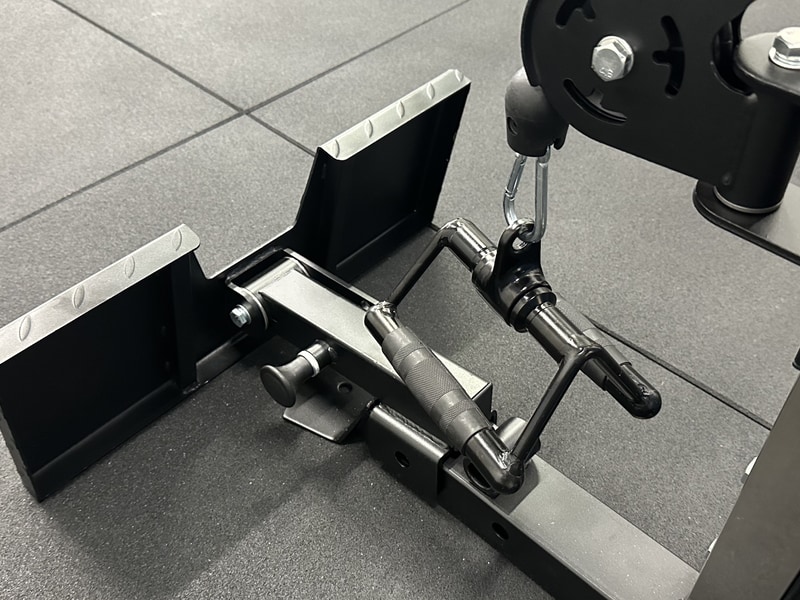
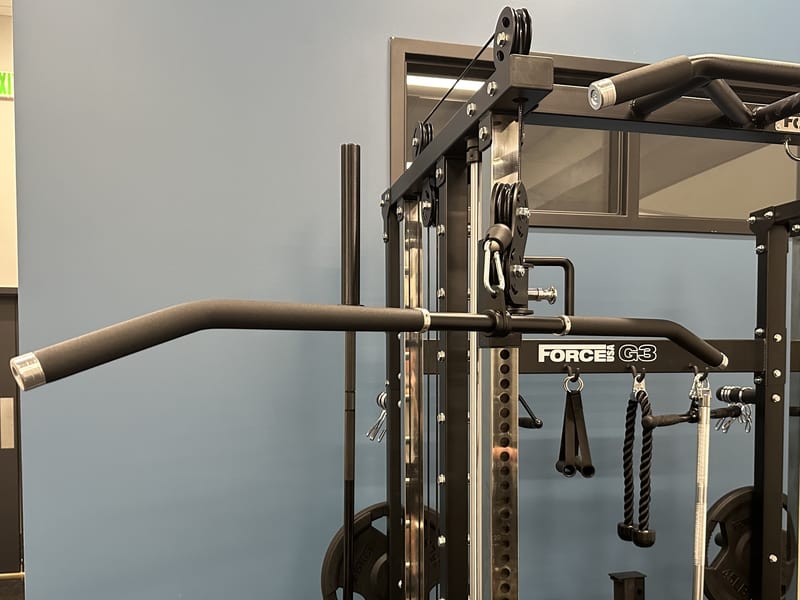
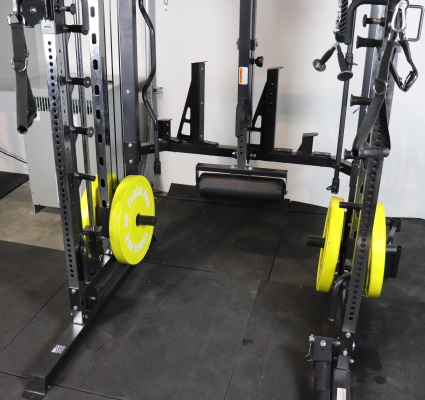
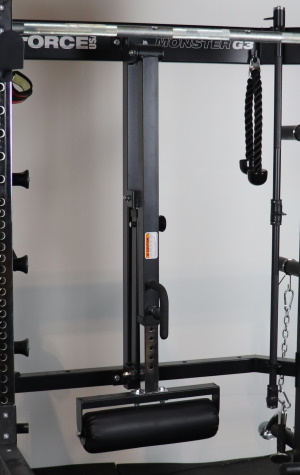
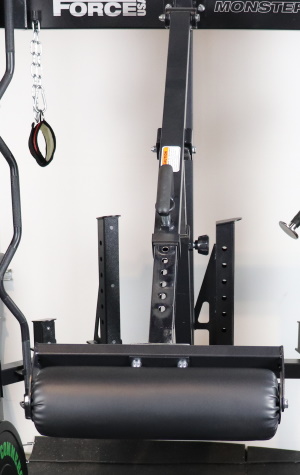
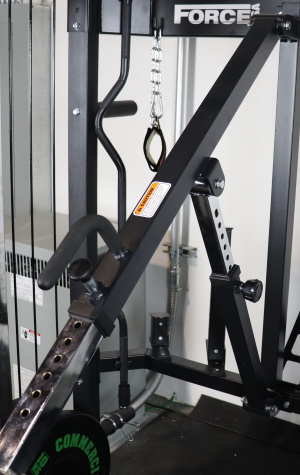
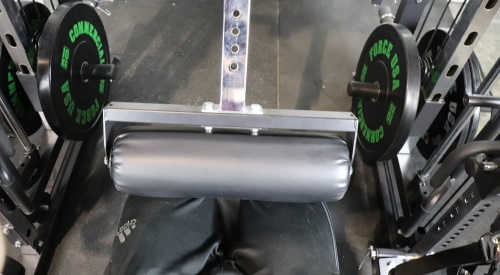
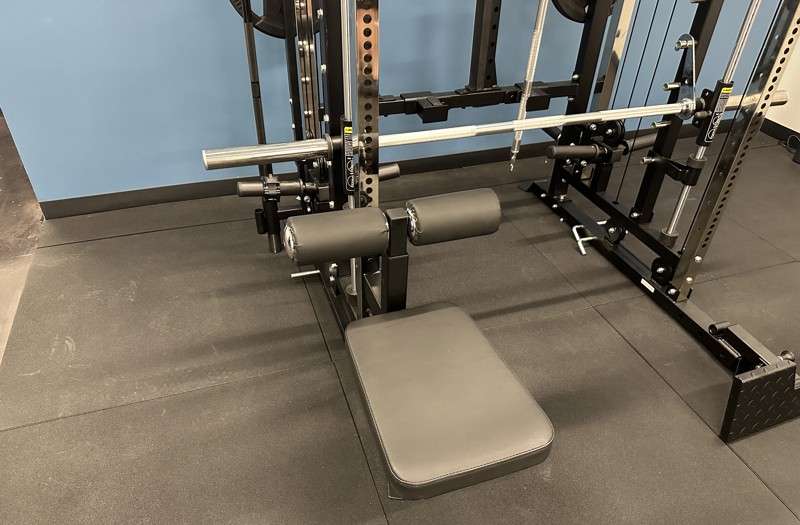
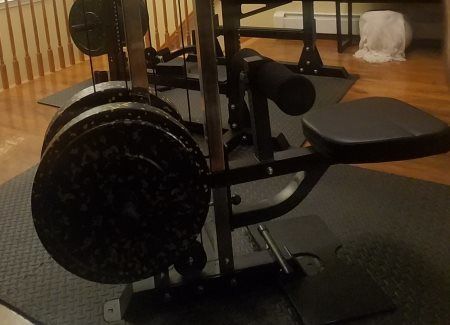
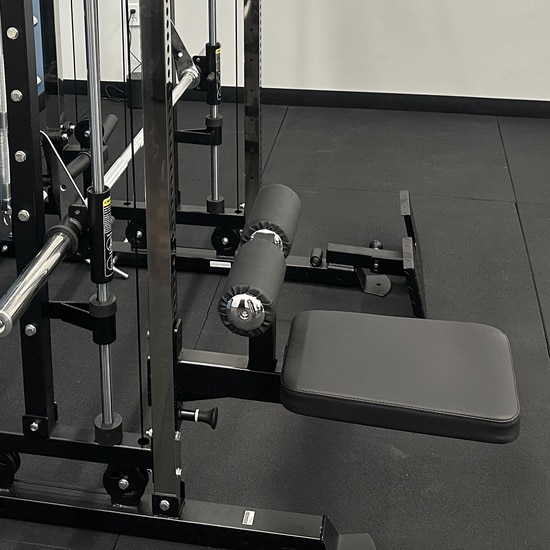

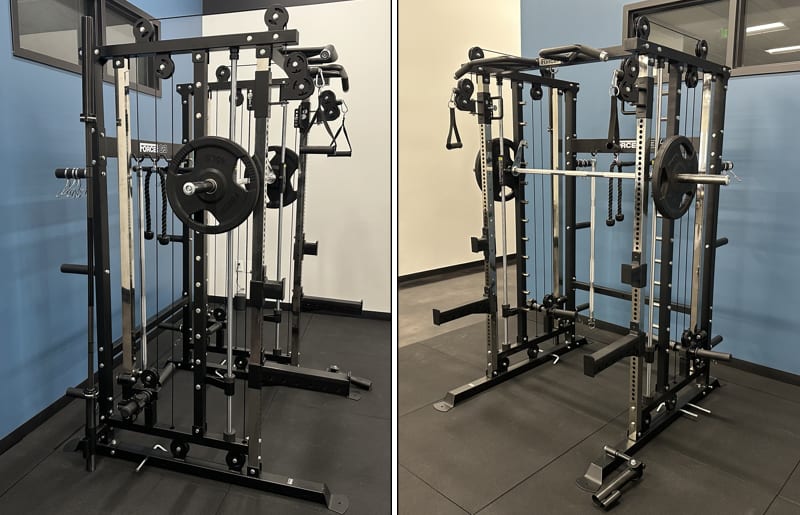
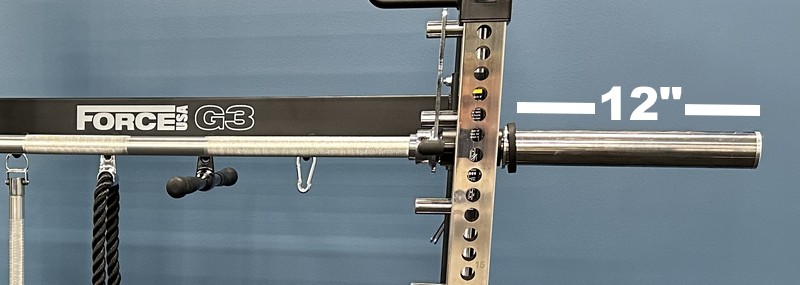
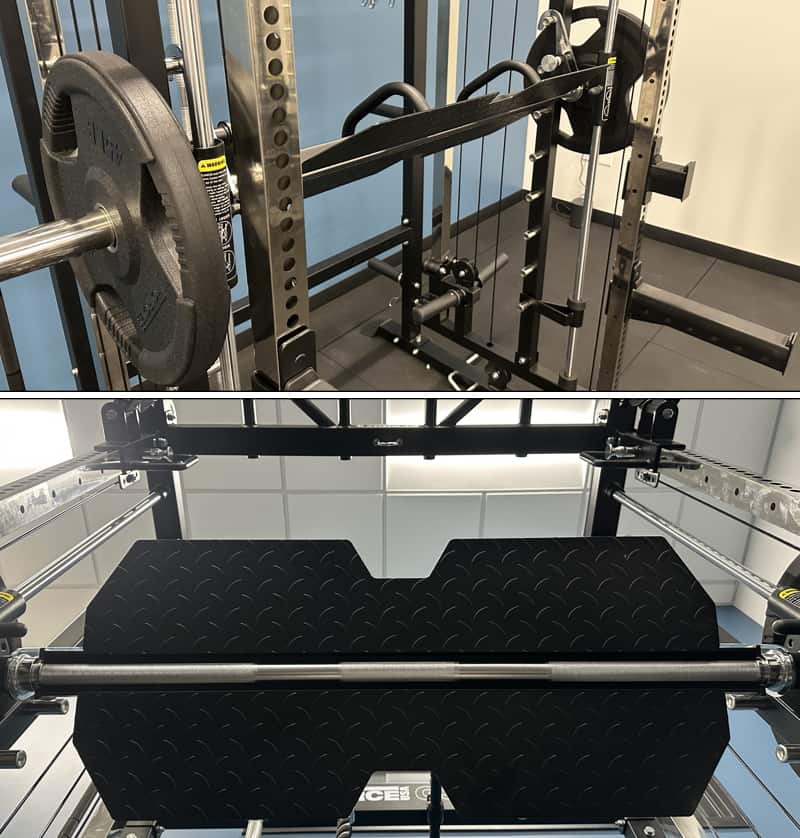
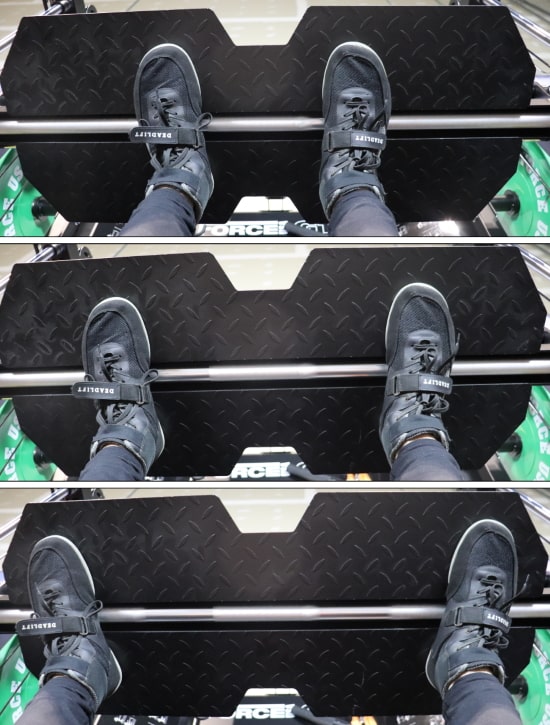

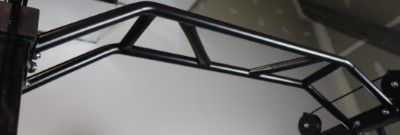
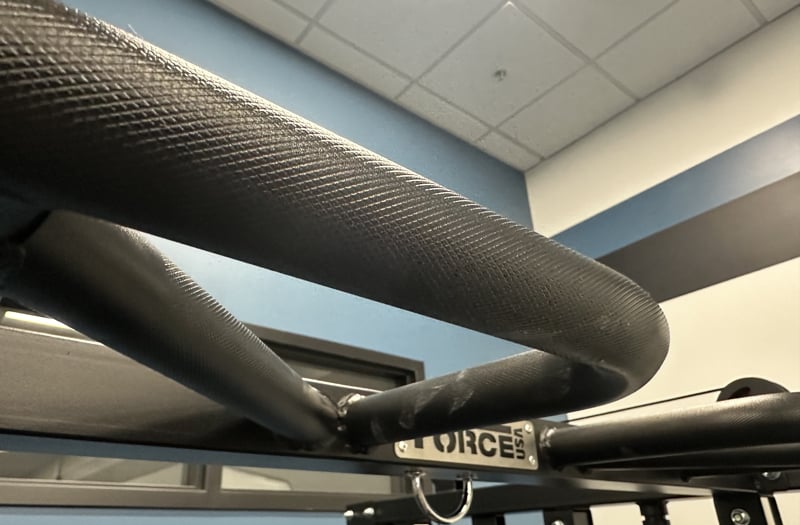
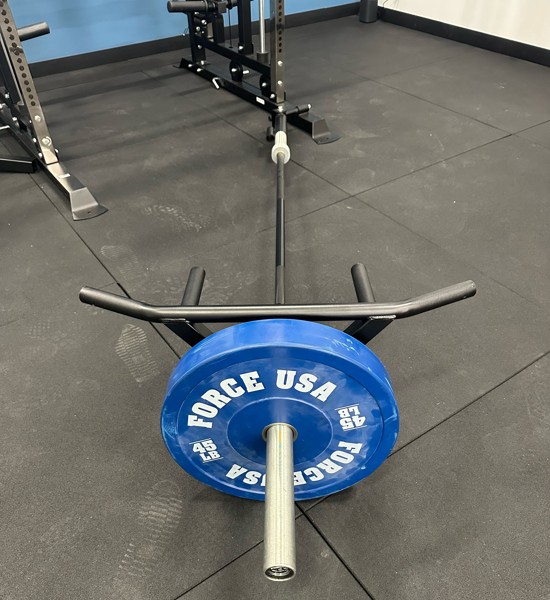
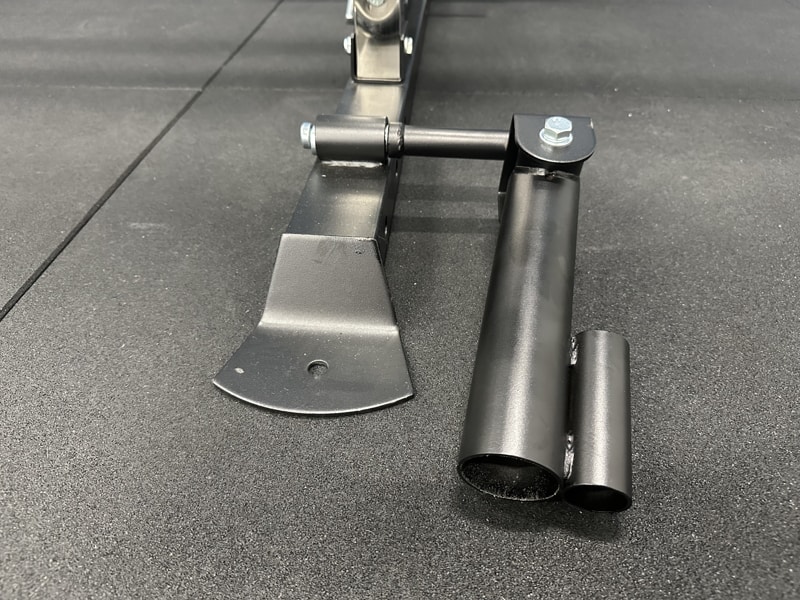
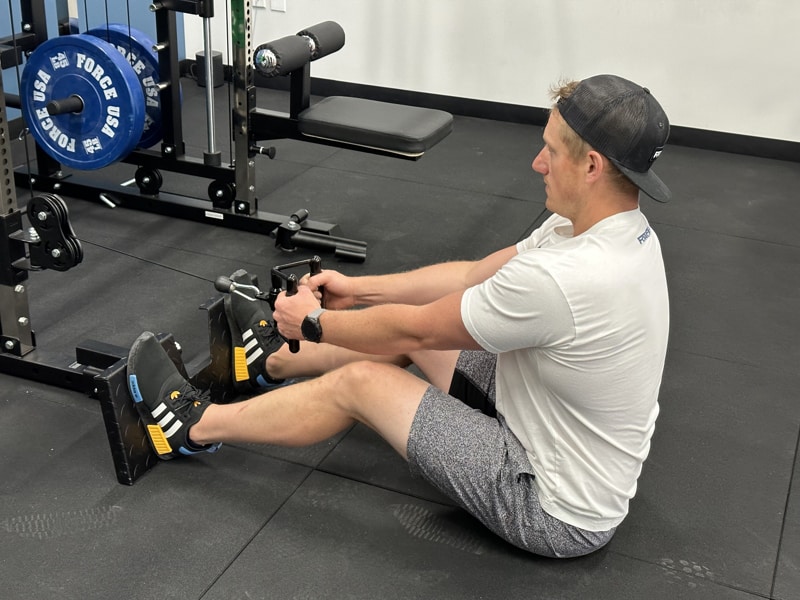
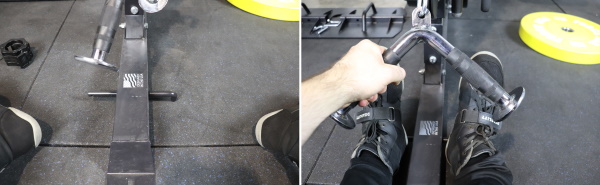
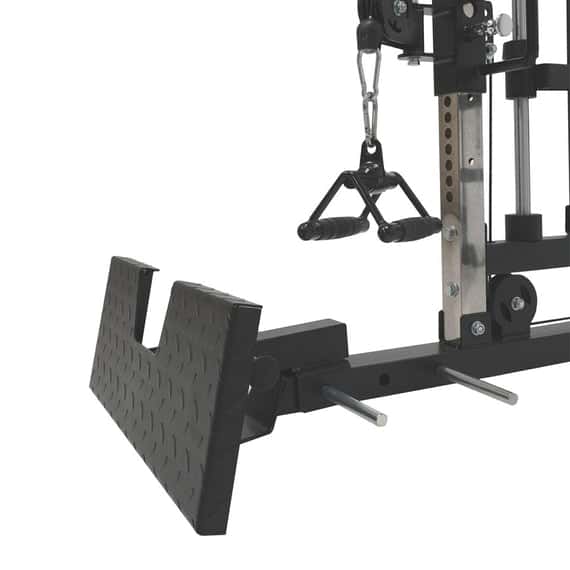

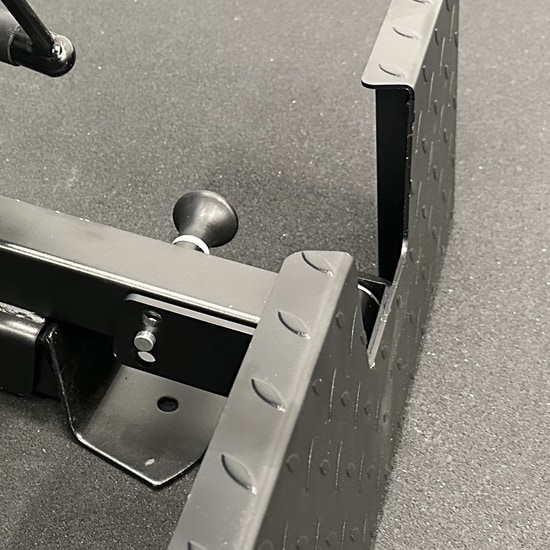
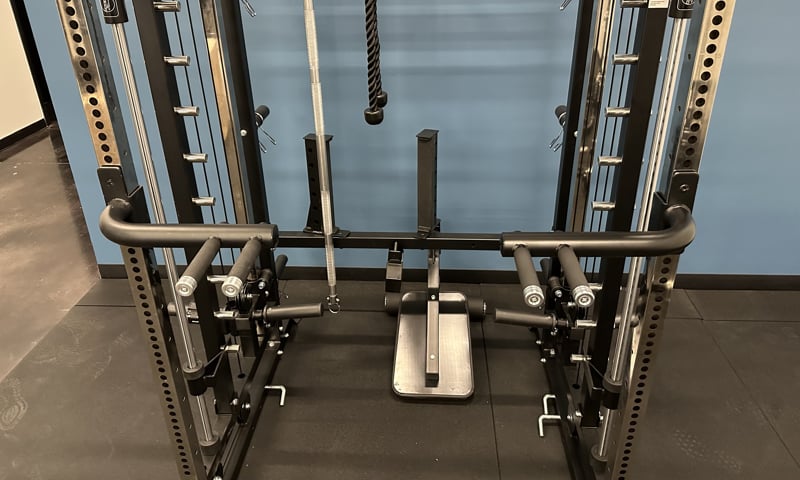
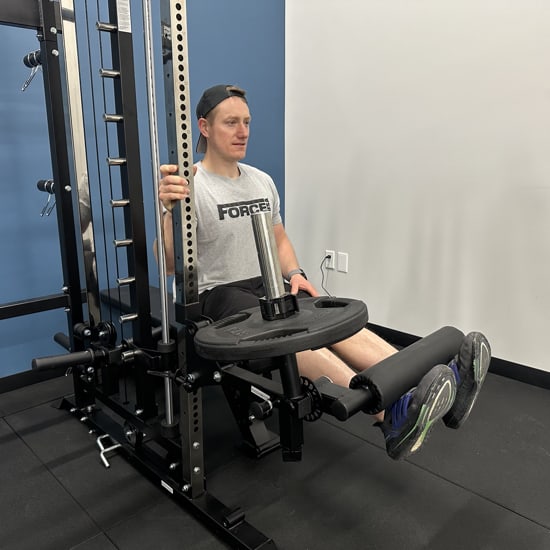
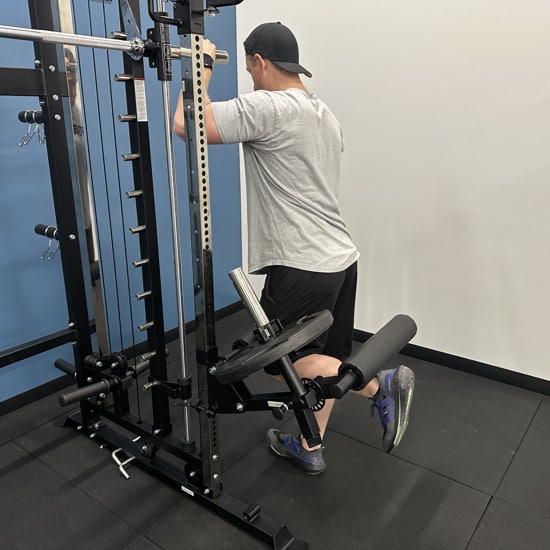
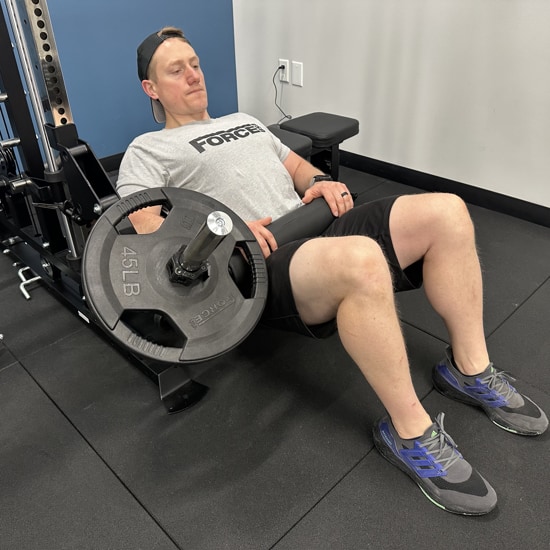
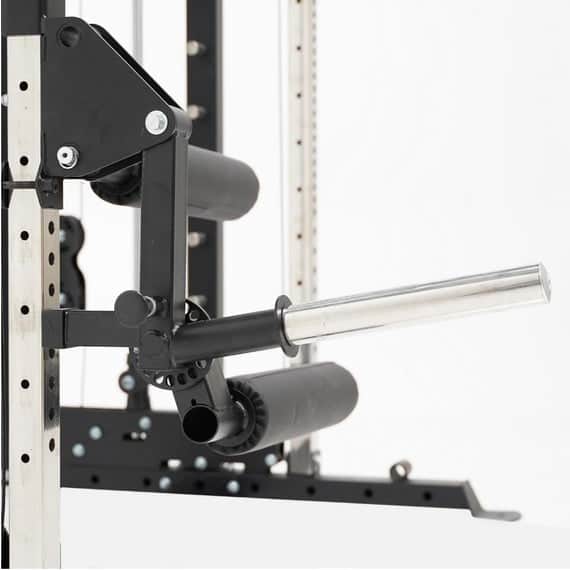
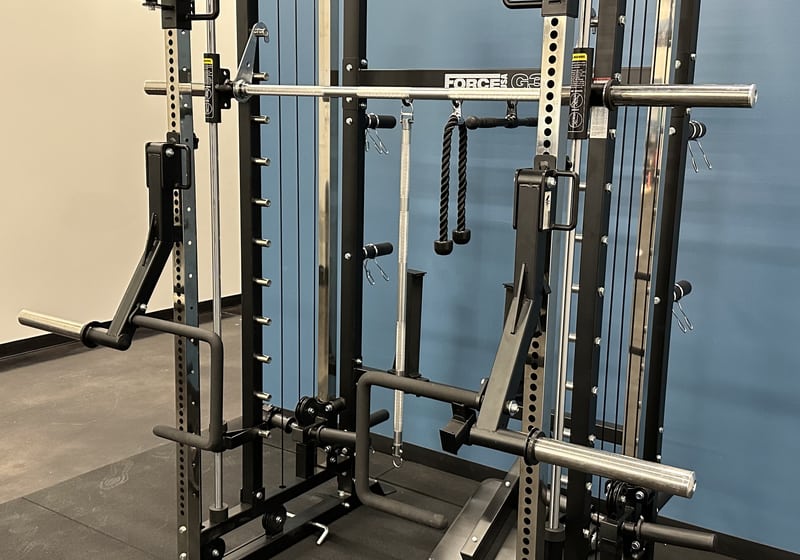
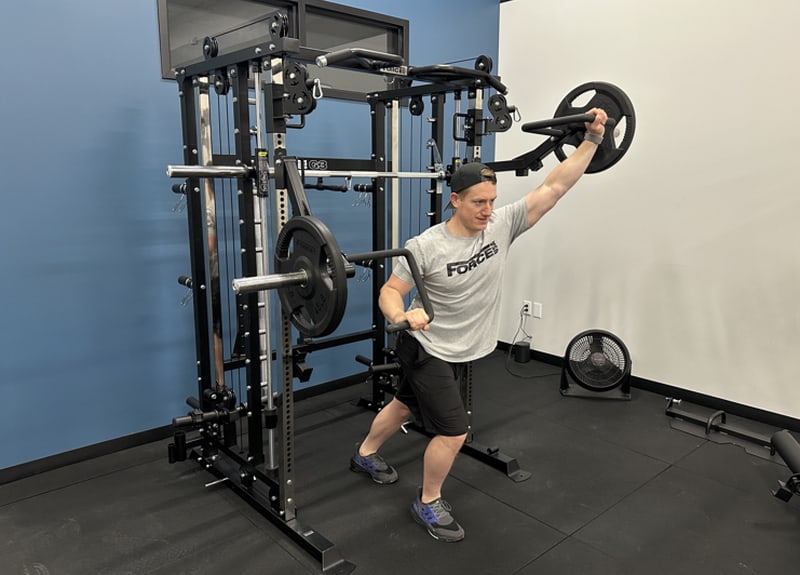
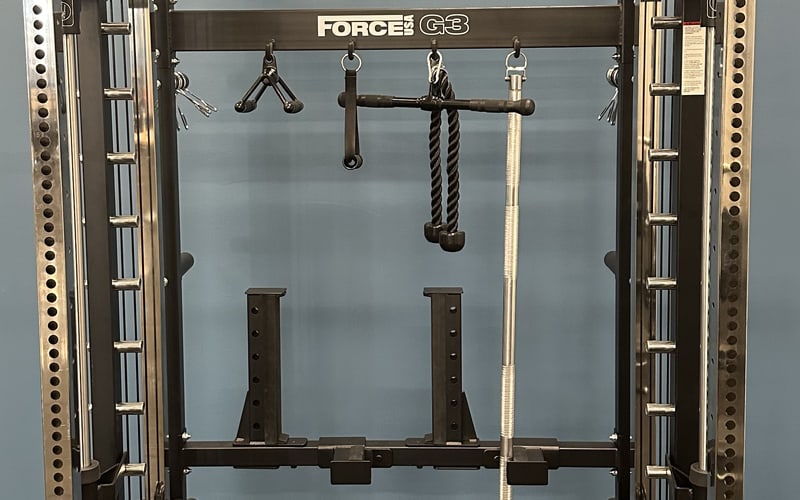
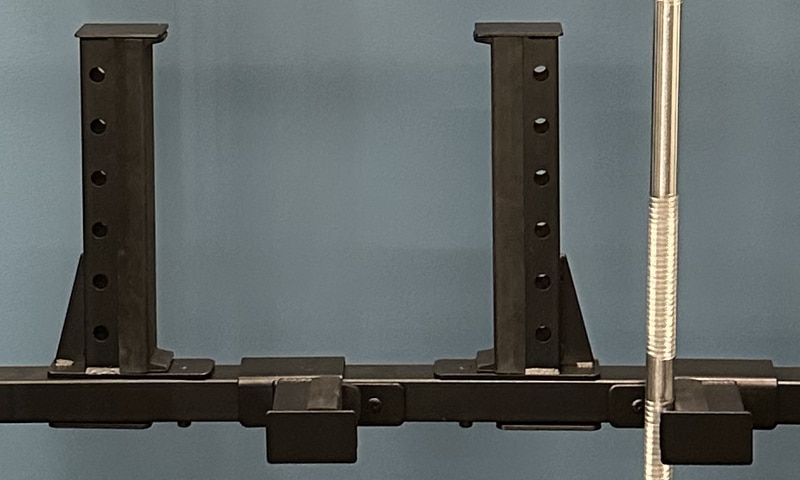
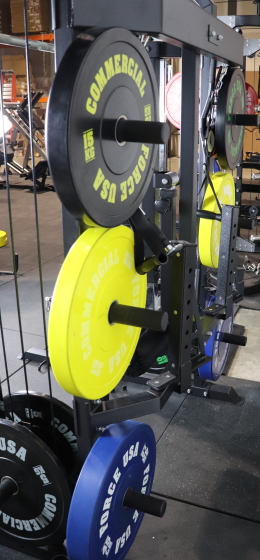
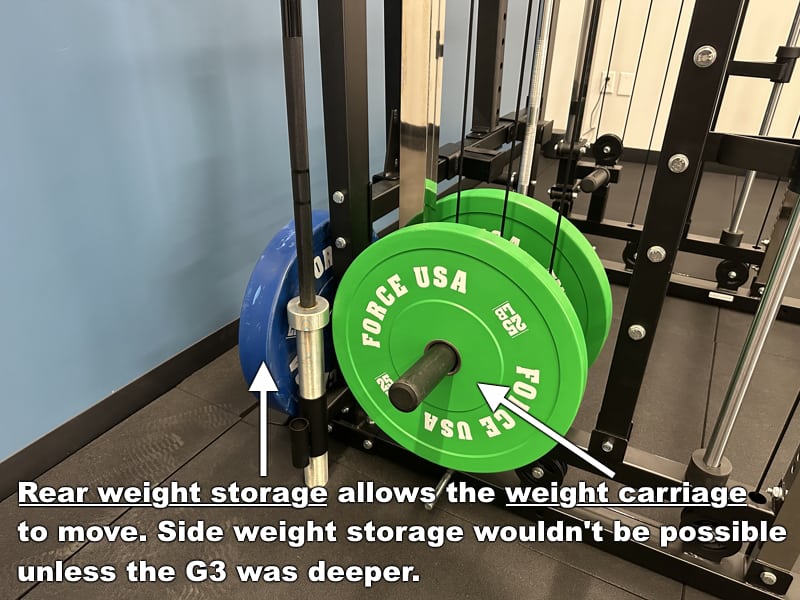

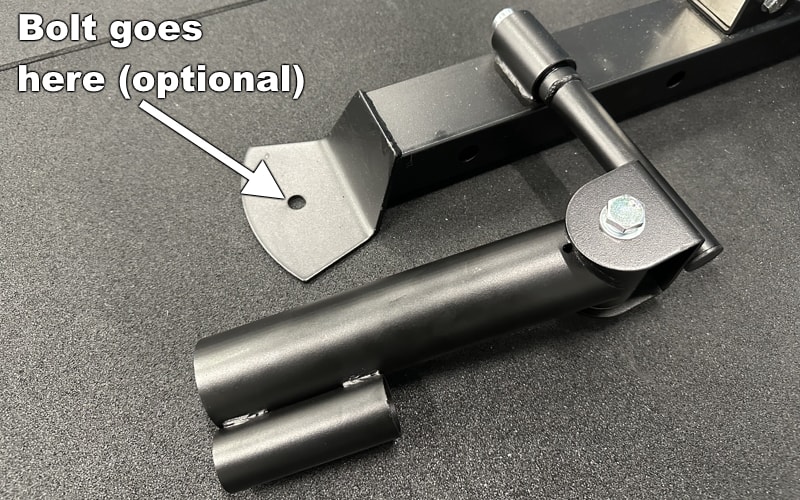
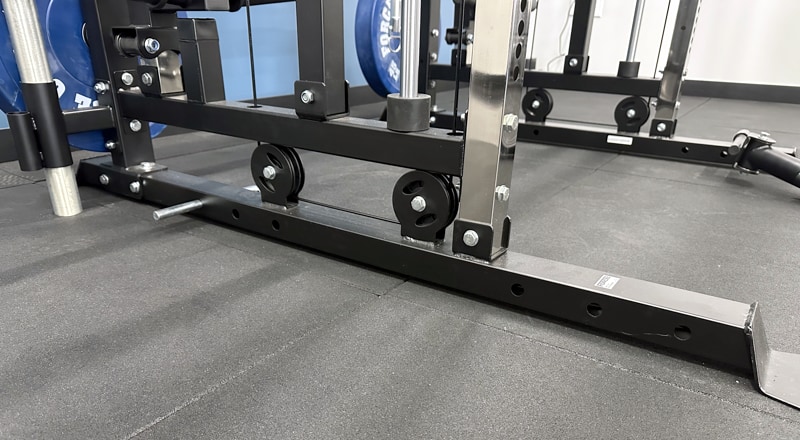
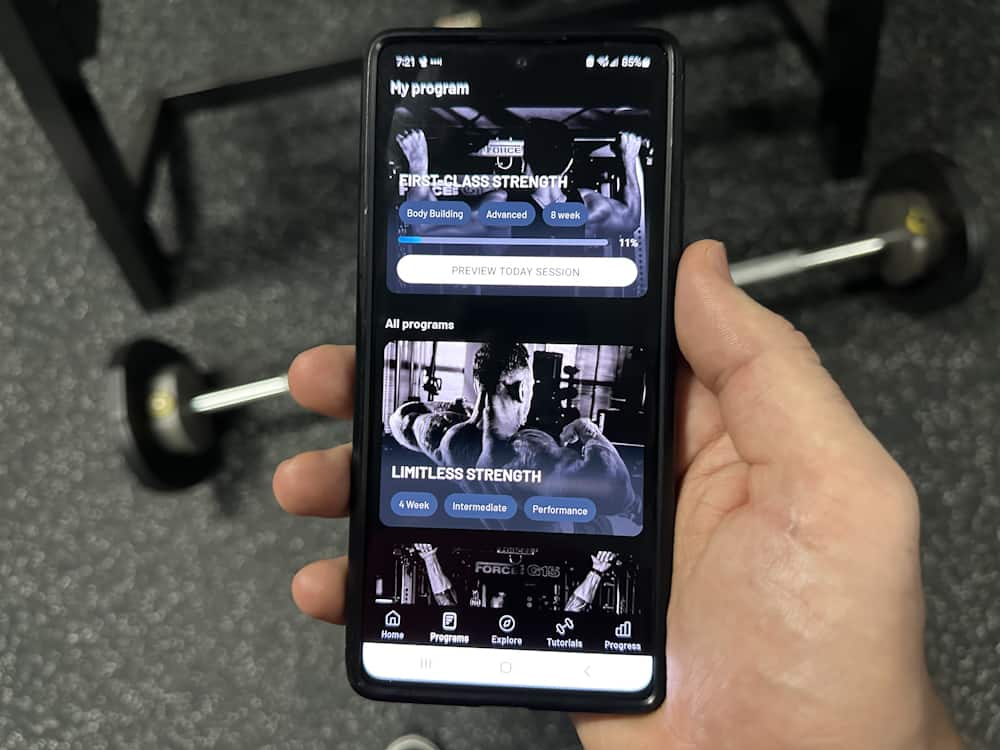
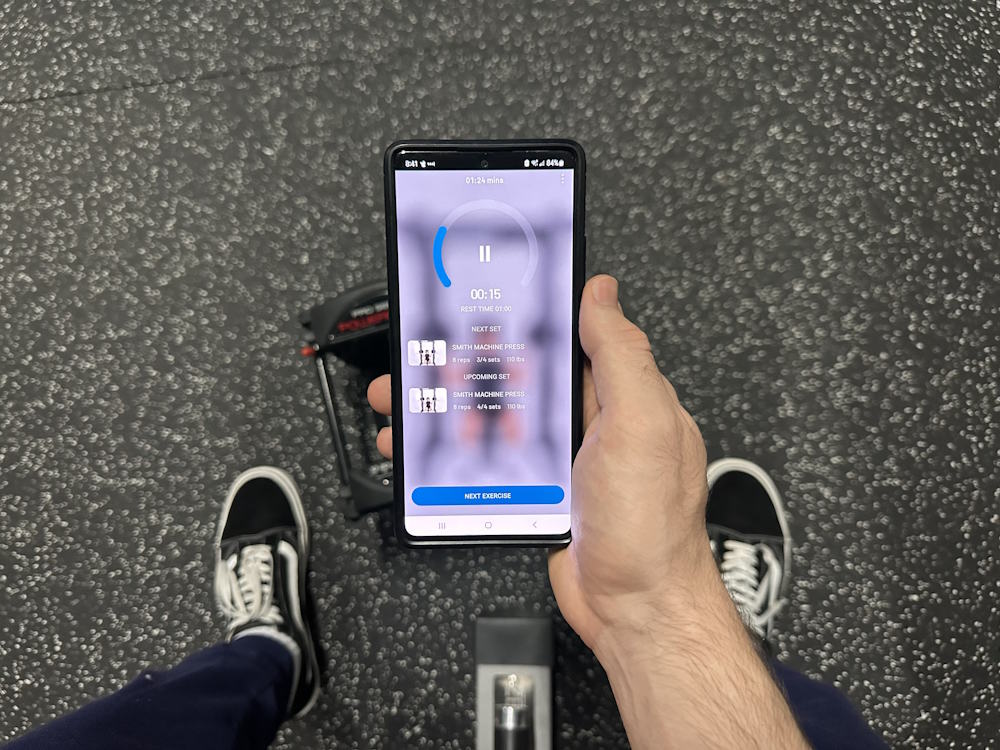

Impressive website. I just landed on it while doing a search for older men bodybuilding. I trained for a BB contest in my 40s, I am now 10 yrs older, and am still loving the challenge. I hope to visit your website again to see what it has for a guy like me, but keep up the great work. Saludos!
Does the Smith machine have a locking mechanism on both side ends to secure it from moving when using the leg press plate? I didn’t even know it had this feature. How much play or movement was there when it was all locked into place?
Hi Jason, I assume you’re talking about the feature shown in the image below, where you can insert the pins through the machine hooks to prevent the Smith bar and leg press plate from rotating — correct?

If so, then the answer is YES. There are 2 pins, and you can insert one on each end of the Smith bar.
If you were to try to rotate the Smith bar with no weight on it, there would be only a very small amount of play. When you have weight on it and are using the leg press, you won’t feel any play there. It’s very secure.
I also didn’t know about this feature until one of the Force USA guys pointed it out to me, and I was pleasantly surprised. It’s a smart design element and a handy little feature to have.
With the roller bearing system. I’ve never seen this type of system before , only linear bearings personally. I do wonder how they feel, and the level of drag is difficult to get a sense of without using it. You did already say there’s a small difference from linear systems, could you elaborate any further on that if possible?
It’s hard to describe. But I’ll try. When you’re pulling the G3 Smith bar up, you can basically feel the rollers the spinning. It is not a type of “drag” where the bar is catching or skidding intermittently on the track. Rather, it’s more of a “soft friction” that’s consistent throughout the motion.
It’s almost like it adds a very light tension to the bar…but it’s a consistent light tension throughout the range of motion. You could almost call it a “smooth drag”, even if that term is kind of an oxymoron. This consistent friction/tension makes it non-disruptive to your lifts. Of course, a bearing system would have no added tension because of less friction, but the roller bearing system is decent and definitely gets the job done.
Also, it’s worth noting that the drag is less apparent as you load on more weight.
Hopefully, this description gives you a better idea of the G3 Smith machine’s feel!
I can’t find anywhere how heavy the unit is.
Can you tell me more the weight of the machine?
Hi Niels, the Monster G3 unit weighs 340 lbs. In comparison, the G6 weight 940 lbs, the G9 weighs 540 lbs and the G12 weighs 950 lbs.
I noticed the dip attachment is still not available for the G3. Is it possible to line up the smith bar and barbell to form parallel bars for dips?
That wouldn’t really work, since the grip width would be too narrow if you put the barbell in the j-hooks, and too wide if you put the barbell on the safety spotter. On top of that, the Smith bar would likely be either slightly lower or slightly higher than the barbell, depending on which height you set them.
It might work better if you had two barbells, and you put one on either end of the safety spotters. Though, even that might be too narrow.
I’m sure Force USA will release the G3 dip attachment soon. But in the meantime, there’s always bench dips!
Do you think the following dip handles can now be use to G3?
FORCE USA Dip Handle
FORCE USA MyRack Dip Handle Attachment
If I look at the holes in the G3 frame closely seems like it is possible to retrofit it as an alternative?
Well, I didn’t personally test it, but the MyRack Dip Handle could potentially be retrofitted (if you know what you’re doing) to work on the G3, because:
You also mentioned the “Force USA Dip Handle.” I Googled that and found a dip handle that looks like it uses 1″ diameter peg to install onto a rack. If that’s the one you were referring to, there’s no way it could work since the G3 has 5/8″ holes.
Lastly, as you may already know, Force USA is working on a G3 dip attachment. It’s currently in development and will be released in the not-so-distant future (no date announced as of yet). So, another option is to get the G3 unit now, then buy the official dip attachment when it’s available. Of course, I understand wanting to find a DIY workaround if dips are essential to your training 😀
Outstanding review. Possibly the most thorough review of a product that I’ve ever been interested in.
Thanks, Matt!
The G3 leg attachment that you show in your review looks a lot wider than the one offered on the website for the G3. Did they change the width of the leg attachment?
The leg press plate you’d receive is the wider looking one that’s shown in my review. It is 29″ x 16″. The video on the Force USA site shows an older version of the G3 unit, which had a smaller leg press plate. And as for the picture on their site, it’s either the angle of the photo that makes it look smaller (or possibly it’s a shot of the older version).
In any case, I reached out to Force USA and confirmed that anyone who orders the leg press attachment will indeed receive the large (29″ x 16″) plate.
Thats wonderful! Thank you for the prompt reply and for your wonderful review of the product. Im sold!
Fantastic review, very comprehensive. I am seriously thinking of upgrading my current force USA rack to a G3 (or an Armortech F30 Pro functional trainer) and you’ve certainly cleared up a few queries I had about it.
Do you happen to know the weight rating on the side pegs? I have done a bit of research but cant seem to find it.
thanks
Matt
Thanks, Matt. When you say “side pegs” are you referring to the Smith machine? If so, the Smith machine’s total weight capacity is 770 lbs. So, to get the weight capacity for each side, you’d just divide by 2 (i.e. 385 lbs per side).
But maybe you mean the weight holder pegs on the pulley system? If so, I don’t think there is a stated weight capacity rating for those. But they’ll definitely be able to hold as many weight plates as you can fit them — Each peg is 6 inches long, and each pulley has 2 pegs, so it can hold at least as much weight as you can fit on that. If this is what you were asking about, let me know and I’ll see if I can reach out to Force USA to see if they have an actual number for weight capacity on this. Though it’s not a common spec on any system.
Hi Alex,
Thanks so much for your reply. I was referring to the pegs on the pulley system, I was a little unclear sorry. I was just thinking about when using it for last pull downs. If the pegs are 6 inches deep and I could get 3x25kg plates each side that’s a total of 150kg (330lb) which at a 2:1 ratio would feel like 75kg which is sufficient for me. My preference is for single pulley pull downs so I can utilise the lat pull down seat. Thanks again for answering my question and a great review.
Hi, love the review. Does the Smith machine bar security hooks have a handle? Or do you need to actually grab the hooks with your fingers (if you know what I mean)
There is a handle, which you would use if you performed the leg press laying on the floor, since the handle is located at the bottom. See the handle below:

However, if you prefer to do leg presses lying on a bench, then you would grab the hook itself. It’s very easy to do this as there’s plenty to hold onto and it’s not hard to swing the hooks in and out of place. As far as safety, you would simply want to grab onto the hooks below where you’ll be racking the weight so you don’t accidentally pinch a finger — though, you would naturally grab the hook at a lower position since your legs will be extended when racking/unracking.
King, I’d just like to say thank you for this in depth review and appreciate you getting back to me with all my questions. I love how you are detailed about things as am I.
I’ve told others about you and how you are friendly and informative about things.
I had so many questions and you def made my decision on purchasing the G3 with a clear view on things. Cheers brother. Melbourne Australia. Antonio’s (Hercules) 🙂
Thanks for spreading the word! I’m happy to help. Enjoy the G3.
Can someone work the smith machine side, say doing squats while another person works with the cables? I ask because my wife and I like to workout together and want to make sure its possible. We have a marcy system now and would like to upgrade but do not have a ton of space.
The smith machine and the cables run on two different weights so you can make it work as long as they give one another some space.
This is the BEST WEBSITE EVER!! Thank you for replying back to my comments on YouTube. Super helpful info on the pulley row exercise workaround. One more question – you mention that the cables can extend farther than the other models. If you just want to do cable cross overs or something that does not require distance, will it sustain tension or do you have to pull it out all the way? I ask this because my garage is small and I will not have that extended space if I have to pull all the way out in front of the rack. Thanks again!!!
Thanks! If you just want to do cable crossovers (or any other exercise that doesn’t require the full cable length), yes it will sustain the full tension of whatever you select on the weight stack. You don’t have to pull the cable out all the way to feel the full resistance. So you won’t have an issue in your small space.
Awesome!! Thank you for your great support!!!!!
Great review, I’ve been eyeing this for awhile and your review was the most comprehensive. I’m sold! We just bought a house with three car garage So this would be perfect!
Thanks, Tre. This will be great for your new garage gym! I know you’ll love it.
Great review – do you know if you can move the Smith machine pole out of the way when doing free weight barbell bench presses and having someone spot you? It looks like the smith bar would be in the way of someone spotting you.
Yes, you can rack it at the highest setting near the top of the machine. That will allow your spotter to get behind you for free weight flat barbell bench press.
I’ve already asked a question previously, but ill say again….Great review!
I have actually gone ahead and purchased a G3 and am just awaiting delivery. Have you any suggestions on doing dips on it?, seems like a missed opportunity that they didn’t initially include a dip attachment and haven’t since come up with one.
Yeah, I know they said previously that a dip bar in was in development. Of course, I’m sure all the craziness with increased demand / supply issues has thrown off some of these plans. In any case, my best advice for simulating dips on the G3 would be to use the functional trainer. Basically, you’d stand or sit on bench in between the 2 cable columns. Using a d-handle on each side, you’d start with your arms back and elbows at 90 degrees like the position you’d be in at the bottom of a dip. Then press the handles down to mimic the motion of a dip, before returning to the start position. Angle your torso more forward or more upright to emphasize the chest or triceps more.
Hi Alex, thanks the reply :). That’s great advice on how to do a dip style exercise, I hadn’t thought of that! Once my G3 (finally) arrives I’ll be sure to try it. Thanks again.
Matt
Anytime, Matt! Enjoy the G3.
Recently purchased the G3 and love it overall. However, I’m getting uneven drag when I use the included lat pulldown bar and attach to both pulley systems. Even if I load weights evenly across all four horns, the right side drags. Any thoughts about how to address this? (Love this site, BTW.)
Alex,
Great review. How would you rate this unit in terms of build quality? It seems very reasonably priced for the number of features, particularly when comparing to other manufacturers. Eg., Is it a tank or does it wobble? Does it feel sturdy?
Also, what are your thoughts on using the smith for bench press, squats, and dead lifts? My son is just getting into lifting and I want to get him something that’s safe but let’s him do all the necessary exercises. The smith concept appeals to me in terms of safety, but I get that it’s a straight movement and so might not be perfectly natural or require use of stabilizing muscles. I’m also in my 40s and think I’ll be more inclined to do exercises on a smith than a free barbell. Am I making sense or am I thinking about this wrong?
Thanks so much!
Thanks!
Hey Daniel, overall the build quality is good as for as home gym equipment goes. It’s not to the level of commercial quality equipment, as it’s not designed for those environments.
As far as the rack/main unit, no it does not wobble, and is quite a sturdy unit. As I mentioned in the review, you’ll notice some sway on the lat pulldown seat as you lean back during lat pulldown reps. Example of other areas where you’ll notice the less-than-commercial quality are the plastic Smith machine sleeves; and the weight holder brackets for the pulleys are on a square tube, which makes it less smooth compared to the double guide rods you see on the other G-Series units as well as commercial cable units.
That said, the pulley motion on the G3 is NOT “rough”; in fact, most home gym lifters will be very happy with the smoothness of the G3 cables. But it’s nonetheless not as smooth than the other G-Series units as well as commercial cable units.
As far as using the Smith machine goes for exercises like bench press, squats and deadlifts go, it’s possible to do, but let me tell you my thoughts/insights:
In general, I am a fan of Smith machine exercises, but I find them more effective as accessory movements to my main barbell movements. I understand some of this comes down to your personal training style and preferences, but I always encourage some free weight barbell training if at all possible! 😀
Thanks so much Alex! Keep
Up the great work on the site. You have a real talent for this and believe it or not it is hard to come by such thorough, clear, and unbiased reviews.
Thanks Daniel, that means a lot!
I just bought the g3 a few weeks ago. Asked customer service if the leg extension attachment will work with my device because on their website it only says for g9, g20 and other models but not g3. They said no. In your review you said it works, can you confirm that for me? Really confused and really want to buy the g20 dip bars, arm jammers and leg enhancement attachments. Thank you!
Hi Taylor, great question. I double-checked with my contact there, Dan, the product manager. He confirmed that the G20 upgrade kit will work on your G3 unit. The only thing to keep in mind, which you may have already read in this review, is that the jammer arms won’t fit on the uprights in the 2″ hole spacing region of the power rack. They will fit on the 1″ hole spacing area. So basically, you can’t use the jammer arms on the upper portion, but you can use them on the middle and lower portions. This means no standing overhead jammer arm exercises. There are no such compatibility restrictions with the dip bars and the leg curl/extension attachment.
Alex,
Great review! Do you know if the FORCE USA G3 UPGRADE KIT works with the Gen 1 model? Will the gen 2 lat pulldown upgrade work with the gen 1 model? Thank you.
Hey Ryan, the Gen 2 lat pulldown seat will work on the Gen 1 G3 since the uprights only changed on the top half in terms of hole spacing. I reached out to the Force USA product manager to verify the compatibility since I noticed that the upgrade kit product page said “Compatible only with Gen 2 / 2023 model” — but he confirmed it will indeed work on the Gen 1. Hopefully they update the verbiage on that page to reflect that.
Thank you for the response. Do you know if the the low row footplate will work on the Gen1 G3 model? Thanks.
Hey Ryan, the Gen 2 G3 low row footplate is also compatible with the Gen 1 G3. The way it attaches is with a band peg while straddling the foot of the rack, which did not change between models.
The leg press hand spotters from gen 1 do fit on the newer G3 and everything lines up properly.
Because the new leg press plate is so wide, there is less than 1″ clearance on each side between the retracted hand spotters and the edge of the plate but it still works beautifully.
I bought mine by accident not realizing it was for the older G3, but I am glad I did. I had to spend extra $ to get the new leg press plate, but having the hand spotters as well is so worth it.
That’s awesome to hear! Thanks for sharing as I’m sure others will appreciate it. I’ve updated the review to include that info.
Hello. I didn’t understand in which case the Smith machine is compatible or not with the standard weights between v1 and v2.
Can you clarify this?
The G3 V2 Smith machine only accepts Olympic-sized plates (~2″/50mm diameter), though you can use standard-sized plates on the G3 V2’s pulley system. On the old G3 V1, you could remove the smith machine sleeve sheaths and load standard plates, but that’s no longer possible on the newer version of the G3.
Please note that the holes in the G3 v1 are not 5/8″ (16mm) but 5/9″ (14mm).
I noticed this when I tried to mount the Jammer Arms on it. The 16mm pin supplied with it did not fit into the holes at all….
For your information, I measured everything with a caliper.
Thanks for sharing Nina, those are very helpful details.
Yes, this is important information. The entire article needs to be corrected. People will be misled into thinking that the G3 v1 has standard holes. Most accessories on the market are 5/8″, so this is an excellent reason to buy the V2 rather than the V1.