
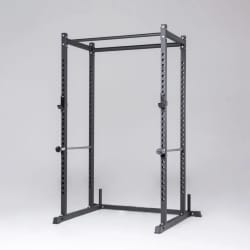
This page will tell you absolutely everything you need to know to select the best power rack for your home gym.
However, if you’re just looking for a quick answer, I’ve included my picks for the top 3 best power racks for the money, in the table below:
| Model | Best for | Rating |
|---|---|---|
| Best power rack for home gym owners who want a high quality heavy duty 3x3 rack with 1 inch holes and tons of optional accessories, at a price that isn't cheap, but also isn't prohibitively expensive | Rated 5 out of 5 in Power Racks |
|
Force USA MyRack Power Rack | Best power rack for home gym owners on a budget who want a modular power rack with the ability to have a full cable crossover setup as well as lat pulldown/low row setup. | Rated 4.5 out of 5 in Power Racks |
| Best power rack for home gym owners who want an affordable 3x3 rack with Westside hole spacing that doesn't need to be bolted down due its flat foot design | Rated 4.5 out of 5 in Power Racks |

If you’re in the process of buying a new power rack for your home gym, but aren’t sure exactly what you need/want, then keep reading. You’ll find answers to all of your questions here.
This is an in-depth guide that will help you answer your overarching question: “What is the best power rack to buy for me?”
That is, this guide will help you make a smarter purchase for your specific situation. For example, I’ll provide specific power rack reviews and recommendations and tell you which features/options to look for, with consideration of the following factors:
- Lifting experience: This includes beginners, intermediate and advanced lifters alike.
- Budget: From low budget to money-to-blow budget.
- Space considerations: Whether your home gym area has a limited amount of floor space and low ceilings, or if you have virtually unlimited space for equipment.
- Features & options: There are certain categories of features that all power racks share. However, the specifications of these categories can vary significantly between racks, which may make or break your decision. Also, some racks have different options or accessories that you can purchase separately. So if there’s a specific accessory you want, make sure the rack you’re considering has it.
I know that a lot of people reading this guide — maybe even you — are going to want to jump straight to my specific reviews of the best power racks. As such, I’m going to put my top power rack recommendations first.
After that, I’ll go into detail about all the standard power rack features as well as the different options/accessories that are commonly available on many racks. Specifically, I’ll tell you what features and specifications to look for (depending on your situation) and the benefits of different power rack options/accessories.
NOTE: This guide talks about power racks only. That is, 4-post or 6-post fully enclosed cages. I won’t be discussing half racks, open racks, generic squat racks, squat stands or all-in-one gyms (like the Force USA G20, Force USA G12, Force USA G9, Force USA G6 and Force USA G3).
RELATED: If you’re also looking for a weight bench to go with your new power rack, be sure to check out my Weight Bench Reviews & Buying Guide as well as my other guide to adjustable weight benches.
Table of Contents
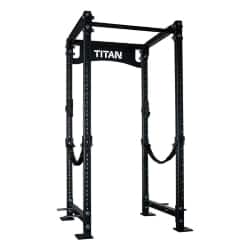
Low Budget: Best Budget Power Rack
If you’re on a lower budget, the power racks below are sufficient in terms of quality and available options for beginner to intermediate lifters. However, they may leave you wanting more if you’re an advanced lifter.
| Model | Best for | Rating |
|---|---|---|
Force USA MyRack Power Rack | Best power rack for home gym owners on a budget who want a modular power rack with the ability to have a full cable crossover setup as well as lat pulldown/low row setup. | Rated 4.5 out of 5 in Power Racks |
| Best power rack for home gym owners who want an affordable 2x3 rack with Westside hole spacing, a sumo base and lots of attachments available | Rated 4.5 out of 5 in Power Racks |
|
| Best power rack for home gym owners who want a bare bones power rack at a great price with only a few options for attachments | Rated 3.5 out of 5 in Power Racks |
|
| Very similar to the Rep PR-1100 (above) in that it's great if you want bare bones budget rack, but with just the addition of extra barbell storage included | Rated 3.5 out of 5 in Power Racks |

Who Should Buy a Budget Power Rack?
Budget power racks are perfect if:
- You’re relatively new to lifting and you just want something good enough to get the job done.
- You don’t care about having all the bells and whistles; you just need something that allows you to do the basics.
- You simply can’t afford a mid-range or premium power rack at this time, but you need equipment that will allow you to squat, bench, etc. safely and effectively in your home gym.
- You’re NOT going to be squatting 500-600+ lbs (at least, not anytime soon). While some budget range racks could handle this amount of weight without issue, I would be wary about moving this amount of weight in many budget racks (even if they are rated for 600-1000 lbs.). If you’re this strong, you deserve a higher quality rack!
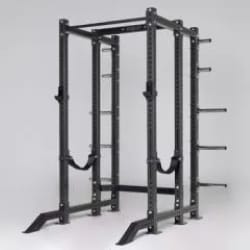
Mid-Range: Best Power Rack For The Money (Best Value!)
If you’re able to invest just a few hundred dollars extra into your power rack beyond the “budget” range, then you’ll get a lot more in terms of quality and available options.
In my opinion, these mid-range power racks provide the best value (i.e. you get the most bang for your buck). These racks could be used in commercial gym environments and last for years. But you can get this same quality at a relatively affordable price tag, for use in your home gym.
| Model | Best for | Rating |
|---|---|---|
| Best power rack for home gym owners who want a heavy duty and highly customizable 3x3 power rack with with Westside hole spacing | Rated 5 out of 5 in Power Racks |
|
| Best power rack for home gym owners who want an affordable 3x3 rack with Westside hole spacing and lots of attachments available, that doesn't need to be bolted down due its flat foot design | Rated 4.5 out of 5 in Power Racks |
|
| Best power rack for home gym owners who want a high-end heavy duty 3x3 power rack with 1 inch holes and plenty of expandability, at a mid-range price | Rated 4.5 out of 5 in Power Racks |
|
| Best power rack for home gym owners want a compact yet heavy duty 4-post 3x3 rack | Rated 4.5 out of 5 in Power Racks |
Who Should Buy a Mid-Range Power Rack?
You should buy a mid-range power rack if you want a well-constructed rack with plenty of options/attachments that you plan to use consistently for at least a few years.
A good mid-range power rack is an excellent choice if you’re an advanced lifter who moves a lot of weight.
However, even if you’re a beginner or intermediate who might be okay with a less durable and less feature-rich budget rack, you should still consider a mid-range rack under any of the following circumstances:
- If you can afford to spend a bit more
- If you want certain features and options only available on mid-range racks
- If you plan on using your home gym for years to come.
- This is an important point to stress. If you’ll be using your rack for a long time, you’re essentially making an investment. Accordingly, it’s smart to consider spending a little bit more now to buy something that can not only withstand years of heavy use but which can also keep you satisfied for years in terms of its features and options/accessories that expand its utility beyond just the basic functions of a power rack.
High End: Best Premium Power Rack
Premium racks are the best of the best in terms of quality and availability of options and attachments. These are the types of racks that you’d expect to see in sports training facilities and strength-focused commercial gyms.
| Model | Best for | Rating |
|---|---|---|
| Best power rack for home gym owners who want a high quality heavy duty 3x3 rack with 1 inch holes and tons of optional accessories, at a price that is quite reasonable (within the "high end" range, that is) | Rated 5 out of 5 in Power Racks |
|
| Best power rack for home gym owners who want a quality 3x3 rack with 1 inch holes that's made in the USA, and are willing to pay extra for the added build quality, without reaching the ridiculous price range. | Rated 5 out of 5 in Power Racks |
|
| Best power rack for home gym owners want a made in the USA 3x3 1 inch power rack with tons of customization and expandability options, and designed with details in mind. Must be willing to pay a lot for this level of craftsmanship. | Rated 5 out of 5 in Power Racks |
|
| Best power rack for home gym owners who want a 3x3 rack with 1 inch holes that's made in the USA with extreme build quality, including a fully welded frame and that's designed for use in athletic facilities. Must be willing to pay a very high price for the extra construction quality, while sacrificing slightly on customizability (e.g. no side holes on uprights) | Rated 4.5 out of 5 in Power Racks |

Who Should Buy a Premium Power Rack?
You should consider buying a premium power rack if you want to build a fully decked out home gym with top-of-the-line equipment that’ll last a lifetime of hard workouts. You should plan on using this gym for the foreseeable future (i.e. don’t get this rack if you’re thinking of moving in a couple of years or switching to a commercial gym). I recommend you also have at least a year of lifting under your belt just so that:
- you know you’re not going to just get bored of lifting and quit you’re familiar enough with training
- you know what you want/need out of a premium rack
Of course, you should also have enough space in your home gym area for a premium power rack. These tend to take up a lot of floor space due to their larger footprints. And most are 8 feet tall or higher, so you need to have high enough ceilings.
You should have a couple to several thousand dollars that you can afford to part with. Don’t go into debt to pay for it.
Conversely, if you’re rich and got money to blow, then by all means, ignore the earlier recommendations about waiting until you’ve been lifting for a while and being sure that you’re going to actually use your rack and home gym for years to come — If you’ve got lots of extra money and you want the premium rack, then go for it!
Even More Power Racks!
If all of the above recommendations didn’t do it for you, then you may just be too hard to please. 😛
Jokes aside, the above really is the crème de la crème for each price range…
…But if you did want to do further research before purchasing, I won’t stop you. In fact, I’ll help you! I’ve created a massive power rack comparison chart with hundreds of different racks and their accompanying features and specifications. (Note: it hasn’t been updated in a little while, so some racks are no longer sold, and there are new racks on the market that aren’t shown in the chart.)
Features That Come Standard On ALL Power Racks
Hole spacing
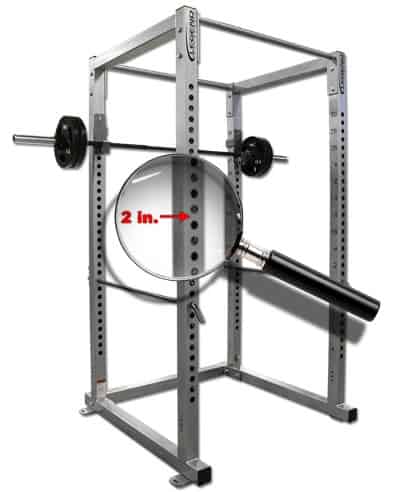
Hole spacing refers to the distance between the holes/notches on the power rack uprights, which the j-cups and safety catches insert into.
Hole spacing varies between power racks, but it is typically between 1 to 4 inches. I do not recommend buying a rack that has hole spacing greater than 3 inches.
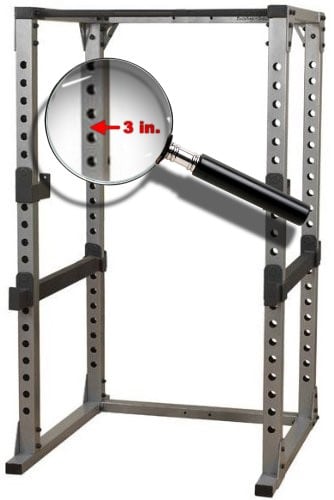
3 inch hole spacing is fine for most exercises, but could it could be less than ideal on some exercises (e.g. bench press) where smaller increments would allow for better positioning of the j-cups and safety catches.
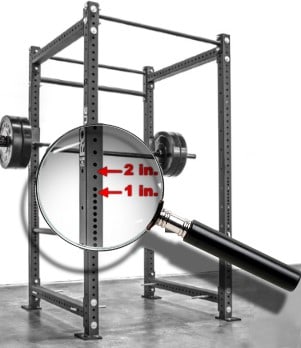
As such, 1 or 2 inch hole spacing is ideal.
Some racks have what is known as the “Westside hole pattern.” This refers to a rack with 1 inch hole spacing in the lower-middle part of the rack, and 2 inch hole spacing below and above it. The lower-middle part of the rack is where the 1 inch spacing would be most useful it allows you to use the smallest increments for positioning the pins and catches on bench press.
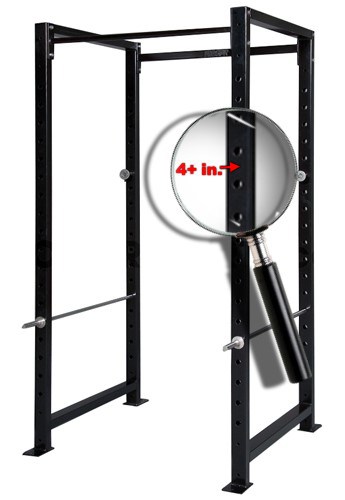
4 inch hole spacing isn’t the end of the world, but depending on the exercise, the pins or safety catches may be just too high or low for you to get into a good position without struggling.
For example, when unracking the bar for squats, you may have to go up on your toes if the pins are too high; or if they’re too low, you’ll have to bend down and quarter squat the weight up off the pins.
J-hooks
J-hooks are sometimes called j-cups or simply pins. They come in pairs. They insert into the holes on the power rack uprights and allow you to position the barbell at the desired height for the given exercise.
You “unrack” (lift off) the barbell from the j-hooks to begin an exercise, and you “rack” (set down) the barbell on the j-cups at the end of the exercise.
Types of J-hooks
There are a few different types of j-hooks/j-cups. I’ll discuss each below:
Rod J-hooks
If you only care about having basic j-hooks that will hold a barbell and a lot of weight, then a rack with a basic rod-style j-hooks will do the trick.
Standard J-hooks
Standard j-hooks refer to the basic style of j-hooks you see in most modern modular power racks. They have a flat and wide back and a flat bottom portion with an angled lip to prevent the bar from rolling off.
They typically have protective UHMW plastic inserts on the top and bottom, which are secured to the steel via screws. Ideally, the screws will be recessed below the surface of the plastic to prevent the screw head from contacting the barbell.
These are plenty strong for most people, but they’re not the strongest there is.
Sandwich J-hooks
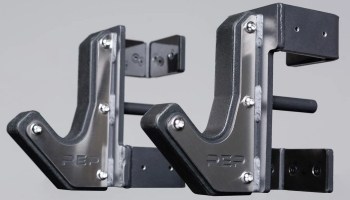
Sandwich j-hooks are the strongest type of j-hooks there are. These have a more robust frame that can handle more weight.
These are called “sandwich” j-hooks because the protective UHMW is sandwiched between the sides of the j-hook frame. One big benefit of this is that the screws/bolts used to secure the UHMW go through the side instead of through the top. This means they’re completely out of the way of the bar.
UHMW cores are used instead of UHMW inserts like on standard J-hooks. The cores allow the entire j-hook frame to be protected. Most importantly, this includes the lip of the j-hook and the underside (at least on most sandwich j-hooks).
The lip is exposed on some standard j-hooks. The underside of the j-hook is exposed on all standard j-hooks. It’s nice to have protection on the underside for those rare occasions where you hit the j-hooks from the bottom (usually on bench).
Another key design feature of sandwich j-hooks is that they’re narrower than the actual uprights of the power rack. This gives you a little extra side-to-side clearance to:
- Rack and unrack the barbell without having the barbell collars hit the outside of the j-hook.
- Rack the barbell without pinching your fingers on the inside if you’re using an extra wide grip (on squats, for example).
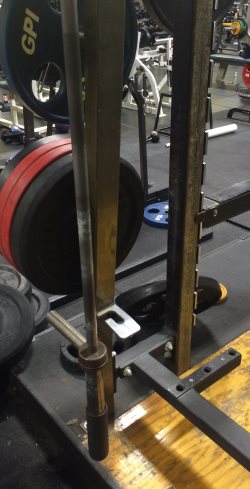
Roller J-hooks
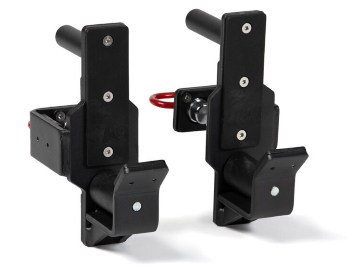
Roller j-hooks have a roller that you set the barbell on. The roller rotates, which allows you to more easily shift a loaded barbell left or right. This makes it effortless to center the barbell before lifting off on squats, bench and other exercises.
On non-roller j-hooks, it requires a decent effort to shift the bar left or right if it’s loaded with hundreds of pounds.
Roller j-hooks used to be super rare and very rudimentary until recently. Now, many brands have come out with a version.
Gunrack-style J-hooks

You can’t adjust this type of j-hook. They’re built into the rack as a single piece of steel that extends the height of each upright. Generally, the distance between settings is at least 3 inches; usually more.
Often, there’s no type of protective coating to protect the bar’s knurling.
These aren’t that common anymore, but you still see them around.
Desirable J-hook Features
There are many j-hook designs out there. The best ones, in my opinion, will have the following features:
Short lip. A short, angled lip makes it so you barely have to move the bar vertically up when unracking it. This is particularly useful on bench press since you want to minimize unnecessary exertion and keep proper positioning of your arms and shoulders/scapulae.

UHMW plastic insert or a UHMW plastic core. UHMW plastic prevents metal-on-metal contact between the bar and the j-hooks, which keeps the bar knurling from being worn down over time.

UHMW inserts and UHMW cores are both significant improvements over basic metal j-cups. However, j-hooks with a UHMW core (i.e. sandwich j-hooks) are superior to ones with just UHMW inserts (i.e. standard j-hooks), since the inserts are thinner than the core and may eventually be worn down after years of use depending on how much you lift and how often you use them.
Note: If you did wear down the plastic, you’d just have to buy some UHMW plastic from the hardware store, cut out a strip and adhere it to the j-hook; this is pretty cheap and easy, but it’s not exactly convenient.
High weight capacity. A higher weight capacity provides peace of mind if you happen to be squatting or benching 500+ lbs. Generally, j-hooks with higher weight capacities are heavier and larger (e.g. sandwich j-hooks) than less robust j-hooks.
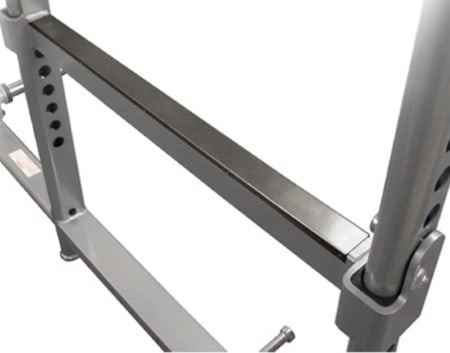
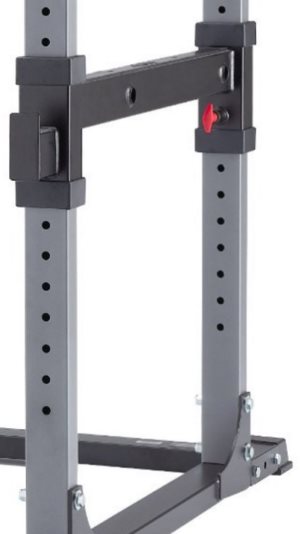
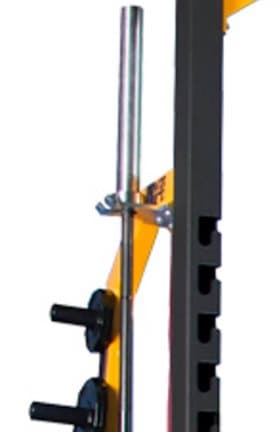
Safeties
Safeties, also called safety catches, are long pieces of metal that come as a pair. One catch will insert into holes on the left front and left rear uprights. The other catch will insert into the holes in the right front and right rear upright.
As their name suggests, their purpose is to catch the barbell just below the bottom of the range of motion if you fail during an exercise.
Essentially, safety catches act as a spotter. They allow you to bench press and squat heavy safely when you don’t have a lifting partner to spot you.
As with j-cups, there are different types of safety catches, and some safety catches are better than others.
In the following sections, I’ll cover each of the basic types of safety catches, with notes about their utility.
Metal Rod Safeties
This rod type of safety catch may be inserted and removed through the holes of the first post and then the second post, like a sword into and out of its sheath. Typically, the rod is 1″ in diameter.

Its front end has a metal bracket that wraps around the front upright and locks the catch in place. This is probably the most common type of safety catch. It is very basic, but it’s good enough to get the job done if your needs are basic.
Pin and Pipe Safeties
These are used on racks with a Westside hole pattern (i.e. 1 inch hole spacing on the lower-middle part of the rack), which necessarily have smaller holes.


You put these on by first inserting the pin through the first upright. As the pin is going through the exit hole of the first upright, you put the pipe up to it and slide the pin through it, and continue sliding the pin through the second upright. The pipe provides the extra thickness and strength needed to withstand a heavy beating from the weights. It’s a simple design, but it’s very strong.
Rectangular Safeties
There are many variations of rectangular safety catches. Notably, most if not all rectangular safety catches are quicker to adjust than the safeties mentioned above. And while not all rectangular safety catches are heavy duty and commercial grade – most of the heaviest duty, commercial grade power racks have rectangular safety catches. Below are some of the most common types of rectangular safety catches:
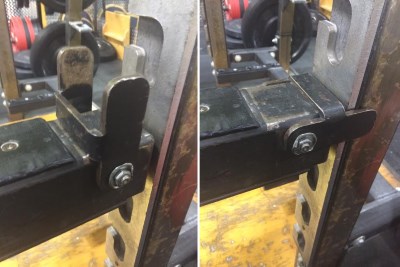
- Flip-Down Safeties: These safeties have brackets on each end with metal pegs that you insert through both uprights at the same time. Then you simply allow the safety to fall, or flip down, into place, such that the brackets are wrapped around the uprights.
- Latch-Secured Safeties: These safeties have short little nubs or inserts that stick out on each end, and insert into the groove or notch of the uprights that some power racks have (as opposed to holes). Once inserted between the uprights, the safety is secured by flipping a latch up on each end of the safety. This connects the safety to the upright and prevents it from rotating.
- Notch-Inserted Safeties: Like latch-secured safeties, these safeties are also found on racks that have notches/grooves as opposed to actual holes. These have a certain type/shape of insert on each end that fits into the notch/groove in such a way that it is automatically secured once it’s put in — no additional latching or moving around necessary.
- Pop-Pin Safeties: Pop-pins allow you to easily adjust the catches by simply pulling the pin out, moving the catch up or down, then letting the pin pop back in. While these are plenty strong for the vast majority of lifters, I wouldn’t trust them for guys with very advanced or elite squat numbers. Plus, I question the durability of the “pop-pin” mechanism, which could be damaged over time from wear and tear, or immediately from accidentally slamming the bar into it.
Here are some telltale signs of higher and lower quality rectangular safeties:
- Features of High Quality Rectangular Safeties: The high quality, robust rectangular safety catches are usually pretty thick and heavy. They may also have UHMW plastic on top to prevent metal-on-metal contact with the bar to preserve its knurling.
- Features of Lower Quality Rectangular Safeties: The lower quality (but not necessarily “bad” quality) rectangular safety catches will be relatively light and made of thinner metal.
Strap Safeties
Some racks have nylon safety catch options available, though these are always sold as a separate accessory – in addition to whichever metal safety catches come standard with the rack.

The benefits of a strap safety system are twofold:
- You can insert the brackets on either end of a strap to different heights so that one end is higher than the other. This provides additional safety on an exercise like bench press: You can adjust the straps such that they’re just below your ribcage to allow for a full range of motion, but they’re over your head and neck region to prevent the bar from falling on these sensitive areas in the unlikely case the bar slips.
- You can slam a loaded bar against it repeatedly without wearing away the knurling. This is great if you plan on doing rack pulls, rack lockouts, concentric squats or any other exercises that involve starting and ending with the barbell on the catches.
There are other variations of safety catches out there, but they’re just variations of the ones I mentioned above. The most important things to consider when deciding about what type of catch you want are:
- Strength/durability
- Ease of adjustment
- The ability to work with other desired features of the rack
- For example – Let’s say you’re considering the Titan T-3 or X-3 racks because you want 1 inch hole spacing. In this case, whether they’re your first choice or not, you’ll have to use pin pipe safeties. This is a trade off with ease of adjustment, which in my opinion, is more than worth it to get 1 inch hole spacing. That said, in this scenario, if you wanted easier adjustment, you could purchase nylon straps, which also work on these types of racks and are easier to adjust.
Weight Capacity Rating
Unless you’re strapped for cash, I recommend buying a rack that’s rated for at least 700 lbs (ideally 1,000+ lbs.). You’ll probably never lift 700 lbs in it, but you may lift several hundred pounds and have to dump the bar onto catches.
So, while a rack that’s rated for 500 lbs., 600 lbs. or whatever number under 700-1000lbs.+ may be plenty strong for now, just know that you’ll probably need to replace it a few years down the line when you start lifting serious weight.
Also, lower poundage ratings are an indicator of overall lower quality in terms of options, expandability, overall rack construction quality (i.e. weaker welds, a potentially wobbly base, easily chipped paint) and accessories that wear out faster, etc.
Frame Gauge
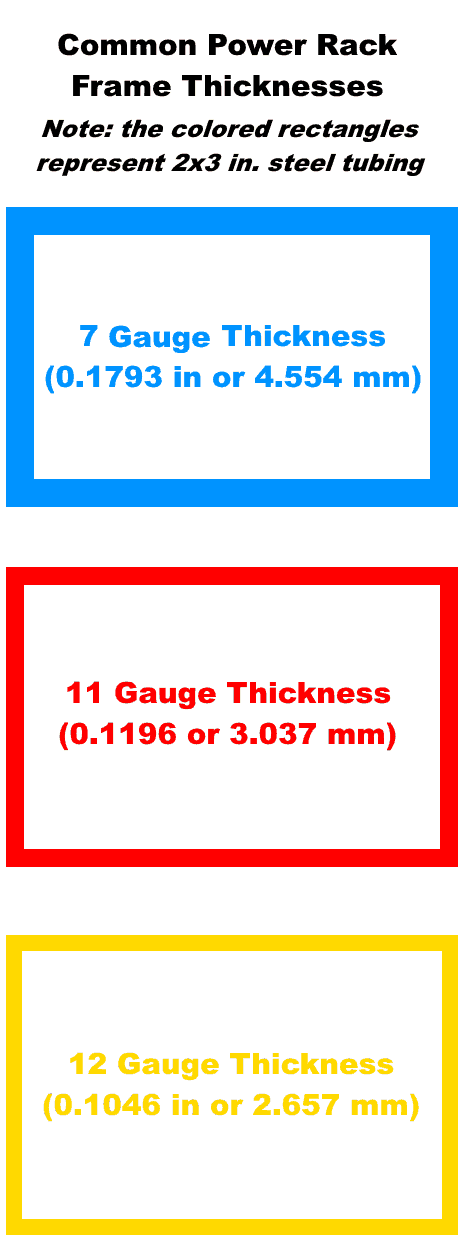
Frame gauge refers to the thickness of the steel used in the uprights and cross beams that form the structure of the power rack. The gauge is expressed by a number, with lower numbers meaning greater thickness.
The majority of power racks use either 11 gauge (1/8-inch thick) or 7 gauge (3/16-inch thick). Assuming the other aspects of the rack’s construction (e.g. bolts/washers/nuts, welds, etc.) are up to par, both 7 and 11 gauge steel is thick enough to provide a sufficiently strong and sturdy structure for any lifter: from beginner to elite.
However, there is still a difference between 7 and 11 gauge racks. All else being equal, a 7 gauge rack will hold up better to years of wear and tear from heavy use throughout the day (i.e. in a high traffic gym). Additionally, if you find a 7 gauge rack, chances are it is higher quality in other areas (e.g. overall construction and durability, available options and accessories, larger footprint). Of course, you’ll also have to pay a premium for a 7-gauge rack.
If you’re a beginner or intermediate, you could get away with using a 12-gauge rack for a while. But trust me, you’ll eventually want to upgrade. But anything higher than 12-gauge is garbage – don’t even consider it.
Footprint (total width & depth of frame) AND Internal Dimensions (width & depth inside the rack)
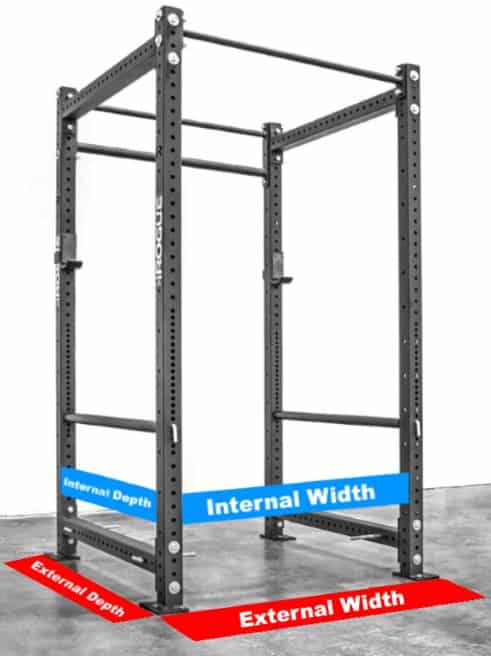
The footprint of a power rack refers to the amount of floor space it takes up. That is, the width and depth of the frame, or the outermost parts of the rack.
The internal dimensions refer to the space inside the rack. That is, the width and depth between, but not including the uprights.
A power rack with a smaller footprint and internal dimensions is best for your home gym under any of these circumstances:
- if you have limited space in your home gym.
- if you have a limited budget and can’t afford the higher price tag that comes with bigger racks.
A power rack with a larger footprint and internal dimensions is best for your home gym under any of these circumstances:
- if you do low bar squats with a lot of forward lean or if you want to do good mornings inside the rack, then you’ll probably feel too cramped inside a smaller rack.
- Specifically, you need to pay attention to the rack depth between the front uprights and rear uprights (Important: this is different than the overall depth of the rack, which includes the distance between the front-most part of the rack and the rear-most part of the rack). So, if you do squat with a significant forward lean or if you plan on doing good mornings inside your rack, you’ll want at least 30 inches of space between the front and rear uprights to perform the movements comfortably, and possibly up to around 36-44+ inches depending on your size, technique and level of claustrophobia :-P. Note that some people could do good mornings and squat with forward lean in a rack with just 24 inches of depth, but it would be very cramped.
- if you do wide / sumo stance squats or deadlifts, then you need a larger power rack.
- Specifically, you should consider the width of the power rack between the inside of the left uprights and the right uprights (Important: this is different than the overall width of the rack, which includes the distance between the left-most part of the rack and the right-most part of the rack). As far as general guidelines go, my recommendation for wide-stance / sumo squatters is to look for a rack with an internal width of about 42 or 43 inches to maximize the amount of space in the rack; this is the sweet spot. Specifically, a rack with 3×3 uprights and about 43 inches for racks with 2×2 or 2×3 uprights. You don’t want more than 42 and 43 respectively, because that would mean you wouldn’t have enough leeway for comfortably racking the bar without hitting the barbell sleeve collars (i.e. the fat circular part of the bar that stops the plates from going any further in).
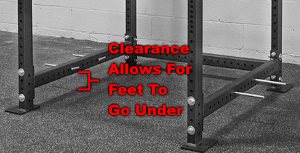
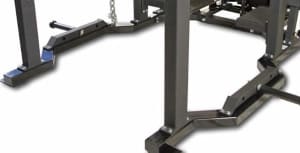
- Ideally, this type of rack should also have a sumo base, which means the lower support crossbars between the uprights are either pushed outward, or they’re raised off the floor to allow your feet to go underneath them if you need even more room for your stance.
Power Rack Weight
All else being equal, a heavier power rack is an indicator of quality. That is, heavier power racks probably have stronger metal structures and heavy duty pins and catches (e.g. Legend Fitness).
Also, because they’re so heavy, these racks aren’t going to be wobbly or sliding around on the floor if you not-so-gracefully re-rack a heavy weight (though many can still be secured into the floor…just in case)
However, there are plenty of relatively light power racks that are still heavy duty, commercial grade. You just have to bolt them into the floor or a platform to prevent them from moving around or tipping. Alternatively, some of these lighter heavy duty racks have support bars you can attach to the rear of the rack near the base, which you can use to add stability to the rack without having to bolt it into the floor.
Power Rack Height
Most high quality power racks are about 8-9 ft tall. Only a handful are in the mid-7ft. range, with even fewer at or below 7ft. The problem many potential power rack buyers would have with the 8 to 9 ft tall power racks is the fact that many ceilings in people’s home gyms are around 8 ft tall, if not shorter.
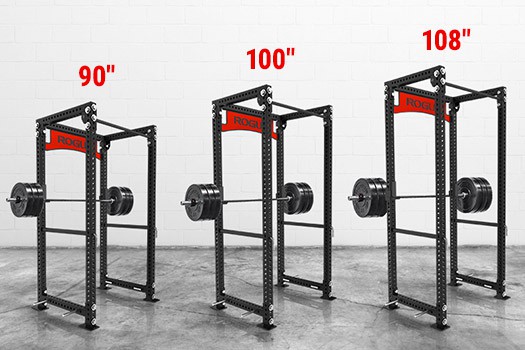
This significantly reduces the number of viable options many buyers have when choosing a rack. And it is part of the reason why racks like the Titan T-3, X-3 and X-2 are so popular: because they’re all around 7.5 ft tall, give or take (and they all have short versions around 7 ft tall or a bit under). This height provides just enough clearance for the many buyers with ~8 ft tall ceilings, and even allows for the extra bit of headroom above the rack needed to do pull ups. Plus, they’re still high quality racks.
There are other, shorter racks out there, too. Some are good quality, and others are less impressive, but they can be sufficient for beginners and intermediates. I plan on doing an article discussing the best power racks for low ceilings as well as power rack alternatives for low ceilings.
Options / Accessories That May Or May Not Come Standard On Some Racks
Pull Up Bar
Most, but not all, power racks come standard with some type of pull up bar. For the few that don’t, you usually have the option to buy one separately.
Typically, a power rack comes standard with a pull up bar. In the following sections, I’ll go over the most common types of power rack pull up bars:
Straight Pull Up Bar
This is the classic pull up bar. Its name is self-explanatory: It’s just a straight bar. If given the choice between a straight bar and a curved bar (see next bullet point), I’d choose the straight bar.

Curved Pull Up Bar
A curved bar is straight towards the center, then angles slightly downward on the sides. The idea is that the slight angle allows you to achieve a more comfortable and biomechanically advantageous wrist position for wide grip pull ups. However, I’ve tried different curved pull up bars, and many times they put your wrist in a more awkward position which makes it slightly more difficult to perform the movement naturally. This is why I prefer a straight bar vs a curved one (though my power rack at home has a curved bar, which is good enough.

Some of the higher-end power racks may offer some or all of the following as optional upgrades for the pull up bar:
Fat Pull Up Bar
This is just like a straight pull up bar, with one big difference: It’s thicker. Generally, a fat pull up bars is about 2 inches in diameter. This is the bar you’ll want if you want to improve grip strength. Some power racks have fat bar options with a regular straight bar built into it so that you can still train back with pull-ups if your grip is giving out.

Monkey Pull Up Bar
This is like a smaller version of the monkey bars that you probably used to play on in the park as a kid. It’s like a ladder laying down across the top of the power rack. There are two long bars parallel to each other, with 3 or more shorter bars in between that are perpendicular to the longer bars. This allows you to do a variety of pull up grip variations, including wide, normal and close grip variations of regular pull ups and hammer-style (neutral) grip pull ups.

Multi-grip Pull Up Bar
This type of pull up bar setup allows you to do just about any type of pull up grip variation: close grip, wide grip, angled wide grip, hammer (neutral grip), close hammer (neutral) grip, wide hammer (neutral) grip, etc.

Dip Bar Handles
Other than pull up bars, dip handles are the most common option available for power racks.
Not all power racks have dip handles, but the vast majority do. Sometimes they come standard with the racks, but other times you’ll have to pay extra for them.
There are two basic types of dip station attachments for power racks:
- Two handles that are connect and attach on the rack at one point. In my experience, most higher quality power racks will have this type of dip station. This is sometimes called a Matador dip bar attachment or Y dip bar attachment.
- Two separate handles that attach on two adjacent uprights at the same height.
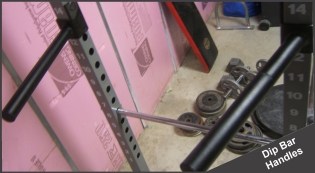
There are other dip attachment styles, but these are the main ones.
If the rack you’re considering doesn’t have dip handles that come standard or as an optional add-on, then I would suggest you look at a different rack. First off, dips can be an excellent exercise so you’ll want the equipment that allows you to do them. Secondly, the lack of dip bar handles is an indicator of a low quality rack.
Plate Storage
Plate storage refers to an area on the power rack with sleeves attached that you can slide your weight plates onto when they’re not in use.
Some racks have a dedicated set of uprights in the rear of the rack, with multiple sleeves attached to each upright. The sleeves may be welded permanently into place. Or, they may be bolted on so that you can adjust and/or remove them as needed.
Other racks have storage on two of the main four uprights. These are almost always bolt-on plate storage sleeves.
If you’ve got the space and an extra bit of money, then you should go for a rack with a dedicated section for storage. Whether they are welded or bolt-on storage sleeves is just a matter of preference. I like the bolt-on style because it’s more versatile.
Bar Storage
If you have multiple barbells, then you may want to consider a power rack with bar storage. This allows you to easily and conveniently store bars out of the way when they’re not in use, to maximize space in your home gym and keep the area free from the clutter and obstruction of stray barbells.
The major benefit of bar storage is that it saves space and provides easy access to additional barbells when you need them.
How does bar storage work? There are two basic designs, but they accomplish the same thing: the bar ends up being held vertically in the rear of the power rack or somewhere on its outside.
The most common bar storage design is a cylindrical tube with an opening on top, located on or near the base of the rack. It is just the right size for you to slide one end of the barbell into. These are often welded onto the rack. Or, in the case of modular power racks (e.g. Titan, Rogue, Sorinex and more racks), they are bolted onto the rack through the holes on the uprights.
The other bar storage design you’ll find is the kind where the bar is hung vertically from near the top of the rack. You store it by simply sliding one end of the bar (where the skinny part meets the fat part aka the “collar”) between either side of a hook/slot that holds it in place. This design is far less common, and you’ll only see it on some expensive, premium commercial racks.
The advantage of this over the tube/sleeve bar holder described above is that it may be slightly faster and easier to store and remove the bar because you don’t have to slide the bar down into and up out of the tube each time. But it’s an almost negligible difference in my view, and I’ve used both kinds before. Either will do just fine.
In my opinion, bar storage would be nice to have, but I wouldn’t consider it a must-have option. That said, if you’re getting a mid-range or premium power rack, chances are very high that bar storage comes standard or is available as an optional add-on. Even a decent number of budget power racks come standard with bar storage or offer it as an option.
So if you want this feature, don’t worry — You’ll have plenty of racks to choose from in all price ranges.
Lat Pull Attachment / Cable Pulley System
If you find a power rack with a cable pulley system option, it will – at the very least – have a high pulley aka a lat pull attachment. With a high pulley / lat pull attachment, you start by grabbing the handle up high and bringing it down against the resistance of the weights. In practical terms, this means you can do exercises like lat pulldowns, triceps extensions and face pulls.
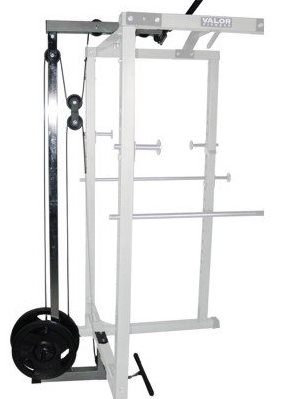
Some power racks have a cable pulley system that includes a low pulley, in addition to the high pulley. With the low pull system, you start by grabbing the handle down low and bringing it up against the resistance of the weights. This allows you to add in other exercises like horizontal seated rows, upright rows and curls.
Then, there are even some racks that also have a cable crossover attachment, though the ones I’ve seen look kind of clumsily made and they take up a bunch of room in front of the rack. If you wanted one of these, I’d say just get a separate cable crossover machine – it’ll be better quality and probably won’t take up much more room.
Power racks that have any type of cable pulley system aren’t that common, but you can find several if you look.
I’ve found that you’re more likely to find cable pulley system options available on racks that I’d describe as lower-but-decent-quality (i.e. they’re plenty good if you’re a beginner or intermediate, but you’ll probably eventually want/need an upgrade). Here are some examples of those:
- Valor Athletics BD-7 Power Rack with Lat Pull Attachment
- BodyCraft F430 Power Rack plus the BodyCraft F431 Lat / Low Row Attachment
- XMark XM-7620 Power Cageplus the XMark XM-7621 Lat Pulldown / Low Row Attachment
- Valor Athletics Hard Power Rack plus the Valor Fitness BD-11L Lat Pull Attachment
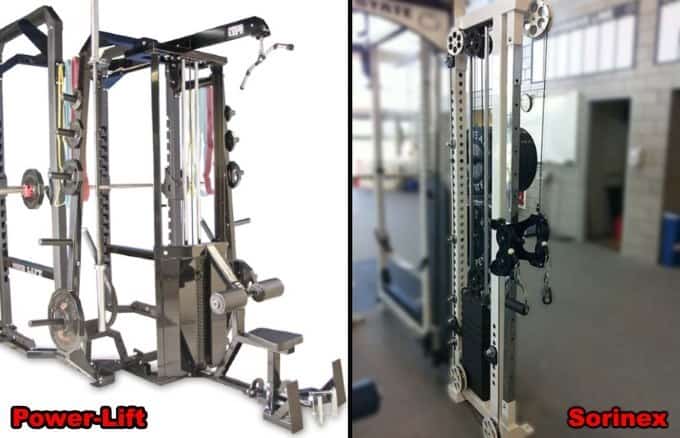
However, there are some expensive premium racks that offer a pulley system, including some Power-Lift power racks and some Sorinex power racks.
Also, there’s another great option you should consider if you want a pulley system, but the racks you’re considering don’t have one.
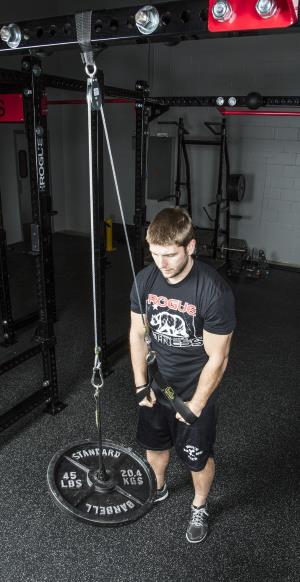
And that option is the Spud Inc. lat pulley.
You can use this on any rack. It’s an incredibly simple, but effective design.
It’s made from just a few basic materials (nylon, cable, pulley, carabiner).
You loop the top nylon piece over the upper crossmember of the power rack and slip the lower nylon piece through the middle of any Olympic weights.
Hole Numbering On Posts
This refers to painted-on or engraved numbers next to each hole/notch on the posts for marking which height the pins or safety catches are at.
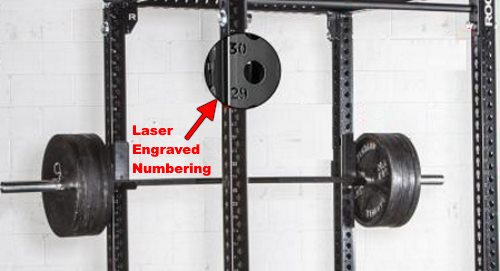
Once you know which height the pins and catches should be at for each main lift, you can quickly adjust them to the corresponding numbers (e.g. for squats on a given power rack, you might find that the best height for the safety catches is at hole #6, while the best height for the pins is at hole #18).
If the rack doesn’t have numbered holes, though, it should not be a deal breaker – you’ll just have to count the holes each time or mark them with tape or chalk.
Band Pegs
As the name suggests, band pegs allow you to attach resistance bands from pegs on the power to the barbell.
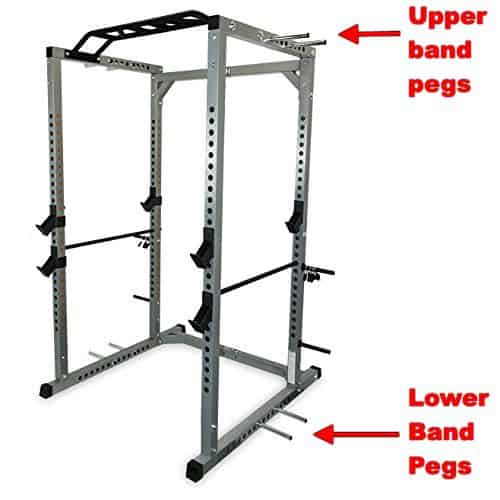
Band pegs are most commonly used to do:
- Band squats and reverse band squats
- Band deadlifts and reverse band deadlifts
- Band bench and reverse band bench
If a rack comes with band pegs, they’re located at the bottom and/or top posts of the rack on either side.
There may may be just one peg or multiple pegs (usually no more than 3) on either side of the top and/or bottom.
The pegs may be welded in, or they may be removable/adjustable as part of a modular design.
Band pegs are usually only available for mid-range and high-end power racks.
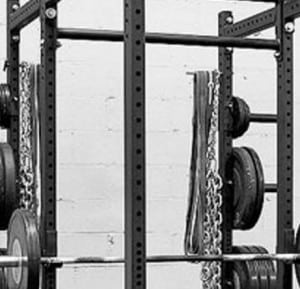
Band/Chain Storage
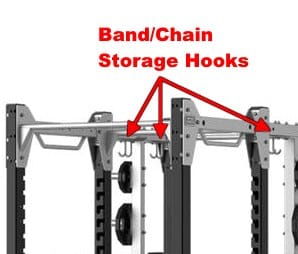
Band/chain storage refers to small hooks attached to the power rack, which are meant to hold resistance bands, chains or other accessories.
They’re usually found closer to the top of the power rack, on the upper rear portion. Specifically, they’re commonly found on/around/under the plate storage section (if one exists), on the back of the rear uprights or upper crossbeam supports.
They may be welded on some racks, in which case, they come standard. Or, as is the case with modular racks, they may be separate attachments.
They typically are seen in multiples of two. Most racks with storage hooks have either two or four, which is plenty of storage space for just about any lifter. But some racks have as many as 6 or even 8 storage hooks!
Band/chain storage hooks would be particularly useful for anyone who does band or chain work for any of the main lifts. The main benefits are that you save space since bands and chains can take up a lot of room and get tangled up if not stored and organized efficiently. Plus, your workouts are more efficient because your bands, chains and other accessories are literally within arms reach, so you can set up for your lifts faster.
If you’re not planning on ever doing any band or chain work, then these storage hooks shouldn’t be a big consideration for you. That said, if a rack you’re considering has them, then that’s just a bonus. You can still use them for storing other things like your weight lifting belt, dip belt or your barbell clamps/collars.
Spotter Arms (Different Than Safety Catches)
Spotter arms are different than safety catches, which I discussed earlier. However, they serve a similar function: to “spot” you at the bottom of the range of motion exercises like squat and bench press. They prevent the bar from hitting you or pinning you down if you ever fail or lose control of the barbell.
Spotter arms are designed for use on the outside of the rack. As such, each spotter arm has just one end that is attached to an upright. Whereas, safety catches are made for use inside the power rack. Accordingly, both ends of each safety catch attach to the power rack between the front and rear uprights.
Spotter arms can be useful for many things:
- Keep a dedicated bench area outside the rack, and a dedicated squat area inside the rack. You can avoid the time and effort of having to move your weight bench inside the rack and adjusting the safety catches. Instead, you can just stay on the outside of the rack. This can be especially useful if you’re supersetting an exercise inside the rack with an exercise outside the rack on spotter arms.
- Barbell exercises like shrugs, rows, curls, hang cleans or hip thrusts and others. For these types of exercises, it may be more efficient and safer to start with the barbell at a certain level, while still being able to step back to perform the movement in an open area, unimpeded by safeties or the uprights of the rack. Also, you might want to rack the barbell at a certain height between sets to change the weight more efficiently.
Spotter arms are always available as an option on mid-range and premium power racks. However, they are not available on some budget power racks.
Landmine Attachment
A landmine attachment consists of a cylindrical tube that holds one end of the barbell. There is a hinge joint and a swivel joint between the barbell holder tube and the point where the landmine attaches to the base of the power rack.
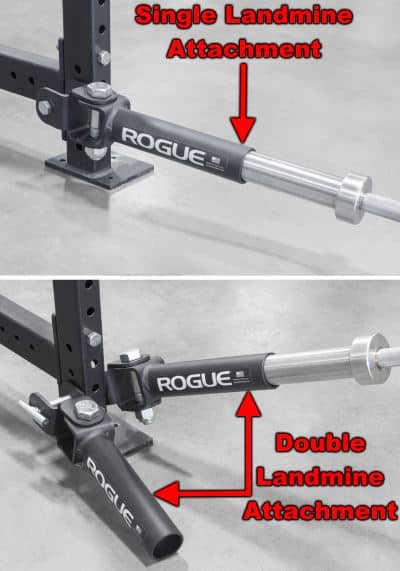
These two joints allow you to move the far end of the barbell in any direction. Depending on the rack, you may be able to get a double landmine attachment, which is just two landmine attachments attached close together. Double landmine attachments expand your exercise selection to include a bunch of two-handed landmine work.
This is a pretty cool add-on for a power rack. Not essential by any means, but certainly cool. It lets you introduce some variety into your training. The most popular exercises you can do with this attachment are T-bar rows and landmine press. However, there are a whole bunch of exercises you can do with landmines.
What most landmine training exercises have in common is their ability to effectively train your core and shoulder/scapular stability simultaneously. If done right, this will increase your bench press and overhead press strength and reduce your risk of shoulder or lower back injury.
Other Options
There are several other optional attachments on the market. But they’re not as common as the ones I’ve already listed so I won’t dedicate a full section to each.
Instead, I’ll just list some of them:
- Lever arms aka jammer arms (these are becoming more and more popular)
- Step up platform
- Utility pads (can be positioned to allow you to do glute-ham raises, or to place your rear foot on Bulgarian split squats and other unilateral leg exercises)
- Glute-ham attachment (better solution than above-mentioned utility pads)
- Reverse hyper mount attachment
- Spotter platforms
- Heavy-bag or speed bag attachment
- Safety squat handles
- Monolift attachment
- Technique tray attachment
- Ball grips for chin ups
- Rope pull attachment
- Bench connector (to keep bench even inside the power rack and to keep it from potentially moving/sliding at all during bench press)
Now You Know What The Best Power Rack Is For You – It’s Time To Buy It!
Hopefully, this has covered everything you wanted to know about power racks and the different features, specifications and optional accessories.
You should now be fully armed with the knowledge you need to decide what’s the best power rack to buy for you.
If you’ve got any unanswered questions, please ask them in the comments section below and I’ll do my best to answer you as soon as I can…
…Otherwise, it’s time for you to go and order your rack now! Be sure to consider my top power rack picks near the beginning of this article.

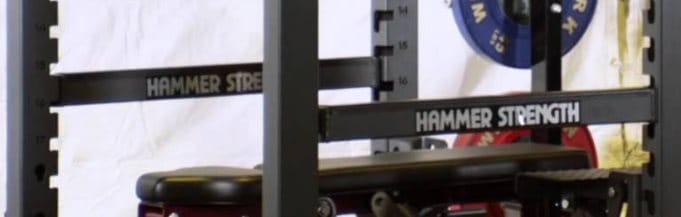
I’ve been looking for j-hook with roller and can’t find anything similar to what’s pictured in this guide. Where did you find that picture and/or where can someone find that item?
Hi Kyle, I took that picture myself. It’s of the power rack at the gym I go to. I can’t think of what brand the rack is, but I’ll try to remember to check tomorrow when I’m training.
Okay, so I just got back from the gym a little while ago and I’m happy to say that I remembered to check the brand of the power rack:
As you can see from the image I took, the manufacturer is Nebula Fitness. However, according to their website, they’ve been sold to Rogue Fitness, and it looks like they also are having (or had) their remaining orders fulfilled by Rae Crowther.
So, it looks like your best bet would be to reach out to both of these companies and see if you can talk to a knowledgeable product person who might know something about this type of roller-style j-hook/j-cup. It might take a few calls/emails, but you’d be surprised how helpful some of these companies can be. Best of luck, and let me know if you find any solutions.
Thanks! I’ll reach out to both and see what I can find out. If it’s anything helpful I’ll be sure to share.
Great, hope to hear back with good news.
Pleaseeee keep this great review up to date with the comparison chart!! Seriously the Most helpful review i ran to since starting my Research 3 weeks ago! Could have saved me much time!
Thank you!
Thanks, Mo! I’m happy that this helped you out so much. I definitely will be adding new power racks to this chart at some point this year. Stay tuned.
Happy lifting,
Alex
I love the post. The most comprehensive and helpful I’ve read.
I’m new to weight training. In terms of where you place the Power Rack in a home gym, is there any advantage to having space behind the rack? Does this enable you to do different exercises or move easily between different exercises? I want to check before bolting down the Power Rack and also want to be space efficient.
Thanks!