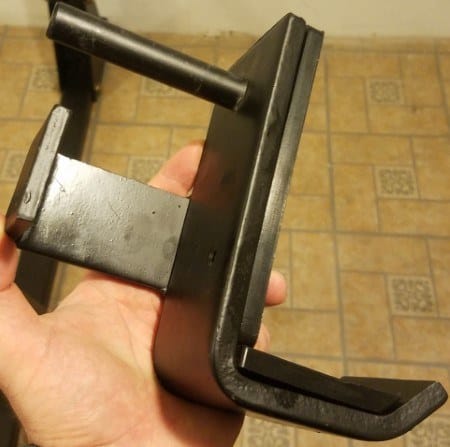
In this Titan X-3 power rack review, I’ll tell you all you need to know about the Titan X-3 Flat Foot Power Rack. I bought the short version of this rack in 2017 and used it for a year and a half before moving.
I’ll tell you everything there is to know about this beefy yet budget-friendly 3″x3″ flat foot power rack: The features, pros, cons, why I chose it, and more.
I’ll walk you through the process of figuring out if the Titan X-3 power rack is the best power rack for your home gym. But before I get into all the details, here’s a quick overview of this popular power rack:
| Model | Pros & Cons | Rating |
|---|---|---|
Pros:
| Rated 4.5 out of 5 in Power Racks |

Table of Contents
Why I Chose the X-3 Flat Foot Power Rack?
I bought the Titan X-3 power rack back in 2017 after moving into a new apartment. I was very excited to set up a new home gym right away. The rent agreement included exclusive basement access and the landlord gave the OK to use it for weight training…
…However, there was a catch. I had to wait for the previous tenant to move all of the stuff they left in there. It was supposed to take a few weeks. That turned into a couple months, which rolled into several months. Then after just under a year, I finally got access! Woo!
Having to wait so long to set up my home gym sucked. BUT, it gave me plenty of time to consider which power rack to buy. I already have a bit of nerdy obsession with power racks, as evidenced by my power rack comparison chart featuring 175+ racks and my super detailed power rack buying guide.
I had a blast researching many of the older racks I already knew about. I had even more fun exploring the many new power racks that had since come out.
Most importantly, being forced to wait to build my home gym was a blessing in disguise because the Titan X-3 series didn’t launch until February 24th 2017. This was about 7-8 months after I was supposed to have basement access.
If I didn’t have to wait, I would’ve had to either pay much more for a rack with comparable specs/features, or I would’ve had to go with a rack that didn’t meet my needs as well as the X-3 power rack did.

I ended up choosing the X-3 short power rack because it had the following features, which I either needed or really wanted in my power rack:
- A short enough rack height to fit under the basement’s low ceilings.

- A robust frame that I’ll never outgrow. The X-3 checks this box with its 3″ x 3″ uprights made from 11 gauge steel, which are responsible for its very high 1500 lb weight capacity rating. To give perspective, the majority of respectable racks (including many “commercial use” racks) are rated for 1000 lbs, which is still very robust and capable of handling anything most lifters can throw at it. As I’ll discuss later, having this extra capacity gives me more than enough room to grow in strength, since I may eventually use over 1000 lbs on a couple short/partial range of motion lifts, where using such ridiculously heavy loads may eventually be feasible.

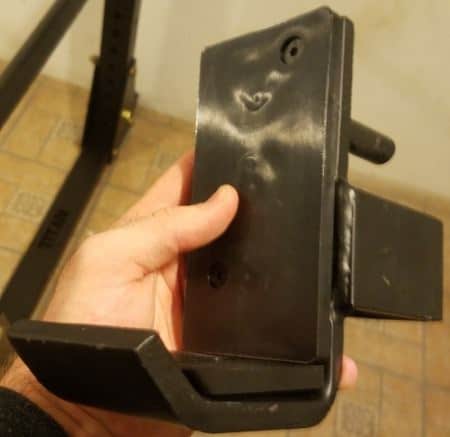
- A rack that does NOT need to bolted to the floor. The X-3 Flat Foot power rack is completely self supporting thanks to its flat feet. Though you can buy special gusset plates to bolt to it the floor if you want to (e.g. if you’ll be doing band-resisted movements with high band tensions; if you’re a gym owner and don’t want members to move it around).


- A modular power rack with A LOT of accessories available for purchase separately. Over time and on an as-needed basis, I want to be able to expand my power rack’s functionality in terms of band use, weight storage and overall more exercise possibilities. This “expandability” is so important for anyone who wants to maximize the useful life of their rack. There won’t be any reason to buy a whole new power rack when you can just buy a relatively inexpensive add-on that gives you the capability you’re looking for. Over the few months I’ve been writing this article, Titan released at least 10 new X-3 accessories. At the time of publishing, there are over two dozen accessories that are compatible with the X-3 power rack–So it’s safe to say that the X-3 meets and exceeds this criteria.

- It needs to have Westside hole spacing. Westside hole spacing refers to 1 inch hole spacing in the bench press and rack pull region (where you need the most precision for j-hook and spotter bar positioning) and 2 inch hole spacing above and below this region (where you don’t need as much precision).

The above are my main reasons for choosing with the X-3 power rack. However, you may very well have different needs and preferences for your ideal power rack…
…With that in mind, in this next section, I’ll discuss the key factors everyone should consider before buying a power rack and how the X-3 power rack stacks up in each category:
What to Consider Before Buying
There are a number of things you should consider before buying this (or any) power rack. I’ll talk about the most critical ones below:
Weight Capacity Rating
Ask yourself the following:
- Do you want one of the strongest racks you can get?
- Do you want a rack that can take a major beating workout after workout, year after year?
- Do you want a rack you can grow with over time–one that you’ll be able to safely train in even if you eventually reach highly advanced to elite levels of strength?
If you answered yes to any of the above questions, then the Titan X-3 checks the box for capacity. It is rated at a very impressive 1500 lb capacity. This is largely thanks to it’s robust frame consisting of robust 3″ x 3″, 11 gauge steel tubing.
Any well-built rack meant for serious long-term use will have a weight capacity of at least 1000 lbs. That’s plenty for just about everyone.
Personally, I never thought I’d want anything more than 1000 lb capacity rack. I’m natural and plan on staying that way, so there’s no way in hell my bench or squat will approach even the 700s (my dream would be a 600 lb squat several years down the line).
However, I’ve recently gotten into doing heavy power shrugs and high rack pulls. These exercises involve favorable leverages (for high rack pulls), use of momentum (for power shrugs) and relatively short ranges of motion (both) that lend themselves to using A LOT of weight potentially. How much? Near or even over 1000 lbs is feasible after enough training.
I’m far from that amount currently, but it’s very possible I’ll get there in the next couple of years if I stick to it. If and when I get there, I want a rack that can definitely handle that amount of weight slamming against the safeties. In reality, many of the racks rated for 1000 lbs could probably handle hundreds of pounds more, but I’d rather be safe than sorry!
So obviously most people will never actually get to the level where they’d need a rack that could withstand 1500 lbs., even doing the couple of exercises I mentioned above. Still, a 1500 lb capacity power rack is an overall construction quality and durability.
In short, you’ll never outgrow this rack.
Footprint
You need to consider the footprint of the rack to make sure it will fit within your floor layout.
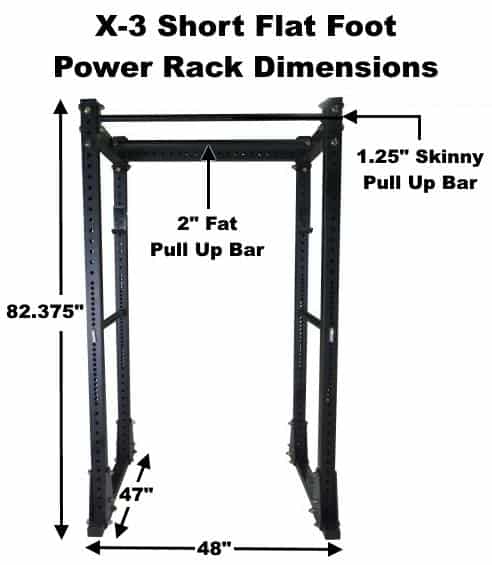
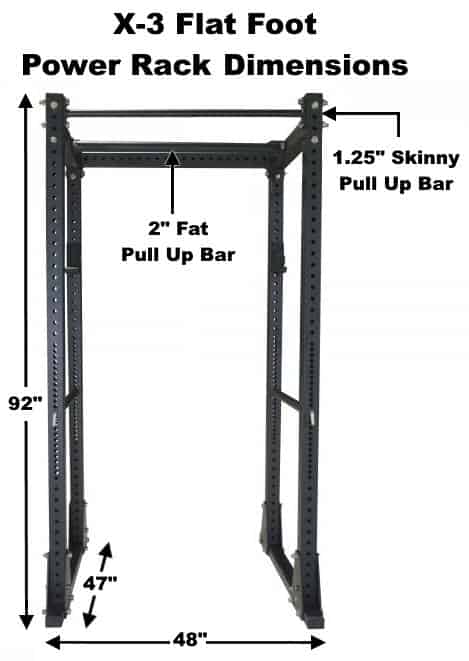
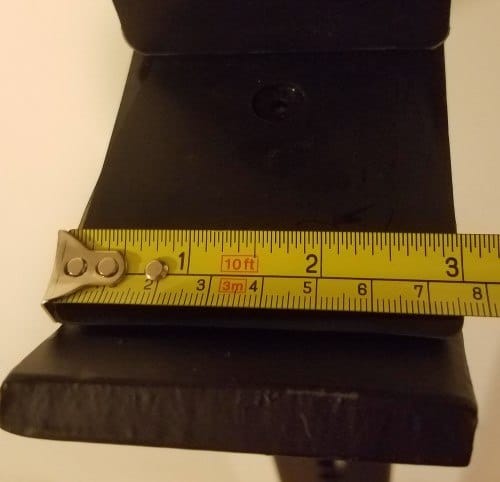
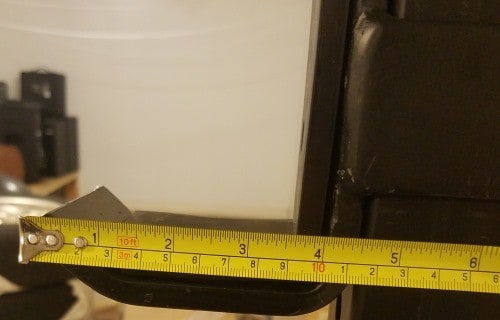
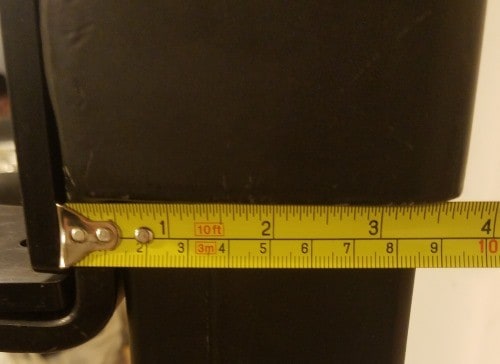
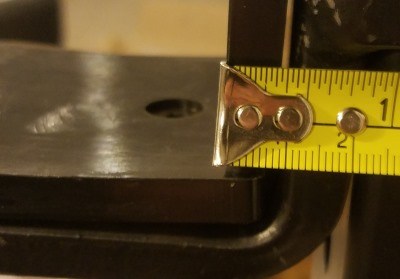
The footprint of the X-3 power rack (both the short and tall versions) is 48″ wide x 47″ inches deep.
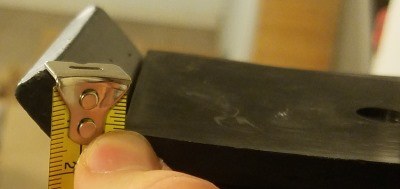
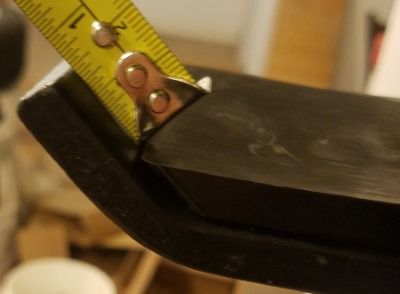
NOTE: The Titan website has the external depth listed as 49″. However, this must be a mistake or typo because I measured mine and it is 47″, as you can see below:

Of course, you actually need more than 48 inches of width. The barbell is 7 feet long, or 84 inches long. Then you’ll need at least a foot on either side to lift safely without hitting walls other objects on either side. That’s a total of 9 feet, or 108 inches width that you really need to account for.
Go to your basement, garage or wherever you’re planning on building your home gym. Get a tape measure and take down the floor space dimensions.
Do you have at least 48″ (really, 108″ as explained above) x 47″ of space available where you want to position the rack?
Don’t forget to consider whether or not you’ll have enough room for weights. If you use the optional X-3 weight storage pegs, you’ll need account for the extra space taken up by the 45 lb Olympic plates. The pegs go on the front or rear uprights.
The 45 lbs plates end up adding about 2-3 inches beyond the end of the flat feet. That means you to account for about 50 inches of depth if you plan on using these storage pegs. You could alternatively store your plates outside the rack, on the floor (if you’re cheap and lazy) or on a plate tree.
And what about any other gym equipment you plan on having in your home gym? Will that fit in the available floor space along with the power rack?
Ceiling Height
How tall is your ceiling?
You NEED to know this before buying this or any power rack. You don’t want to buy it and end up realizing your rack will only fit if you create a giant hole in your ceiling.
You also need to consider the additional height clearance you’ll need above the total rack height to do pull ups without bonking your head on the ceiling. Most people will need about 8 inches of additional ceiling space.
There is a bit of a workaround for this if you’re getting close to the max allowable height. That is, you can install the pull up bars lower on the rack. If your ceiling is exactly the height of the power rack or just a few inches taller, then you’ll need to install the pull up bar up to 4 notches lower than the default position at the top of the rack. You’ll have to find a similarly low spot for the second pull up bar, possibly underneath the first bar, or on the opposite side of the rack.
If you have a taller ceiling, that’s great. Get the regular full height X-3 power rack. It’s 92″ tall. In order for this rack to fit you’ll need a ceiling that is at least 92″. Ideally, your ceiling should be 100″ or higher to comfortably do pull ups without having to install the pull up bars lower.
If you have a lower ceiling, then you’re probably an ideal candidate for the Titan X-3 Short Power Rack…
…How low of ceiling? Under 92″ tall but at least 82.375″ tall.

As you can see, I barely made cut-off. That was a close call!
IMPORTANT: Will you be putting your power rack on gym mats or a platform?
If so, remember to factor this in when measuring your ceiling height! Mats are usually ~3/4 of an inch thick. Lifting platforms are usually 2 inches tall (some taller). Yes, these are small measurements. But just a fraction of an inch will determine whether or not a rack fits, if your ceiling height is right on the border between different power rack heights.
Hole Spacing
Hole spacing refers to the distance between the holes on the power rack uprights. These holes are where you attach the j-hooks, pin/pipe safety bars and any number of accessories.
You adjust these attachments up or down to get them in the correct height for your body and the barbell, depending on the exercise.

Not all racks have the same hole spacing. This matters. The further apart the holes are, the less precise you can be when positioning the height of the attachments.
Here are a couple of examples of how this can be a problem–all of which any lifter has experienced
- For squats, you may have to rack and unrack the bar from your tippy toes if the j-hooks are too high. If they’re too low, you’ll have to rack and unrack the bar from a quarter squat position.
- For bench press, you may have to unrack and rack the bar too low, with your elbows bent like you’re starting partway through a rep. Or you may try to unrack and rack the bar too high. In this case, you’ll lose your back tightness during the unrack, which will throw off your strength and technique right from the start. Even worse, you may not able to rack the weight at the end of your set depending on how fatigued you are–this could end catastrophically as I’m sure you can imagine.
- For bench press, you may have to set the safeties spotter bars either too low or too high. When they’re too low, you risk having the bar crush you if it slips. Or, you’ll be trapped temporarily if you fail at the bottom (you’ll be fine, but you’ll have to really struggle, squirm and roll the bar forward to get out, and you may get a nasty pinch in the process). Conversely, if you have to put the safeties too high, you’re much more likely to accidentally slam one or both sides of the bar into the safeties unless you’re super slow and deliberate.
- For rack pulls, if the safeties are too high, you’ll over-emphasize upper back and traps while under-emphasizing lower back, glutes and hams. If the safeties are too low, you’ll over-emphasize lower back, glutes and hams, while under-emphasizing upper back and traps. Rack pulls are often done purposely at different heights to emphasize different muscle groups. So as hole spacing increases, the number of possible rack pull heights decreases.
The above are just of the most common examples of exercises affected by hole spacing.

Any exercise is at least somewhat less safe when the j-hooks and/or spotters are too high or too low. Plus, you unnecessarily less space between the holes because you have to work around the bad positioning.
So, generally, less space between the holes is best. Most racks probably have 3 inch hole spacing. This is decent, and you can get “close enough” to the ideal position for most exercises. However, it’s not ideal.
I personally would never consider buying a rack with 4 inch or more hole spacing. This is where you’ll start to run into a lot more issues with the j-hook and safety spotter heights.
I think that 2 inches and less is ideal. You can do just about any exercise perfectly in power rack with 2 inch hole spacing. However, some exercises can benefit from the additional precision allotted by 1 inch hole spacing (hence, why I said 2 inches and less)…
…Those exercises where an inch can make a meaningful difference include the bench press and rack pulls at different heights. Those are the big ones that come to mind, at least.
Conveniently, these lifts all take place within a certain zone in the rack. Specifically, between about 2 feet to 4 feet off floor. This is the genesis of Westside hole spacing: 1 inch spacing in the bench press and rack pull zone, and 2 inch spacing above and below.
You may ask, “Wouldn’t 1 inch hole spacing everywhere be optimal?” In theory, it would. However, in practice, that would reduce the weight capacity of the rack without a major positive trade-off. Second, it would increase the cost of the rack–again, without any notable benefit in return.
Westside hole spacing is what I and many others consider the gold standard of hole spacing in power racks.
The X-3 power rack does have Westside hole spacing. I wouldn’t be writing this review otherwise, since it was a requirement when I was shopping around for my rack.
How Long You Plan to Use It
Consider how long you plan to use your new power rack. Will it be a short term solution, or a mid- to long-term investment? I’ll give my advice on the different scenarios below:
Short-Term Use
Are you getting a power rack for just a short amount of time? Like just a few months, or a couple of years max?
- Maybe you’re going to be moving in the near future and won’t be able to bring the rack with you.
- Maybe you’ll be going away to college soon and won’t need the rack except for when you come back home for a few weeks during breaks.
- Maybe your family has a vacation house that you want to workout at, despite only visiting infrequently or for relatively short stays throughout the year.
Whatever the specific scenario is, the X-3 might not be the smartest investment if you only need to get a rack for short term/temporary or sporadic use…
…Why? The X-3 is more mid-range in terms of price. Sure, you get great value for that price. But the $660-700 price tag isn’t what most people would consider a “budget” rack.
I would instead recommend a basic budget rack like the Titan T-2 for those with short term needs. It is “good enough” for most lifters and it’s extremely cost efficient at $380-400 depending on the height.
The only exceptions to recommending a budget rack for short term use is for:
- Highly advanced lifters who need a more robust rack with a higher weight capacity (T-2 has a 700 lb capacity vs the X-3’s 1500 lb capacity)
- Lifters or athletes with specific training prescriptions that require built-in features or optional attachments only available on the X-3 power rack
- Lifters with plenty of extra cash and who really want a higher quality rack even if they’ll only be using it for a relatively short period
Mid to Long-Term Use
Or are you planning on buying a power rack that you’ll be using for at least a few years? Even a decade, or two? Possibly even a lifetime?
If so, then an X-3 power rack is an excellent choice for these reasons:
- It is a very sturdy power rack with a 1500 lb weight capacity you’ll never outgrow
- It has good overall construction quality. The hardware (bolts, nuts, washers) are heavy duty. And although some of the welds may not have slight imperfections visually, they are all fully fused, making them completely adequate from a functional standpoint. The rack will be able to handle a ton heavy use many, many years.
- You can expand it’s capabilities to your heart’s desire by buying any of dozens of accessories available for separate purchase–in the future, if and when you need them. This includes things like different safety spotters, pull up bars and handles, dip bars, band pegs, a monolift, a landmine, and even “extensions” that add a new section to the back of your rack. No need to upgrade your whole rack or buy a separate piece of equipment if you can get a power rack accessory that does what you want. I talk about all of the accessories in detail below.
Accessories
How important is expandability? Meaning, do you need or want the ability to add a lot of different accessories to expand the type and total number of exercises you can do in/on your power rack–either right away or some time in the future?
If expandability is important, the X-3 is an excellent choice. It is a new rack and already has a bunch of different optional accessories that you purchase separately–and the number is growing.

It’s also worth mentioning that even if Titan doesn’t make certain X-3 accessories you’d thought would be available, then chances are Rogue Fitness makes them for their RML-390F. They’d be compatible with the X-3 since the specs of both racks are basically identical (more on this later).
In this review, I’ll be going over all the different X-3 power rack built-in features and add-on accessories currently available from Titan (as well as ones from Rogue). Be sure to look at that part carefully if you need your rack to have specific accessories.
If you’re looking for a rack with the greatest number of total accessories available (i.e. the greatest expandability), then you might want to consider the Titan T-3 instead. However, you have to also weigh the core specs (i.e. flat feet vs sumo base, weight capacity, dimensions, etc.) of the T-3 and X-3 against your preferences. Then decide accordingly.
Band Work
Do you plan on doing any lifts with bands? Meaning, band-assisted or band-resisted exercises. These lifts are most commonly done by more experienced lifters, especially those who compete in powerlifting.

Some of the more common band-resisted exercises include:
- Band-resisted bench press
- Reverse band bench press
- Band-resisted squat
- Reverse band squat
- Band-resisted deadlift
- Reverse band deadlift

It’s important to realize that band-resisted exercises require attaching the bands to the bottom of a power rack.
This means two things:
#1 The Rack Should Have Lower Band Pegs
Ideally, your power rack should have a space to attach band near the bottom of the rack.
Unfortunately, the X-3 power rack doesn’t have holes on its base like the T-3 power rack does. This is because the X-3 has a flat foot design. Having holes on the flat feet would compromise their structural integrity. And the feet need to be as strong as possible since they are the literal foundation of the X-3 power rack.
Sounds like bad news if you want to do band resisted lifts, right? Well, don’t lose hope just quite yet. I’ve got some easy workarounds that will allow you to install lower band pegs if you want to do band-resisted lifts:
- Attach the band pegs to lower part of the uprights. This involves attaching 2 pegs on the left-side uprights (front left and rear left) and another 2 pegs on the right-side uprights (front right and rear right). Then for each side of the rack, you hook a band around the 2 lower pegs and then around that side of the barbell. This workaround doesn’t require buying any accessories besides the band pegs. The only downside is possibly having more band tension than you’d expect, since the two pegs at the bottom of the rack are spread far apart. Despite that, most lifters will be totally satisfied with this option.
- Buy a second set of pin and pipe safeties. Then attach the safeties on the lowest possible point on the rack. Wrap the band around the safety and then stretch it up and attach it to the end of the barbell. Do the same on the opposite. side. This option should work pretty great, and doesn’t even require getting the band pegs.
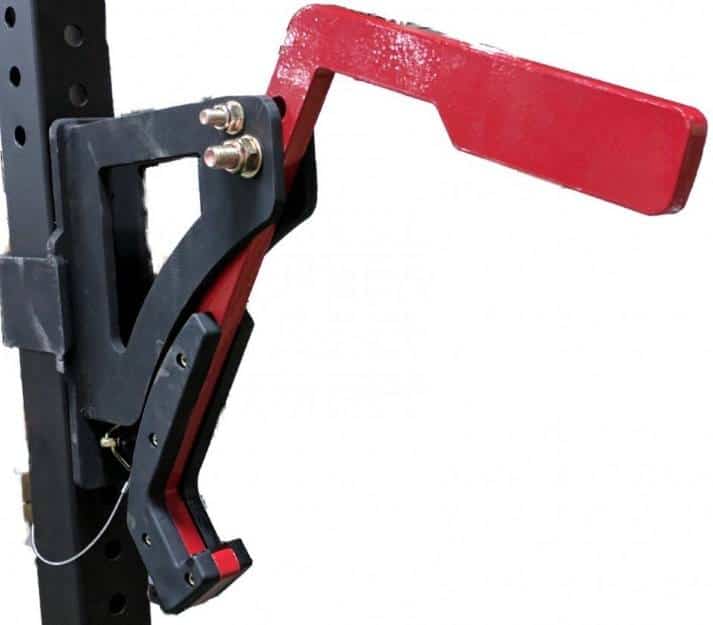
- Buy the flip-down spotters. Attach them as low as possible on the rack. This is probably the most “official” workaround, because, as you’ll notice, the flip-down spotters have holes made specifically for attaching the band pegs (or other accessories). The only downside is you can’t attach these all the way at the bottom of the rack like you can with the pin/pipe spotters. This is because the base gusset plates are in the way. That said, you can attach them just above this level, which is pretty close to the floor. The only time you might benefit from getting even lower than this is if you wanted to do band-resisted deadlifts from the floor inside the rack. In this case, either of the methods described above are superior. For every other scenario I can think of, this one is ideal.
- Buy the X-3 spotter arms and use them inside the rack. The concept is the exact same as with the flip-down spotters, discussed directly above. However, it’s not quite as good because you have to install the spotter arms 4-6 inches higher than if you were using the flip-down spotters workaround. This is because the spotter arms have welded-on gussets on their undersides for support. These spotter arm gussets get in the way of the gusset plates at the uprights, so you can’t install them as low as you may want to. Despite this limitation, this workaround might work just fine depending on the person and the exercise. I wouldn’t recommend getting the spotter arms just for this purpose. However, it could be a convenient solution to the lower band peg issue if you already have a pair of spotter arms–they are one of the most popular X-3 accessories after all, and have plenty of other applications.
#2 The Rack Needs to be Secured to the Floor
If the rack is not secured to the floor for band-resisted exercises, then it may shift, pop up or possibly even tip over if you apply enough force.
Ideally, you should secure the X-3 by bolting it to the floor or a lifting platform with the optional bolt-down gusset plate kit using the appropriate hardware (e.g. concrete anchors).
Now, there is one workaround to bolting the rack to the floor via the gusset plate kit. That is, to load enough weight on the rack to counteract the upward force applied through the band tension.
You could do this by putting a bunch of 45s on the optional weight plate holders, and possibly getting multiple pairs of these weight plate holders to load on even more weight plate if needed.
You could also stack weight plates or heavy dumbbells on the feet of power rack. Or, if you have a workout partner, they could stand on the feet of the rack, using their body weight to keep it stable on the floor.
Understand that this “workaround” isn’t something I officially endorse. There is a chance that you could underestimate the load needed as a counterweight, which could end in injury or damage to the rack, your floor or the ceiling potentially. However, if done right, physics agrees that the counterweight workaround will indeed work.
If you end up going this route, it’s only feasible to do band resisted exercises with light to moderate band tensions. Once you get to higher band tensions, it becomes less practical to load enough weight onto the rack in the right places–and the consequences of miscalculating the counterweight load required becomes too risky. At that point, you need to just bolt-down the rack or simply avoid doing band-resisted movements.
Budget
This should go without saying, but you shouldn’t go into debt to buy a power rack. Save up until you can afford a suitable rack.
Assuming you do at least have some money to spend, first ask yourself:
How tight or flexible is your budget? More specifically, how much money are you comfortable with spending?
If you’re looking to pay rock bottom prices, the X-3 power rack is not for you. It has a mid-range price. There are significantly cheaper racks out there. Just understand that there is going to be a big trade-off in overall quality, specs, features and available accessories…
…Don’t worry, it’s not the end of the world. Far from it actually. While it would be nice to afford a more expensive rack like the X-3, you can still get the job done with a basic bare bones rack like the Titan T-2. It’ll cost you just $380-400 depending on the rack height you choose. You can do all the typical lifts power racks are used for. And it will keep you safe. It even has a couple different useful accessories like dip bars and plate holders. No bells and whistles. No super impressive specs. But it’s good enough and you can easily milk out years of use if needed before an upgrade makes sense (at which time you hopefully have enough money for something better).
What if you’re willing and able to spend somewhat more to get better quality, BUT you’re not quite ready to spend the $660+ for an X-3 power rack?
In that case, I’d recommend the Titan 24″ deep T-3 power rack — either the short or full height version for $490-560. So you’ll save $140+ vs the X-3 (and pay about $110+ more vs the T-2).
Despite the relatively small jump up in price compared to the T-2, you get WAY more in terms of standard features and availability of optional accessories. The specs and features are impressive enough for these racks to be suitable for some commercial gyms. They’re stronger than the T-2 and could keep you satisfied through a lifetime of strength progress. Plus, you can greatly expand it’s capabilities by getting any of the several available accessories–I believe there are actually more T-3 accessories currently available than there are X-3 accessories. Plus, the T-3 comes standard with a couple features that you have to buy separately for the X-3; namely, plate storage pegs and band pegs.
All that said, there are some downsides of the T-3 compared to the X-3. As there should be, considering it costs an extra $100! The main downsides include the following:
- The frame isn’t as strong and therefore the weight capacity is lower (1000 lbs vs 1500 lbs)
- You have to bolt down the rack into the floor (or a platform) if you ever plan on using more than a couple hundred pounds in the rack
- The T-3’s internal depth is 24 inches, whereas the X-3’s is 30 inches. NOTE: there are “deep” versions of the T-3 that are 36 inches, but that bumps the price up
Finally, if you’ve got $660+ you’re willing to part with for a power rack and the X-3’s specs, features and accessories match up best with your needs and wants, then I say GO FOR IT. That’s what I did, anyway. 😀
If you’ve got even more cash that you’re just trying to throw away, then get a few X-3 accessories while you’re at.
Benefits of the Titan X-3 Power Rack
These are the main benefits of the Titan X-3 power rack:
Strong and Durable
All you have to do is look at the technical specs of the X-3 power rack to understand that it was designed first and foremost to be a heavy duty rack. Other racks like the T-3 are also what most would consider robust and capable of handling heavy use over many years…
…However, when it comes to strength, the X-3 is like the T-3, BUT ON STEROIDS! 😀 Sorry to resort to that overused saying. But it’s true. The X-3 blows the T-3 (and any comparable racks) out of the water in this category.
It is literally 50% stronger than the T-3:
- The uprights take up 50% more space. The X-3’s 3″ x 3″ uprights take up 9″ cubic inches of space, or volume, per inch of height (3″ width x 3″ depth x 1″ height = 9 cubic inches). Whereas, the T-3’s 2″ x 3″ uprights fill up just 6″ cubic inches per inch of height (2″ width x 3″ depth x 1″ height = 6 cubic inches). And to bring it all together: 9 is 50% more than 6 (9/6 = 1.5). Who said you’d never use Math in the real world!
- It can handle 50% more weight. The X-3 has been rated at a 1500 lb weight capacity. The T-3 has been rated at a 1000 lb weight capacity. While this is impressive in it’s own right, the X-3 nonetheless outclasses it by a full 500 lbs. Thus, making the X-3 power rack 1.5x (aka 50%) stronger!
Best Value for High Load Capacity Power Racks
I know a lot about power racks. I’ve read through the features and specs of hundreds over the years when making my comparison chart and just out of interest.
The X-3 is the lowest priced rack in the category of strong, or heavy duty, power racks. This means:
- Power racks with a high load capacity ratings. I would consider a “high” to be 1000 lb rating or more capacity. The X-3 is rated for 1500 lbs.
- Power racks with robust frames. I’d consider a frame to be robust if it has AT LEAST 2″ x 3″ uprights and 11 gauge OR THICKER steel (e.g. 7 gauge is typically the next thickest gauge you’ll see). The X-3 is 3″ x 3″ with 11 gauge, so it easily meets and exceeds my standards for a robust frame.
There are certainly stronger and more precisely constructed power racks out there (e.g. Sorinex racks, Power-Lift racks, Matrix Magnum racks, Rogue Monster series racks and others) with crazy specs like 3″ x 3″ (or even 4″ x 3″!) uprights and 7 gauge steel. BUT, they range from a few hundred to few thousand dollars more!
Even racks with comparable specs (i.e. 3″x3″, 11 gauge) are more expensive. For instance, the Rogue RML-390F is almost identical to the X-3 in every way, and it costs hundreds of dollars more. More on this rack below.
Plus, the additional benefit of a load capacity/overall quality that’s higher than the X-3’s is likely minimal for home gym users–especially when weighing the marginal benefit against the cost.
You Can Accessorize!
The X-3 is more than just a strong block of metal you can squat and bench in. It’s designed to be used with any of a growing number of power rack accessories that expand your exercise choice selection.
I’ll talk about each and every one of the accessories you can get for the X-3 later on. For now, I’ll just mention a few of the coolest ones: multiple dip bar attachments, double landmine attachment,
No Need to Bolt It to the Floor (Unless You Want to)
As mentioned earlier, one of the big reasons I chose the Titan X-3 was because it has a totally self-supporting design. You don’t have to bolt it into the floor to keep it stable and safe, even if you’re pushing some really big numbers in there.
This is because of two major design elements:
- The flat foot design is made for stability. It distributes the weight over the floor. And because the feet extend about 6 inches beyond the uprights, on the front and rear of the rack, this prevents any rocking back and forth if a heavy bar is dropped inside.
- The rack is REALLY heavy because of the large 3″ x 3″ uprights, 11 gauge solid steel construction and heavy duty hardware. Specifically, the short version is 334 lbs and the full height version is 343 lbs. This is heavier than most home or light commercial power racks by about 100 lbs! All this weight helps keep the rack steady on the floor thanks to this little thing called gravity. ;-P

So while you don’t need to bolt down the X-3 power rack, you can do so if you want. You just have to get the 4-pack of bolt-down gusset plates.
You might want to do this if you plan on doing heavy band resisted squats or bench press. Or, if you just want to maximize stability to the point that the rack will never budge one single millimeter.
Walkthrough Design
Another super convenient feature of the X-3 power rack is that there is no bottom crossmember on the base that is blocking the front or rear of the power rack. So you can easily walk or bring a bench all the way through either end without impediment.

This means you can put equipment exactly where you want it inside the rack. For example, if you want to put your bench further back, you can do so. Whereas, if there was a bottom crossmember in the way, you’d have to position the bench more toward the front in than you’d prefer. This was actually an annoyance with my old power rack.
Besides better equipment positioning, the biggest benefit with the walkthrough design is more room to exercise inside the rack. Here are some exercises made possible, or easier thanks to the walkthrough design:
- Lunges
- Reverse lunges
- Split squats
- Bulgarian split squats
- Inverted rows
- Step ups (assuming you have enough vertical clearance)
- Some push up variations
Unbeatable Value
Is the Titan X-3 the best power rack for the money?

It’s impossible to say, since there’s subjective elements to that question. However, in my case, the Titan X-3 short power rack was most definitely the best power rack for MY money.
As with all Titan products, the price is ridiculously low for the overall construction quality, the specs and the features you get.
Yes, there are other 3″ x 3″ power racks out there with westside hole spacing and tons of accessories. BUT guess what? They cost around twice as much, or more! But you can be sure they’re not double the quality. They might be 5 or 10% “better” overall, if such a thing is even quantifiable.
Whatever the case, the marginal improvement isn’t worth the 2x or higher price tag. That extra bit of quality doesn’t make a difference to me from a practical standpoint. And I’d bet most people reading this review would have a similar perspective.
Titan X-3 Power Rack Pros & Cons
Pros
- High value (bang for your buck)
- Very robust, sturdy and safe, as evidenced by the 3″ x 3″ frame and 1500 lb capacity
- Tall and short versions available
- Doesn’t need to be bolted down thanks to long, flat feet that provide balance
- Walkthrough rack design allows you to do exercises with forward/reverse movement without impediment (e.g. front or rear lunges). Also, you can easily switch between exercises on either or both sides of the rack, inside or outside, if you have multiple j-hooks.
- Can be bolted down if you want for maximum stability (e.g. to prevent slight shifting; or to do band resisted work–which by the way requires a workaround for lower band pegs)
- Lots of accessories available (from Titan, as well as many other from Rogue)
- Squat stand variations of the X-3 are available if you don’t have the floor space for a full power rack.
Cons
- Weight storage and band pegs are sold separately, despite coming standard on the T-3 power rack
- You can not do wide sumo stance exercises inside the rack to do the flat foot design
- Currently 30″ is the only depth available
- No built-in holes on the feet for band pegs
- Feet extend far in front of an behind the rack. This is necessary to provide stability. However, it increases the footprint and floor space needed to accommodate it.
- Since this is a newer rack from Titan, they don’t have all the accessories available now that will eventually be available. However, as mentioned in the “Pros” column, you can get any other accessories from Rogue.
Titan X-3 vs Titan T-3
Titan’s first and currently it’s most popular power rack is the Titan T-3. It’s a great rack and you may be considering it as well for your home gym.

The T-3 has many things in common with the X-3, but there are some major differences. Let’s take a look at them in the table below:
| Category | Titan X-3 | Titan T-3 |
|---|---|---|
| Price: | $659.99 for full height version $699.99 for short version Free US shipping | $559.99 for full height version $489.99 for short version $599.99 for full height deep version $529.99 for short, deep version Free US shipping |
| Short Version: | There IS a short version of the Titan X-3 power rack (as mentioned throughout, I bought this one) | There ARE two short versions of the Titan T-3 power rack: One for the default depth (24″) version and one for the deep (36″) version |
| Deep Version: | There are NOT any deep versions. All X-3 flat foot power racks are 30″ deep | There ARE two deep versions of the Titan T-3 power rack: One for the full height version and one for the short version |
| Height: | 92″ for full height version 82.375″ for short version | 91 1/8″ for full height versions 82 1/4″ for short version |
| Footprint / Dimensions: | 30″ internal depth 36″ external depth not including the feet 47″ external depth including the feet (NOTE: Titan site claims its 49, but I measured 47″ on my short X-3) 42″ internal width 48″ external width | Regular Depth Versions of T-3: 24″ internal depth 32 3/4″ external depth 42 1/8″ internal width 53 1/4″ external width Deep Versions of T-3: 36″ internal depth 44 3/4″ external depth 42 1/8″ internal width 53 1/4″ external width |
| Base: | Flat foot base | Sumo base |
| Bolt-down Option: | Optional bolt-down gusset plate kit is available | Designed specifically to be bolted down to floor or platform |
| Conversion Kit: | There is no kit available for converting the X-3 squat stands into a Titan X-3 power rack | There is no kit available for converting the T-3 squat stands into a Titan T-3 power rack |
| Manufactured: | The X-3 and all Titan racks are manufactured in China, though the Titan company and warehouse facility is based out of Tennessee. | The RML-390F and all Rogue racks are made in the USA |
Now, I want to highlight and expand upon a few key items shown in the comparison chart above:
Flat Foot Base vs Sumo Base

The most apparent difference between the T-3 and X-3 is the base.
- The X-3 has the flat foot base. This is self explanatory: the feet lay flat on the floor and tubing itself is also flatter (2″ x 3″) than the tubing that makes up the uprights (3″ x 3″).
- The T-3 has the sumo base. This means the lower crossmembers on the left and right side of the rack are elevated a few inches off the floor.
One type of base is not inherently better than the other. They’re just different. Each has its own benefits and drawbacks.
Let’s start with the benefits and drawbacks of the sumo base:
- It allows you to use an extra wide stance (i.e. a “sumo” stance; named after sumo wrestlers) that exceeds the width of the rack itself, because your feet can go under the elevated crossmembers. This would desirable if you want do sumo deadlifts, sumo rack pulls or sumo squats inside the rack, and if your sumo stance width is actually greater than 42″ (the internal width dimension of both the T-3 and X-3).
- The other big benefit of the sumo base is that the lower crossmembers have holes in them. This is the perfect location for putting band pegs if you want to do band-resisted squats, deadlifts, rack pulls, bench or others.
- Sounds great so far. But here’s the big drawback: it doesn’t provide the support needed to keep the rack stable and stationary. For the rack to have a sumo base, you need to bolt it to the floor. For some people, myself included, this is not an option. Even if it is an option, you may find that having the rack bolted is limiting. For example, if you ever want to adjust the rack position, you have to take the bolts out and then drill into the floor again to re-bolt it down.
Now, let’s examine the pros and cons of the flat foot base:
- It provides enough stability and balance needed to support the rack on its own. This base will prevent tipping and prevent or minimize any shifting, using any load up to the max weight capacity of 1500 lbs. No bolt-down required. This is a HUGE benefit for me personally, as I mentioned before, and it greatly outweighs any of the negatives, as well as any of the positives I discussed about the sumo base. Again, that’s me. Your home gym limitations and training needs/preferences could be totally different than mine.
- You can move the around if you want to. Sometimes you need to reorganize your setup to make things work better in the space you have. Maybe you’re doing different exercises that you need more space for. Maybe you got some new equipment that you need to make room for. Maybe the feng shui of your gym are just feels off! 😀 Who cares. The point is you can move the rack across the floor with relative ease. It is just shy of 350 lbs, so it will take some effort. But it’s a hell of a lot easier than having to remove bolts from the floor, move the rack, then drill holes in the floor and re-install the bolts–as you’d have to do if you wanted to move the T-3.
- You can optionally bolt it down if you want to totally eliminate the very minor shifts in position that may occur over time or if you really slam a heavy bar into one of the sides. It can also allow you to safely use more weight on the attachments outside of the rack (e.g. any exercise where the bar is on the spotter arms, weighted Y-bar dips with the bar facing outward); even if you’re not using the max weight capacity of these attachments, you have to consider that you’re actually putting more force on the rack because you’re creating a lever. Don’t want to do the optional bolt down, but still want to go heavy outside the rack? Here’s the quick and dirty trick: counterweight opposite side of the rack by loading a bunch of weight on the plate holders.
- You can’t do sumo stance exercises inside the rack, unless your sumo stance width is less than 42″ (the X-3’s internal width). I personally never do any sumo stance work. But I know some people are really into sumo stance deadlifts. If that’s you and you really want to do you sumo deadlifts inside the rack, then you should get the T-3 instead. Or if you want the X-3 for other reasons, you could just deadlift outside the rack. That’s what I do anyway, and I’m pretty sure the vast majority of other lifters also deadlift outside the rack. The only scenarios I see the flat foot base being a deal breaker are: 1) if your sumo stance is greater than 42″; and 2) any of the following exercises are a must for you: sumo squats, band resisted sumo deadlifts, reverse band sumo deadlifts, band resisted sumo rack pulls, reverse band sumo rack pulls, or regular sumo rack pulls over close to or approaching 1000 lbs (since you could do these outside the rack on the spotter arms, but they have a max capacity of 1000 lbs vs 1500 lbs inside).
Different Depths: 30″ vs 24″ or 36″
The default rack T-3 racks (tall and short ones) have a 24 inch internal depth. There are also “deep” versions of the T-3 with a 36 inch internal depth (tall and short versions).
The X-3 is only available with a 30″ internal depth for both the tall and short X-3 power racks. This is nice because it is significantly deeper than the default T-3 depth. In my opinion and experience, 30″ depth is plenty of space for just about any sized person doing just about any exercise that requires a power rack.

However, if you know you want even more space because of preference or comfort, then you may be disappointed by the lack of 36″ depth X-3 rack option.
Titan X-3 vs Rogue RML-390F
The Titan X-3 power racks are almost the same rack design as the popular Rogue Monster Lite 390F also known as the RML-390F.

The Rouge version has been around for years. Whereas the X-3 just came out in the first half of 2017. So Rogue gets credit for originality on this one. But that’s probably not a factor most lifters care about in deciding which track to buy.
The two competing racks, while VERY similar, aren’t completely identical. Here are the main differences:
| Category | Titan X-3 | Rogue RML-390F |
|---|---|---|
| Price: | $659.99 for full height version $699.99 for short version Free US shipping | $870 plus shipping |
| Short Version: | There IS a short version of the Titan X-3 power rack | There is NO short version available for the Rogue RML-390F power rack |
| Height: | 92″ for full height version; 82.375″ for short version | 93 3/8″ |
| Footprint / Dimensions: | 30″ internal depth 36″ external depth not including the feet 47″ external depth including the feet (NOTE: Titan site claims its 49, but I measured 47″ on my short X-3) 42″ internal width 48″ external width | 30″ internal depth 36″ external depth not including the feet 48″ external depth including the feet 43″ internal width 49″ external width |
| Bolt-down Option: | Optional bolt-down gusset plate kit is available | No bolt-down option available |
| Conversion Kit: | There is no kit available for converting the X-3 squat stands into a Titan X-3 power rack | There is a kit available for converting the Rogue SML-2 and SML-3 squat stands into an RML-390F power rack |
| Manufactured: | The X-3 and all Titan racks are manufactured in China, though the Titan company and warehouse facility is based out of Tennessee. | The RML-390F and all Rogue racks are made in the USA in Ohio |
Here are the important similarities:
- Most accessories made for the Rogue RML-390F are compatible with the Titan X-3. And vice-versa. However, some likely will not be compatible between the 2 racks. This includes any accessory that is mean to be attached across the width of the rack (e.g. the fat or skinny pull up bars). This is because the width of the RML-390F (43″ internal, 49″ external) is 1 inch greater than the width of the X-3 (42″ internal, 48″ external).
- The key similarities between the X-3 and RML-390F are: 3″ x 3″ uprights, Westside hole spacing and the same depth dimensions (30″ internal depth; 36″ external depth not including the feet). These similarities allow you all accessories–except those mentioned in the previous bullet point–to be interchangeable between the two racks.
- Both racks likely have the same weight capacity rating of 1500 lbs. I say “likely” because Rogue does not list it on their site. However, it’s reasonable to assume the Rogue is also rated for 1500 lbs since the steel thickness is the same, the uprights are the same and the rack dimensions are either identical or almost the same.
Titan X-3 Power Rack Specs


Titan X-3 Power Rack Specs & Features Overview
- 42″ inside width
- 48″ outside width
- 30″ inside depth
- 47″ outside depth (NOTE: The Titan site lists it as 49″. This is a mistake/typo since I measured mine at 47″)
- 1500 lbs weight capacity
- 11-gauge solid steel frame
- 3″ x 3″ steel tubes
- 1¼” diameter skinny pull up bar
- 2″ diameter fat pull up bar
- 87″ pull up bar height (for full height rack)
- 78.375″ pull up bar height (for short rack)
- 92″ overall height (82.375″ for short rack)
- 2 j-hooks
- 2 “pin & pipe” safety catches
- Many optional attachments available, discussed below.
- 343 lbs overall weight (334 lbs for short rack)
- Can be bolted-down but requires optional gusset plates
- UHMW protective plastic coating on j-hooks as well as the optional spotter arms and monolift attachments. Preserves the bar and the attachments
- Westside hole pattern: 1″ hole spacing in bench/rack pull area; 2″ everywhere else
- 5/8″ (16mm) hole diameter
- 48″ x 47″ foot print, or 15.66 ft² (NOTE: The Titan site lists a footprint of 48″ x 49″, or 16.33 ft²; this is an error since I measured mine at 48″ x 47″)
- Very low price considering the specs
- High quality construction, built to last and endure frequent heavy use
- 1 year limited warranty (details)
- FREE shipping – ships same day if ordered before noon CST on weekdays
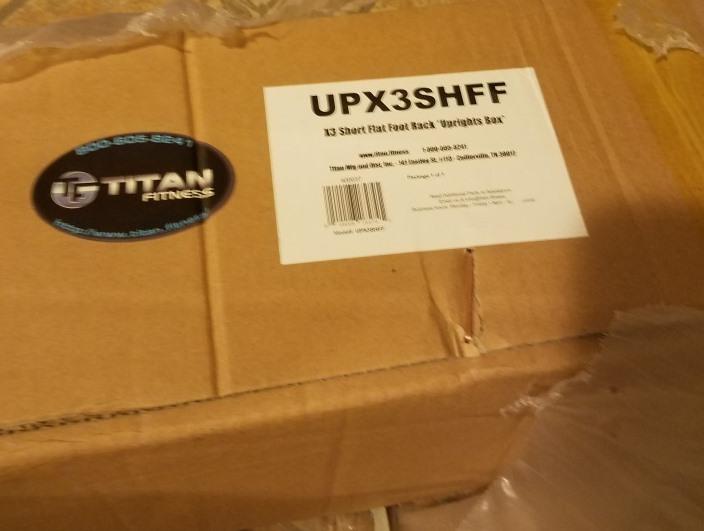
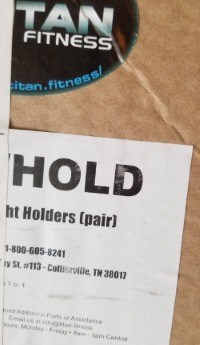
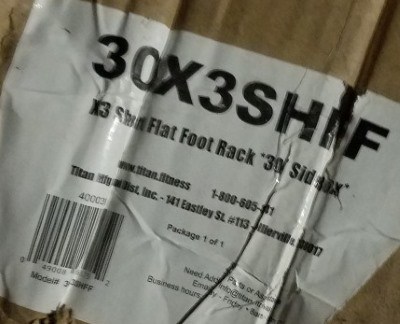
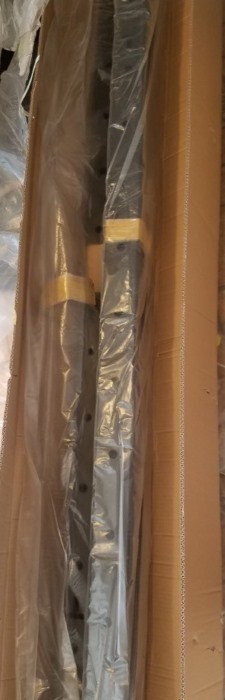
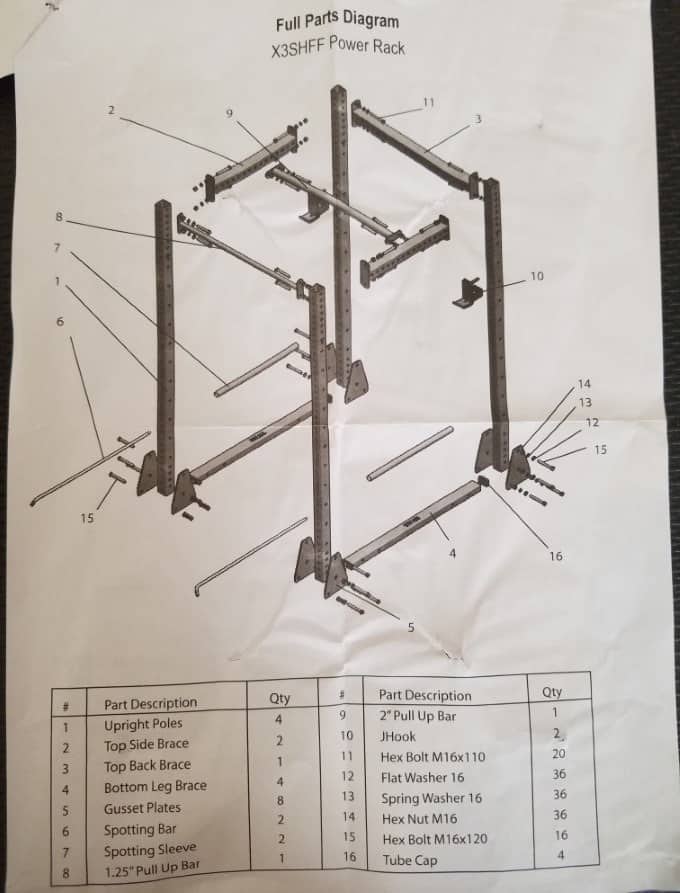
Titan X-3 Unboxing & Installation
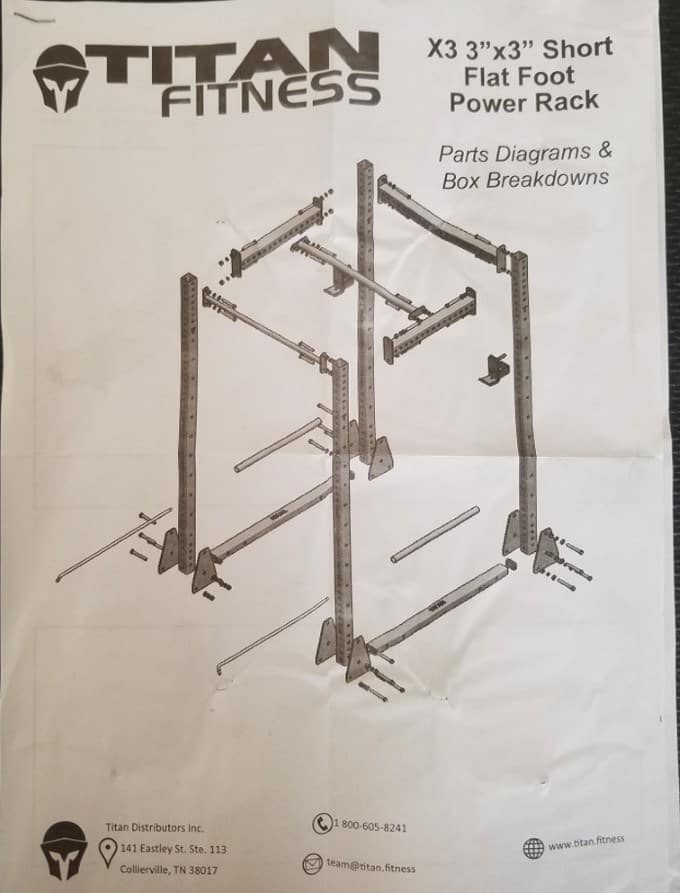
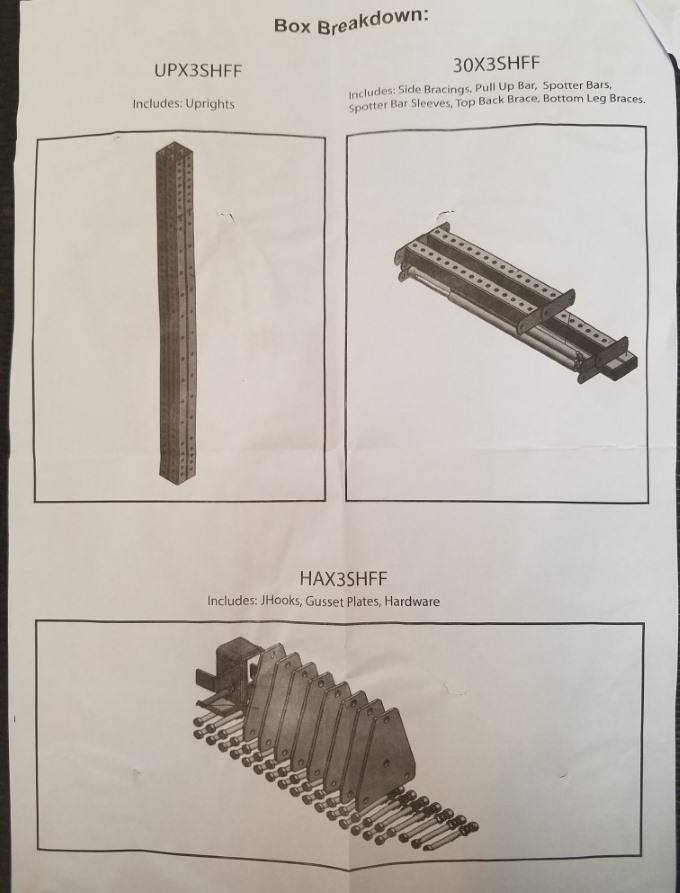
Unfortunately, installation wasn’t as straight-forward as I expected. Frankly, this is because the instructions are confusing.
You’re basically just going off a diagram. And as I noticed that diagram has some small but important details that are shown incorrectly. Specifically, it doesn’t show the correct order that the hardware (i.e. bolts, washers, lock washers, nuts) should be secured.
FYI, the correct order is: bolt -> washer on one side, then lock washer -> nut on the other side. This might be obvious if you’re into DIY projects or construction, but I’m not. So I had to start over once I realized I was putting it together wrong.
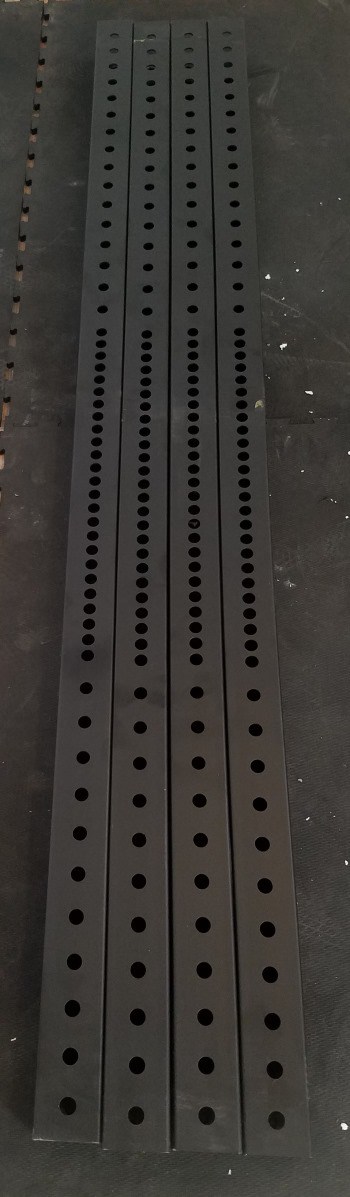
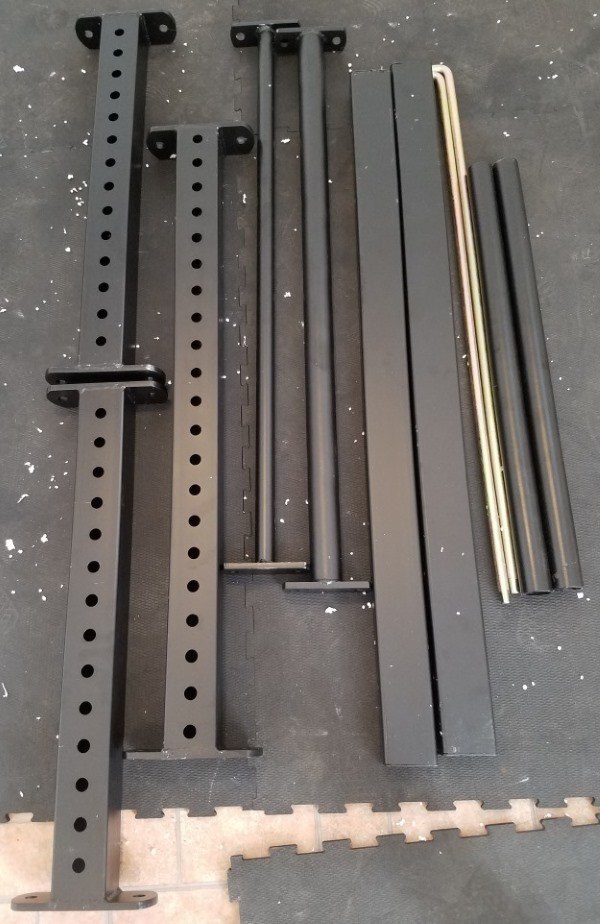
Titan X-3 Unboxing Photos
See below for a bunch of photos I took while unboxing the X-3 and organizing all the parts for assembly:


Titan X-3 Power Rack Accessories
UPDATE: I originally wrote this Titan X-3 power rack review back in 2017. However, some of the X-3 accessories in the following sections are no longer available. Similarly, there are several new X-3 accessories available now that weren’t available previously. You can see all currently-available Titan X-3 power rack accessories here.
Standard Accessories
X-3 Skinny Pull Up Bar & X-3 Fat Pull Up Bar

The X-3 comes standard with 1 skinny bar (1.25″ diameter) and 1 fat bar (2″ diameter). These are actually the same exact bars used for the Titan T-3.

If you wanted a second skinny pull bar to replace the fat bar, you could do so by purchasing an additional skinny bar separately. Then put it in place of the fat bar.
I personally don’t see the value in having 2 skinny bars for myself–or most other lifters for that matter. However, maybe you and a workout partner want to do pull ups at the same time using the same bar.
Here’s another possible skinny/fat pull up bar scenario you could set up:
You could have both the skinny and fat bar set up as normal. Then you add a third bar (either fat or skinny) in between the original 2 bars.
You’d have to position the bars so there’s enough space to do pull ups on one without hitting into either of the others. It might be a bit cramped, but it’s doable. The main benefit of doing this is that you would create a kind of makeshift monkey bar set up that would allow you to do neutral grip pull ups (i.e. palms facing each other).
The above are just the different ways you can get creative with pull ups–using just the skinny and/or fat bars. However, there are actually A LOT of other optional X-3 pull up bars and accessories to give you even more variety when it comes to pull up variations. I’ll discuss these later on in this review.


Specifications:
Skinny Pull Up Bar:
- Material: Steel
- Length: 42″
- Diameter: 1.25″ (Outer Diameter)
- Weight: 6 lbs
- Compatibility (General): Any power racks, half racks or squat stands with 5/8″ holes, 2″ hole spacing and 42″ internal width (distance from inside of one upright to inside of opposite upright).
- Titan Compatible Racks: All Titan X-3 and T-3 power racks and squat stands.
Fat Pull Up Bar:
- Material: Steel
- Length: 42″
- Diameter: 2″ (Outer Diameter)
- Weight: 9 lb
- Compatibility (General): Any power racks, half racks or squat stands with 5/8″ holes, 2″ hole spacing and 42″ internal width (distance from inside of one upright to inside of opposite upright).
- Titan Compatible Racks: All Titan X-3 and T-3 power racks and squat stands.
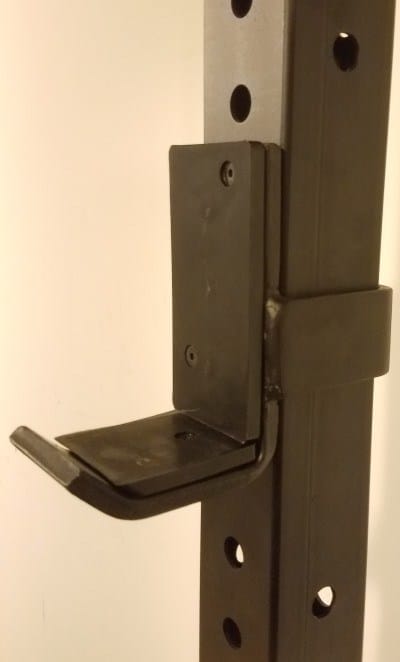
X-3 Padded J-Hooks
The Titan X-3 power rack comes with a pair of padded j-hooks. The “padded” part refers to the UHMW plastic liner covering both the upper and lower portions of the j-hook.
The UHMW plastic eliminate metal-to-metal contact between the j-hooks and the bar. This is an important feature because of the following specific benefits:

- It protects the barbell knurling from wearing down over time
- It protects the barbell from immediate damage (e.g. scratches or dings) if you rack the weight really hard
- It reduces noise when racking/unracking the bar
- It absorbs much of the impact that occurs when the barbell hits against the j-hooks. This cuts down on any bouncing that occurs when racking. The benefit here is two-fold. First, there’s less noise and damage as mentioned above. Second, you’re much less likely to have the loaded barbell bounce so hard off the back of the j-hooks that it misses the lip/cup and comes down on you! This scenario is rare, but it can happen if you: 1) you have j-hooks that don’t absorb impact; 2) rack the bar too hard; 3) begin to remove your hands before the bar is fully racked and sitting still.
These j-hooks have a short, angled lip. This design makes it easy to unrack the barbell. You can just hoist the bar a very short distance up and away from the hooks in order to successfully clear the lip and unrack the bar.
Many other j-hooks or j-hook alternatives have a tall and/or non-angled lip. This requires you to hoist the bar higher up over the lip and increases the likelihood of hitting the bar into the lip when you unrack…
…Even if you don’t hit the lip, you still have to lift the bar higher than is ideal. This requires additional energy expenditure and ROM, which can throw off your strength and/or form. This is an especially important concern on bench press where maintaining the setup position is extremely important and can easily be disturbed by poor execution during the unrack.
Another good feature of these particular X-3 j-hooks is that they have a tall upper portion. It is 6 inches high. This is great because you’re much less likely to rack the bar too high and accidentally bang up the uprights, compared to if you were using j-hooks with a short upper portion.
Compare this to if you had j-hooks with a short upper portion. In that case, you’d be much more likely to accidentally rack the bar a bit too high and bang it into the uprights. Or at the very least you’d have to put extra focus on racking precisely to avoid doing so.
Even though you get a pair of the X-3 j-hooks with the rack, you may want to consider getting a second pair. This way you can quickly switch between exercise stations if you’re supersetting two different barbell exercises. Or maybe you want to transition from one exercise to the next quickly or because you don’t feel like unloading the bar.
If you want the benefits of having extra j-hooks, then be prepared to get a extra barbell if you only have one now.
Specifications:

- Weight Capacity: 1,500 lbs per pair of j-hooks
- Liner Material: UHMW plastic
- Weight: 4 lbs per j-hook
- Dimensions of Bottom Padded Portion: 4″ depth x 3″ width
- Dimensions of Upper Padded Portion: 6″ height x 3″ width
- Pin Diameter: 5/8″
- Compatibility (General): Fits on any rack with 3″ x 3″ uprights and 5/8″ holes
- Titan Compatible Racks: All Titan X-3 power racks and squat stands
X-3 Pin & Pipe Safeties
The pin and pipe safeties are the default spotter bars that come standard with the X-3 power rack.

The main benefits of these pin/pipe safeties are as follows:
- They keep you safe from being crushed or pinned under they bar. They catch the bar at whichever height you set them, ensuring the bar can’t drop any lower. They’ll stop the bar whether you lower the weight slowly onto them, or if you have to bail from a lift and dump the bar completely. NOTE: You shouldn’t drop the bar on purpose
- They absorb a great deal of the blunt force when the barbell is dropped or slammed into them. You want them to absorb most of the impact rather than the barbell. This makes it more likely that the bar will remain straight and the quality of its knurling will be preserved.


The pin/pipe safeties, however, are not perfect for every situation. Here are a few of their shortcomings:
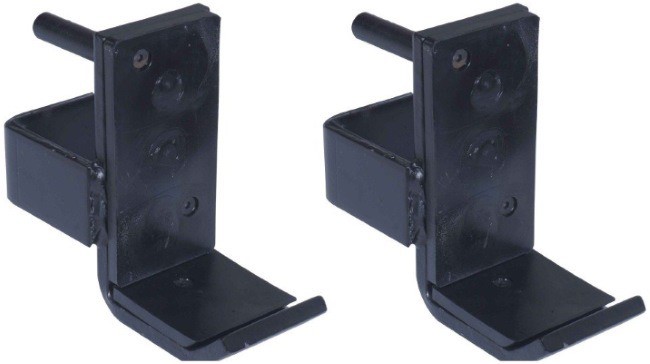
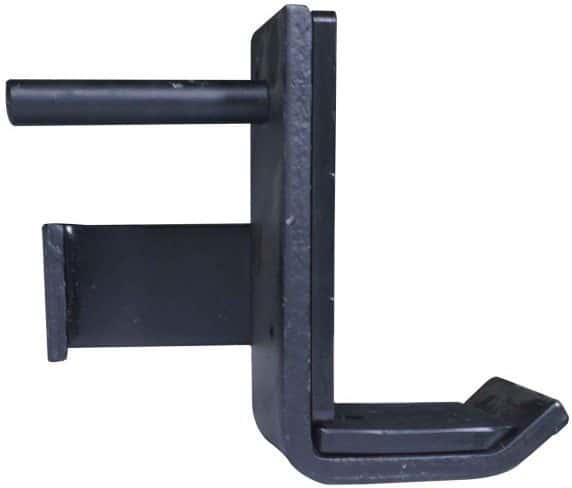
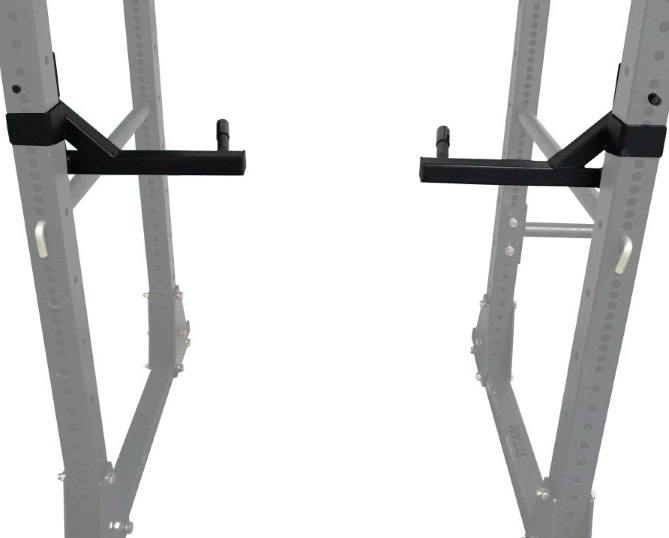
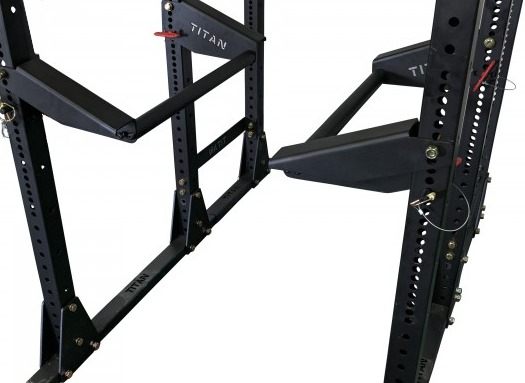
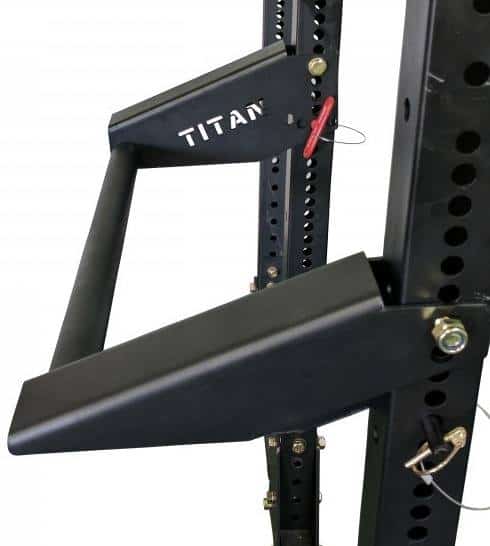
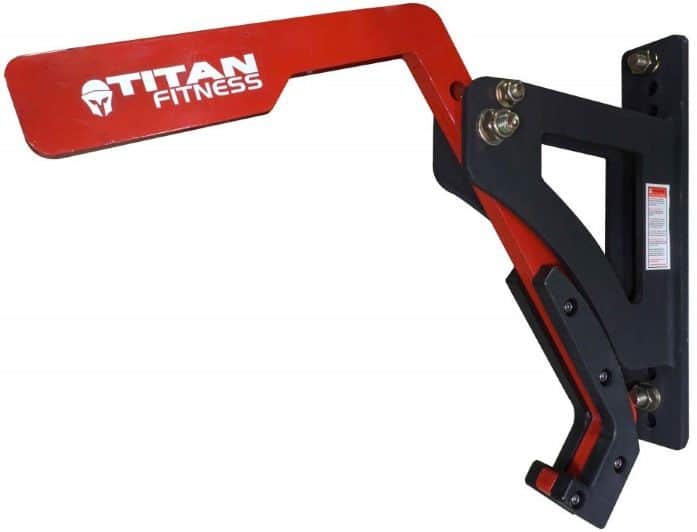
- They’re not the best option if you think you’ll be slamming a heavy bar into them, such as is required for heavy RDLs. In that case, the X-3 flip-down spotter arms are a a far superior option. They’re a full 3 inches wide, have a flat surface and a protective UHMW plastic lining.
- You shouldn’t be dumping the a heavy barbell on these, at least not on purpose. Why? If the bar is heavy enough and dropped from high enough, you may the bar may develop a permanent slight bend. It may also get a ding or two in the knurling. It’s not the end of the world, but it’s definitely not what you want to happen. If you’re attempting new PRs and the chances you’ll need to dump the bar are significantly higher than normal, then the X-3 flip down spotters are a better choice. If you’re doing the exercises where you may want to dump the bar as part of the movement (e.g. if you want to dump the bar in a controlled fashion at the end of the hang clean or similar Olympic lift variant).

They consist of a 1/2″ pin and a 1 3/4″ pipe. You put these spotter bars in the rack by first holding the pipe between the two uprights at the desired height. You then slide the pin through the holes in the first upright, into and through the pipe, and all the way through the rear upright. Then do the same on the other side of the rack.
Why use a pin and pipe for spotters? Because the small 1/2″ pin design allows the rack to have small 5/8″ diameter holes with 1 or 2 inch hole spacing.
However, a 1/2″ pin by itself wouldn’t be nearly strong enough. That’s where the pipe comes in. The pipe greatly bolsters the strength of the spotters. Not only that, but it absorbs more of the bar’s impact, and reduces any acute damage and long-term wear to the barbell. This is all thanks to the structure of the pipe and its large size (1 3/4″ diameter).
Specifications:
- Material: Steel
- Pin Length: ~37″
- Pin Diameter: 1/2″
- Pipe Length: ~29.5″
- Pipe Diameter: 1 3/4″
- Paint Finish: Black powder coating
- Compatibility (General): Any power rack with 5/8″ holes and 30″ internal depth
- Titan Compatible Racks: All Titan X-3 power racks.
- Price: N/A currently
Optional Accessories
There are about 2 dozen optional accessories for the X-3 power racks as of the time I’m writing this review (November 2017). I’ve seen Titan add a couple new accessories each month for the past few months.
I expect them to continue adding more X-3 accessories to their product lines in the coming months and years.
Below, I’ll discuss all of the accessories that are currently available. As time goes on, I’ll try to update this page with any new X-3 accessories that come out.
3 Different Dip Bar Attachments
There are currently three different dip bar attachments available for the X-3:
- The X-3 Dip Bar Handles (2 separate pieces)
- The X-3 Y Dip Bar (1 piece)
- The X-3 Parallel Bars (2 separate pieces)
I’ll discuss each of these in detail below. But first, I’ll go over the different exercises you can do on both of these dip options. And if there’s in any notable differences between how you do these exercises on the two different attachments, I’ll be sure to point them out to you.
First off, you can do dips on this attachment. Duh! It’s in the name. Below are the other, much less obvious exercises you can do these if you get a little creative:
Inverted Rows
In case you’re unfamiliar with inverted rows, you do it by grabbing onto a fixed barbell, or in this case the dip handles. You position your body facing up to the ceiling with your legs and torso straight. Start with your arms hanging straight, then row your body up against gravity.
The X-3 dip handles attachment actually has a very convenient design for inverted rows. This is because the handles attach opposite each other on the front left/front right uprights or the rear left/rear right uprights. This set up allows you to position your body between the uprights–This, combined with the X-3 power rack’s walkthrough design, allows you to have your body pointing toward the front or the back of the rack.
Inverted rows are one of the few areas where the X-3 Y dip bar attachment is less effective than the X-3 dip handles, despite being better overall. You can still do inverted rows with the Y dip bar option, but you can’t position yourself as optimally–You have to either straddle one of the uprights (not recommended) or face away from the attachment, which might be difficultif space is limited outside the rack.
Incline Push Ups
Incline push ups refer to a modified, or easier version of the push up, where your hands are higher than your feet. The higher up you place your hands relative to your feet, the easier it becomes.
It works basically the same with both dip attachments options:
- You adjust the height to the desired level.
- Then you grasp the handles, walk your feet out, make your body straight and proceed to do push ups to your heart’s content.
Pull Ups
Believe it or not, you can also do pull ups with both of the dip bar attachments, too!
The power rack comes with two pull up bars. But those are straight pull up bars. Whereas, the dip attachments allow you to do neutral grip (palms facing each other) pull ups.
The process for setting up either of the dip attachments for pull ups is pretty straight forward:
You just adjust the height of the attachment so that it’s at or near the top the upright(s). Then you’re all set to do your neutral grip pull ups.
This is a neat little trick to have available, especially if you don’t have enough headroom using the skinny or fat pull up bars. When you use the dip bars for pull ups, you can attach at a lower height, so you have plenty of clearance to do pull ups without hitting the ceiling.
Of course, you could also solve the pull up headroom issue by installing one of the included pull up bars at a lower height. That’s what I plan on doing when I get around to it. But even that option doesn’t give you the ability to use a neutral grip.
Several Dip Variations
There is more than one way to do a dip. In fact, there are many different types of dips.
This includes modified dip variations to make dips easier for beginners. This also includes advanced dip variations to that make dips more difficult. And it includes other types dip variations that emphasize the chest, shoulders or triceps more.
Check out these 20 different dip variations if you want to get creative with this exercise–some (but not all) of the variations shown can be done on these X-3 dip station attachments.
Now that I’ve covered the exercises, let’s look at each dip attachment option in detail.
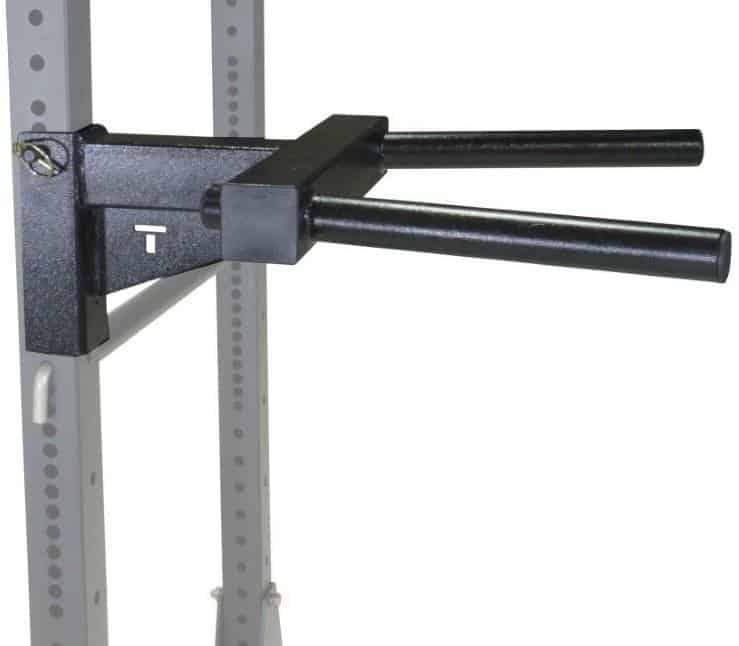
X-3 Dip Bar Handles
The X-3 dip bar handles are the most basic of the different types of dip attachments available for the X-3 racks.
They are two separate dip bar handles that attach to either front left and front right uprights, or the rear left and rear right uprights.
The handles can face inside the rack or outside. I recommend using them inside the rack for better stability if you do heavy weighted dips and you don’t have the rack bolted down with the optional bolt-down gusset kit.
These have an impressive 700 lbs weight capacity. I don’t know if anyone could exceed that amount doing weighted dips (excluding a few of top 400lb+ freak Strongman competitors out there). So they’re plenty sturdy. But they’re less robust and less durable than the X-3 Y dip bar attachment, which is a behemoth of dip attachment (I’ll discuss this in the next section).
So, should you get these dip bar handles? If the following are true, then yes, you should get these dip handles:
- You want basic but perfectly sufficient dip bar handles
- You prefer, or don’t mind, having 1.25″ diameter handles (this is just a bit larger than the 1.1″ diameter of an Olympic barbell handle. Some people consider this handle diameter to be a bit “skinny” for dips. However, it’s a subjective preference. Some like it and some don’t care either way.
- You prefer, or don’t mind, having separate handles (as opposed to a single attachment)
- You want to save about $10 bucks compared to the Y dip bar
Specifications:
- Weight Capacity: 700 lbs.
- Material: Steel
- Handle Spacing: 24″
- Handle Diameter: 1.25″ (1″ steel handles; rubber grips increases diameter by 0.25″)
- Weight: 13 lbs per pair of handles
- Compatibility (General): Fits any 3″ x 3″ uprights with 5/8″ holes
- Titan Compatible Racks: All Titan X-3 power racks and squat stands
X-3 Y Dip Bar
The X-3 Y dip bar is more impressive of a dip attachment compared to the dip handles discussed above. It is a single piece of equipment as opposed to the more basic X-3 dip option (discussed above), which consists of two separate pieces.

As you probably guessed, this dip attachment is named after the Y-like shape it resembles. It has a robust base that makes contact with the rack along an entire 10 inches of the upright, and wraps around three of the four sides of the 3″ x 3″ upright tubing.
From its base, it extends outward another 10 or so inches before branching out into the handles. This is provides plenty of clearance to perform dips, which often inolve angling your torso forward (especially on chest-focused dips)–the last thing you would want is to have to worry about bumping your noggin into the uprights on every rep.
Because this Y dip attachment extends out so far, it needs additional support to ensure it can handle even the heaviest of weighted dips with ease. This support is provided by the triangular gusset welded on the underside.
The handles are long and are somewhat angled. This gives provides a very ergonomic taper that allows you to use a grip width of anywhere between 17 to 24 inches. You just position your hands more forward or backward depending on your desired grip width.
This large range of grip widths ensures lifters of any stature – tall or short – can do dips comfortably. It also lets you target the triceps more by going narrower. Or you can emphasize the chest a bit more by going a bit wider.
The handle widths are thicker. They’re just under 2 inches in diameter. This actually makes it easier and more comfortable to perform dips compared to on narrower handles, in my opinion…
…Over the years, I have done dips on all kinds of different dip stations, with different handles. I find that the the weight is more evenly distributed over my palm with thicker handles. Whereas the thinner handles can sometimes feel like they’re jamming into my thumb and forefinger region. It’s not harder to grip since it’s not a pulling motion.
The X-3 Y dip bar is secured to an upright with a pin which allows you to quickly mount/dismount the dip station. You can mount/dismount it in about half the time it takes for the X-3 dip bar handles.
You can attach to any of the four uprights and you can have facing in the rack or outside of it. However, you should NOT do dips with the handles outside the rack IF the rack is not bolted down with the optional gusset plates.
I recommend the same thing for the separate X-3 dip bar handles. However, it is even more important with the Y bar dip attachment because the handles extend much further out and all the weight will be on one corner of the rack as opposed to being spread between two uprights–thereby greatly increasing the possibility of the rack tipping if you’re heavy and/or are doing weighted dips.
I’d recommend the Y dip attachment if you agree with the following:
- You want the strongest and most durable dip attachment available — the Y dip bar doesn’t have a weight capacity rating listed. However, you can tell just by looking at the design that it’s has a greater capacity than the 700 lb rating of the regular X-3 dip bar handles. Not that you would actually need that much, but it’s a testament to the overall construction.
- You want a more ergonomic design — this refers to: faster and easier adjustment since you only have to attach/remove a single piece instead of two separate handles, significantly tapered handles allowing you to find the right grip width between 17 to 24 inches, and thicker 1 7/8″ diameter handles that I and many others find to be more comfortable on the hands during dips.
- You prefer, or don’t mind, having 1 7/8″ diameter handles. This is just 1/8″ less than the diameter of an Olympic barbell sleeve, which is where the weights are loaded. I prefer this somewhat thicker handle size for dips since makes heavy dips easier on the hand by spreading the load over a greater area of your palm vs the skinnier 1.25″ handles.
- You prefer, or don’t mind, a flow-through dip attachment design with connected handles and a single attachment point.
- You don’t mind paying an extra $10 bucks.
Specifications:
- Material: Steel
- Length: 27″
- Handle Length: 15.5″
- Width between Handles: 17″ to 24″ (tapered handles)
- Handle Diameter: 1 7/8″
- Compatibility (General): Fits any 3″ x 3″ uprights with 5/8″ holes
- Titan-Compatible Racks: All Titan X-3 power racks and squat stands
X-3 Parallel Bars
The X-3 parallel bars are a brand new accessory introduced by Titan.

I thought I was done writing the review when I saw it, and I had to come back and write this section! But I’m happy to do so for this particular X-3 accessory, since it’s a pretty unique one with some broad applications.
Let’s start with how they work: As the name implies, the parallel bars are two separate pieces. Each piece includes a 29.5-inch bar with with brackets on either side, which connect to the rack.
The connecting brackets are over a foot long. They hold the bars away from the uprights so that they’re positioned toward the middle of the power rack, closer to where you would want to grip when doing dips. If you didn’t have the bars positioned more toward the middle like this, then they’d be too far apart to do dips (the rack’s internal width is 42″ after all).
The way the brackets actually secure to the uprights a bit odd–or at least different than how any of the other accessories attach. It’s a two-fold attachment mechanism:
- You bolt-on the top of the bracket. That is, you actually secure a bolt with a nut and washer and tighten it with a wrench. This is the part that threw me off and made me a bit disappointed, since you either have to: 1) keep it there the whole time (which would only make sense if you have an X-3 power rack with the 24-inch extension; and you use the 24-inch extension area for your main lifts); or 2) you’d have to keep a couple of wrenches handy to bolt and un-bolt the attachment whenever you want to install it, remove it or adjust its height. The second scenario isn’t the end of the world, but it’s still kind of a hassle. Surely, the need to bolt the parallel bars attachment is essential to ensuring its stability. Still, it does cause potential issues in it’s day-to-day use. And I wanted to point that out so you understand the limitations and the different use cases before you decide whether or not to buy it.
- You slide a quick-pin into one of the holes the bottom of the bracket, insert it through power rack upright and then out the other side of the bracket.
What makes the connecting brackets special, though, is that they are actually adjustable in terms of their width! That is, you can move them so the distance between the parallel bars (i.e. your “grip width”) becomes closer together or further apart. There are 4 grip width settings: 15″, 17″, 21″ and 26″.

The way you set the grip width is by inserting the quick-pins into the desired hole on the bracket (i.e. one of the bottom 4 holes that are in the slight arc; see image above). For a narrower grip width, you’d insert the pin toward the back of the bracket for a narrower grip width. For a wider grip, you’d insert it toward the front (i.e. toward the laser-cut “TITAN” as shown above)
It’s worth pointing out that you do not have to adjust the bolt on the upper part of the bracket to adjust the width. The bolt stays in. You just remove the quick-pin, swing the bracket forward or backward until the holes line up for the desired width setting, then reinsert the quick-pin.
Also, as you might have noticed, there are 4 holes on the bracket that run in a straight line, perpendicular to the 4 holes used for adjusting width. These are for adjusting height. But, if you’re like me, you may be wondering why there are so many holes. After all, there is only one bolt per bracket, so wouldn’t you just need one hole? Well, I think I figured it out. I’ll try to explain…
…First, I’ll point out that you can only put the bolt in one of the top 2 holes, since these two holes are the only ones with matching holes on the opposite of the bracket that would receive the end of the bolt. These holes, by the way, are spaced one inch apart (center-to-center). So, this allows you to get the adjust the bar height with the greatest possible precision of 1 inch increments, even if you’re installing the parallel bars in one of the 2-inch hole spacing regions of the uprights (remember, it has 1″-2″ Westside hole spacing).
As for the 2 other holes below the top 2 holes in the bracket, you may end up needing to put the quick-pin in either of those, as they may be the only ones that line up with holes on the upright (depending on which height on the uprights you’re installing parallel bars).
Hopefully that explained it for you. If not, don’t worry–it’s a pretty minor detail anyway. But to summarize, the basic reason for having all 4 of those holes in the straight line is that they give you the ability to adjust the height with maximum precision.
The X-3 parallel bars may be the right dip attachment for you if:
- You want the dip attachment that gives lets you do the most non-dip body weight exercises compared to the other two dip attachments. Here are some of the other exercises you can do on these bars: push ups, leg raises, V-sits, L-sits, planches, inverted rows. And as I’ll explain in the next bullet, you can even do pull up variations on this attachment!
- You have a low ceiling like I do and, even with the short X-3 power rack, you’ll have insufficient headroom to do pull ups without hitting your head. You can simply attach one bar on the uprights to create a very good makeshift pull up bar. You’d want to attach it how ever many inches lower than the other pull up bar(s) that is needed to give you sufficient head clearance for full range of motion pull ups. You can also attach both bars at the desired height and do neutral grip pull ups too! And you can actually do multiple different grip widths for the neutral grip pull ups thanks to the 4 width settings discussed earlier.
Specifications
- Material: Steel
- Bar Length: 29.5″
- Total Length: 36″
- Width between Handles: 4 adjustable settings including: 15″, 17″, 21″ and 26″
- Weight: 65 lbs. (for both handles)
- Bar Diameter: 1.9
- Compatibility (General): Fits any power rack with ALL of the following: 30″ internal rack depth: 3″ x 3″ uprights and 5/8″ holes
- Titan-Compatible Racks: All X-3 power racks
X-3 Monolift Attachment (Bolt-On or Adjustable Versions Available)

A monolift is a piece of equipment that lets you unrack and re-rack a barbell for squats without having to walk it out or walk it back in. It’s most useful when using max or near-max weights.
And it’s actually used in some powerlifting federations during competition, albeit almost exclusively in geared/equipped federations, rather than the raw federations, which are currently most popular. That said, you don’t need to compete in powerlifting at all to benefit from training with a monolift.
…Most lifters have never used a monolift. This is largely due to the fact that they’re pretty inaccessible. You won’t find one unless you go to a more serious strength/powerlifting-oriented gym. This is because monolifts are usually their own separate entity. They almost look like power racks themselves and are about the same size. And as you’d expect, they’re very expensive.
However, the X-3 monolift is different! It is compact version of the monolift that attaches to the X-3 power rack. It essentially piggybacks off the power rack’s stability and strength. Thus, you get the functionality of a traditional monolift in a fraction of its size and at a fraction of its cost.
I actually got the X-3 monolift attachment when I ordered my rack. And I’ll be writing a separate X-3 monolift review soon. So keep an eye out for that…
…Until then you can take a look at the 2 slightly different versions of the X-3 monolift attachment for yourself:
- Adjustable X-3 Monolift
- Bolt-On X-3 Monolift (this is the one I got; I should have got the adjustable version)
And here’s a quick rundown of the monolift attachments’ key specs:
Specifications:
- Weight Capacity: 1000 lbs
- Material: Steel frame; UHMW plastic padding on the jaw
- Bolt Hole Diameter: 5/8″
- Height: 24″
- Width: 3″ for bolt-on monolift; 2 1/4″ for adjustable monolift
- Jaw Thickness: 3/4″ steel, (2) 5/8″ pad
- Jaw Depth: 2 1/4″
- Jaw Height: 1″
- Weight: 65 lb per pair for bolt-on monolift; 70 lbs per pair for adjustable monolift
- Compatibility (General): Fits any power rack or half rack with 3″ x 3″ uprights, 5/8″ holes with 1 or 2 inch hole spacing. Also, you need sufficient height on the uprights to attach to attach the monolift at the desired heights (i.e. if you’re very tall and your rack is short, it might not work). NOTE: If you’re using a half rack, you’ll likely need to bolt it down; same goes for power racks without flat feet.
- Titan Compatible Racks: All Titan X-3 power racks
X-3 Bolt-Down Gusset Plates
One of the awesome things about this X-3 power rack is that you don’t need to bolt the rack to the floor to use it safely, but you can if you want to.
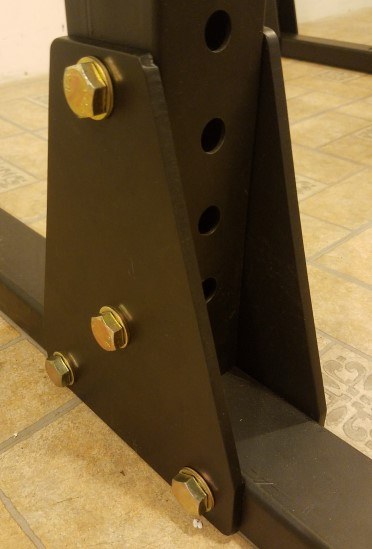
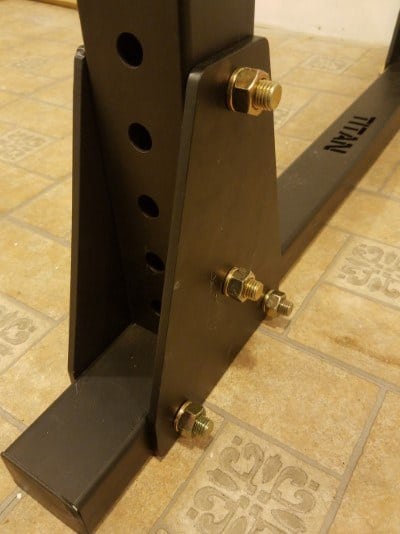
As I’ve said, one of the major reasons I went with the X-3 power rack vs the T-3 power rack was because the T-3 needs to be bolted down.
If you don’t bolt down the T-3, you risk tipping it if you rack a heavy barbell too hard or accidentally dump the barbell against the uprights. This simply wasn’t an option for me because my landlord understandably doesn’t want me drilling holes into the basement floor.
The X-3 was perfect for me because it got rid of this problem. The flat foot design, with the feet extending in front of and behind the uprights, provides the stability needed to prevent the rack from tipping.
The X-3’s large 3″ x 3″ frame also adds over 100 lbs more total weight compared to the T-3’s 2″ x 3″ frame (343 lbs for full height X-3 vs 230 lbs for full height T-3). Simply being heavy adds to its stability. The heavy weight itself is of little importance compared to the flat foot design with regard to preventing tipping. Rather, the heaviness really ads to the stability in terms preventing slight shifting/sliding or wiggling of the rack when racking or dumping a heavy weight.
Other, lighter non-bolted down racks can shift around maybe an inch or so if you don’t set down the bar gently enough. My first power rack (the Powertec P-PR) would do this, and I’d have constantly shift it back into place so that it was even with where I preferred to stand.
Now that I’ve thoroughly delved into why you don’t need to bolt down this rack, let me talk about the fact that you can bolt it down with the optional X-3 bolt-down gusset plates and why you might want to do this.
Here are the main benefits of bolting the X-3 power rack to the floor:
- Do Band-Resisted Work: Don’t confuse band-resisted exercises with band-assisted exercises. Band-assisted exercises require attaching bands from the bar to the top of the rack. They make the weight lighter than the actual weight, at the bottom of the rep. You can do these no problem without having the rack bolted to the floor. Whereas, band-resisted exercises require attaching bands from the bar to the bottom of the rack. This makes the exercise heavier than the actual weight of the bar, at the top of the rep. You DO need the rack bolted down for this. If you don’t, then you will move or possibly even tip over the rack, if you apply enough force through the band tension. So, if you want to do this type of work, you’ll have to get the bolt-down gusset plates.
- Maximizes Rack Stability: As I discussed previously, this rack is pretty damn stable to begin with thanks to the flat feet and its heavy weight. However, it can still slide slightly or move around if you rack the weight hard enough or bang into the uprights with a heavy enough load. If you want to prevent this possibility, then get these gusset plates and you won’t have any worries. It is my opinion that bolting down for this purpose only makes sense if you’re squatting enough weight (e.g. 500-600+ lbs) where racking the weight hard my cause some sliding. Another case where bolting down for added stability makes sense is if you’re planning on doing kipping pull ups or muscle ups.
- Safely Use Spotter Arms and Y Dip Bar on Outside of Rack: You can use the optional spotter arms and the optional Y dip bar on the inside of the rack with no issues. However, if you use these on the outside of the rack without it being bolted down down, then the rack becomes less stable the heavier the weight you use. This is because you’re essentially adding a lever on the end of the rack and putting a load on the end of that lever. You can get away with this if you use relatively light weight. However, the more weight you add, the less stable the rack becomes and the more likely you are to make the rack move, slide or tip.
The mechanism for bolting the rack down is pretty convenient:
- The solution involves these 4 special gusset plates with side legs that replace the default gusset plates on the outside of the rack.
- You use the existing hardware from the default gusset plates to attach the new bold-down gusset plates onto the base of the uprights.
- You do need to purchase separate hardware for attaching the rack to the floor or a platform. If you’ll be going straight into a concrete floor, then you’ll need to get some concrete anchors from the hardware store. If you want to secure your X-3 power rack to a wooden lifting platform, then you’ll have to go out and find different type hardware. Typically, lag bolts are recommended for mounting to wood. I haven’t done this myself, but I would assume you’d want lag bolts with dimensions corresponding to the concrete anchors; meaning 3/8″ bolt diameter and approx 4″ length (or less if your platform is under 4″ thick). Be sure to seek guidance from your local hardware store if you need it.

NOTE: There is an (unofficial) trick to increase the stability of the power rack without using the bolt down gusset plates. This is what I do improve the rack’s stability when using the spotter arms. That trick is to simply weight down the opposite end of the rack by loading the weight storage pegs with enough extra weight plates. This works pretty well. But of course it has its limits. If you’re using really using a lot of weight, then you really should bolt it down.
Specifications:
- Material: Steel
- Units Per Package: 4
- Plate Thickness: 5/16″
- Weight: 9 lb per gusset plate
- Paint Finish: Black powder coating
- Compatibility (General): Fits any 3″ x 3″ uprights with 5/8″ holes that has an existing gusset plate with the same dimensions. This will be very few other racks. One notable one that should work is the Rogue RML-390F.
- Titan Compatible Racks: All Titan X-3 power racks and squat stands.
X-3 Double Landmine Attachment
A landmine is a highly versatile piece of equipment. It attaches to a fixed position near the floor (e.g. at the bottom of a power rack) and has a barbell holder that holds one end of the barbell.
")
There are two joints between the barbell holder and where it’s attached. This double-joint mechanism lets you move the opposite end of the barbell in ANY direction: up, down, left, right, diagonally or in any type of curving pattern.
Landmines are an excellent attachment to have for the following purposes:
- To add variety and novelty to your workouts by introducing different exercises and oftentimes unconventional exercises to your training
- To enhance your core strength with loaded rotational movements (e.g. landmine twist), as well as variations of more traditional exercises that force you to improve your stability and balance (e.g. landmine single leg deadlift, landmine press).
- To improve your range of motion and dynamic mobility, especially on overhead and other shoulder movements by doing exercises like the landmine press, landmine front squat, landmine Y-press and landmine Meadows rows, just to name a few.
The X-3 landmine attachment only comes as a double landmine unit. There is not a single landmine version available for the X-3. There is a single landmine attachment made for the 2″ x 3″ uprights of the T-3, but it does not work the X-3’s 3″ x 3″ uprights. The X-3 double landmine, however, does also work with the T-3 racks.
")
In any case, a double landmine is superior to a single landmine. You can do all the same exercises with a double landmine as you can with a single landmine (you simply use just one landmines). Then you have an even greater number of exercises available with a double vs a single landmine.
The only additional requirement to be able to do any double landmine exercises is that you need a second barbell. If you don’t have second barbell now, you can always get one at some later time.
Here are some of landmine exercises you’ll have access to with the X-3 double landmine attachment:
- T-bar row
- Landmine press
- Double landmine press
- Landmine squat
- Landmine hack squat
- Landmine RDL
- Double landmine RDL
- Double landmine RDL/squat (gripping behind the weights on the handle knurling, with back toward the landmine–this looks like an RDL variation but mimics squat in terms of leg muscles trained)
- Landmine lunge
- Double landmine lunge
- Landmine floor press
- Double landmine floor press
- Landmine z-press
- Double landmine z-press
- Landmine unilateral rear delt row
- Landmine meadows row
- Landmine clean and press
- Landmine rotation
- Landmine twist
- And more…
Specifications:
- Weight Capacity: 315 lb
- Tube Length: 10″
- Tube Inside Diameter: 2″
- Quantity: 2 landmine sleeves
- Band Peg Diameter: 5/8″
- Band Peg Length: 10″
- Weight: 8 lb
- Compatibility (General): Fits any uprights with 5/8″ holes (upright tubing size doesn’t matter as long as it’s no larger than 3″ x 3″. You can mount it just about anywhere else you want (i.e. not just on uprights). But you may need additional hardware and the place you mount it must have 5/8″ holes and enough room to move the landmine once in use. For example, if you want to mount it on the wall, then you could do so by first installing an X-3 wall storage strips near the floor.
- Titan Compatible Racks: All Titan X-3 and T-3 power racks and squat stands.
Parallel Handle for Landmine
The parallel handle is made for use with the landmine attachment. It goes on the far end of the barbell prior to loading any weights on. The weights go on after and hold it in place.

The main use of parallel handle is for T-bar rows. It provides a far superior grip compared to the alternatives (e.g. using your hands on the barbell itself, or creating a makeshift handle from a towel or a v-bar attachment that you pull against the bar).
You’ll be able to lift much heavier weight and feel your target back muscles working more intensely with this handle.
T-bar rows are an awesome back exercise. They’re actually one my favorites. So this handle and the actual X-3 landmine attachment are both on my short list for future purchases for my home gym.
Titan makes two versions of this. The only difference between them is the diameters of the handles:
- Standard Grip 1.3″ Diameter Handle: This is just slightly thicker than the handle of a barbell (1.1″). This is the one that I’ll eventually get. And I’d recommend it to most other people interested in getting a handle. It will feel more natural to hold onto than the fat version. You won’t have to worry as much about your grip fatiguing and will be able to lift more weight.
- Fat Grip 1.9″ Diameter Handle: This is a noticeably thicker handle. It is just a hair thinner than the end of a barbell (i.e. the barbell sleeve), which is 2.0″ thick. This will be harder to grip, which will mean you won’t be able to row as much as you could with the skinnier 1.3″ version. However, there is one major benefit. It will train your grip strength and forearms hard. If that’s a priority for you, then go with this one. If not, go with the 1.3″ handle.
Some other notable features of both variations of the handle include:
- Quickly and easily install the handle by simply sliding over the barbell end
- The tube part that slides over the barbell end is smooth on the inside and designed to prevent scratching on the bar
- Has a powder coated finish atop the steel body, which improves your grip while protecting the steel from rust and damage
Specifications:
- Handle/Grip Diameter: 1.3″ for standard version; 1.9″ for fat grip version
- Handle/Grip Length: 8 3/4″
- Distance between Handles: 9 1/2″
- Distance from Handles to Bar: 10″
- Weight: 20 lb
- Paint Finish: Black powder coating that improves grip
- Compatibility (General): Fits onto the end of any Olympic barbell
Band Pegs
These are the same exact band pegs as those used for T-3 power racks.
As mention in previous sections, you should only use band pegs on the bottom of rack for band-resisted exercises if you have the rack bolted down.
The flat feet that form the X-3’s don’t have holes for band pegs. This is likely because having holes in this location would structurally weaken the rack’s base and reduce its total weight capacity.
So if you want to do band-resisted exercises, then you have use a workaround to attach the bands from the bar to the bottom of the rack. Here are the solutions I’ve come up with (some are better than others):

Workaround #1: Attach Band Pegs to Lowest Point on Front/Rear Upright Pairs
This is the most elegant solution for band resisted exercises. It will work fine for most scenarios and it doesn’t require purchasing any power rack accessories besides the band pegs.
Here’s how you set it up:
- Put one band peg on at the lowest point possible on each upright.
- Attach the band around the front left and rear left pegs, and then around the left end of the barbell. Do the same on the right side.
So basically, the band has three points of contact on each side. One at the top and 2 at the bottom, forming a triangle with the band.
Having the band spread so far apart at the bottom like this is actually perfect for band deadlifts. And it will still work well enough for bench and squat.
However, I consider this method a slight “workaround” because it’s not perfect. For band bench press at least, it is ideal for the band to be attached at just one point at bottom, aligned with your bar path. This way, you’re pressing directly against the tension…
…Whereas, if the band is spread apart at the bottom, you’re more likely to experience some tension pulling forward or backward if you don’t position the bands and yourself in the optimal position. And as you can imagine, that can throw off your rhythm or back/shoulder positioning during the set.
So, while this is not the perfect for every situation, it’ll still get the job done.
Workaround #2: Attach Bands Around Pin & Pipe Safeties
This workaround does not involve using any band pegs. The idea is to set the pin/pipe safeties to the lowest height possible.
The great thing about this band peg workaround is that you can attach the safeties on the bottommost hole height on the rack. Compare this to the two workaround #3 and #4, which I discuss below–They have a similar basic premise. However, they utilize different types of spotter bars that can’t be attached nearly as low as the pin/pipe safeties.
Once you have adjusted the pin/pipe safeties to the lowest height setting, you just need to attach the bands:
- Wrap one band around the left pin/pipe safety.
- Wrap the other end of the same band around the left end of the barbell. The position of the bands on the safeties should be in line with where the bar will be at the top of the rep.
- Repeat steps 1 and 2 with another band for the right side.
This set up works great for squats, bench and deadlift. However, one important thing to point out is that you’ll need a second set of safeties for spotting on bench press and squat…
…You can get another pair of pin/pipe safeties if you want, but I’d personally recommend getting either the X-3 spotter arms or X-3 flip-down safeties, since they have additional uses for other types of exercises.
Workaround #3: Attach Band Pegs to X-3 Flip Down Safety Bars
This is probably the second best workaround for putting band pegs near the bottom of your rack for band resisted movements.
You’ll need the X-3 flip down spotters. I personally wouldn’t recommend getting them for just this purpose, since it’s an extra cost and the above solution works just as good if not better.
However, I would recommend getting them if you also do heavy rack pulls or power shrugs, since they are superior for reducing rattling and bouncing of the bar when you slam the weight down vs the default pin/pipe safeties.
Assuming you have a pair, here’s how it’d work for squat and bench:
- Set the flip down safety bars as low as they’ll go–just above the gusset plates supporting each of the uprights. This should be low enough so you can put the pin/pipe safeties above them in the proper spot if you need them to perform the lift safely.
- Put one band peg on each flip down spotter. It should be positioned such that it will be in line with where the bar will be at the top of the rep.
- Wrap the band on the left side around left band peg and left end of the barbell. Do the same on the right side.
NOTE: This set up won’t work for deadlifts since the flip down spotters will be too high, even at the lowest possible setting. Use the method described in the previous points if you want to do band resisted deadlifts in the X-3 power rack.
Workaround #4: Attach Band Pegs to X-3 Spotter Arms
This entails using the X-3 spotter arms inside the rack instead of outside the rack, which is how they’re typically used. Also, you need to attach it as low on the uprights as you can.
Unfortunately, you can’t attach the spotter arms at the very bottom of the rack. This is for two reasons:
- Part of the arms extend down several inches to provide support
- The gusset plates supporting the uprights extend up several inches.
These factors put limitations on this workaround. For example, it won’t work if the spotter arms prevent you from putting the pin & pipe safeties at the correct height (on exercises that require it).
Specifications:
- Material: Steel
- Diameter: 5/8″
- Length: 10″
- Length (Exposed Portion): 7″
- Quantity: 4 band pegs per order
- Weight: 1.1 lb each
- Compatibility (General): Fits any 3″ x 3″ uprights with 5/8″ holes
- Titan Compatible Racks: All Titan X-3 and T-3 power racks
X-3 Spotter Arms
I’d rank the X-3 spotter arms as one of the most practically useful accessories available for this power rack.
")
These spotter arms attach on just one upright. This gives you the ability to do exercises on the outside of the power rack. You are free at last! No longer are you confined to the inside the cage!
Why would want to work outside the rack? Well, there’s plenty of reasons:
- You may want to do exercises where the spotters act as a convenient place to rack/unrack the weight so you can easily add/remove weight between sets. Sure, you could use j-hooks to do this. But that would require being much more precise when racking the bar. Plus, you’d have to either walk the bar further to/away from the rack, or perform the exercise very close to the rack–both of which are not ideal for number of reasons (i.e. could make form worse, possibly increase injury risk or at least cause more fatigue from walking the bar more steps than needed).
- You may want to do exercises that require more freedom of movement in front of, behind or above you. That is, exercises where the barbell might bump into the sides or top of the rack if you were to do it inside the rack. Some examples of such exercises could be: Overhead press, push press, overhead squats, lunges, lateral lunges, step ups and Bulgarian split squats.
- You may be supersetting two different barbell exercises and want to minimize time between sets. So you setup one exercise inside the rack (e.g. bench press) and one outside the rack (e.g. barbell row). When you finish one exercise, you just move to the other.
- You may just prefer working outside the rack. It’s a change of scenery. Nothing wrong with wanting that.
The spotter arms are very easy to add and remove. They work very similarly to how you adjust J-hooks. The only difference is these spotter arms also have a pin that you insert at the bottom to provide additional security and stability.

They’re very strong. Each spotter arm is made from thick 7 gauge steel (thicker than the 11 gauge rack frame) and has a gusset plate welded on its underside to provide the support needed for the 24 inch spotter arm to be both long and strong.
They are rated for a 1000 lbs weight capaciyt. This is less the 1500 lbs rating of the pin and pipe safeties. Still, 1000 lbs capacity is nonetheless impressive considering only have one attachment point to the rack.
Specifications:
- Capacity: 1000 lbs
- Material: 7 gauge thick steel
- Arm Length: 24″
- Tube Sizing: 3″ x 3″
- Coating: Full 3″x 24″ UHMW plating liners
- Weight: 17 lbs per spotter arm
- Compatibility (General): Fits any power rack with 3″ x 3″ uprights with 5/8″ holes
- Titan Compatible Racks: All Titan X-3 power racks and squat stands
X-3 Flip Down Safety Bars
As covered earlier, the X-3 power rack comes standard with the pin and pipe safeties. The pin and pipe safeties are great. They totally get the job done.
However, just because something is good, doesn’t mean there isn’t something else that’s better…

…Enter the X-3 flip down safety spotters. These flip down spotters serve all the same functions as the pin/pipe safeties. But they have a few notable benefits on top of that, which makes them better overall:
- Stronger, More Robust Design: You can tell just by looking at these flip down spotters that they’re significantly stronger and more durable. They have more surface area to spread the impact of the weight. Plus, they wrap around the upright and make contact with three of the four sides, which enhance their support. They also have small welded gussets, which further bolster the connection between the main 3″ x 3″ tube portion and the attachment/locking mechanism on each side.
- Less Noise: Imagine the following test: Drop a 400 lb barbell from 2 feet, onto pin/pipe safeties. Do the same exact thing again, except this time drop the bar onto flip down spotters. What do you think the difference would be? I’ll tell you: They’ll both be loud! However, the flip down spotters will be significantly less loud, they’ll rattle/vibrate less and the barbell will bounce less. Of course, this doesn’t just apply to dumping a weight, which should be an infrequent occurrence. The flip down spotters are also quieter during more normal use. For example, when you slam bar in a controlled fashion onto the safeties RDLs, or when not-so-gently set down a very heavy load on barbell shrugs. Reducing noise is preferable in general. But it may be especially important for you if you train within earshot of roommates, a young child (don’t wake Jr. from his nap!), other family members or neighbors neighbors, and you want to be considerate.
- UHMW Plastic Lining for Protection: The entire top side of the flip down safeties is lined with UHMW plastic. This is the same stuff used on the J-hooks. This special plastic provides a protective layer over top of each safety’s 3″ x 3″ steel tubing. It greatly reduces the wear on the barbell knurling over time. It also significantly cuts down on the noise (see above bullet point) since there’s no metal to metal contact. Lastly, these liners help absorb some of the impact when the bar dropped or slammed into the safeties, so there is less bouncing or rattling of the bar. You want to minimize to for noise and bar protection obviously–But even more practically, you don’t want the bar to be jumping around at all at the bottom of each rep on heavy RDLs, as it can throw off your technique and focus during the movement.
- Easier and Faster Adjustment: These are way faster and simpler to adjust than pin pipe safeties. They have the same basic locking/attaching mechanism as J-hooks. You line up the spotter at the with the uprights at the desired height and insert the welded pin end of the safety into the upright hole. Let the safety flip down into place. Then secure the other end by inserting the included hitchpin through the upright.
- Holes for Attaching Band Pegs (or any other accessory): The flip down safeties have holes spaced two inches apart. You can attach accessories in these holes just as you would on the rest of the rack’s holes–I’m sure there are plenty of different creative things you could do with different accessories. However, the major application that comes to mind is using these holes to attach band pegs for band resisted exercises. You can attach these quite low on the rack–just above the gusset plates. That ends up being a bit over a foot in height off the ground, which gives you more than enough room for band resisted squats and bench press. However, that’s too high for deadlifts. Though, you may be able to RDLs–you’d keep the flip down spotters at the lowest height setting and then you’d have to use the pin and pipe safeties for the starting/ending point of the RDL. I think this would work well enough, but I can’t say for sure since I haven’t tested it. One thing to note, though, if you do try this, is that the number of possible RDL heights may be restricted–you may not be able to do below the knee RDLs. This is because the bands will be over a foot high and the pin/pipe safeties will have to be at least few inches higher so that there’s enough space between bar and band pegs to create sufficient starting band tension against the bar. I spoke about other ways to band resisted deadlifts earlier.
- Perfect for RDLs: The flip down spotters are the ultimate safety bar accessory for RDLs, bar none (lame pun intended). Why? Because RDLs necessarily require slamming a heavy barbell onto the spotters each rep. When you’re doing that, you ideally want spotter arms have these characteristics: strength/durability, impact/shock absorption, noise reduction, bar protection. As I outlined in the above bullet points, the X-3 flip down spotters score better in all of these categories than the standard pin and pipe safeties.
- Also Perfect for Other Heavy Partial Exercises That Require Safeties: I wanted to dedicate the previous bullet point to just RDLs since they’re very common and involve more weight than almost any other other lift. However there are other heavy partial exercises where flip down spotters are also the ideal tool for the same reasons. This includes pin presses, overhead pin presses, pin presses, pin squats and probably others I’m not thinking of. The reasons are the same as described in the above bullet on RDLs.

Specifications:
- Material: 11 gauge thick steel
- Tube Sizing: 3″ x 3″
- Overall Length: 35″
- Weight: 45 lb (for the pair)
- Paint Finish: Black powder coating
- Compatibility (General): Any power rack with 3″ x 3″ uprights and 5/8″ holes
- Titan Compatible Racks: All Titan X-3 power racks
X-3 Strap Safety System
I’ve just discussed a two different types of safety spotters options available for the X-3. That’s in addition to the pin/pipe safeties that come standard with the power rack.
You’d think that’d be more than enough options, right? After all, you’re just trying to do one thing: stop a barbell from falling beyond a certain point. Well, I got one more option for ya!
And actually, this one is probably the most unique type in terms of what it’s made of and how you can use it. It has some pretty attractive benefits, which push it toward the top on my list of most-wanted X-3 accessories.
Okay, now let me actually talk about this different spotting accessory option…

…It’s the X-3 strap safety system. Here’s what it is:
- Each safety strap consists of the following: One 35″ long, 3″ wide nylon strap, with each end secured to a j-hook style attachment on each end.
- The 35″ strap is a few inches longer than the 30″ internal depth of the rack itself. This is by design to give the straps a bit of slack so they have some “give” to them. The slack also allows the straps to droop in the middle, allowing you dump the barbell at a higher point, and roll away from you. This is great for making squats and bench safer. (Below, I’ll discuss an even better technique for bench).
These are the main benefits and use cases for the strap safety system:
- If you accidentally squat deeper than expected and the bar barely touches the safeties, you won’t get rattled like you would if using any of the other solid metal spotters. The material is not only soft, but it has some slack in it, too.
- Each strap is connected on either end by what is basically the same as a J-hook. These J-hook style attachments make it super quick and easy to install, remove or adjust the straps on the power rack.
- You can adjust one end of the strap independently of the other. Meaning, you can have it higher on end and lower on the other. This would give you a bit of slope, so that you can let bar roll away from you if fail at the bottom on bench or squat. Also, sloping the straps is especially useful on bench press for protecting your head and neck in the unlikely yet possible scenario that bar slips or you fail while racking. If you’re using solid straight spotters (i.e. any of the others discussed above), there’s a chance your head and neck may be at least somewhat exposed since the spotters are set lower than your chest–sometimes this means your head and neck will be slightly above or at least very close to safety. But when you use the strap system and slope them so that they’re higher where your head/neck are, then there’s no chance the bar will even get close to hitting these sensitive regions.
- This is the without a doubt THE best safety spotter option if minimizing damage to your bar is important. Even if you drop a loaded barbell from a couple feet up, you’re dropping it on a flexible fabric material. It’s not going to get dinged or worn down. If you have a cheap barbell, you might not care much about this. But if you invested in a decent barbell, then safety straps are the best way to protect and preserve it.
- This is also the quietest safety spotter option, by a long shot. Again, you’ll be dropping or hitting the barbell into flexible fabric material. It’ll be way quieter than the pin/pipe safeties, since they are made of steel and the steel is exposed. Now, as I mentioned in the previous two sections, the X-3 spotter arms and X-3 flip down spotters have UHMW plastic liners atop their steel surfaces. This noticeably dampens noise compared to the pin/pipe safeties. However, they’re still no match to the X-3 strap safeties when it comes to noise reduction. If you lift at odd hours of the day and/or have family/kids/neighbors you don’t want to disturb, then the strap safeties are a must.
- The straps are strong with an insane 10,000 lbs capacity rating (though this doesn’t supersede the rack’s capacity). Also, the nylon webbing material itself is durable ad will last you many, many years if not a lifetime without any significant fraying or wearing of the material.
Below are the key specs of the X-3 strap safeties.
Specifications:
- Capacity: The Nylon webbing itself is rated for a full 10000 lbs. However, the effective capacity is limited to that of the rack itself: 1500 lbs.
- Material: Strap is made of nylon webbing; j-hook style attachments are made of steel
- Strap Length: 35″
- Strap Width: 3″
- Strap Color: Black
- Weight: 14 lbs per each (1 nylon strap itself plus 2 j-hook style attachments plus hardware)
- Compatibility (General): Fits any power rack with 3″ x 3″ uprights and 5/8″ holes
- Titan Compatible Racks: All Titan X-3 power racks
X-3 Plate Holders (Adjustable or Bolt-on)
Unless you already have a separate weight plate tree or plan on buying one, the X-3 plate holders are almost a must-have.
You need to put your weights somewhere when not in use. Sure, you could just put them on the floor. But that’s just plain uncivilized! Actually, that’s what I did in my old home gym and it was a pain in the ass to picking the weights off the floor.
I couldn’t just throw the 45s down because I didn’t wan’t to crack the concrete or the plate itself. I had to be extra careful not to pinch my finger between the plate and floor when gently laying them down. Plus, they got dirty as hell from being on the floor, which often rubbed off onto me.
Looking back on it now, that was a lazy move on my part. I could’ve saved myself a lot of minor inconveniences and a few pinched fingers over several years by getting a cheap weight tree. Oh well. 😀
Now I know better. So for my new home gym, I made sure to get the optional plate holders attachment when I ordered my X-3 power rack. They attach on any hole on the rack, but the most logical place to put them is on the lower portion of the rear uprights.
There are two versions of the X-3 weight storage pegs:
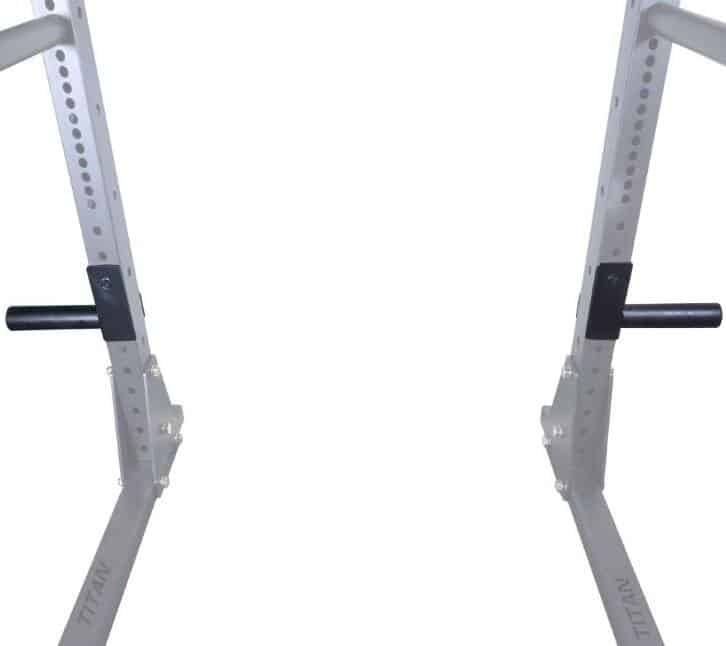
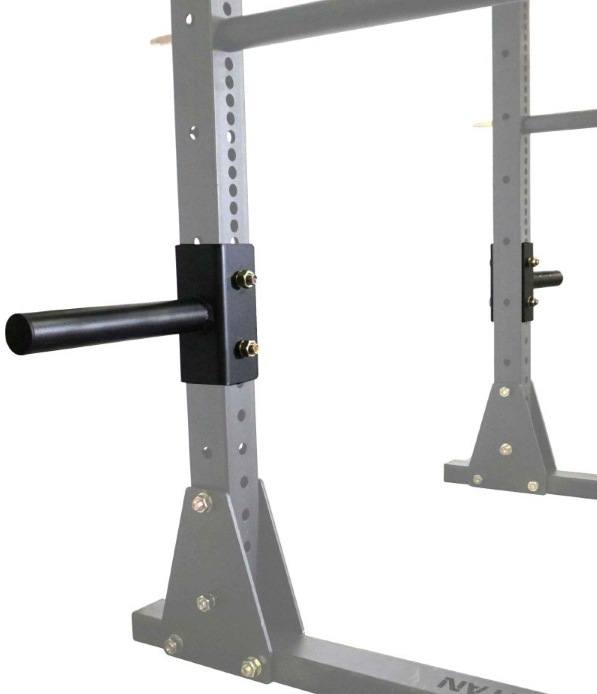
- Bolt-On Storage Pegs: I got this version. They come with the hardware (i.e. bolt/washer/lock washer/nut) needed to secure them to the upright. You can choose to install them an any height, on anywhere there’s a hole on the uprights. I chose to install mine toward the bottom on the rear of the rack, where they’re as out-of-the-way as possible while still being accessible when I need to use them. I got these mainly because they’re a bit sturdier and won’t have any wobble whatsoever compared to the adjustable ones. Plus, I plan on keeping them in the same place so I have no need for the adjustable version.
- Adjustable Storage Pegs: You can adjust the height of these storage pegs on the rack just like you would with J-hooks. If you think you might want to move your storage pegs around periodically, then go for the adjustable ones.

Like I mentioned above, the storage pegs are meant to attach on the uprights. This is what I do and it works totally fine for me. However, I can see that it is not the perfect solution.

Specifically, I can see two issues. They’re relatively minor and don’t affect me, but I can see how they might annoy some lifters:
- The stored weights will take up some of the rack’s usable depth at the height where the storage peg is installed. Of course, the plate holder pegs are on the outside of the rack, so they’re technically not taking up any space within the footprint of the rack. But since, the barbell extends outside of the rack, the plates do technically reduce the usable depth, though only at the specific height on the upright where the holders are installed. So how far forward are we talking? Well, the 45 lb plates are the biggest and so they’ll extend into this zone the furthest. The actual distance is approx. 7.5 inches (most 45 lb plates are just under 18″ diameter; half the plate extends behind the rack; 1.5″ of the distance it extends forward doesn’t count because it’s covered by the upright –> 18/2 = 9 – 1.5 = 7.5. Yay for Math, right?!).
- The plate holder pegs wrap cover up about 8 inches of height on the upright. This means the holes on the uprights for that span of 8 inches are also covered up and thus can’t be used for other accessories. The most problematic scenario here would be if you wanted to use the safeties at that height.

If you’re bummed out about these issues, don’t be! There are several workarounds, and that’s not even including the obvious alternative of just getting a weight plate storage tree. See below:
- Both of the above problems can be minimized or completely avoided by strategically choosing a height on the rack that you’ll rarely or never use. Again, this is usually somewhere on the lower rear uprights.
- If you’re still apprehensive about the plates getting in the way or the holders covering up some holes, then I recommend opting for the adjustable plate storage pegs instead of the bolt-on holders. This way, you can always strip the plates off and remove or adjust the holders when needed.
- Another, more elegant solution is is to get the X-3 wall strip (or a pair of them) and attach the plate holders on it. IMPORTANT: This only works with the bolt-on plate holders. If you go with this option, you’re able to completely move plate storage of the rack. Plus, it’ll improve the overall organization of your home gym and make more efficient use of the space, because it’ll be tucked away, flush against the wall.
- The final solution is to opt for an X-3 rack extension. The purpose the extension serves is to add an entirely separate section to the main power rack area. You can then install the plate holders on the new set uprights, completely out of the way of your way in the main rack. There are two types of extensions: 10″ depth and 24″ depth. If you want it just for plate (and other accessory) storage, get the 10″ version. However, if you want to use it for storage AND also have basically a second (slightly less deep) power rack all in the same setup, then go for the 24″ version.
Specifications:
- Material: Steel
- Overall Length: 15″
- Sleeve Length: 12″
- Sleeve Diameter: 1.9″
- Quantity: 2 per order
- Weight: 9 lbs per holder (18 lbs per pair) for bolt-on version; 4 lbs (?) per holder (8 lbs per pair) for adjustable version
- Compatibility (General): Fits any 3″ x 3″ uprights with 5/8″ holes
- Titan Compatible Racks: All X-3 power racks and squat stands
X-3 Rotating Pull Up Handles
These rotating pull up handles are clever pull up attachment. It gives you more variety in terms of the types of pull up/chin up variations you can do thanks to the swivel pin design that enables free rotational movement.

Here are some of the things you can do with these handles:
- Use any wrist position: You can do pull ups with: a pronated grip (palms facing away aka traditional pull ups), neutral grip (palms facing each other aka “hammer grip” pull up style), supinated grip (underhand aka traditional chin ups) AND anything in between. You may want to do to different positions to emphasize different muscles. For example, a supinated grip will hit the biceps harder, neutral grip will hit the brachioradialis really hard and pronated grip will emphasize lats and rear delts more. You may want to use a wrist position that falls somewhere in-between these three basic positions simply because it’s the most comfortable position for your wrists. Similarly, you can allow the handles to rotate throughout the range of motion. This will likely feel like a more natural movement compared to keeping your wrists in a fixed position throughout the pull up range of motion.
- Go wide or narrow: You can quickly and easily move the handles closer or further apart thanks to the quick pin mechanism for securing to the rack. A wider grip width pairs well with pull ups; a wider than normal pull up grip width will hit the lats more intensely. A narrower grip width pairs well with chin ups and hammer grip pull ups; a narrower than normal grip width on chin ups or hammer grip pull ups will emphasize the biceps more.
- Improve core strength/stability: The rotating handles necessarily make you engage your core more than you otherwise would on a fixed pull up handle. This is the case whether you are resisting the rotation (i.e. trying to keep wrist position fixed throughout range of motion), or if you are rotating the handles as you do the pull ups.
- Better forearm workout: You’ll get a noticeably stronger forearm workout with these compared to a fixed pull up bar. This is because your forearms have to work harder to resist the rotation if you’re to maintain the same wrist position throughout the movement. They also work harder than normal when you rotate your wrists throughout the motion, as this also engages the forearm muscles.

I think this is a great attachment. It’s practical and I could see myself using it relatively frequently if I had it.
I’d certainly use these rotating handles more than if I had the X-3 pull up spheres attachment, which I discuss in the next section…
…That being said, though, I probably won’t be getting these any time soon. The reason is that I really don’t need them. I’ll be set with the existing pull up bars (well, just one bar really, since the fat bar is too close to the ceiling).
Specifications:
- Material: Steel
- Bracket Dimensions: 3″ x 3″
- Handle Diameter: 1.25″
- Handle Width: 5″
- Overall Height: 9″
- Weight: 5 lbs each (10 lbs for the pair)
- Compatibility (General): All power racks with 3″ x 3″ tubes and 5/8″ holes
- Titan Compatible Racks: All Titan X-3 power racks
X-3 Pull Up Spheres
The X-3 pull up spheres, available as 3-inch spheres or 5-inch spheres, are more than just another tool for pull ups. Rather, the primary use of this X-3 power rack accessory is to train grip and forearm strength using your body weight.


Practically speaking, this will involve doing pull ups and pull up variations on these spheres. But my point is that you wouldn’t do pull ups on these if your main concern was training your back.


Yes, you will get a good lat/back workout doing pull ups on these spheres. But it will pale in comparison to the grip/forearm you get. It will also pale in comparison to the lat/back workout you’d get by doing pull ups on a traditional pull up bar.
This is a perfect tool for:
- Rock climbers
- Arm wrestlers
- Gymnasts
- Anyone competing in Crossfit (since many events require maintaining a base level of grip strength over many reps and an extended period of time — i.e. high rep pull ups, muscle ups, deadlifts, Olympic lift variations, rope climbs, etc.)
- Anyone doing Strongman training (where a strong, high endurance grip endurance is essential)
- Any lifter who wants to improve grip to get better at other heavy pull movements (e.g. deadlifts, RDLs, rack pulls, shrugs, rows, pulldowns) without having to rely on using lifting straps as much

Here are some of the exercises you can do on it:
- Pull ups
- Chin ups (stand on opposite side of spheres and grasp them with underhand grip)
- Flexed arm hang
- Straight arm hang
- Single-arm straight arm hang
- Mixed grip pull ups (one sphere on one side of the crossmember; the other sphere on the other side)

Since you can place the individual sphere handles in any hole, you position them closer together or further apart. This means you can do close grip or wide grip versions of the above exercises.
One final notable feature of these X-3 spheres is that they’re supposed to be ergonomic. One indicator of this is 1″ rubber spacer on the bolt portion, directly behind each sphere. This allows you to grasp the spheres without your knuckles and fingertips touching the crossmember. Plus, it prevents the metal spheres from scratching up the rack.

Now, the question comes to this: Should you actually get this attachment? The answer is only “Yes” if you want to focus grip training using body weight. If that’s the case, this is the best tool for you. If not, then I see no real value in getting it other than novelty.
I personally don’t plan on getting the X-3 pull up spheres anytime soon. I’m not planning on doing any dedicated grip strength training now or in the foreseeable future. It’s just not a priority. That doesn’t mean these aren’t a quality power rack accessory. It’s just not for me, at this time.
If you do want this for grip training, then definitely give it a shot. I’m sure it will be the same high-value I’ve come to expect from Titan equipment.
Specifications:
- Material: 9 gauge thick steel
- Sphere Diameter: 3″ (5″ version also available)
- Overall Length: 7.8″
- Bolt Diameter: 5/8″
- Weight: 5 lbs (might be the total weight of the pair; I’m not positive)
- Compatibility (General): Fits in 2″ deep crossmembers (i.e. top connecting part of the rack) with 5/8″ holes.
- Titan Compatible Racks: All Titan X-3 power racks
X-3 Wall Strip (Single Unit or 2-Pack)
The X-3 wall strip is a very handy, space saving accessory. It is available as a single wall strip or as a pair of wall strips.
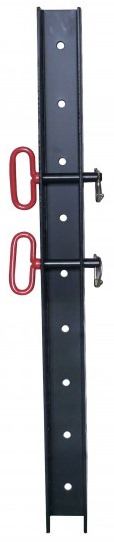
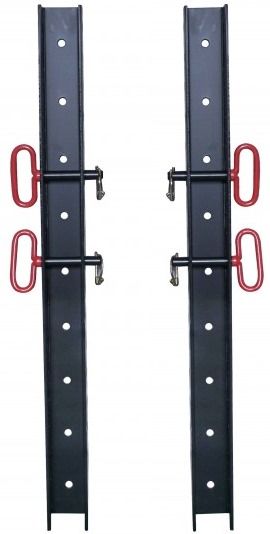
It is meant to be mounted to a concrete wall or a wall with sturdy wood studs. This requires drilling the appropriate hardware through the mounting holes in the back of the wall strip.
Unfortunately, the mounting hardware is not included. If you’ll be drilling into a concrete wall, you should use 1/4-inch concrete anchors (to fit into 3/8-inch mounting holes). If you’re drilling into wood studs, the way to go about mounting it is simply using 1/4-inch lag screws (to fit into 3/8-inch mounting holes).
NOTE: The above aren’t official hardware/installation instructions. Rather, it’s information based on some quick researching of how to mount different equipment to wood or concrete walls.
The wall strips are designed to store equipment or to attach accessories for use as a separate exercise station. Each wall strip comes with two quick pins for to easily and securely attach other accessories.
These are the two most common uses for the wall strips:
- Weight Plate Storage: You can attach X-3 weight storage pegs to store and organize your weights. This is helpful if you want to keep the power rack totally clear of storage pegs and weights. NOTE: Only the bolt-on weight storage pegs work for this application–not the j-hook style adjustable ones.
- Dip Station: You can attach the X-3 Y dip bar attachment to create a dip station that’s always ready to use. This way, you don’t have to waste time and energy adding and removing the Y dip attachment from the rack every time you want to switch from dips to another exercise, or vice versa.

Here are a couple of other less common yet creative ways to use the X-3 wall strips:
- Landmine Station: You can attach the X-3 double landmine attachment to one of these wall strips. This is perfect if you want to have a dedicated landmine station where it’s always attached (ideally, with a second barbell that stays in, too). It’s totally out of the way and you never have to waste time and energy adding/removing it from the power rack. To do this, you need to have the wall strip pretty low near the floor. Otherwise it will be too high to do landmine exercises correctly. Personally, I would make sure the lowest hole on the wall strip is no more than 3-5 inches off the floor.
- Battle Ropes: I’ve never used battle ropes, but I know they’re popular. And they look like they can give you an intense cardio, core and forearm workout. If you want to use them in your gym, then an excellent place to secure them is the X-3 wall strips. You could secure them to one strip, or to a pair of strips spaced further apart. You could easily secure the rope to the wall strip (depending on the rope diameter) by passing it through one of the included pins. There are plenty of other ways you could attach thicker ropes too–you just have to get a bit creative. As long as you can attach the rope properly to the wall strip, you can rest assured that the wall strip itself will be a solid foundation that can withstand any amount of pull, whip, rotation or other force you can throw at it. As with the landmine use case, you’re going to want to have the wall strip(s) mounted close to the ground so that you can use it for battle rope training (i.e. the lowest set of holes should be no more than 3-5 inches above the floor).
- Climbing Rope (Wall Strip on Ceiling): Got a tall ceiling? Like to climb? Then why not install a climbing rope!? Now you can. Of course, you need to be sure that your ceiling is strong enough and that you’re capable of securely mounting this strip on the ceiling. Assuming you have all the above prerequisites, then you just need to get a good climbing rope. The rope made specifically for this purpose has either pre-tied reinforced loop in the rope end, or a built-in metal hook at the end. Either way, you can connect it using the included pins. Just hook it onto and/or loop it through at least one pin.
- TRX (Wall Strip on Wall or Ceiling): If you’ve got a TRX suspension trainer and are looking for somewhere to hang it on, then the wall strip will work. You can do it two different ways. First is attaching it to a wall strip that’s mounted on the wall. In this case, it has to be mounted high on the wall so that you enough room to do a variety of exercises. You mount the strip such that you can attach the TRX at 7-9 feet above the floor. Of course, having the TRX against the wall limits you exercise options. Ideally, you want it to be hanging from the ceiling, far enough away from any walls that might get in your way. To do this, the solution would be to mount the wall strip to the ceiling. Then, just attach to one of the pins on the ceiling-mounted wall strip. Again, the ideal TRX height from the floor is around 7-9 feet, so hopefully your ceiling is somewhere in that ballpark. I would not recommend getting a wall strip if your only objective is to hang a TRX from the ceiling–If that were the case, then you could just install the mounting attachment made specifically for TRX. Rather, I’d only recommend it if you also wanted to use the ceiling mount for another purpose as well, like attaching a climbing rope as discussed above.
The wall strip is 36 inches, or 3 feet, tall. That gives a decent amount of room to store multiple attachments. However, it’s still short enough that you should give good thought to exactly where on the wall you mount it.

Side view showing the 3-sided steel channel construction
Think about what you’ll use it for. Then mount it higher or lower accordingly.
As touched upon before, an example of when mounting low makes sense would be if you wanted to use the landmine attachment on it and/or battle ropes. Mounting higher would make sense if you wanted to hang a suspension trainer like the TRX. You’d want to mount somewhere in between (e.g. 1-2 feet off the floor) if you wanted to use it as a dip station.
What if you want to use it for multiple applications with different recommended mounting heights? The answer is simple: Get another one (or a second pair) and attach them at the different heights for their respective applications.
It is 3″ x 3″ and made from 11 gauge steel just like the X-3’s uprights are. However, the wall strips are actually “steel channel.” This refers to its shape/structure. Basically, it’s just like the square tube of the uprights in every way, except that one side is open. The open side in the case of this wall strip is the front, as you can see in the photos.
The use of steel channel instead of square steel tubing is by design. You need the open front to be able to install the hardware and secure the back of the strip into the wall…
…It’s important to highlight this last point — that the back strip is against wall — to understand the limitations of the wall strip. Specifically, it helps us see which other accessories work or don’t work with the wall strip:
- J-Hook Style Accessories Don’t Work on the X-3 Wall Strip: First off, J-hook style accessories include any accessory that uses the same type of locking/attachment mechanism as the actual “J-hook” accessory that’s used to rack/unrack the weight on squats/bench/etc. That is, it has the pin that inserts into the upright hole and the metal portion that wraps around the side and back of the upright. Examples of X-3 accessories with this J-hook style mechanism include the X-3 J-hooks (obviously), X-3 spotter arms and the X-3 adjustable plate holder pegs. Any X-3 accessory with a J-hook style attachment mechanism will not attach to the wall strip in the right direction (i.e. forward, away from the wall). In order to have these j-hook style accessories face in the intended forward direction, you would need to wrap the j-hook portion around the upright (i.e. the back of the j-hook must be behind/against the back of the upright). You actually can attach these accessories to the wall strip, BUT they will be facing left or right and running along the the wall. You won’t be able to use them for their intended purpose: performing certain exercises (or storing plates in the case of the j-hook style adjustable weight pegs). The only reason to attach these types of accessories to the wall strip would be to store/organize the accessories themselves.
Specifications:
- Material: 11 gauge steel channel
- Depth: 3″
- Width: 3″
- Length: 36″
- Accessory Hole Diameter: 5/8″
- Accessory Hole Spacing: 2″
- Wall Hole Diameter: 3/8″
- Wall Hole Spacing: 4″
- Compatibility (General): Compatible with many accessories made for racks with 5/8″ diameter holes. This does not include accessories for require inserting or bolting in to a hole on the front of an upright (see the following bullet point for examples of such non-compatible accessories for the X-3).
- Titan Compatible Accessories: Compatible with all Titan accessories made for the X-3 power racks and squat stands that only require being attached to one upright. NOTE: This includes many X-3 accessories. However, it only makes sense to use some of the wall strip(s). Examples include: X-3 Y dip bar, X-3 plate storage pegs, X-3 spotter arms (if you have the pair of wall strips). Since the wall strips have just 3 sides, they do not work with X-3 accessories that require inserting or bolting in to a hole on the front of an upright (e.g. Flying Pull-Up Bar–this requires being bolted through the front and rear of an upright which is impossible with the wall strips; X-3 dip handles–these would attach wouldn’t be oriented correctly; X-3 J-hooks–these would also attach but be positioned incorrectly).
X-3 Mounted Wall Ball Target
Most lifters focused on powerlifting, bodybuilding or general strength training styles will have no interest in or need for the mounted wall ball target. That includes myself. However, I’ll still talk about for those who may be interested in it.

This accessory will appeal primarily to Crossfitters, or lifters interested in dabbling in some Crossfit exercises. It designed specifically to train for wall ball shots, which is one of the exercises done at the CrossFit Regionals competition.
You install by inserting the post part of it down into the top of one of the uprights. You then line up its holes with the holes on the upright, and secure it with the included hardware (i.e. the bolts go through the front of the upright, then through the wall ball target post, and out the back of the upright).
You do have some flexibility in terms of the height above the top of the upright. The lowest setting would be positioning the post so the angled portion of the post starts right as it comes out of the upright.
I can’t tell for certain, but it appears that you can adjust the height as much as 6 inches higher. I’m basing this on what I can see from the images and specs–the post hole spacing is 2 inches, there are 7 holes (14 inches) on each segment of the post, you need at least 4 holes (8 inches) of the post kept down inside the upright to secure it; do the math (14-8) and you get a max of 6 inches of additional height.
Note that this accessory actually works on both the X-3 as well as the T-3 power racks.
However, you don’t have to mount it to a power rack. You can also mount it to a wall stud, according to Titan. However, I’m pretty sure you would need to buy different hardware to secure it. Lastly, I don’t see why you couldn’t also mount it to a cement wall. In that case, you would most definitely need different hardware to secure it.

If you are interested in getting this accessory, keep in mind the following:
- You need a tall enough ceiling. More specifically, you need a bare minimum of 21 inches of clearance above the top your rack.
- The standard heights for Crossfit wall ball shots are 9 ft, 9.5 ft and 10 ft. So ideally, you’ll want to have at least that amount of total ceiling space.
Specifications:
- Post Material: Steel
- Target Material: 1/4″ thick steel (3 gauge)
- Overall Height: 35″
- Target Diameter: 16″
- Depth: 6.5″
- Hole Spacing on Post: 2″
- Weight: 22 lb
- Paint Finish: Matte black powder coating
- Compatibility (General): Any 3″ x 3″ or 2″ x 3″ power rack with 5/8″ holes spaced 2 inches apart in the top portion of the rack — Uprights must be open at top so attachment can be inserted inside.
- Titan Compatible Racks: All X-3 and T-3 power racks — Can also be attached to the wall via the T-3 or X-3 wall strip.
X-3 Shackles (Pair)
The X-3 shackles that are meant to be bolted on to one of the crossmembers that form the rack.

Each shackle has a hole at its bottom. The pair of shackles comes with a pair of carabiners, which are meant to go in the holes so you can easily attach other equipment. However, the carabiners are removable if you want to use the holes for something else.
You can move the shackles closer or further apart depending on the application. Generally, though, the position and distance between shackles will be similar for most uses.
These are a few different uses for the X-3 shackles that I came up with:
- Ab Straps: You can hook on a pair of hanging ab straps. This will let you do a bunch of excellent ab exercises, including hanging knee raises, hanging leg raises, hanging oblique raises and hanging oblique twists.
- Pulley Attachments: No need to buy a complete separate lat/triceps pulldown machine when you can attach the Spud Inc Lat/Triceps Pulldown Pulley System and Spud Inc Low Row Pulley System (requires the Lat/Triceps pulley) to the X-3 shackles. Granted, you could get both of these attachments and just wrap them around the top cross members–But the shackles are a more secure way to do it, that wont have any chance of sliding to one side or another. Plus, it’s easier to attach and remove the pulley attachments from the shackles. Just open/close the carabiner.
- Pull Up Attachments for Grip-Focused Work: There are a bunch of interesting grip-specific pull up attachments out there that work perfect for these types of shackles. This includes hanging “cannonball” pull up spheres, hanging “piston” pull up posts, hanging pinch-grip pull up posts and hanging pinch grip pull up blocks. These types of attachments are popular among rock climbers. However, these are also a great option for anyone looking for a fun and challenging way to improve their grip strength and develop their forearms.
- Gymnast Rings: You can attach a pair of gymnast rings to the shackles. Many people, including many people involved in calisthenics or Crossfit, like to use gymnast rings for dips, inverted rows, pull ups and incline or decline push ups. The rings make these exercises much more challenging. You have to work extra hard to stabilize your body throughout the movement to keep the rings from moving.
- TRX Suspension Trainer: The X-3 shackles are a great place to attach a TRX suspension trainer if you have one. The TRX is similar to gymnast rings in some ways. But it is actually more versatile in terms of the number of exercises you can do on them. Also, you have a lot more range in terms of how low or high you can adjust the height of the handles/stirrups, as well as greater ease of handle/stirrup height adjustment. Additionally, you only need to attach the TRX to one of the shackles. Attaching the TRX to a shackle is more convenient and stable than wrapping it around the top of the power rack.

There’s likely a number of other creative ways you could use these shackles, but the above is a good starting point.
If I ever get these, it would probably be for the ab straps and to secure a lat/triceps/row pulley system. However, I currently don’t have a real need or desire to get either of those items. So for the time being, I won’t be getting these shackles.
Specifications:
- Weight Capacity: 500 lbs
- Material: Steel
- Length: 3″
- Width: 3″
- Height: 7″
- Weight: 6 lbs per shackle (12 lbs for pair)
- Paint Finish: Black powder coating
- Compatibility (General): Any power rack with an upper crossmember that is 3″ x 3″ and has 5/8″ holes.
- Titan Compatible Racks: All Titan X-3 power racks
Variations of the Titan X-3 Power Rack
There are other types of racks besides power racks within Titan’s “X-3” product line.
This includes different configurations of the X-3 squat stands. I discuss these in detail in my Titan X-3 Squat Stand and Half Rack review. If you don’t want to read the full review, then I’ll provide an overview here:
First off, here are images of all the different squat stand configurations with links to their product pages:
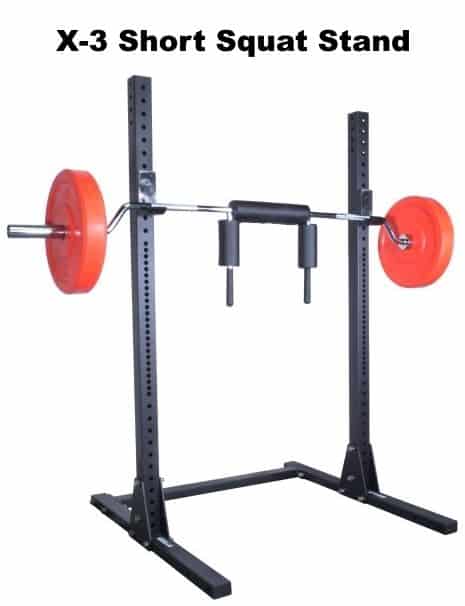
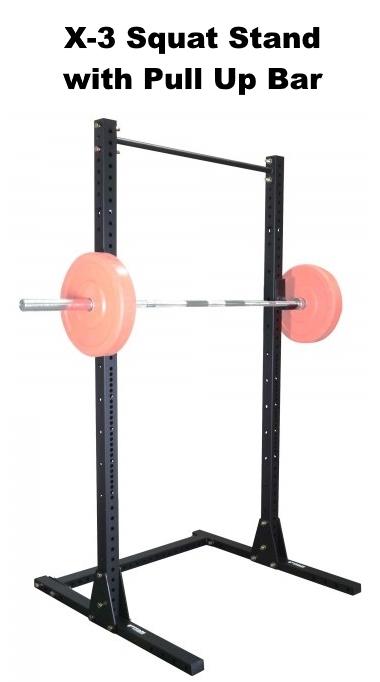
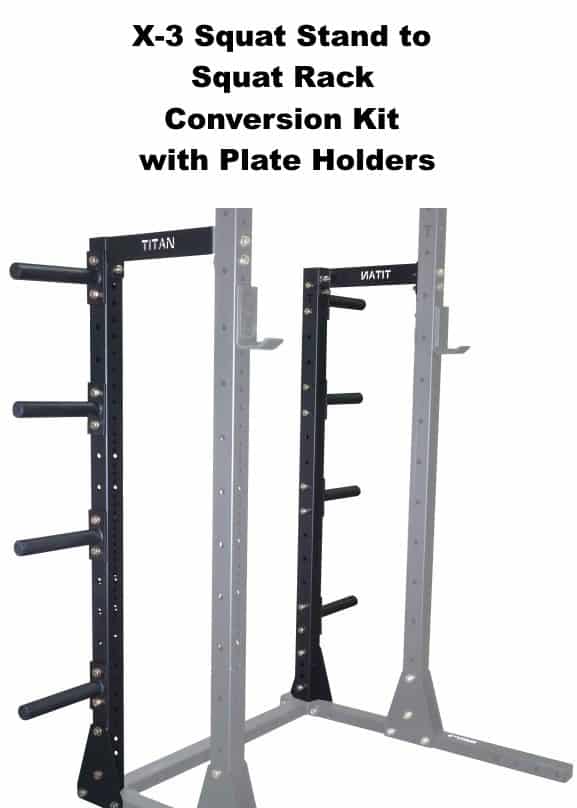
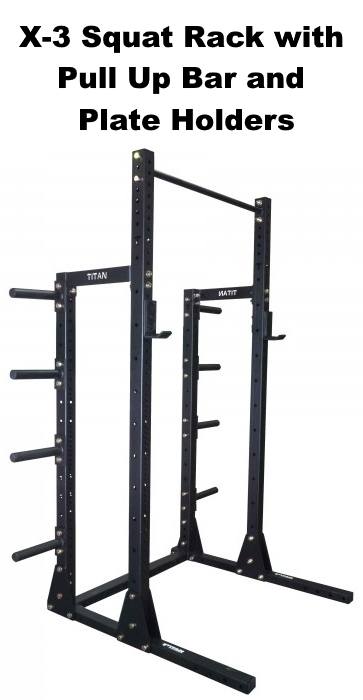
Now, I’ll cover the key similarities between the X-3 Squat Stands/Half Racks and the X-3 Flat Foot Power Rack:
- 3″ x 3″ uprights and 11 gauge steel construction
- Flat foot design that doesn’t need to be bolted down
- 47″ external depth – The product pages say 49″, just like it does on the X-3 Flat Foot Power Rack page. However, as I discovered, the X-3 Flat Foot Power Rack is actually 47″. I can only assume that this is also the case with the X-3 stands and racks.
- 48″ external width
- Same internal width of 42
- At a bare minimum, they all come standard with at least 1 pair of j-hooks. All but one come standard with a pull up bar.
Again, I’ve got a ton more information about these stands/racks in my detailed X-3 squat stand/half rack review. I go in-depth on all their features, pros and cons, and who they’re best suited for.
Alternatives to the Titan X-3 Power Rack
Why choose the X-3 over similar racks? Below, I’ll weigh the major pros and cons of the two most likely X-3 alternatives (Rogue RML-390F & Titan T-3) against the X-3.
Rogue RML-390F Power Rack
I discussed this at length earlier. I’ll recap here the primary benefits of the Rogue RML-390F vs the Titan X-3:
- It has a thicker and more durable powder coat paint finish. The X-3 has a powder coating, but it doesn’t compare to the quality of the Rogue rack. The RML-390F will resist scratches and chipping from impact with the barbell and plates. It will also have an overall sleeker and more professional look to it out of the box.
- It is made in the USA. All Rogue racks are manufactured in the US, in the state of Ohio. This gives gives them better quality control (i.e. consistency) and ensures a premium level of quality. This is directly related to what I’ll discuss in the bullet point below:
- The overall construction quality is better and more consistent. The quality difference is relatively minor. However, it is worth mentioning because it’s a definite advantage of the RML-390F. If I had to give it a rating, I’d say the X-3’s construction quality is 95% as good as the RML-390F. For example, all the welds are all very clean looking on the Rogue. Whereas, some of the X-3 welds are a bit messier–though they perfectly functional. Also, you’ll be hard pressed to find any dings in uprights or other imperfections out of the box on the RML-390F. Basically, the higher construction quality essentially boils down to better aesthetics. It doesn’t, however, appear to give it an edge in terms of things like weight capacity rating of the rack itself or any attachments used on it.

And here are some of the standout drawbacks of the RML-390F vs the X-3:
- It’s around TWICE as expensive as the X-3 power racks, after you consider shipping costs. More on shipping costs below:
- Shipping is NOT free, as it is with the X-3. Though, if you’re lucky enough to live in the Columbus, OH area, you can pick it up for free from the factory.
- It comes with just 1 pull up bar. You can pick either a skinny (1.25″ diameter) pull up bar OR a fat (2″ diameter).
- There is no optional bolt-down gussets available from Rogue if you want to bolt it down. However, I’d imagine that you could buy the bolt-down gussets made by Titan and use them on the RML-390F if you get it.
Titan T-3 Power Rack
Most people considering getting a Titan X-3 power rack are probably also considering the Titan T-3 power rack.
I actually did a very in-depth Titan T-3 review as well. I recommend reading that if you think the T-3 may be better than the X-3 for your needs.
However, I’ll give a quick rundown of T-3 power rack vs X-3 power rack:
- T-3 needs to be bolted down to the floor or a platform; X-3 does not need to be bolted down (but you can if you want to).
- T-3 has 1000 lbs weight capacity rating; X-3 has 1500 weight capacity rating.
- T-3 has 2″ x 3″ 11 gauge uprights with a sumo base; X-3 has 3″ x 3″ 11 gauge uprights with a 2″ x 3″ flat foot design.
- T-3 has a full-height version that is 91.125″ tall and a short version that is 82.25″ tall; X-3 has a full-height version that is 92″ tall and a short version that is 82.375″ tall.
- T-3 is available in 24″ depth and 36″ depth; X-3 is available in just 30″ depth.
- T-3 currently has a few more accessories available, though that gap is closing rapidly because Titan has been adding new X-3 accessories monthly if not more frequently as of writing this (Nov. 2017).
- T-3 and X-3 both extensions that create a second enclosed rack area to perform lifts and/or store weights and accessories. The T-3 has a 24″ and 36″ rack extensions available. The X-3 has 10″ and 24″ rack extensions available.
- T-3 is less expensive, with the full-height power rack costing $559.99 ($599.99 for the deep full-height version) and the short power rack costing $489.99 ($529.99 for the deep short version); X-3 is more expensive with the full-height power rack costing $699.99 and the short power rack costing $659.99.

NOTE: Both the 24″ deep version and the 36″ deep version are available in at two different heights: short (82 1/4″) and full-height (91 1/8″).
Here are some of the reasons you might want the T-3 vs X-3:
- Budget is a priority and you want to save $100+.
- You want a sumo base to be able to do extra wide stance exercises inside the rack (e.g. sumo deadlifts, sumo squats).
- You want a power rack with an internal depth greater than 30″ (in which case you’d get either the 36″ deep full-height T-3 power rack or the 36″ deep short T-3 power rack).
- You want an extension to install on the back of the rack that deeper than 24″ (24″ is the max extension depth for the X-3 vs 36″ for the T-3).
- You want a bolt-down rack and you want this capacity built in standard. (This is in contrast to the X-3, where bolting is not necessary, but if you want to do it, you have to buy the optional bolt-down gusset plates separately first.)
Titan X-3 Sumo Base Power Rack
That’s right, now there’s two Titan X-3 power racks in town!

The new rack is technically called the “Titan X-3 Power Rack.” However, to avoid confusion with the X-3 Flat Foot Power Rack that this current review is dedicated to, I’m going to refer to the new X-3 as the “Titan X-3 Sumo Base Power Rack.”
This rack is yet another new product that Titan introduced while I was writing this review. It dropped some time in September or October of 2017. It’s crazy how many products these guys churn out–I can barely keep up!
So, what’s the X-3 Sumo Base Power Rack all about? Well, let’s put it this way–if the X-3 Flat Foot Power Rack and the Titan T-3 Power Rack had a child, this is what it would look like when it’s all grown up. 😛
But seriously, it takes key design elements from each of the those racks and combines them together:
- Similarities to the X-3 Flat Foot Power Rack: 3″ x 3″ uprights, 1500 lb capacity, compatibility with most X-3 accessories
- Similarities to the T-3 Rack: Sumo base, 24 inch depth version, 36 inch depth version, band pegs included, weight plate holders included
All other major features/specs that the X-3 Flat Foot and T-3 share, the X-3 Sumo Base Power Rack also shares.
The only major specs I noticed that are unique to only the X-3 Sumo Base Power Rack are the height dimensions of its full-height versions and its short versions:
- X-3 Short Sumo Base Power Rack Height = 80″ (compared to 82.375″ for the X-3 Short Flat Foot Power Rack and 82.25″ for the T-3 Short Power Rack)
- X-3 Full-Height Sumo Base Power Rack Height = 90″ (compared to 92″ for the X-3 Full-Height Flat Foot Power Rack and 91.125″ for the T-3 Full-Height Power Rack)
So, who would be better served by the X-3 Sumo Base rack vs an X-3 Flat Foot rack?…
My thoughts are that it’s the superior choice IF you like the robustness and high weight capacity of the X-3 Flat Foot Power Rack, BUT you also want to do or have any of the following:
- You want the ability to do sumo deadlifts or sumo squats inside the rack.
- You want to do band-resisted training and be able to position the bands anywhere on bottom of the rack without having to do any of the workarounds I outlined earlier.
- You want a shallower 24″ depth OR a deeper 36″ depth instead of the X-3 Flat Foot rack’s 30″ depth.
- Your ceiling is just a couple of inches or less too low for either the full height or the short X-3 Flat Foot Rack. You get about 2 inches of extra breathing room with the X-3 Sumo Base rack, which is great news if you’re right on the cutoff point. As mentioned throughout this review, I barely had enough room to fit the short version of the X-3 Flat Foot rack. Let’s say my ceilings were even half a half-inch lower. Then I would’ve had to find a different rack–and if the X-3 Sumo Base rack was out at the time, then I probably would’ve settled on it–I would’ve had to figure out workaround to bolting it down, but still, I could make it work if I had to. Luckily, though, I had just enough ceiling clearance for my flat foot rack to fit! *phew*
- You want to pay a bit less for your rack while also getting band pegs and plate holders included standard. Currently, the short and full-height versions of the X-3 Flat Foot Power Rack retail for $659.99 and $699.99 respectively; band pegs and plate holders don’t come standard. Whereas, the X-3 Sumo Base Power Racks generally run a bit lower in price, with the four different height/depth configurations retailing from $599.99 to $649.99.
NOTE: You must also be willing and able to bolt this rack to the floor for stability, just as you would for the T-3.
Here are all of the different depth and height combinations of the X-3 Sumo Base Power Rack:
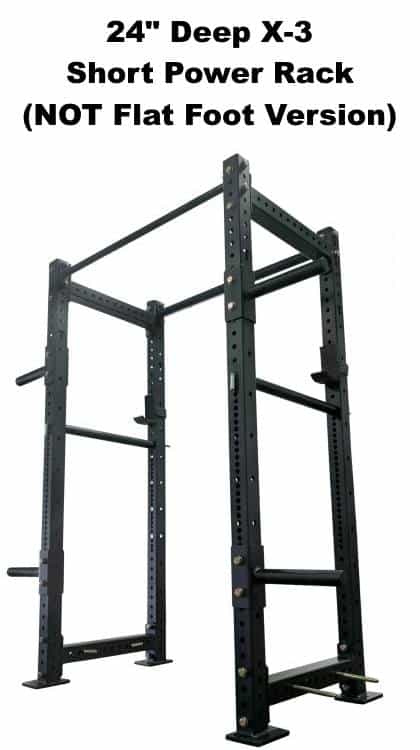
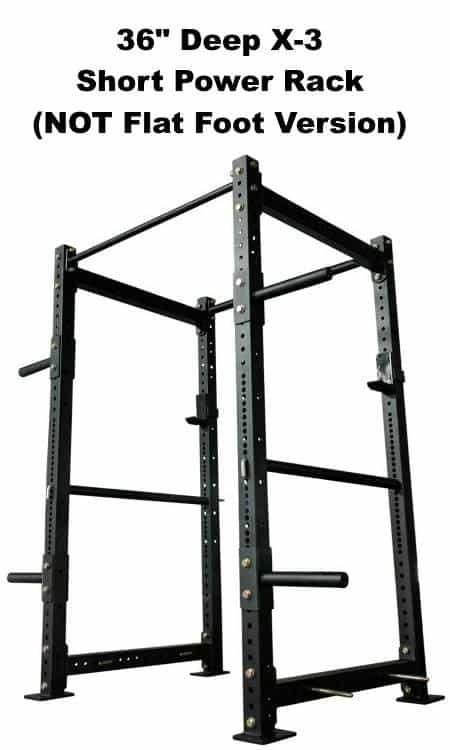
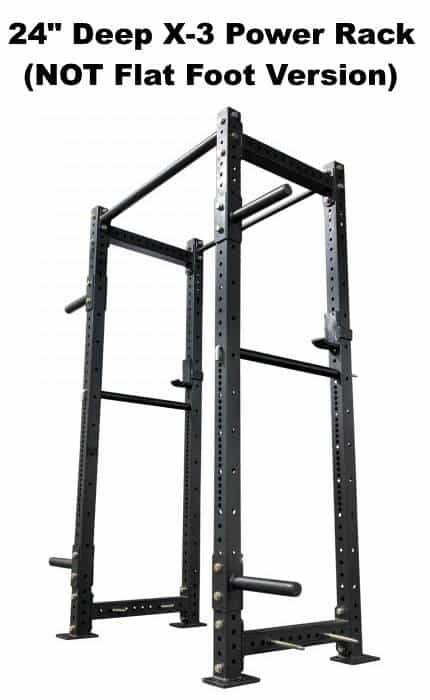

- X-3 Sumo Base Short Power Rack – 24″ Depth
- X-3 Sumo Base Short Power Rack – 36″ Depth
- X-3 Sumo Base Full Height Power Rack – 24″ Depth
- X-3 Sumo Base Full Height Power Rack – 36″ Depth
Titan X-2 Power Rack
UPDATE: The Titan X-2 is no longer sold, though Titan does still carry some X-2 accessories for existing X-2 owners.

I actually wrote a full Titan X-2 Power Rack review. I recommend reading that in full if you’re interested in this rack. However, I’ll give you a very quick rundown of the basic features and specs:
- Made with 2″ x 2″ 9 gauge steel with welded upper and lower side bracings
- Very high 3000 lb weight capacity
- Available in one depth: 24″ (internal depth)
- Available in two heights: 78″ and 87″ — Both versions are between 2-5 inches shorter than all other versions of the X-3 and T-3 power racks because the upper side bracings are welded on instead of being bolted-on; bolt-on bracings require additional space above the top of the side bracing to bolt into the upright, resulting in extra unused space.
- Sumo base
- Westside hole spacing
- Comes standard with pair of j-hooks, fat and skinny pull up bars, pin/pipe safety bars, 4 weight plate holders and 4 band pegs.
- J-hooks are made specifically for left and right side; an improvement over j-hooks on the X-3 and all other Titan racks), as well as fat
Here are the main negatives of the X-2 power Pack:
- There are currently a limited number of X-2 accessories available. This is because the X-2 is brand new. Eventually, more accessories will be added, but it is unknown how many, which kinds and how long before they’re available.
- There is only a short 10″ rack extension is available: This is awesome if you want a rack extension for weight plate storage. However, if you want a secondary exercise area, then you’d want a 24″ rack extension, which both the X-3 and T-3 have. It is unclear whether or not Titan will add one in the future.
- It needs to be bolted down. This is of course because it is a sumo base power rack, which have raised lower side bracings as a necessary part of their design. So, you get the benefit of having the space under the rack for wider stances. But it’s at the cost needing to bolt the rack down to ensure safety.

Force USA MyRack Power Rack
Many lifters will find the Force USA MyRack to be a solid alternative to the X-3.
I’ll start by saying that it is a 12 gauge rack and not 11 gauge — But don’t dismiss it based on that. I almost blew it off after learning that fact, but I’m glad I gave it a chance.
It actually has many other design factors that compensate for its slightly thinner steel tubing. To the point that it can compete in the same league as many 11 gauge racks. It boasts a 2000 lb static weight rating.
It’s like the Titan X-3 in that it’s also a flat foot rack that doesn’t need to be bolted down. Though it can be bolted down, and has holes built into the feet for that purpose. If you want to bolt the X-3, you have to buy the special gusset plates separately.
There are many differences between these two racks, but I’ll highlight the main ways in which the MyRack stands out in comparison:
- The MyRack has arguable the best selection of attachments, including some that few or no other companies (including Titan) offer. To clarify, they certainly don’t have as many attachment options as Titans. Rather, they have the most unique collection of high-impact attachments that I’ve seen in any power rack company so far. They make the MyRack arguably the best complete home gym solution. There are 17 attachments currently, with more on the way — However, the 2 I want to highlight are the Lat Pulldown/Low Row and the Cable Crossover Attachments. No other rack I know of has BOTH of these options.
- It has built-in lower band peg holes, which is a key feature that the X-3 lacks.
- It has numbered holes. This is a small detail that makes a huge difference.
- Generally, the quality control is better than with Titan.
The X-3 wins in other ways of course. It is beefier with 11 gauge steel with 3″ x 3″ (versus 12 gauge, 2.4″ x 2.4″ uprights). If you’re already an advanced/elite lifter in terms of strength, you should definitely stick with the Titan X-3 vs. the MyRack.
Also, the X-3’s attachments are also generally less expensive. And even if it doesn’t have the key unique attachments that the MyRack does, it has a great many more available.
If you’re interested in learning more about this rack, I’ll point you toward my Force USA MyRack review, which has all the additional information you could possibly want.
Ready to Buy the Titan X-3?
Any serious lifter looking for a good, affordable power rack for their home gym should strongly consider the X-3. To summarize why:
- It’s boasts an impressive set of specifications and features that put it in the same league as high end collegiate strength and conditioning equipment.
- It has great overall build quality and can withstand many years if not a lifetime of heavy use. It might lack the have some aesthetic imperfections, lack the premium finish and get more scratches over time compared to more expensive setups–BUT functionality-wise, it can hold its own.
- It has vast array of available compatible accessories available for purchase (from both Titan and Rogue) that will extend it’s applications way beyond basic barbell movements.
- It does the above at a fraction of the cost you’d expect. You can get the full-height or short version of the X-3 power rack for between ~$660-700.
If you consider that most decent gyms will cost somewhere in the ballpark of $40-50 month, you’ll be able to pay off your ~$660+ investment in the X-3 in less than a year and a half. If you also calculate the transportation and time costs associated with transportation to and from the gym, the rack pays for itself even sooner. For example, I just calculated that I had been paying about $120 in fuel driving to the gym each year. And I had it good–my gym is 3 or so miles away and I had been going 3-4 times per week.
I think I’ve covered just about everything you could possible want to know about the X-3 power rack. You should be armed with all the information you need to decide if this is the right power rack for you…
…So if you do indeed want to buy the X-3 power rack for your home gym, then see below for details:
Where to Buy
I recommend buying the rack from the Titan Fitness website. First and foremost, you’ll get the best price. Plus, shipping is free for US customers.
Here are the Titan Fitness store for the two different X-3 power racks:
If the power racks are too big for your home gym or just not your style, but you still like the attributes common to all racks in the X-3 lineup, then here are the links to all the X-3 squat stands and half racks on the Titan Fitness store:
- X-3 Half Rack
- X-3 Squat Stand with Pull Up Bar (92″ height version)
- X-3 Short Squat Stand (72″ height version)
Finally, here are the links to all the X-3 accessories as well as the power rack extensions on Titan’s website:
Some X-3 accessories may also be available on Amazon.

Wow, really in depth! Thanks for taking the time to get the details. How’s the titan holding up?
Thanks, Scott. I’m all about the details when it comes to reviews. It’s holding up great. Now, my focus is on stocking up on other home gym equipment 😀
Thank you for the in depth information. It is very informative and detailed. Do you know if the 10 in extension will have enough room for bumpers plates with a loaded barbell on the rack?
Thanks, Dev. I don’t have the extension. But the plates will definitely with room to spare, without going into internal area of the main rack. To be exact, you’ll have 5.5 inches between the where the inside of the main rack starts and where the stored bumper plate ends. See the diagram at the end of my comment.
That said, there is a scenario where you could run into an issue. That is, if you have a loaded barbell on the j-hooks and it’s at or near the same height as a weight storage peg with plates currently being stored on it (this is because the bumper plates on the barbell will extend ~8 inches back behind the upright when on the bar is on the j-hooks, which is greater than the 5.5 inch gap mentioned above). In that case, you’d have to remove the plates from that storage peg. In practice, though, this probably wouldn’t occur often if at all, since you’d likely install the storage pegs out lower or higher on the rack–out of the way of the height of your main lifts. That said, if you want to avoid any possible occurrence, then the 24″ extension would be the best bet.
Diagram below:

Absolutely, positively the most in-depth, detailed and comprehensive review I’ve ever seen. I read your T3 review and was ready to purchase…then watched the X3 and changed my mind. There were many significant factors involved, but the flat-foot design is the most crucial for my particular circumstance.
I placed my order for the X3 shorty today…along with a bunch of accessories that you outlined in your review. Thank you so much for taking the time and making the effort. Best of luck to you!!
Thanks for the kind words, Jerry! Very happy to have helped you make a decision. I totally agree about the flat foot being an important factor…it was a big one for me when deciding; drilling into the floor simply wasn’t an option.
I can tell you’re excited about your new home gym — I know you’re gonna love it…and your wallet will be happy too, since Titan’s prices are so low compared to the competition.
Feel free to come back and leave another comment after you’ve set everything up and tested it out. I’d love to hear how you like your new setup.
Best,
Alex
Amazing review. I’m debating between the Rogue RML 390 and the Titan X-3. It’s hard to justify nearly double the price but then again if the quality is noticeably better, then it might be worth it. I’m sure the Titan will be good enough for my needs though. What do you think?
You’re right, it’s a tough choice. The RML-390 will be better construction overall — if you really want the best of the best, then I’d say go for it. However, in practical/functional terms, the X-3 will work just as well. If you’re looking for a compromise, I might suggest getting the X-3 rack, but getting the accessories from Rogue (specifically any accessories that absolutely maximize safety e.g. monster j-hooks, strap safeties or other safety bars, etc).
I just want to say how amazing, detailed this review is. I greatly appreciated it. I just picked up the X3 power rack, did massive research and your review just confirmed my purchase.
Thank you again! Please keep up the great work!!!
Thanks, Sam! Enjoy your new rack, I know you’ll be happy with it.
Best,
Alex
Awesome review. Of course like everyone else, i’m looking for a rack. I have a valor fitness 2×2 that I want to upgrade. It sways a ton and I want a beefier rack. I’m torn between the Titan line and Rep Fitness. Wondering how you’re going with the X3 and if you were to do this again, would you make the same decision today. Also how did you over come the lack of holes on the bottom for band pegs?
Thanks
Jason
The X-3 was solid, but I left it at my old apartment since I have the Force USA MyRack at my new place.
Now — between Titan and Rep Fitness, I would go with Rep Fitness. My “dream rack” right now is the PR-5000, which is an absolute beast with a TON of extensibility and has been getting great feedback in terms of quality. Of course, it’s more expensive, and you can still get a lot of the quality, features and attachments with the PR-4000.
Titan will be cheaper, but somewhat lower quality — still beefy and good enough. But if I were to buy again, I’d want the extra level of quality — And with Rep, you still get a pretty good bang for your buck (especially compared to, say, Rogue — Rogue of course is excellent, but you may more of a premium).
I’m curious as to why you chose to switch from the X-3 to the Force USA MyRack. I’m between those two racks right now, would you mind sharing what tipped the boat towards Force USA for you? Especially since the MyRack’s odd 2.4″ uprights take away the prospect of getting Monster Lite attachments from Rogue?
I wanted the in-rack lat pulldown / low row, which wasn’t (and I think still isn’t) available for the X-3 flat foot rack. I also was really attracted by the ability to have a full cable crossover setup, which Titan/Rogue also didn’t have (though I no longer have these setup since I moved into a smaller space).
You had me sold on the short X-3, until you mentioned the MyRack. I’m looking for a rack for my basement that has a low ceiling (90″). I plan to use it for squat and bench and will be getting optional spotter arms. I don’t plan on doing pull ups due to the low ceiling. Given my use case, would the MyRack be the better, more economical choice or should I still get the X-3? My budget is 600-700 for the rack and accessories.
Both racks will meet your needs, of course. But the MyRack will give you more bang for your buck. It starts at $399 and you only need to budget for the spotter arms, which still puts you below the short X-3’s price point of $569.99.
Great Review! Just bought the short flatfoot X-3.
I’m getting mixed info on compatible cable attachments – Titans website and staff are also giving mixed info. Anyone experience in adding a cable to the X3 flatfoot?
I’m not sure if I missed it in your post, but do you know if the X-3 Series Flat Foot Extension Kit would fit the Rogue RML-390F rack? It seems like it would work if you add a Rogue cross member to adjust for the correct width. Just concerned about the size of the feet affecting the height and how the holes line up.
Thanks,
Elie
I’m not sure about that specific compatibility, Elie.
@Alex – are you certain that you can lower the pull-up bar? I want to buy the 91″ but I’m a little concerned about the height with my ceiling. If I can lower the bar to 84-86″ then I’ll be set.
Curious, my current landlord said he doesn’t care if I bolt down the cage in the garage as long as I properly fill the holes after I leave. So I’m leaning towards buying the bolt down version of the x-3.
From the looks of it, the flat foot version pretty much just looks like a bolt down version that’s bolted to 2×4’s. I’m curious if anyone has taken the bolt down version and just bolted it to two 2×4’s to get the same stability as the flat foot?
I’m trying to think if this is a valid solution for a bolt down version in the future if I ever have to move and the new landlord won’t let me bolt it down.