In this Vitruve Encoder review, I’ll tell you everything you need to know about this popular velocity based training (VBT) device.
The Vitruve Encoder is a linear position transducer (LPT) that you can tether to your barbell or your body. It captures velocity and related data for every repetition you perform and displays that data in an app on your phone or tablet.
You need a piece of technology like this to do velocity based training, which research suggests is the most effective strength training strategy. It helps you program the optimal load and regulate your fatigue based on real-time feedback.
Before I get into the details of this Vitruve Encoder review, here’s a high-level summary of the pros and cons of this VBT device:
| Model | Pros & Cons | Rating |
|---|---|---|
Vitruve Encoder | Pros:
| Rated 4.8 out of 5 in VBT Devices |
Table of Contents
UPDATE: The New & Improved Vitruve App
The new and improved Vitruve app has launched, available on iOS, Android, and Desktop. It looks different and has different features than what’s shown on this review page.
You can see my review of the new Vitruve app here.
Benefits of the Vitruve Encoder
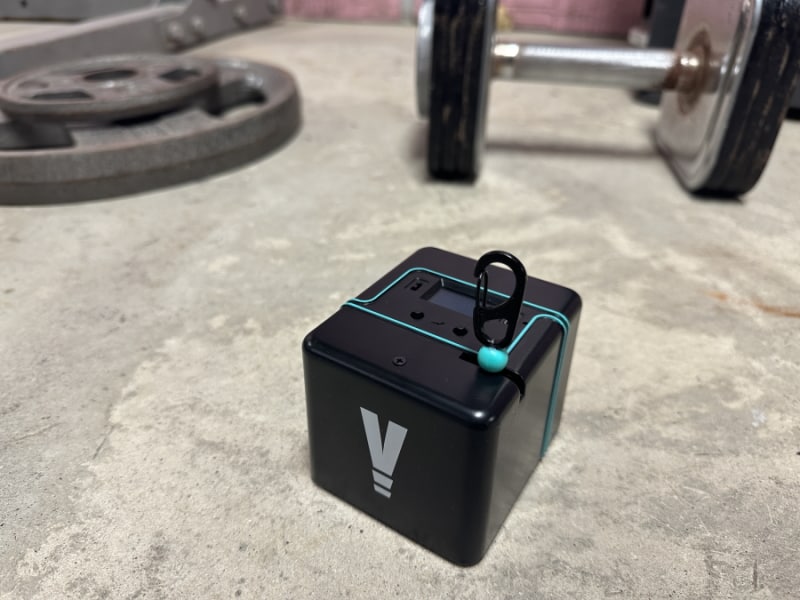
Scientifically validated for reliability. You can only reap the benefits of velocity based training if the VBT device you’re using is accurate and consistent. Luckily, the Vitruve is one of a handful of VBT devices that’s been scientifically validated through a study.
Get real-time feedback. The app provides real-time visual feedback so you can see your velocity metrics for each rep. It also provides audio feedback if you’re using velocity zones so you can hear if you’re going too slow or too fast.
Lightweight, portable & easy to set up. The Vitruve encoder can easily be transported in your gym bag. The time it takes to set it up – from taking it out of your gym bag to anchoring it and connecting the string to your bar – is just a few seconds.
Track progress. The Vitruve app tracks your progress over time for each lift.
Predict performance. Create your own force-velocity profile for each lift to accurately predict your one-rep max for the day on a given exercise based on your warm up sets.
Avoid injuries. Reduce your work set loads on days when your predicted performance level is lower.
Get stronger, faster. Increase your work set loads on days when your predicted performance level is higher.
Become more explosive. Train to increase your Rate of Force Development (RFD).
Use it for any strength training goal. Vitruve isn’t just for lifters or athletes seeking only to improve speed and explosiveness. You can use it for any type of strength goal to target any of the 6 strength traits, including absolute strength, circa max strength, accelerative strength, strength-speed, speed-strength, or starting strength.
Reduce fatigue and recovery time. Often, lifters will unknowingly perform more reps and/or sets than is necessary for their training goals. The extra volume doesn’t provide an additional benefit. Rather, it only adds fatigue, which increases recovery time within and between workouts. You can use Vitruve to manage fatigue by setting velocity loss thresholds within and between your sets.
Stay motivated and stick to your program. You’ll have better adherence to your program because you’ll be motivated by real-time feedback. You’re more engaged in your training you’re trying to hit a certain velocity goal for every rep.
Use Code KING for 5% OFF – VITRUVE VBT Device »
What is the Vitruve Encoder?
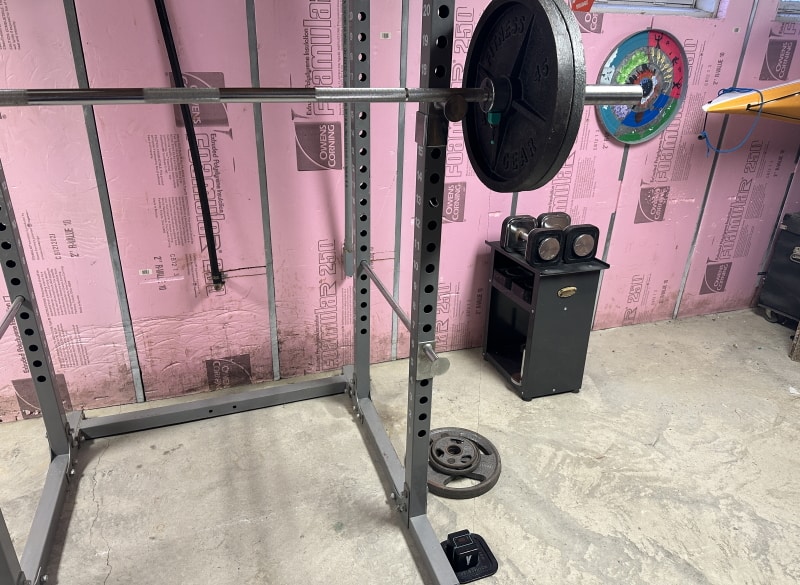
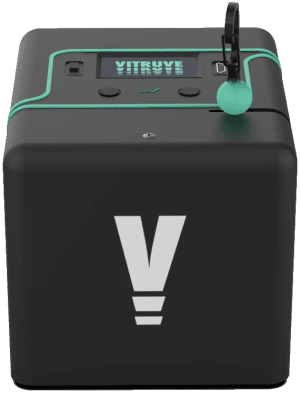
The Vitruve Encoder is a linear position transducer (LPT). It has an optical linear encoder encased in an outer shell made from ABS plastic. There is a super strong “string” (made of braided thread; a type of fishing line) on a spindle inside the plastic shell and connected to the encoder. The end of the string attaches to your barbell.
The string extends and retracts when you lift and lower the barbell during exercise, causing the spindle to rotate. The encoder uses rotation to measure the linear movements, which it converts into an angular movement. This is used to generate a bunch of valuable exercise data, including velocity and many other metrics, which I’ll discuss a bit later.
Linear Encoder vs Accelerometer
Linear encoders are more accurate in measuring velocity than accelerometers, as they measure the actual change in position over time rather than the cumulative acceleration. In other words, linear encoders measure velocity directly, whereas accelerometers measure velocity indirectly (based on acceleration). This indirect measurement reduces accuracy.
Other causes for inaccurate and inconsistent measurements in accelerometer-based VBT devices include factors such as:
- Slight variations in barbell movement/technique
- The sensitivity (or lack thereof) of the algorithms used in these devices
Linear encoders are also more precise than accelerometers when measuring position. This is because they measure the actual distance traveled. This allows encoders like Vitruve to record and display your range of motion. Accelerometers, on the other hand, estimate distance indirectly, just like they do with velocity.
Of course, accelerometer-based VBT devices are typically less expensive and more convenient to set up by simply sticking it on your barbell or yourself. However, it’s important to remember that the accuracy and reliability of your movement data are essential to doing VBT properly. Unfortunately, studies and anecdotes alike have shown accelerometer devices to be inaccurate and inconsistent.
Fortunately, many linear encoder VBT devices, including Vitruve have been scientifically validated.
What’s Included
There are different packages you can choose from when purchasing the Vitruve Encoder:
Just the Encoder
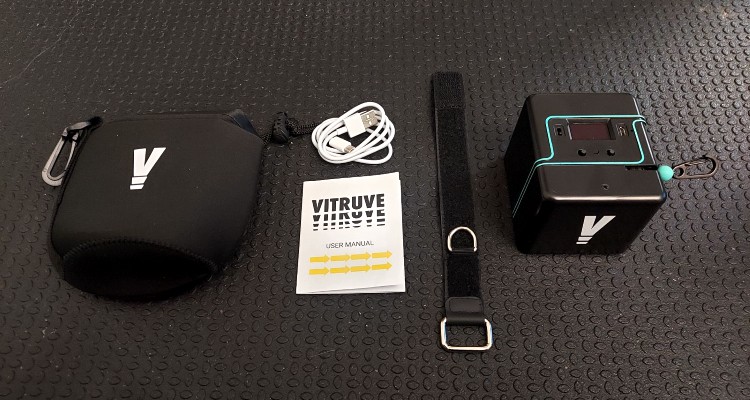
Here’s what you get when you buy just the Vitruve Encoder:
- The Vitruve Encoder unit
- Neoprene bag for storage/transportation
- Velcro strap to connect the string to the barbell or your body.
- Micro USB Type-B charging cable
- User manual
- The free app for athletes/individuals; available for both Android and iOS
This is the least expensive option at $447 with tax included and free shipping.
Vitruve Pack for Athletes/Individuals
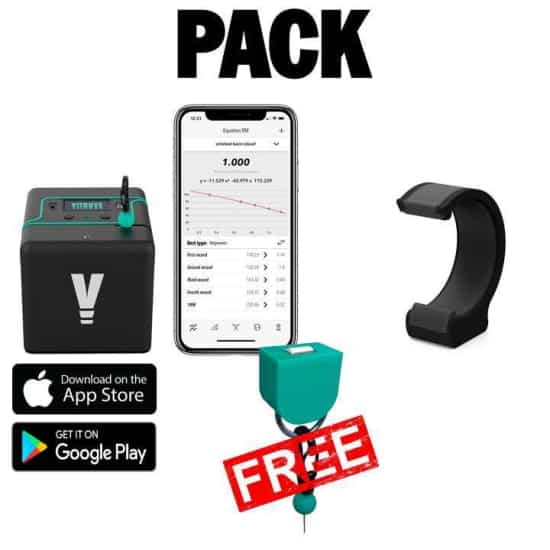
With the Vitruve Pack for Athletes/Individuals, you get when you buy just the encoder (see above), PLUS:
- A magnetic roller hook that lets you connect the string to the barbell almost instantly. It stays in the same position even when the barbell rotates. This makes setup easier and the measurements more accurate than the velcro strap.
- A magnetic smartphone mount that lets you attach your phone to a power rack (or any metal surface). This gives you instant visual feedback for each rep when using the app.
I recommend that most lifters who will be using the encoder themselves (i.e. non-coaches) buy this package instead of buying just the encoder alone. My reasons for this recommendation are:
- You get the roller hook and magnetic phone, both of which make your training workflow so much more efficient when using the Vitruve Encoder.
- It only costs a bit more at $476 with shipping and tax included
- You save $19.65 compared to if you bought the roller hook and magnetic phone mount separately.
Vitruve TEAMS App for Coaches/Teams (Bundled With Encoder OR Sold Separately)
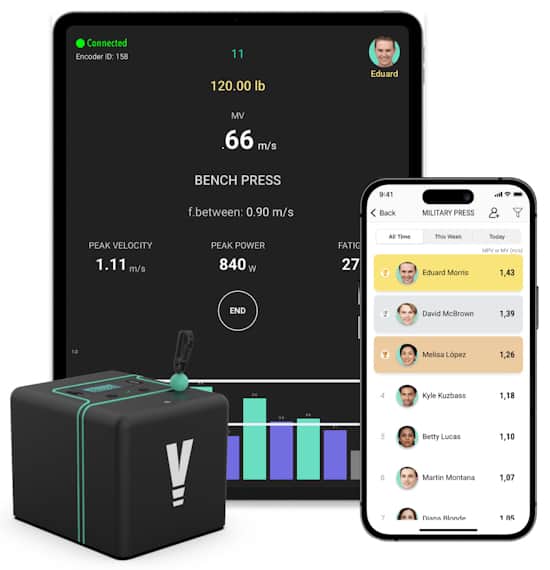
The Vitruve TEAMS App is only meant for strength coaches. It’s designed specifically for coaches so they can manage multiple athletes using the encoder(s) through a single interface.
Do NOT buy the TEAMS app subscription if you’re just an individual lifter.
Here’s what you need to know about the TEAMS app:
- You can buy your Vitruve Encoder(s) bundled with the TEAMS app. Alternatively, if you already have your encoder(s), then you can buy the TEAMS app licenses separately. If you don’t own any encoders, be sure to go with the bundle option because you will save this way.
- This TEAMS app is an annual subscription. It does not auto-renew. They will contact you before the license expires, which is a nice gesture.
- The app subscription licenses are on a per-encoder basis. So if you have 3 encoders, you’ll need 3 licenses. You can purchase up to 6 licenses through their website. If you need more, just contact Vitruve directly.
- There are 3 tiers to the app with different features, outlined below:
| TEAMS App Features: | Basic: | Elite: | Professional: |
| Unlimited Athletes | ✅ | ✅ | ✅ |
| Visualize and Export Data | Up to 7 Days | Up to 180 Days | Unlimited |
| Leaderboards | ❌ | ✅ | ✅ |
| Wellness Tests | ❌ | ✅ | ✅ |
| Insurance | ❌ | ✅ | ✅ |
| Athletes Security | ❌ | ✅ | ✅ |
| Automatic Weight Suggestion | ❌ | ✅ | ✅ |
| Third Party Integrations | ❌ | ✅ | ✅ |
| API Access | ❌ | ❌ | ✅ |
| Multi-Coach | ❌ | ❌ | ✅ |
| Free Hardware Upgrades | ❌ | ❌ | ✅ |
Note that the “Athlete” plan on Vitruve’s product page refers to the free version of the app for individuals.
The price for the Vitruve TEAMS App varies depending on which software tier you choose and how many encoders you purchase.
On the low end, the app price for using the Basic app subscription bundled with one encoder costs $620. On the high end, the price for the Professional app subscription on 6 encoders will run you $5,360. Tax and shipping are included.
You get a bigger discount the more you buy — whether it’s the encoders bundled with the TEAMS app licenses or just the TEAMS app licenses.
Specs
Here’s a quick breakdown of Vitruve’s key specs:
- Weight: 13.15 oz (372.8 g)
- Dimensions: 2.99 in x 2.8 in x 3.5 in (7.59 cm x 7.11 cm x 8.89 cm)
- Materials: ABS (outer shell), PLA (internal components)
- String: 8.2 ft (2.5m) max travel length
- Frequency: 100 Hz
- Display: OLED
- Wireless Technology: Bluetooth 5.0, WiFi
- Battery: 3000 mAh (up to 25 hours; the more reps you do, the faster it drains)
- App: iOS (free app & paid TEAMS App), Android (free app only)
- Data Export: Yes (.CSV)
- Warranty: 2 years
Use Code KING for 5% OFF – VITRUVE VBT Device »
How Do You Use the Vitruve Encoder?
Turn On and Pair the Encoder
First things first. Turn on your encoder. You will see the OLED screen turn on and the Vitruve logo will appear. Next, it will display your encoder’s number (e.g. mine is 238), which is only useful if you have multiple encoders.
Here’s the process for pairing it, which you only need to do the first time you use it:
- Be sure your smartphone or tablet has Bluetooth turned on.
- Open the app on your device.
- You’ll see a screen pop-up showing the available encoders.
- To pair, simply choose your unit (the device shown will match the encoder number you saw when you turned on your display). If you’re an individual athlete with just one encoder, I recommend activating the “connect automatically” option so your encoder connects to the app automatically for all future sessions.

Note that it is also possible to connect the encoder to the app via WiFi. However, this is not recommended since the Bluetooth connection is more reliable.
Additionally, you can use the Vitruve Encoder without the app; just by using the encoder and controlling it with the buttons on the device itself. You don’t get nearly as much utility out of it this way, but it is possible. The only time it might come in handy is if you forget your phone/tablet or if it runs out of battery.
How to secure and position the encoder?
Once you’ve turned on and paired your device, the next step is to anchor the device to the floor so it doesn’t lift up during exercise.
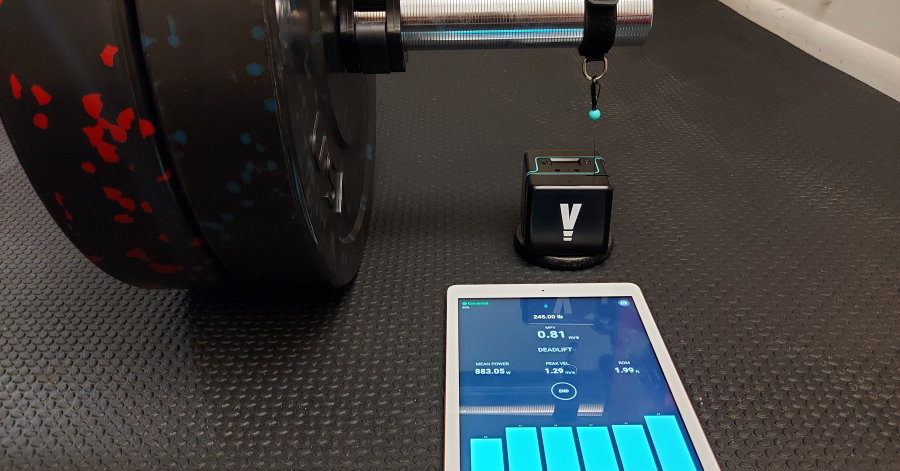
To do this, you’ll simply secure the Vitruve Encoder to a small metal weight plate using the built-in magnets on the bottom of the device.
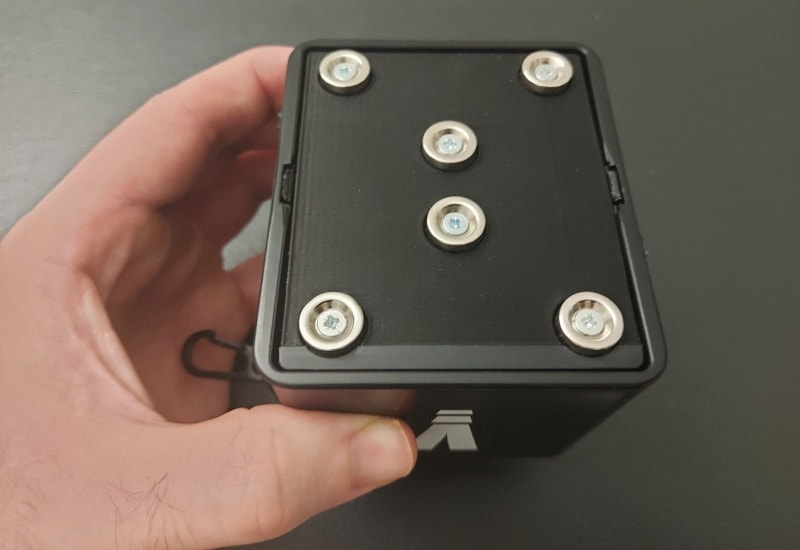
A 2.5 lb or even a 1.25 lb plate provides more than enough weight to keep the device anchored.
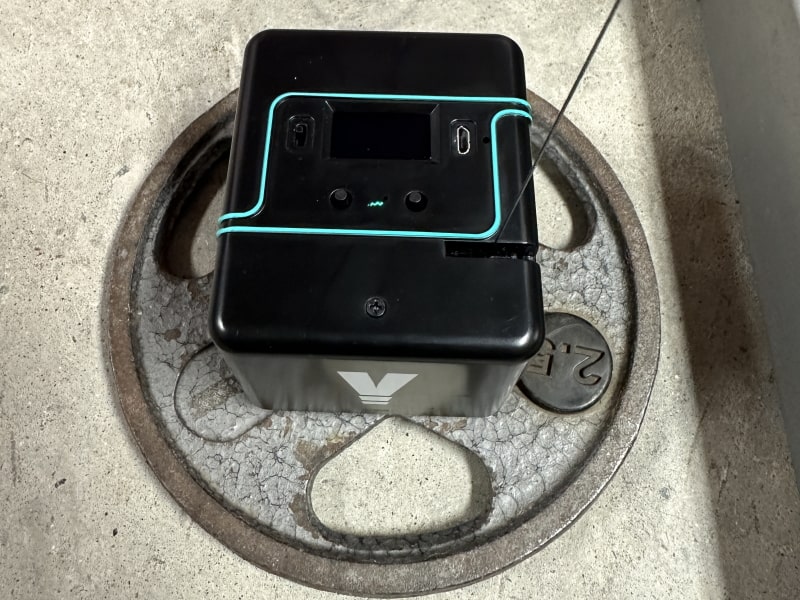
Position the anchored encoder directly beneath where the bar path will be during the exercise. If you’re doing a bodyweight-only movement such as a vertical jump, position the anchored encoder slightly out of the way so you don’t land on it.
Connecting to bar
The next step is to tether the encoder to the barbell with the string. You can do this with either the velcro strap or the roller hook.
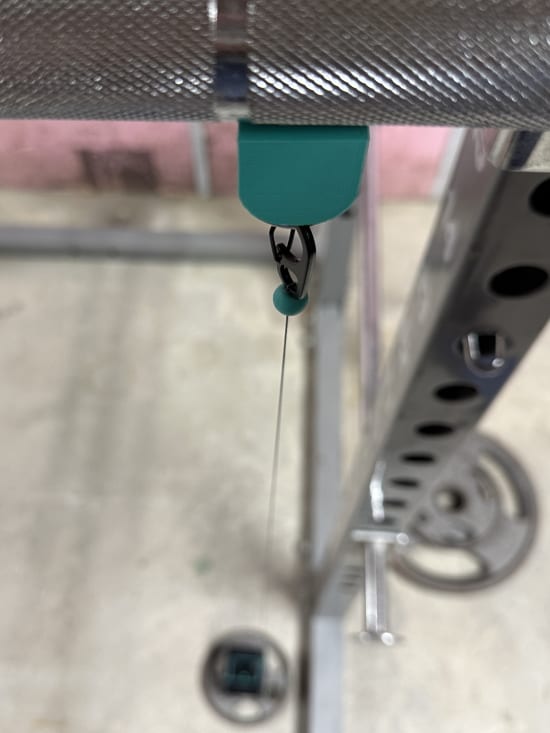
I highly recommend using the roller hook for any barbell movement. It takes less than a second to attach it to the barbell and it stays in the same position even if the barbell rotates. You just place the magnetic portion on the underside of the barbell sleeve or shaft and it will stay there.
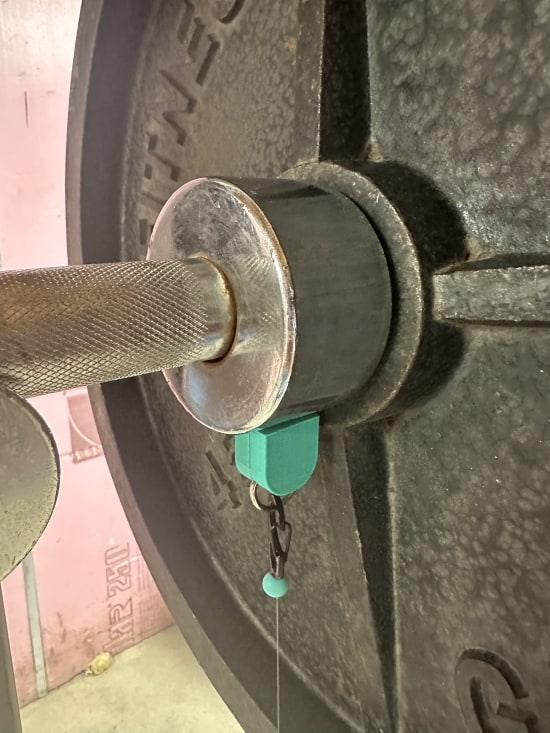
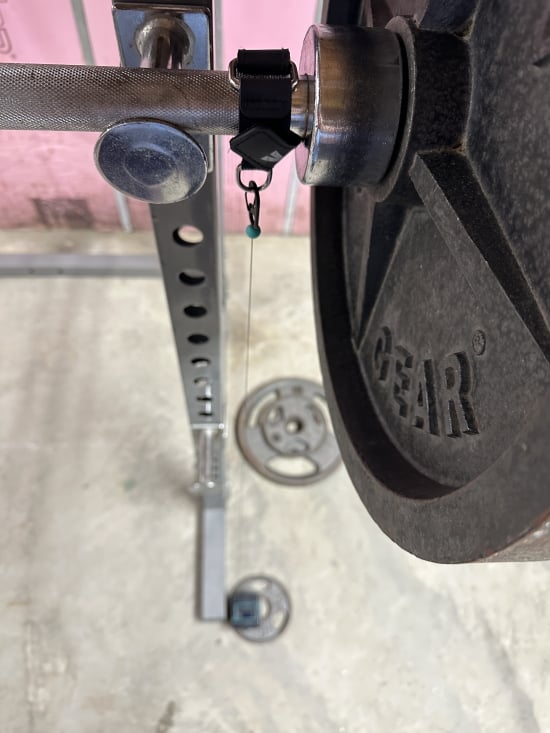
You can secure the velcro strap around the bar, too, but it takes a few seconds to put on the bar, which interrupts your workout flow a bit. Plus, it will rotate with the barbell, pulling the string with it.
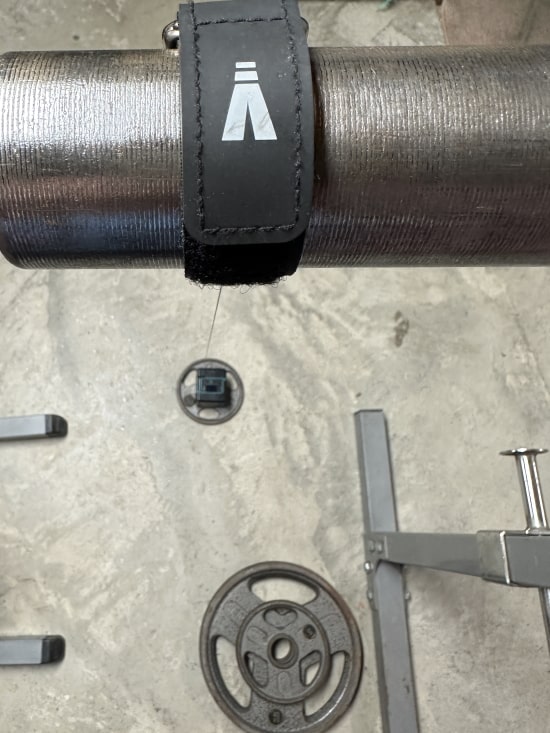
The strap is best if you’re attaching it to your body, such as around your wrist for a dumbbell exercise or securing it to a lifting belt or dip belt when doing pull ups or dips.
Once the string is attached to your barbell (or your body), you just need to click to start the exercise in the app and you are ready to begin the movement. I’ll discuss the details and process of using the app later. But first, I want to talk about what the encoder measures.
What the Vitruve Encoder Measures
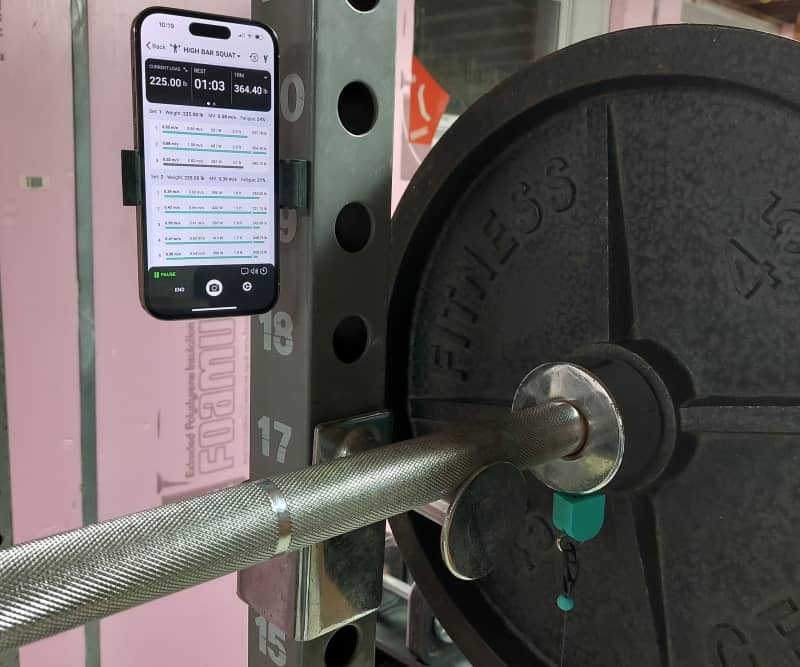
The Vitruve Encoder can measure all of the following metrics:
- Mean Propulsive Velocity (MPV): The average speed (measured in m/s) from the start of the concentric phase of the repetition until the bar acceleration is less than that of gravity. Put differently, the MPV is the mean concentric velocity minus the braking phase; it only measures the propulsive portion of the concentric phase.
- Mean Velocity (MV): The average speed (measured in m/s) from the beginning until the end of the concentric repetition.
- Fatigue: In the context of velocity based training, fatigue is measured via velocity loss between sets and/or within (intra) sets. You can set the velocity loss at whichever percentage you choose.
- Fatigue intra: The velocity loss within a single set of a given exercise; comparing the first repetition (or the fastest repetition) to the slowest repetition of the same set. As far as recommended percentages go, something between 10-25% velocity loss is ideal for most people, particularly when strength is the priority. You can go quite a bit higher if you’re doing bodybuilding-style hypertrophy training with higher reps and going to or near failure. In fact, if you are going to complete failure, there’s no need to pay attention to fatigue percentage, since it will technically be infinite.
- Fatigue between: The velocity loss between multiple sets of a given exercise; comparing the fastest rep of the first set to the fastest rep of each subsequent set. As far as recommended percentages go, around 5% velocity loss works for most people.
- Peak Velocity: The maximum speed (measured in m/s) reached at a single point during the concentric phase. Peak velocity is always greater than mean velocity (and mean propulsive velocity), though generally, a higher peak velocity correlates to a higher mean velocity.
- Mean Power: The average amount of power (measured in watts; calculated by Force x Velocity) applied throughout the concentric repetition.
- Peak Power (TEAMS App only): The maximum amount of power (measured in watts; calculated by Force x Velocity) applied at a single point within the concentric repetition.
- Peak Force (TEAMS App only): The maximum amount of force (measured in newtons; calculated by Mass x Acceleration) applied at a single point within the concentric repetition.
- Mean Acceleration (TEAMS App only): The average acceleration (measured in m/s^2) of the concentric phase of the repetition.
- Peak Acceleration (TEAMS App only): The highest acceleration (measured in m/s^2) inside the concentric phase of the repetition.
- ROM (Range of Motion): The distance that the load (e.g. barbell, dumbbell, body) moves during the concentric phase of the repetition.
- Estimated 1RM: The predicted one-repetition max for a given exercise based on your Force-Velocity Profile.
- Rep Count: The number of repetitions performed in each set.
NOTE: While most of the metrics above typically apply to the concentric phase of the repetition, it is possible to get some of these metrics for the eccentric phase of the repetitions using the Eccentric setting in the app. There are limited applications for the eccentric data, but it is a possibility with Vitruve.
Using the App
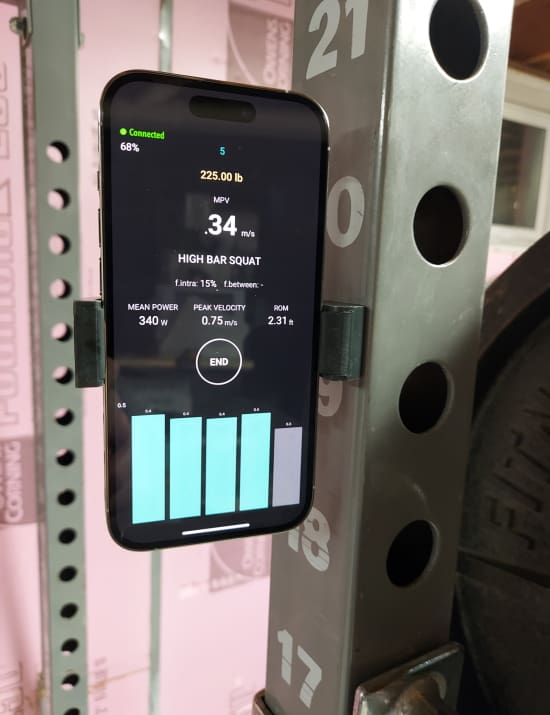
In this section, I’ll tell you all you need to know about using the app. I’ll show you all the important settings and options and how to track your lifts.
Please note that I’ll only be showing the free app designed for individual lifters; not the paid subscription TEAMS app designed for coaches.
Also, I’ll be referring to, and showing screenshots of, the iOS version of the free app. This is an important distinction since there are some differences between the iOS version and the Android version. The iOS version is the first to get new features. So the Android version is always lagging in comparison.
I should note that the app is not required to use the Vitruve device. You can use just the encoder itself using the OLED screen and the physical buttons. However, it’s highly recommended to use the app to get the most out of the device. In fact, I only ever use it with the app, myself.
Connecting the Vitruve Encoder to the App
Before you can use the app, you have to connect it to the device. It’s easy to do, and I’ve already outlined how to pair the encoder with the app here.
Note that when you pair it the first time, you can set it to pair automatically every time you use it going forward.
How to Start Your Workout / Record Your Lifts
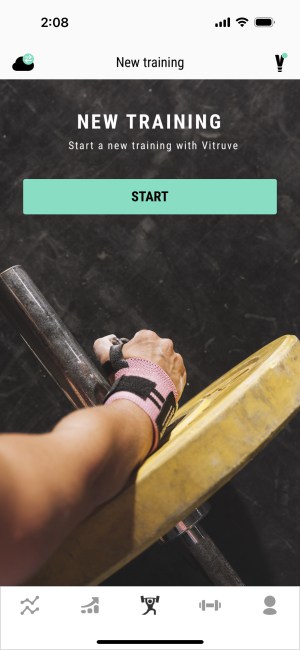
Go to the training tab, which is represented by the icon of a lifter pressing a barbell overhead. Click the “Start” button.
Use Code KING for 5% OFF – VITRUVE VBT Device »
On the following screen, you’ll be able to choose from several popular compound exercises that are already available in the app by default. Since VBT is more practical for the major lifts, chances are that the lift you want to do will be in this lift.
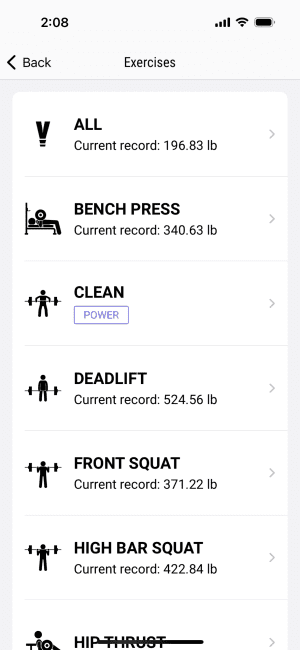
However, you can add more lifts if you don’t see the one you want to do. Simply navigate to the Exercises tab of the app, represented by a dumbbell icon.
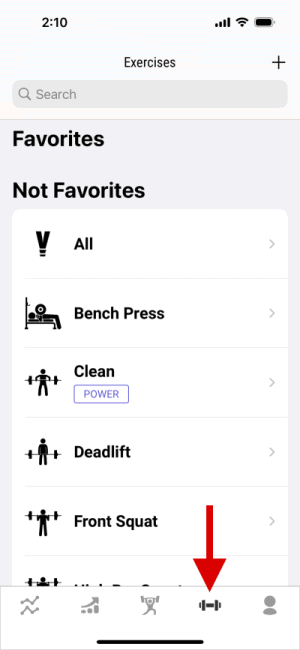
Then tap the ‘plus’ (+) in the top right corner. This will give you a list of around 100 additional exercises to choose from (plus the ability to create any custom exercise). Click “download” on the lift(s) you want and they’ll be available when you’re in the Training tab.
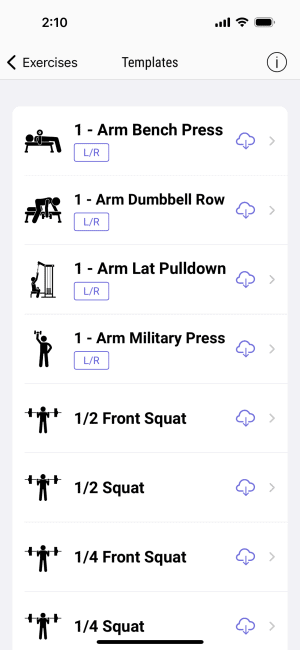
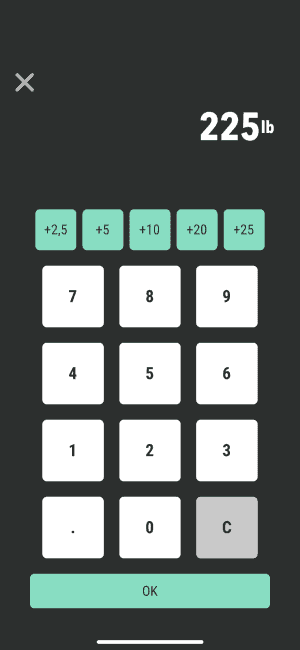
Once you select the exercise that you want to do (in the Training tab), the next screen will allow you to input the amount of weight you’ll be lifting for your first set.
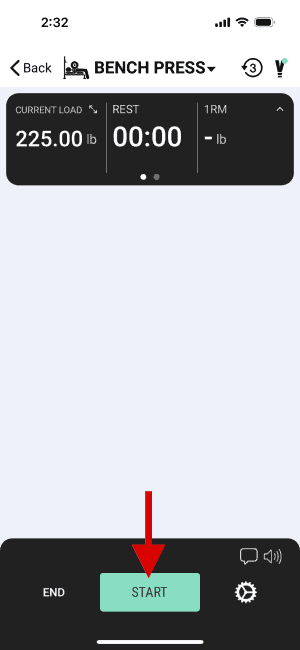
Assuming you’ve already set up your barbell, loaded on the weight and connected the Encoder’s string to the barbell, then simply click the “Start” button and begin lifting whenever you’re ready.
During the set, the app will display different training metrics in real-time for each repetition.
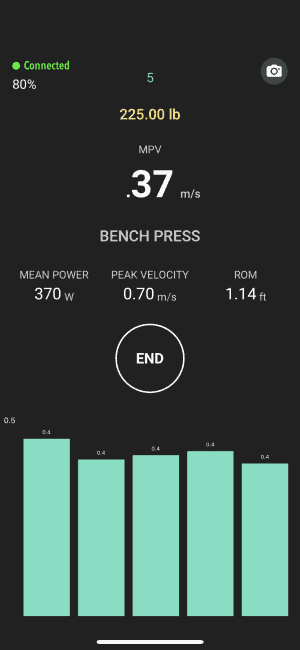
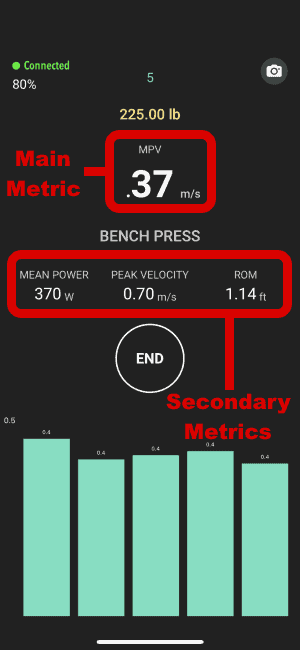
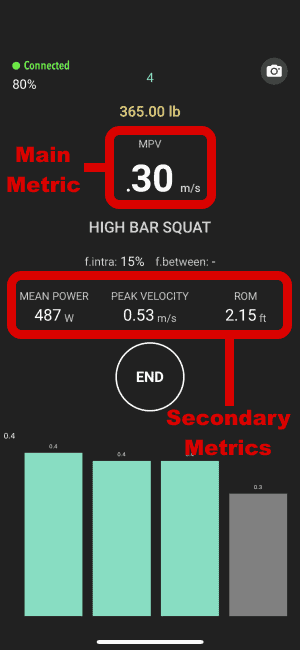
This includes one main real-time metric displayed in the center with three secondary real-time metrics displayed below it:
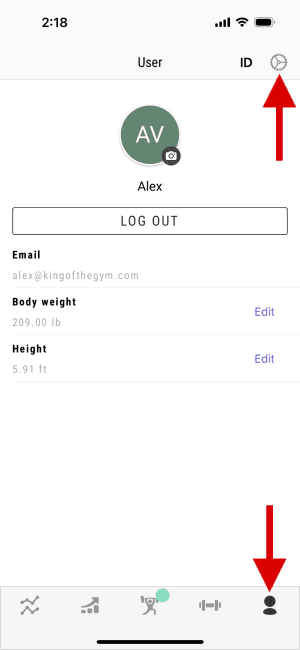
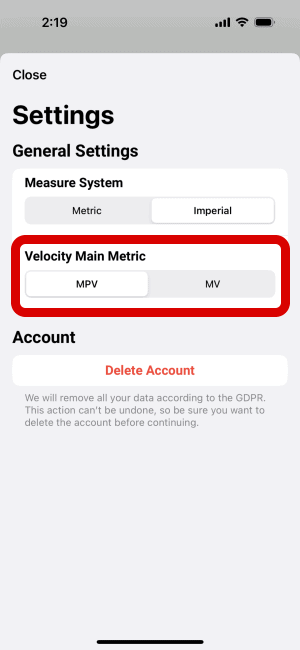
- The main real-time metric shown by default is either mean propulsive velocity or mean velocity, depending on which one you set as your “Velocity Main Metric”. To change the “Velocity Main Metric”, go to the User tab. Then tap the settings icon on the top right and select either MPV or MV under the “Velocity Main Metric” option. I’ve kept my main real-time velocity metric as the default, which for me is the mean propulsive velocity; I find it’s generally the most meaningful metric.
- By default, the secondary real-time metrics include mean power, peak velocity and range of motion (ROM).
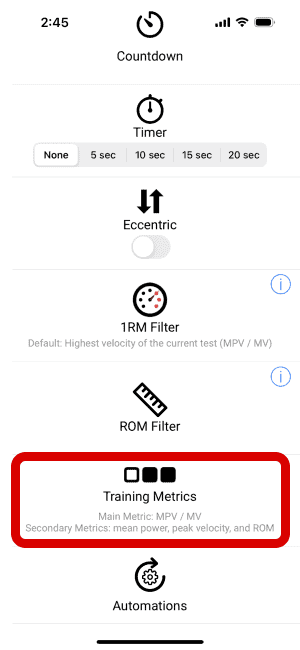
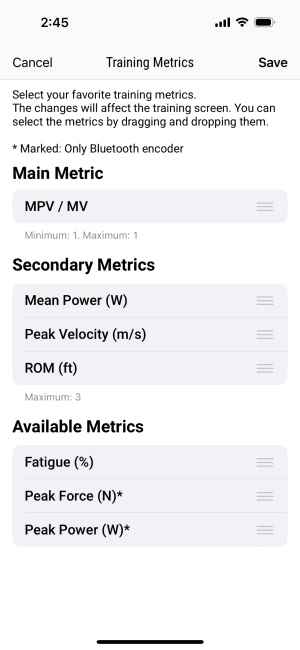
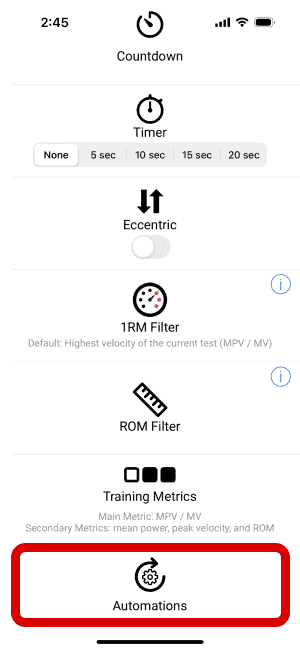
- SIDE NOTE: You can change both the main and secondary real-time metrics to something besides the defaults. To do this, go to the Training Metrics settings as shown in the screenshots below, then choose your preferred metrics. I’ll also talk more about this later in the Training Metrics section.
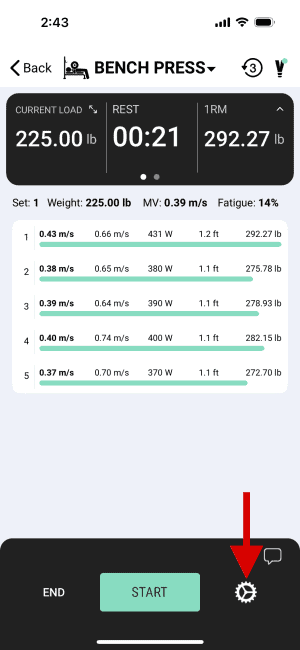
The screenshot below highlights the default Main Metric and Secondary Metrics within the real-time training screen.
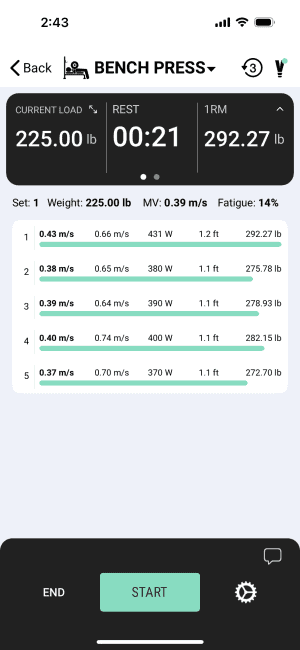
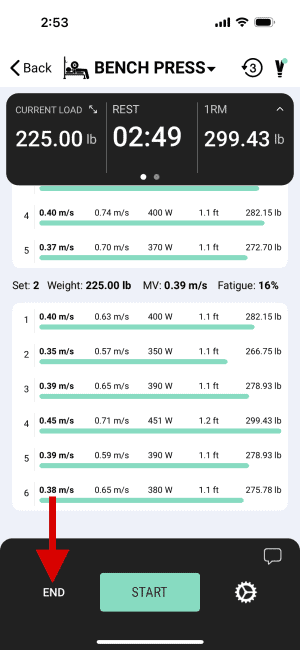
Press the “End” button once you’ve finished your set. This will take you back to the training overview screen, which lays out all of the metrics for every rep within every set you perform for the current exercise.
SIDE NOTE: If you activate the “Automations” setting – which I’ll discuss in-depth later – you can bypass the need to manually start and end each set. This saves time, frees up mental energy and prevents you from accidentally forgetting to record a set.
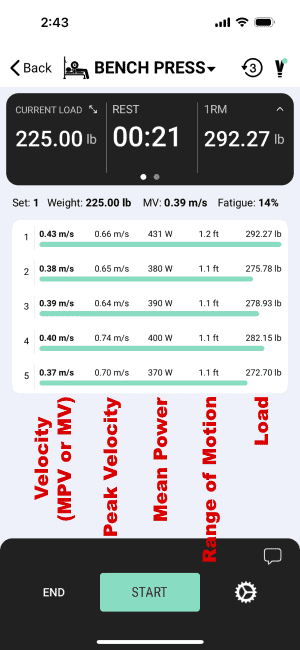
The training overview data shows the following training metrics for each rep within a set:
- Mean Propulsive Velocity or Mean Velocity (whichever is set as your Velocity Main Metric)
- Peak Velocity
- Power
- Range of motion
- Estimated 1RM
There is also set-level data for each set, which includes:
- Weight
- Mean velocity of the entire set (the average of your MPV or MV for all reps in the set)
- Fatigue (% velocity loss for the set)
The estimated 1RM data point is a cool and useful metric. It is calculated based on the weight you lifted, the velocity at which you lifted it and a Force-Velocity Profile equation. There is a different default Force-Velocity Profile for each exercise. This default profile can provide an okay 1RM estimation, which can give you some idea of your strength on that day. However, if you want a more accurate estimation, you should create your own Force-Velocity Profile for your important lifts – I’ll tell you how to do that in a later section.
The 1RM estimation is very helpful if you’re using percentage-based training for your programming. You can use the estimate to program your weights for the day since your actual 1RM varies from day to day – And the cool thing is you can do this during your warm up sets. (But again, I should stress that this is most useful if you first create your own, unique Force-Velocity Profile.)
There is a percentage slider in the training overview area that gives you an easy way to know the %1RM – For example, if my programming calls for 85% of my 1RM, I’d set the slider to 85% of my estimated 1RM.
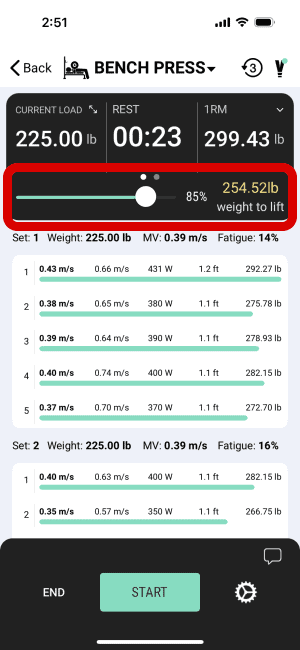
There’s one other cool feature I want to mention about the training overview screen: You can see your velocity history for up to the past 3 workouts that you used a given weight. So, let’s say you’re doing bench press and input 225 lbs for your set. You can tap the icon in the top right corner, which has the number 3 with an arrow around it. This creates a pop-up showing mean velocity (MV or MPV) the last 3 times you benched 225 lbs (within the last 2 months). This gives you a velocity goal to beat during your upcoming set(s). I use this feature a lot.
Sometimes you’ll find that there is no existing history because you’ve never used a certain weight for a given exercise (or at least you haven’t used that weight in the past 2 months). In this case, I’ll look at my training log to see which weight I used in the previous week (usually it’s a 5 lb difference). I’ll input that previous weight and then check the velocity history and make a note of it. Then, I’ll change the weight back to the correct weight for my current set. This gives you an approximate velocity to try to beat, even if it’s for a slightly different weight than what you’re lifting.
Editing your data
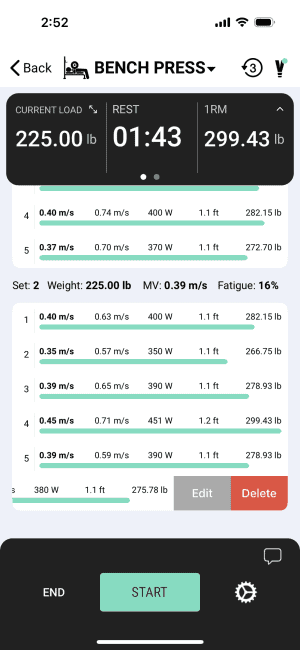
You can edit your data if needed during your training session for your lift. The edit feature allows you to do the following:
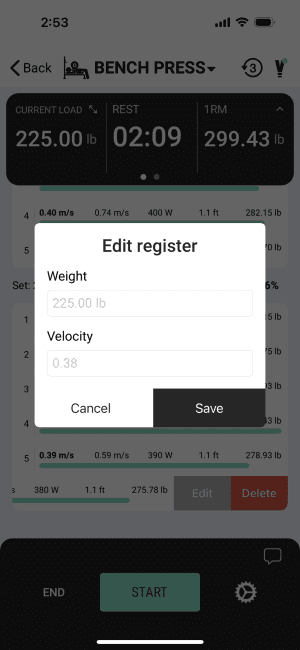
- Change set lift weight: Sometimes I’ll accidentally input the wrong weight and then do my set. Once I notice, I’ll edit it. This is the only reason I’ve ever needed to use the edit feature.
- Change MPV: You can edit the MPV (or MV if that is your Velocity Main Metric) for an individual rep. This is something you’d do if you experienced an outlier (way too slow or too fast), usually as a result of some aberration in your technique.
- Delete: You can delete either individual reps or an entire set. Deleting a single rep may come in handy if the encoder mistakenly records a repetition when you’re just moving into place at the start of a set, or bringing the barbell a long distance to rack it at the end of the set. I’ve personally never had any extra reps I needed to delete, but I’m sure it’s something that could occur. You may also want to delete an entire set if you don’t want it in your records for any reason.
You can edit the training data when you’re on the training overview screen. Simply tap on the individual rep that you want to edit. From there, you’ll see a pop-up that will let you choose which metric to edit or delete: either the weight or the velocity. If you change the weight, it will change the weight used for each rep in that set. If you change the velocity, it will change the velocity for just that repetition.
Use Code KING for 5% OFF – VITRUVE VBT Device »
Ending the Training Session OR Switching to the Next Exercise
Once you’ve completed all sets for the exercise that you started the training session for, you have two options:
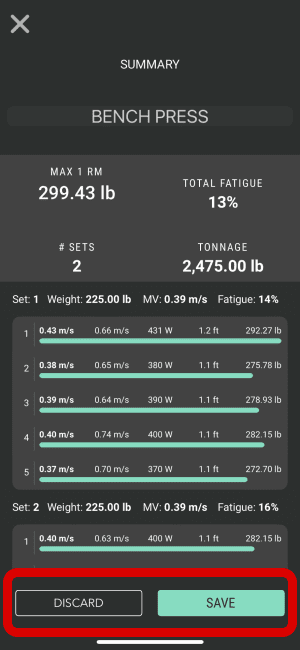
- End the Training Session: If that’s the only exercise you’re going to do for the day, you can end the session now. Tap on “End”, which will bring you to the Summary screen. Then tap “Save” to save the session so that all your data is logged. Or if you don’t want to save the workout, you can tap the “Discard” button.
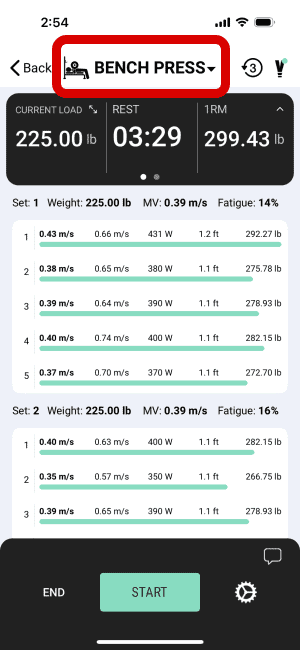
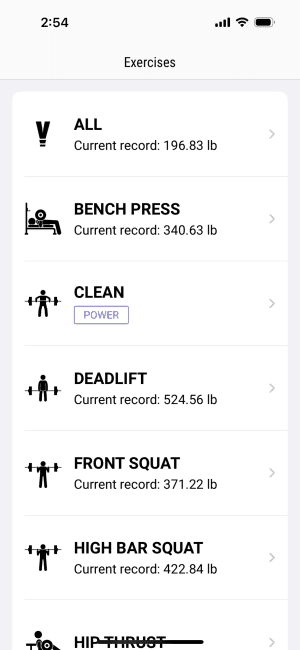
- Continue the Training Session and Select a New Exercise: If you’re going to use your encoder on your next exercise, then you can tap the name of the current exercise near the top of the screen. This will pull up a list of exercises to choose from. Tap on the exercise you want to do next. Adjust your barbell and encoder setup if/as needed. Now, you’re ready to lift.
Using the Video Recording Feature
The Vitruve Encoder app has a neat feature where you can record a video of yourself doing a set with a visual overlay of velocity data for each repetition.
To be clear, the app isn’t analyzing the video to determine your velocity metrics. Rather, the video is just synced up with the encoder in real-time.
I don’t use this feature that much. However, it’s super useful if you have an online coach that you work with. You can send him the video so he can see your form and velocity data all at once.
In addition to that, it’s cool to post on your Instagram or other social media to share with your lifting friends.
You can activate the video mode after you enter your set weight and hit the “Start” button to begin your set. Once on the next screen, simply tap the camera icon in the top right corner.
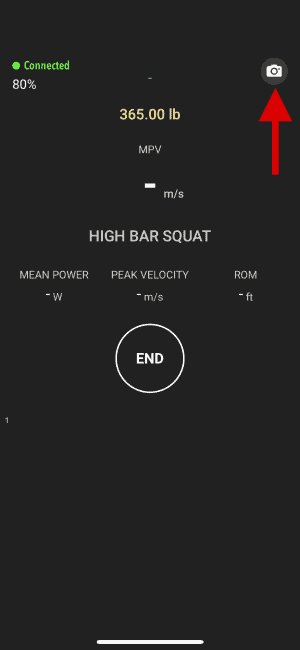
Then you’ll see the camera working. Before you start recording, hit the plus icon (+) in the top right corner.
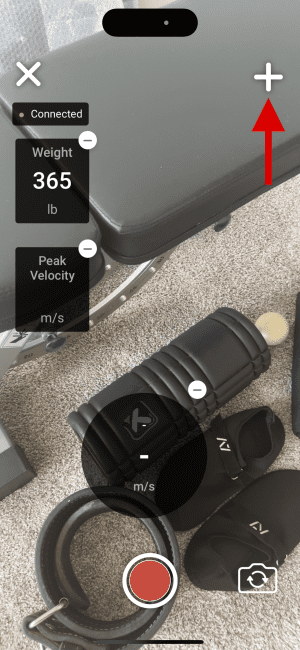
This will allow you to select which metrics you want to be overlaid on top of the video.
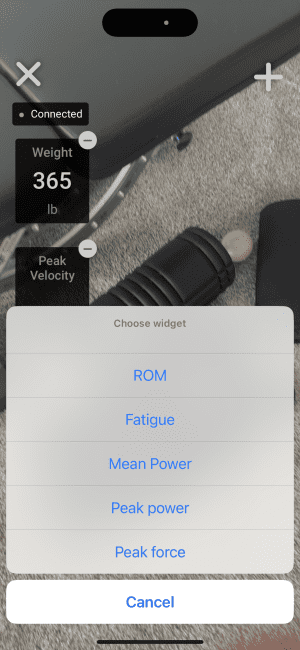
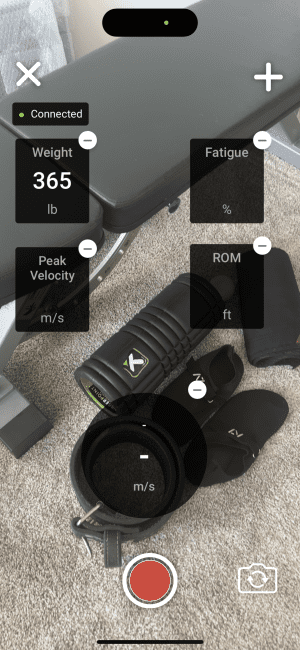
Once you’ve selected the metrics you want to be displayed, set up your phone or tablet so that you’re in the frame, or have someone else film you. Don’t forget to hit the record button before starting the exercise. All of your data will still go into the training overview table when you’re using the video recording feature.
Once you complete your set, end the recording by tapping the red recording button. Then you’ll have the option to save the video to your phone or you can hit cancel if you want to discard it. Finally, tap the “End” button to end your set.
Configuring Settings for Your Lifts
Once you start a training session for a lift, you can configure the settings as needed. The settings will save and apply to all lifts. You can modify them if/as needed at any time while training.
To get to the settings area, tap on the gear icon in the bottom left of the training overview screen.
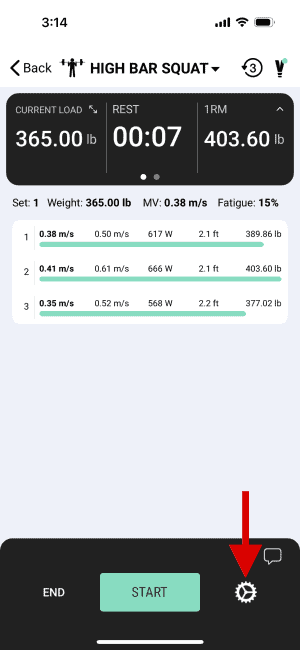
This will bring up a list of 10 settings, including:
- Feedback
- Fatigue
- Velocity Zones
- Countdown
- Timer
- Eccentric
- 1RM Filter
- ROM Filter
- Training Metrics
- Automations

Use Code KING for 5% OFF – VITRUVE VBT Device »
I’ll tell you about how and when to use each setting in the sections below.
Feedback
The feedback setting gives you real-time audio feedback of your velocity data for every rep. When you activate the feedback setting, it gives you the ability to choose which metric you want feedback for. Your options include:
- Velocity – This is the feedback option I recommend for most people, most of the time.
- Max Velocity (i.e Peak Velocity)
- ROM
- Power
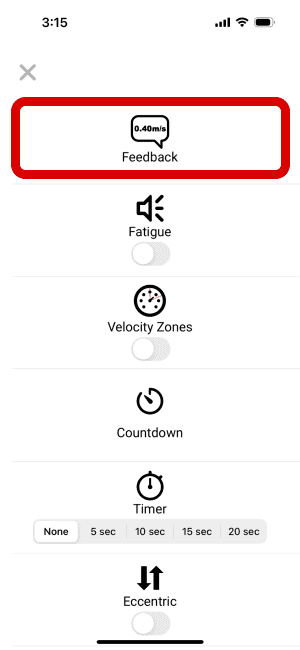
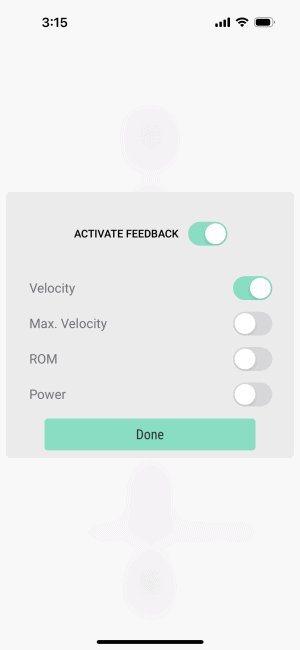
Feedback is the easiest setting to use in a practical way. I always have it activated.
It immediately gives you a concrete performance indicator for every rep so you can know how you’re doing and if you need to try to improve.
Most importantly, it’s a major motivational feature. If you’re going into your set with a velocity goal in your mind, this lets you know if you hit it or not. You’ll find yourself lifting with greater effort on every rep.
Fatigue
The fatigue setting allows you to program a cutoff for how much fatigue to endure before stopping. This fatigue cutoff is often referred to as the velocity loss. It is expressed as a percentage (i.e. 1 – max velocity / min velocity) – I’ll give specific examples in a bit.
The app will beep to provide audible feedback as soon as you drop below the designated velocity loss threshold; signaling you to stop (or optionally lift faster the next rep if you think you can make it back above the threshold).
When you limit fatigue correctly, you can still achieve an effective training stimulus without doing more unnecessary work that only serves to increase your injury risk during the workout and increase your recovery time after the workout. In other words, proper fatigue management using this setting helps you progress faster over time.
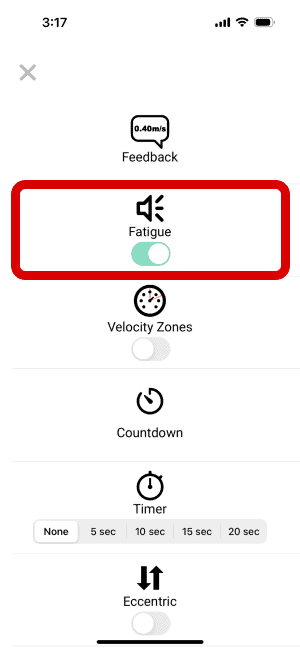
There are two options within the fatigue settings. You can use one or both of these:
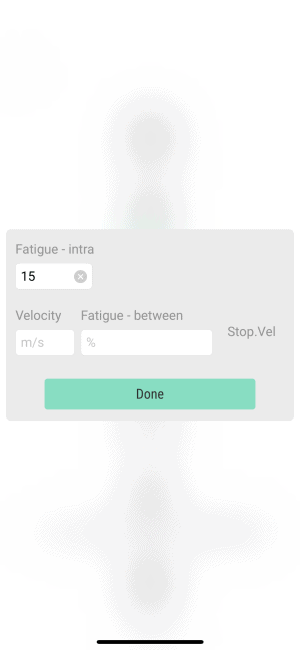
Fatigue – Intra %
This is where you set a velocity loss cutoff within the same set. Again, velocity loss is the same as fatigue.
Use Code KING for 5% OFF – VITRUVE VBT Device »
For example, if you go from .3 m/s as the fastest rep in your set to .25 m/s as the slowest, that’s a 20% velocity loss (aka 20% fatigue): 1 – 0.3/0.25 = 0.2 or 20%.
Studies have shown the ideal range for increasing strength to be between 0-25% velocity loss. Velocity loss much further beyond 25% has been shown to not yield additional strength progress; so you’re doing more work for no good reason.
In order to actually hit within the target range of 0-25% velocity loss when using the Vitruve app, I recommend setting your “Fatigue – Intra %” at a value between 5-20%. You don’t want to choose the low end of 0% because the app will beep even if your second rep is ever so slightly slower than your first rep. Conversely, you don’t want to choose the high end of 25% because most of the time your final rep’s velocity loss will be notably higher than 25% (e.g. maybe your second-to-last rep is 23% and your final rep is 35% when the app actually beeps).
Personally, I’ve had the best results with setting my “Fatigue – Intra %” at 15% (though sometimes I’ll go up to 20% if I want to push myself). This usually keeps me under 25% fatigue (velocity loss) for the set. You can see your actual fatigue percentage for each set in the training overview screen:
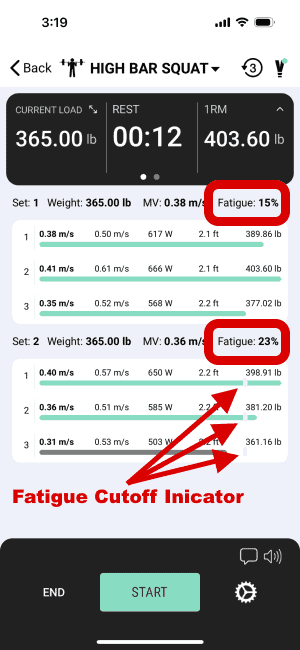
1.) The circled items show the total fatigue (velocity loss) endured for each set.
2.) The arrows show the fatigue cutoff indicators, which mark the fatigue percentage that is input in “Fatigue – Intra %” setting shown in my previous screenshot (15% in this example). Note that the indicators are only shown for set #2 because I only activated the “Fatigue – Intra %” setting after completing the first set.
This is the percentage figure you want to pay attention to and try to be within the 0-25% range. It measures your velocity loss, or fatigue, from the fastest rep to the last rep of the set. That’s the same way the studies measured it that found the 0-25% range to be ideal…
…Don’t confuse the actual fatigue with the fatigue cutoff (i.e. “Fatigue – Intra %” setting) that you input in the Fatigue settings. Your actual fatigue will almost always be higher than your fatigue cutoff setting.
Of course, the whole 0-25% range is a general guideline and there is variation by the exercise and the individual. And there are times when it makes sense to ignore the guideline. But it’s a good starting place for fatigue management.
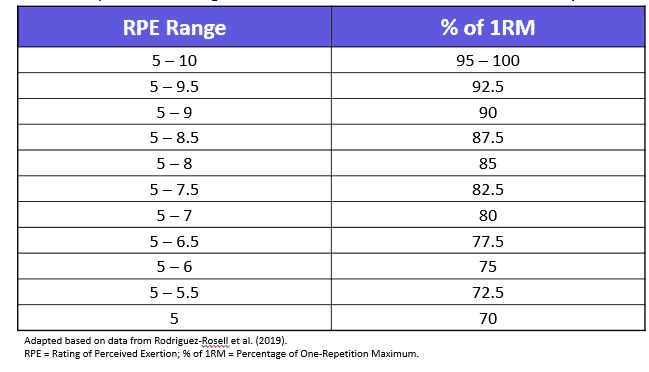
If your programming uses RPE (rate of perceived exertion), it’s helpful to understand the correlation between velocity loss and %1RM and RPE and reps performed in a set. First, take a look at the table below, which shows the optimal RPE range at each %1RM to maintain a velocity loss of 0 – 25%:
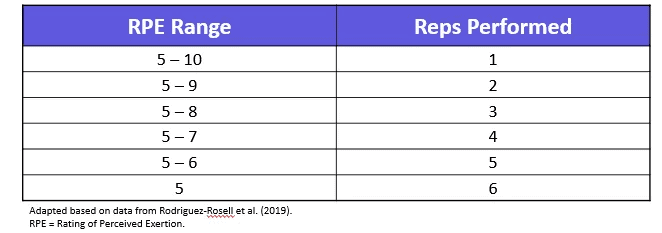
Next, take a look at this other table that shows the optimal RPE range for each rep number to maintain a velocity loss between 0 – 25%:
This final chart ties together these variables (RPE, velocity loss, reps) and gives some practical guidelines for different training goals, with some examples:

If you’re interested in learning more about fatigue and velocity loss in general, and the science and reasoning behind these velocity loss recommendations, read this article. It discusses the above tables and much more, in great detail.
Fatigue – Between %
This is where you set a fatigue cutoff between multiple sets. To do this, you need to set the baseline velocity AND a fatigue percentage.
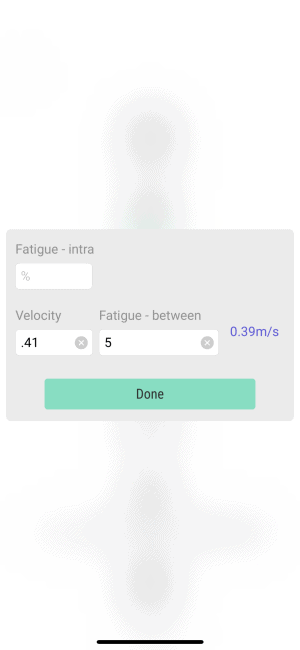
In terms of how to determine the baseline velocity, you should use the highest mean velocity (MV or MPV) from your first work set. This, of course, means that you won’t activate the “Fatigue – Between %” setting until right before your second work set.
The fatigue percentage (i.e. velocity loss percentage) that you input is used together with your baseline velocity to calculate your “stop velocity.” That is, you have to stop the workout when the highest mean velocity of your set is lower than the stop velocity.
For example, if you set your baseline velocity at 0.4 m/s and you set “Fatigue – Between %” at 25%, that means you should keep doing sets until you do a set where the highest average velocity of any rep is below 0.32 m/s. This is because 0.32 m/s is a 25% velocity loss compared to the baseline velocity of 0.4 m/s (1 – [0.4/.32] = 0.25 or 25%).
In terms of some general recommendations, a good starting point to set “Fatigue – Between %” is 5%. If you go much higher than that, you’ll likely end up doing more sets than necessary since the velocity between sets doesn’t drop that drastically.
The idea behind using the “Fatigue – Between %” settings is that if you do it right, you’ll avoid doing extra sets that don’t contribute to additional progress; just more fatigue and longer-than-necessary workouts.
That being said, I haven’t used the “Fatigue – Between %” settings all that much. I find that “Fatigue – Intra %” is easier to implement and sufficient for my needs as far as fatigue management goes.
I prefer using the fatigue settings over the velocity zone settings (which I’ll discuss in the next section). While you can use velocity zones to manage fatigue as well, the fatigue settings are more intuitive and more practical to implement in my experience.
For example, the fatigue is expressed in relative terms (i.e. as a percentage), whereas velocity zones are set using absolute velocities. Generally, a relative fatigue cutoff is more consistent between different exercises and different people. And it’s easy to correlate a relative fatigue % percentage to something like the RPE scale.
Velocity Zones
Velocity zones set an upper and lower velocity limit, giving you a specified range of velocities to train within.
The best way to think about this is that the upper velocity limit determines the load intensity (i.e. %1RM) and the lower velocity limit determines the amount of fatigue before you stop.
If you exceed the maximum velocity limit, the app will beep to alert you. It’ll also beep if you drop below the minimum velocity limit.
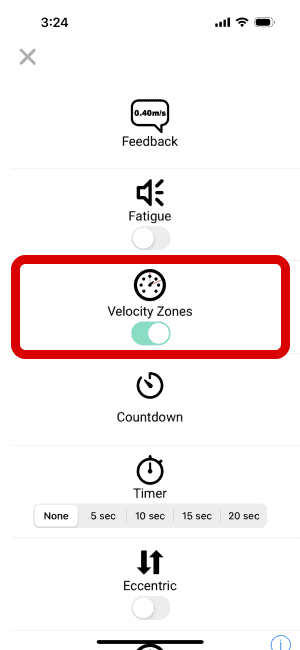
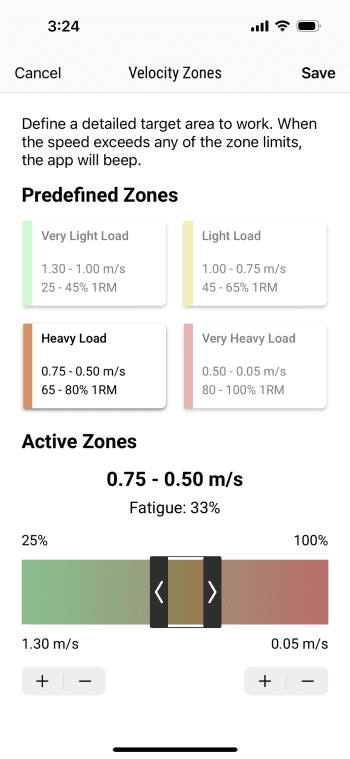
There are 4 preset velocity zones you can select, including:
- Very Light Load (1.3 – 1.0 m/s, 25 – 45% 1RM)
- Light Load (1.0 – 0.75 m/s, 45 – 65% 1RM)
- Heavy Load (0.75 – 0.5 m/s, 65 – 80% 1RM)
- Very Heavy Load (0.5 – 0.05 m/s, 80 – 100% 1RM)
- (You can also do a custom zone, which I’ll talk about in a bit)
As you can see, there is a load range, in the form of %1RM, associated with each velocity zone. This gives you an idea of the amount of weight to use when training within each zone.
Just know that these load ranges are general guidelines, since the actual load associated with a given velocity varies by exercise and by person…
…Due to how much the association between %1RM and velocity varies between exercises, I find it handy to use this table as a reference guide when using velocity zones:
There is also a fatigue percentage associated with each zone. This is a representation of how much fatigue would be incurred in the form of velocity loss from the high end of the range to the low end. It’s calculated by 1 – [max velocity / min velocity] (e.g. 1 – [1.3/1.0] = 0.23 or 23% fatigue).
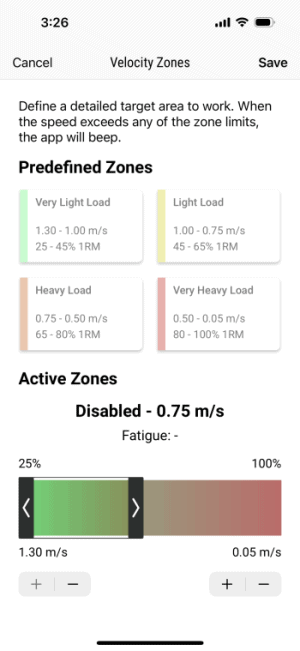
As mentioned, you can set a custom velocity zone if needed by sliding either end of the slider to the left or right.
Note: If you slide the max velocity limit all the way to the left, this disables the max limit, meaning you can go as fast as possible and only have to worry about staying above the minimum velocity limit. Similarly, you can slide the minimum velocity limit all the way to the right, which disables the minimum limit. So you don’t have to worry about going too slow.
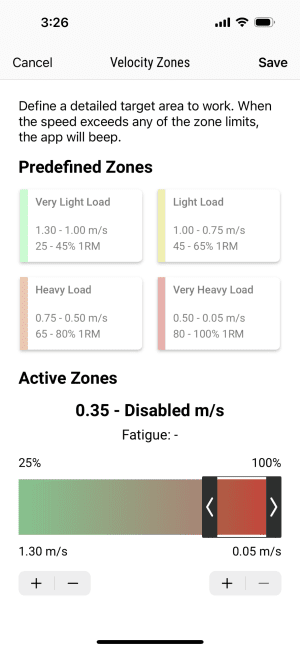
When using a given velocity zone, if you find yourself exceeding the upper limit, that’s an indicator that you should add more weight. If you drop below the lower limit before completing the desired number of repetitions, that’s a sign you should reduce the weight.
Eccentric
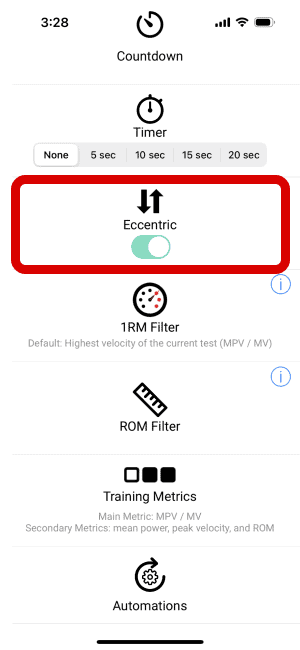
Normally, the app just records your concentric velocity data since that’s typically the most useful. However, if you activate the eccentric option in the app, you can see data for both the concentric and the eccentric phases of the lift.
Use Code KING for 5% OFF – VITRUVE VBT Device »
I can see this being useful if your training involves some sort of tempo training with a slow, controlled eccentric. By utilizing the eccentric option (and activating feedback), you can be sure you’re not lowering the bar too fast.
I’ve only used this setting to test with. I haven’t had a real need to use it in my training. And I don’t recommend activating unless you have a reason. Otherwise, it’s unnecessary data overload, in my opinion.
1RM Filter
The purpose of the 1RM filter is to discard 1RM estimates on reps that exceed a specified velocity. The reason for this is that performing reps at very high velocities (and thus using lighter loads) can produce an inaccurate 1RM estimate.
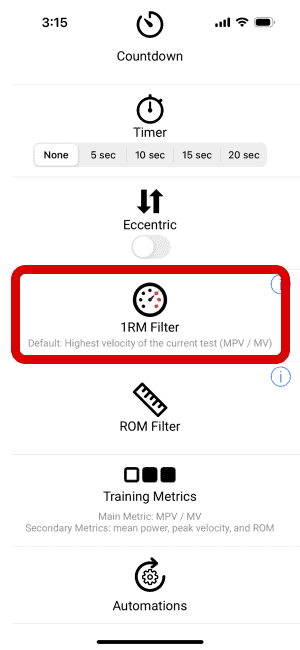
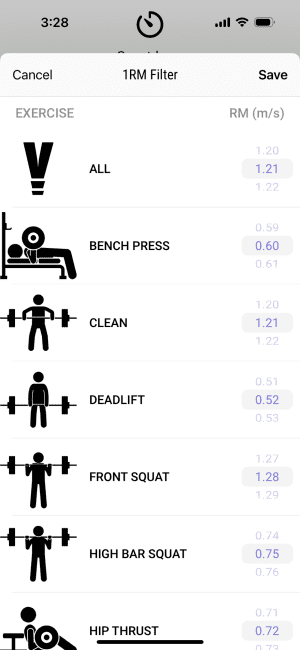
Note that there is a default 1RM filter applied for every exercise. That default filter value is the highest velocity of whatever your current 1RM equation is for the exercise – whether that’s from a custom Force-Velocity Profile that you created or the default Force-Velocity Profile.
This is an advanced feature. I haven’t had a reason to use it. And I don’t recommend toying with it unless you have a reason and know what you’re doing.
ROM Filter
The range of motion (ROM) filter lets you set the minimum amount of distance that the encoder string must travel before it records the movement as a rep.
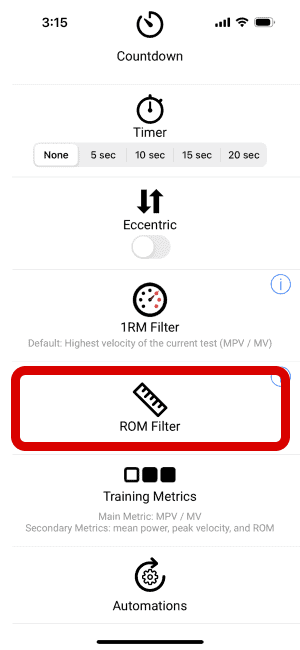
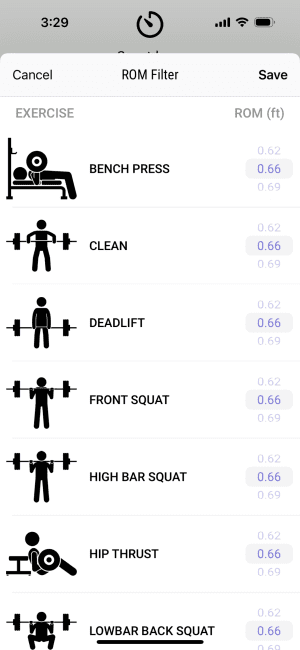
Let’s say you do a big walkout of a couple of steps for squats or lunges. If the ROM filter is set too low, the app will mistakenly count this as a rep – this is called a “ghost rep” and you don’t want that.
The solution is to increase the ROM filter so that it’s greater than the distance of the movement you want to ignore (e.g. the walkout distance), but less than the range of motion of the actual exercise (because you don’t want the filter to be so high that it ignores valid repetitions)…
…Specifically, Vitruve recommends setting the filter between 0.33-0.49 ft less than your true ROM.
However, you don’t need to even bother touching the ROM filter on an exercise if you’re not experiencing ghost reps.
By default, the ROM filter is set at 0.66 ft for every exercise. For most people and most exercises, this is a sufficient ROM filter. I’ve personally never had to modify it since I’ve never experienced any ghost reps.
But if you run into a situation where you do experience ghost reps, just know that you can fix it by tweaking this filter accordingly.
Countdown (Rest)
The “countdown” setting is a rest timer. I find it to be a confusing name since there is also a “timer” feature, which functions more like a countdown – I’ll talk about the timer feature in the next section.
In any case, the countdown setting times you between sets. It’s a simple but useful feature and I use it all the time.
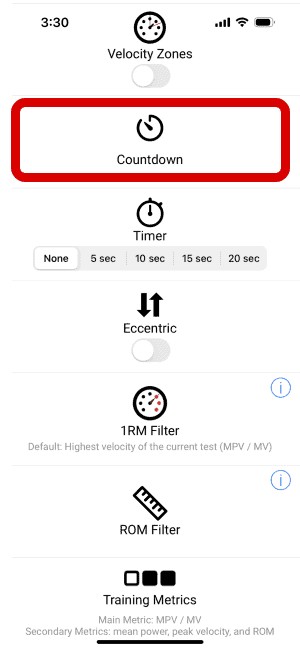
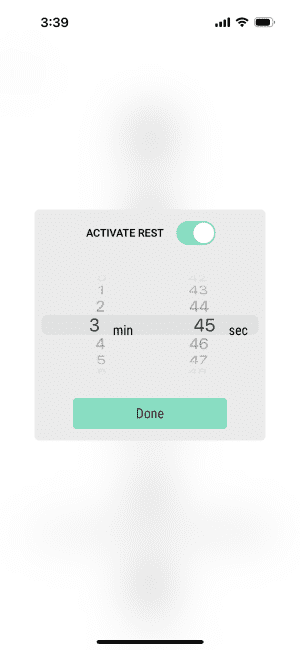
Once you activate it, you simply select how many minutes and seconds you want to rest between sets.
It will automatically start after you complete each set. Once it is 10 seconds away from your selected time, the app will say your name. At 5 seconds away, it’ll do a short beep every second until it reaches your selected time, at which point it will do a long beep. That means it’s time to start lifting again.
This feature works great in conjunction with the “automations” setting, which I’ll discuss later. It makes it so you don’t even have to look at the app or use a separate stopwatch to time your rest.
Timer
As mentioned previously, the “timer” setting should really be called the “countdown” setting, in my opinion. This is because it literally counts down before the app will allow movements to be recorded as reps.
If activated, the timer starts as soon as you tap to start the set. It counts down for however many seconds you select when configuring the settings.
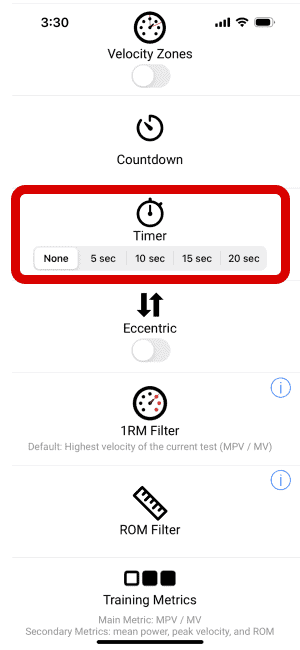
You don’t need to use the timer feature for the vast majority of cases.
Rather, it comes in handy if you’ll be doing an exercise where you have to move yourself or the bar into position after tapping to start the set.
The classic example of this scenario is pull ups – If you have to jump or step onto a box to hang on to the pull up bar, you don’t want the app to record that movement. And you obviously can’t get into position first and then tap the start button (unless you have a training partner who can do it for you).
Activating the timer in this scenario and configuring it for 5 or 10 seconds lets you start the set and give you enough time to get into the starting position on the pull up bar. Once the timer hits zero, the app will make a long beep to let you know when to start doing reps.
Training Metrics
There are 7 different metrics available within the “Training Metrics” settings, including:
- MPV/MV (i.e. mean propulsive velocity or mean velocity — whichever you select as your Velocity Main Metric)
- Mean Power (W)
- Peak Velocity (m/s)
- ROM (ft)
- Fatigue (%)
- Peak Power (W)
- Peak Force (N)


Use Code KING for 5% OFF – VITRUVE VBT Device »
The purpose of the “Training Metrics” settings is for you to decide where to visually display these as real-time metrics when you’re performing reps.
There are two categories to which you can assign the different training metrics:
- Main Metric: This is the highlighted metric that displays in real-time, front and center on the screen for each repetition. You can only choose one main metric. I use the MPV/MV metric as my main metric. I recommend this for most people and scenarios.
- Note: Selecting your main metric does not affect what the app’s “voice” will read out if you have the audio feedback setting activated. The voice will read out the MPV/MV metric even if you have a different metric set as your main metric. The “main metric” is just for what’s displayed visually during your reps.
- Secondary Metrics: These are the metrics displayed below the main metric. They are also shown in real-time for each repetition performed. You can choose up to 3 secondary metrics. I currently have Mean Power, Peak Velocity and ROM as my secondary metrics.
Automations
The “automations” feature is super cool. It wasn’t available when I first started using the Vitruve encoder. It came several months later in an app update.
This feature makes it so you never have to tap start and/or end before and after every set. This gives you a big efficiency boost because you don’t have to fiddle with the app between sets. Moreover, you don’t have to even think about it, which means you can keep your focus on the workout.
Before this feature was implemented, there were several times when I performed a set that wasn’t recorded because I forgot to tap start. When I’m using the automations feature, this never happens.
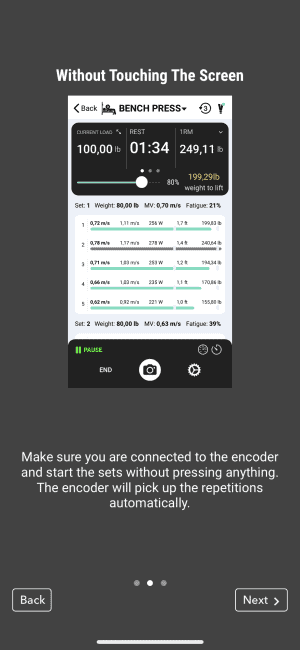
Setting up the automations feature is easy. There are just 2 settings that you can activate and configure:
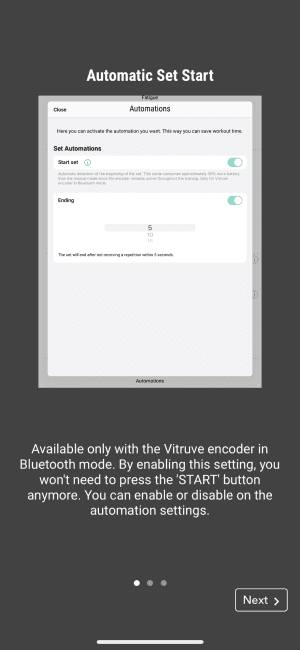
- Start set: If you activate this, the app will automatically start recording as soon as the encoder detects a repetition. There’s nothing you need to configure for this option. It’s either on or off. One thing to note, however, is that turning this on will consume 30% more battery since the encoder stays active the entire time.
- Ending: If you activate this, the app will automatically end after a specified amount of time without receiving any repetitions. If you activate this option, you just need to configure the inactivity time, which you can do in increments of 5 seconds. I use 10 seconds.
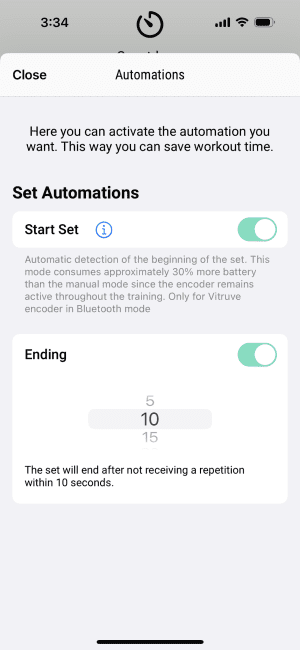
The photos below show the in-app explanation of the Automations setting:
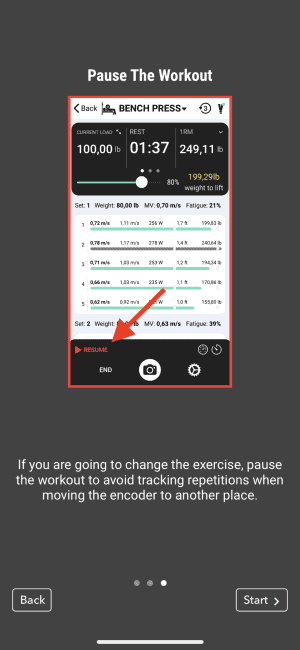
If you have to move the encoder because you’re switching exercises or adjust the setup on your current exercise while you have the automation going, you should first tap “Pause” (in the bottom left) to ensure it doesn’t count that movement as a repetition. Once you’ve adjusted your setup and are ready to go again, tap “Resume.”
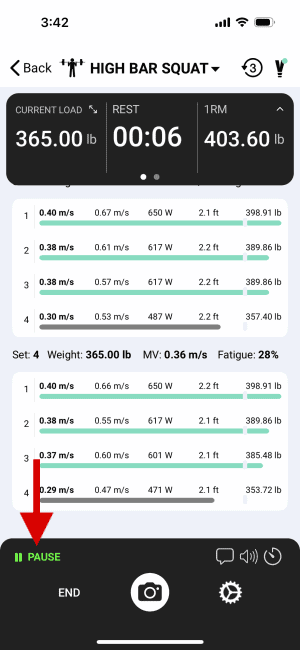
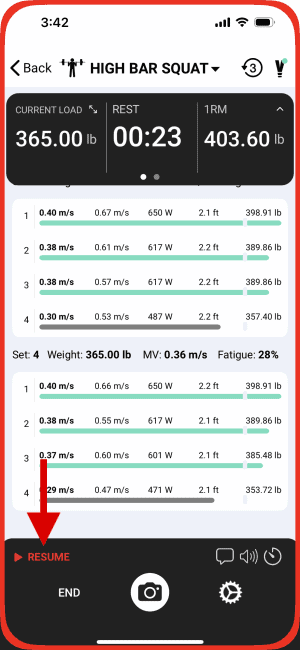
I’m a huge fan of the automation feature and use it most of the time. It works even better when you use it with the Rest / Countdown feature for tracking rest between sets. That combo really puts your workout on autopilot.
When setting up my automation, I activate both the “Start set” and “Ending” options. I’m sure there are times when you might only want to activate one or the other, there’s no issue with having both activated.
SIDE NOTE: If you’re using the automation setting with the “Start Set” option activated, then it’s even easier to use the video recording feature. The video camera button will be prominently displayed near the bottom of the training overview screen. Just tap it, then hit record and perform your set with the camera pointed at you. End the recording, save it to your phone, and it’ll automatically bring your right back to the training overview screen. This is a more efficient process than when using the video recording feature without the automation activated.
How to Set Up a Force-Velocity Profile
The Force-Velocity Profile is an incredibly useful tool. If set up properly, it can estimate your 1RM for the day on any given lift – BEFORE you even perform any work sets.
This is important because your 1RM fluctuates daily based on a whole host of factors. And it’s not always a small fluctuation. It’s possible for your 1RM to change ≥10% higher or ≥10% lower than your “typical” 1RM. That’s a huge difference between your 1RM on your worst day vs on your best day.
It’s valuable to have an accurate 1RM estimation because it gives you an idea of your performance level for the day. It lets you know ahead of time if you should go heavier than normal or lighter than normal. This way, you optimize your training, which means progressing faster over time (lifting heavier on days that you’re stronger) while reducing the risk of injury (going lighter on days that you’re weaker).
The Vitruve app comes with default Force-Velocity Profiles for nearly every lift. Some of these default profiles are relatively accurate for most lifters – specifically those on:
- Squat
- Bench press
- Deadlift
- Overhead press
- Rows
- Pull ups
- Hip thrusts
The profiles for these lifts are based on averages from studies. Other exercises in the app have much less accurate default equations.
That said, even in the case of the above-listed exercises with relatively accurate default Force-Velocity Profiles, I recommend creating your personalized Force-Velocity Profile for your primary lifts IF you’re going to be relying on 1RM estimates to determine your training loads for each session. For me, this meant creating my Force-Velocity Profile for squats, bench press and deadlifts. Those are the only lifts I use my Vitruve device for.
Here are the step-by-step instructions for setting up your Force-Velocity Profile for any given exercise:
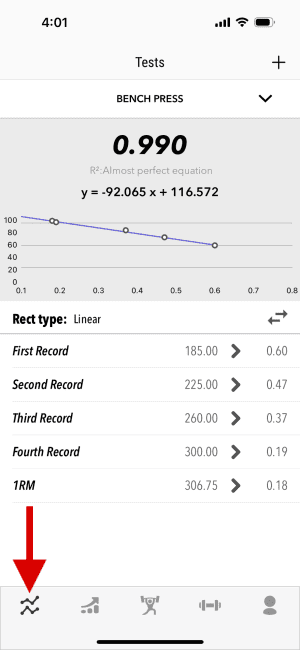
- Tap on the Tests tab, which is represented by the line chart icon.
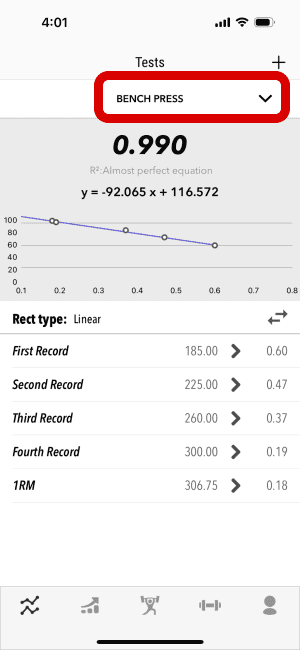
- Next, tap the down arrow at the top to bring up the list of exercises to choose from. Select the exercise you want to set up a Force-Velocity Profile for.
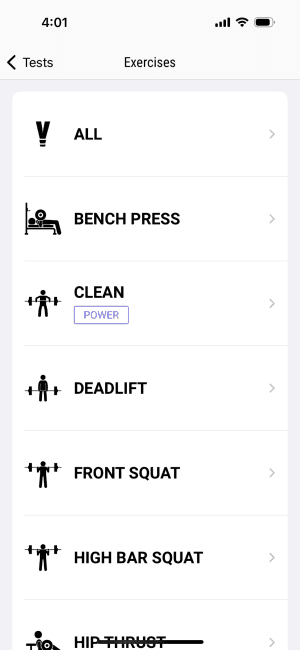
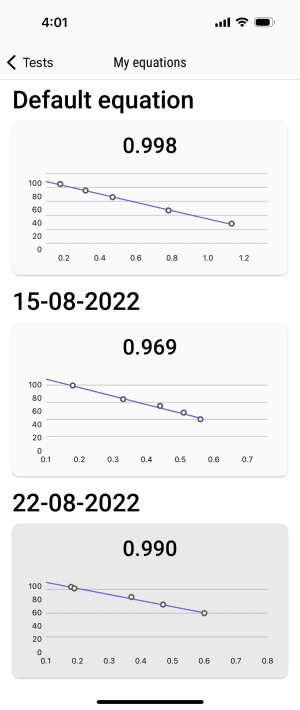
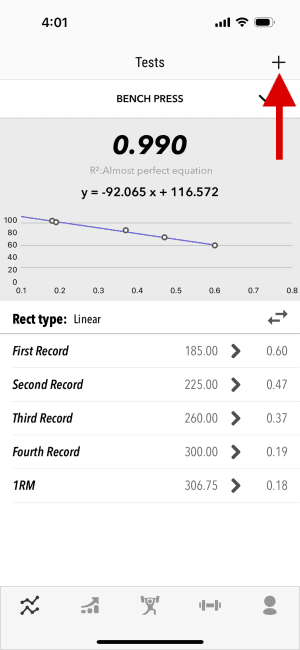
- If you haven’t previously created a Force-Velocity Profile for the selected exercise, it will display the default Force-Velocity Profile for that lift. If you have already created a Force-Velocity Profile, it will display that one.
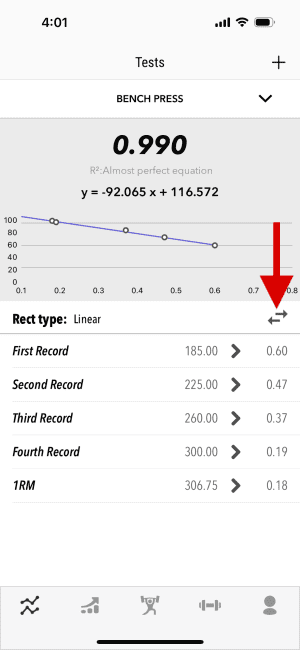
- SIDE NOTE: You can see any Force-Velocity Profiles you’ve created over time for the selected exercise by tapping the opposing arrows icon. This is helpful if you have a previous Force-Velocity Profile that was more accurate than your current one. You can select it to make it the active Force-Velocity Profile for that exercise.
- To start creating your new Force-Velocity Profile for the selected exercise, tap on the plus icon (+) at the top of the screen.
- NOTE: If you have an active training session going on, you’ll have to end it before you can create a new Force-Velocity Profile.
- On the next screen, tap the button that says “Start with Encoder.” This is the best way to do it. There is also a button that says “VBT Cam” which allows you to create a Force-Velocity Profile using your phone or tablet camera, but it’s not as accurate since it relies on you estimating your ROM distance and manually selecting video frames of the beginning and end of your rep. It doesn’t involve the encoder at all so I won’t discuss it further; just know it’s an option that you can play around with if you’re curious.

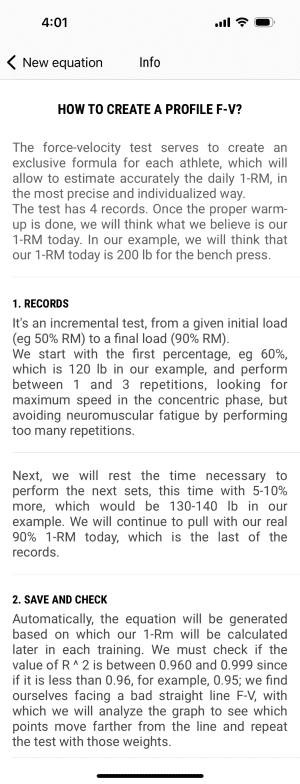
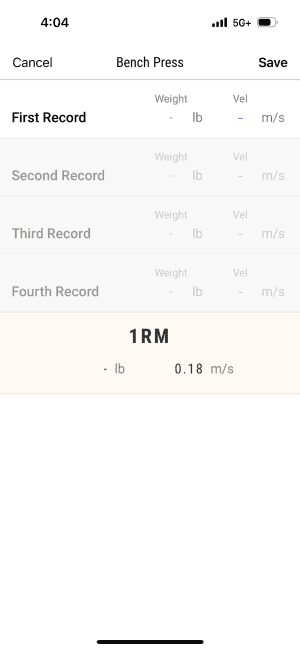
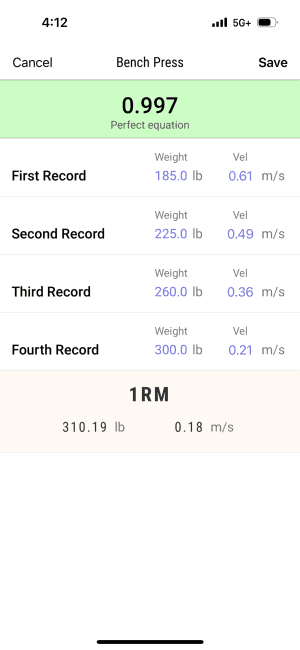
- After tapping the “Continue with Encoder” button, you’ll see 4 rows of records. These represent the 4 different test sets you’re going to perform. Each set should be progressively heavier than the previous set by about 10%. The general recommendation is to start at about 60% of your typical 1RM. The second set should be ~70% 1RM, the third should be ~80% 1RM and the final set should be ~90% 1RM.
Use Code KING for 5% OFF – VITRUVE VBT Device »
- To initiate each record/test set, simply tap on the row. A prompt will appear for you to enter the weight you’re going to lift. Once you enter this, you can begin the test set. The encoder will record the data.
- When performing each record/test set, you must follow all of these practices:
- Use proper technique and full range of motion for every rep.
- Be sure that you’re fully warmed up but not fatigued before testing.
- Lift with maximum intentional velocity (i.e. as fast as possible). If you fail to do so, your Force-Velocity Profile will be inaccurate.
- Perform 1-3 reps per test set. Sometimes your second or third rep will be faster than your first rep. However, don’t perform more than 3 reps, since that will cause fatigue, which will negatively affect your remaining records/test sets.
- Once you complete each of the 4 records/test sets, it will show your estimated 1RM at the bottom. And it will show the R² value at the top. The R² value represents how good of a fit the line is that you just created with each of your 4 data points from your 4 records/test sets. In other words, it’s a measure of how reliable your new Force-Velocity Profile equation is. The R² value can go as high as 1.0, and the higher it is, the better the fit. If it’s higher than 0.96, it’ll say “Almost perfect equation.” If it’s any less than 0.96, it’ll say “Improvable Equation” and if it’s less than 0.94, it’ll say “Bad equation, repeat.” I recommend repeating if you get 0.96 or below. If you don’t get a very high R² value, it’s probably because you weren’t warmed up, had bad technique, chose the wrong weights or didn’t lift as fast as possible for all sets.
If you’re brand new to VBT and have never set up a Force-Velocity Profile, it may take a few attempts to get it right. That was the case with me initially. I think my issue was that I was incorrectly choosing the amount to lift for each progressive set (I was going too light).
Even if you can create a Force-Velocity Profile with an almost perfect equation (high R² value), you may still find that your estimated 1RM during your training isn’t realistic. The first reason for this is that you’re simply using too light of a weight to get an accurate estimation. The 1RM estimations are more accurate the heavier you lift. So don’t pay attention to any estimations when you’re using less than 70% of your typical 1RM…
…Or, if you don’t want to get a 1RM estimation with light weights, there is a filter you can activate. In the settings, you can activate a minimum velocity filter. This means that for any rep with a higher velocity than the filter, you will not get any 1RM estimation.
Let’s say you’re still getting unrealistic 1RM estimates even when going very heavy and you have an “almost perfect equation” for your profile. In this case, you may need to re-do your profile – but this time, you’ll have to manually enter a minimum velocity after completing your 4 records/test sets. Do this by tapping on the 1RM area where it shows your estimated 1RM and the default minimum velocity metric.
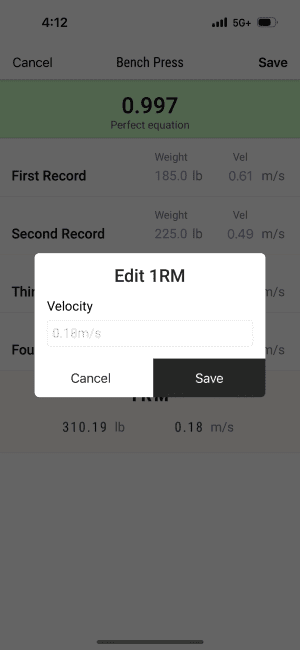
For example, the default minimum velocity for bench press is 0.18 m/s (it’s different for other lifts). However, let’s say you can often reach slower minimum velocities – then you would input a lower velocity metric (e.g. 0.15 m/s). Of course, you’re not supposed to just guess what velocity to put there. Rather, you should base it on your past training data. If you look through the progress tab, you can see all your previous recorded workouts for every lift. Go through this data and see what your most common minimum velocity is and use that value. Most people probably won’t have to do this, but it’s good to know in case you’re not getting accurate 1RM estimates.
In the next section, I’ll talk about how to get accurate 1RM estimates before your work sets – assuming you already have your Force-Velocity Profile set up correctly.
Estimating 1RM Accurately
The Force-Velocity Profile is particularly useful if you use percentage-based training in your programming. You can base the percentage to be lifted on your estimated 1RM value for the day (as determined by your Force-Velocity Profile).
The app has a built-in tool that makes the percentage calculation a breeze. After doing a test set to estimate your 1RM, you simply slide the slider to the desired percentage, and it shows you how much weight to lift.

It’s essential that you get an accurate 1RM estimation if you’re relying on the app to determine your percentage-based lifts. Here’s my advice on how to accurately estimate your 1RM for a given exercise before your main work sets:
- You should have already set up your own Force-Velocity Profile for the exercise in question (see the previous section on how to do this). Don’t just rely on the default profile.
- You should use a heavier weight. At least 70% of your typical 1RM. Though I prefer to go higher, to about 85%. The heavier the weight, the more accurate the 1RM estimation. For this reason, I recommend using your final warm up set to estimate your 1RM.
- Remember to perform the test set with maximum intentional velocity. If you don’t lift as fast as possible, your 1RM estimation will be inaccurate.
- Only perform 1 to 3 reps in this test set. This should count as a warm up set. You don’t want to do more reps as that will cause fatigue and interfere with your performance on work sets. I usually do 2 reps just because my second rep is usually faster than my first.
See Your Progress
One of the great parts of the Vitruve App is that you can see your strength progress over time. The app records every training session you use the encoder for. This lets you see if you’ve gotten stronger or weaker on any lift that you use the encoder for.
To view your progress, simply tap on the Progress tab, represented by the chart icon.
Once you’re on the progress screen, you’ll see a bar chart at the top showing your estimated 1RM for every training session you’ve recorded, for a given exercise.
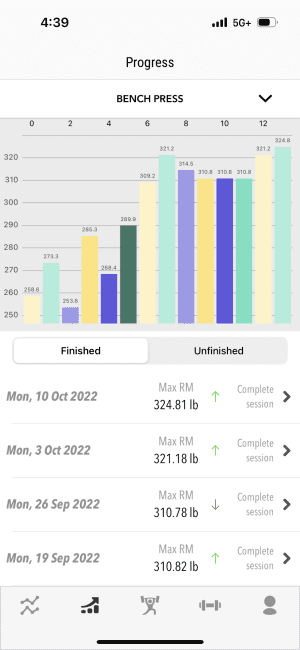
By default, the exercise shown on the progress screen will be the last exercise you performed. You can tap the name of the exercise above the bar chart to see your progress on other lifts.
Below the bar chart, you’ll see a list of all of the training sessions you’ve performed. Each row has the date of the training session and the corresponding 1RM. If you have a reason to, you can delete the training session by sliding to the left on the row (iOS) or tapping and holding on the row (Android).
You can tap on any training session to see the workout history. It will show all of the sets, reps and velocity data for that session.
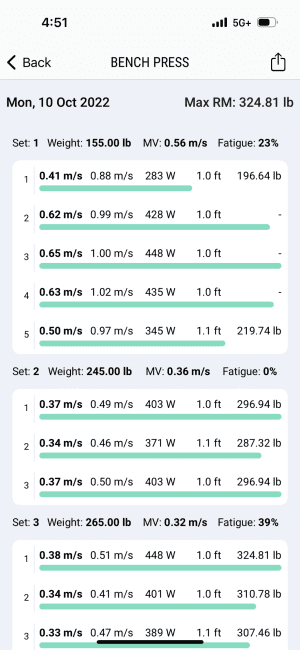
Within the detailed training history view, you can also delete data if you need to – including individual reps or entire sets.
Using OLED Screen Only (No App)
It’s possible to use the Vitruve Encoder without the app. I don’t recommend it since you can do so much more with the app in a much more efficient manner. The only time I see it being useful is if your phone or tablet battery died but you still want to know your velocity.
In order to use just the encoder without the app, then you’ll be relying on the OLED and the physical buttons beneath it.
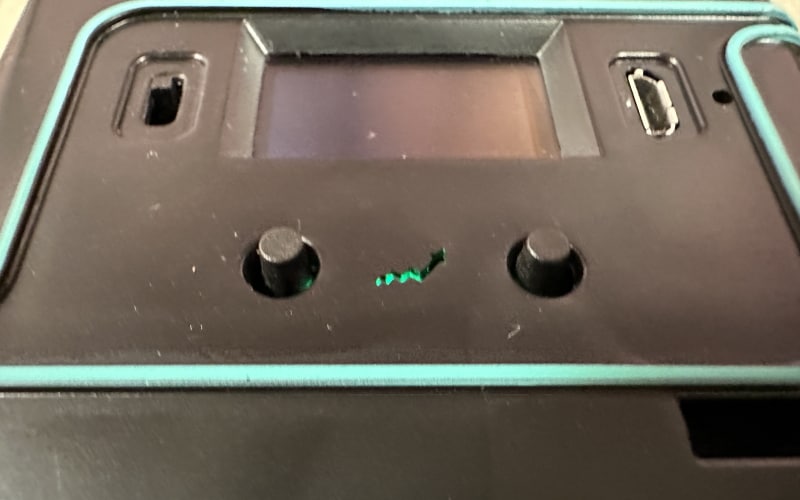
You can start using the encoder without the app as soon as you turn the device on and the screen flashes “GO”.
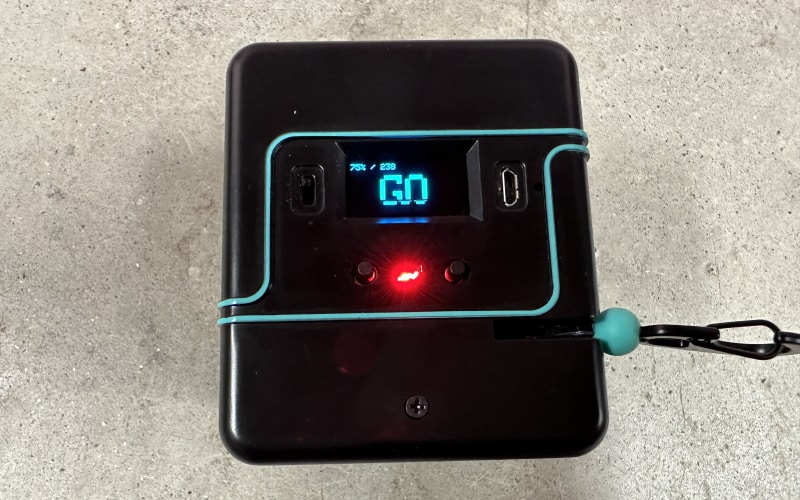
Assuming the string is attached to the bar already, you can proceed to perform your set as usual. For each rep, velocity data will appear on the OLED screen. Of course, you won’t see this since you’ll be lifting.
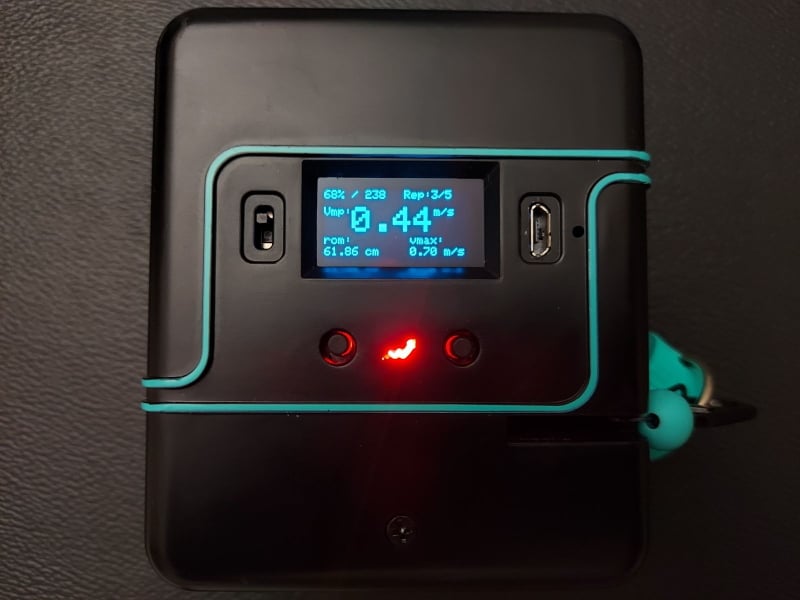
However, you can review the data on the OLED screen for each rep after you complete your set. To do this, you use the physical buttons below the screen:
- Click the left button to review the data for each previous rep in the set.
- Click the right button to review the data for each subsequent rep in the set.
- To begin your next set, you must end the current one by clicking the right button when you’re already viewing the final rep of the set.
The data shown for each repetition includes the following:
- Mean Propulsive Velocity (VMP)
- Range of Motion (ROM)
- Peak Velocity (VMAX)
- Rep Count
- Battery Life
I should also note that physical buttons can also do the following:
- Press and hold the right button for 5 seconds to change the UP/DOWN velocity data collection. Up means that it will register the velocity data for the concentric (this is the default). Down means that it will register the velocity data for the eccentric.
- Tap both buttons at the same time to show the menu. The menu shows a summary of mostly technical data, including the number of your unit, whether it’s set to UP or DOWN (concentric or eccentric), firmware version and ID.
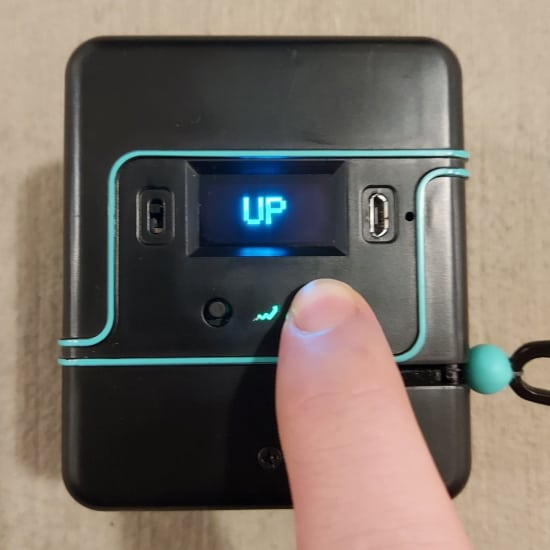
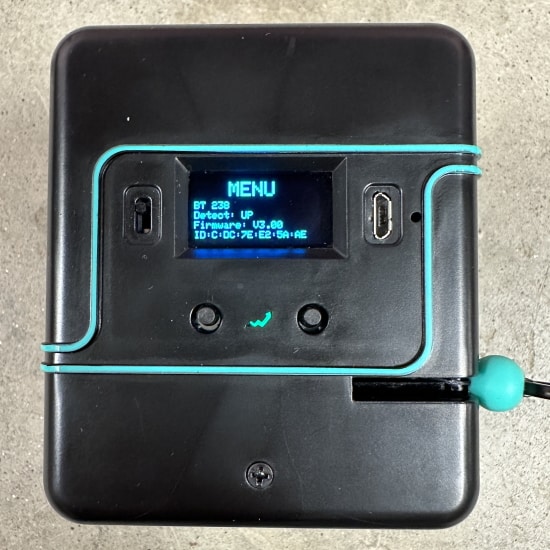
If you want to save any of the data displayed on the OLED screen when training without the app, you’ll need to write it down when reviewing it. Becuase it will be gone forever as soon as you end the set.
Logging your workout data isn’t the only thing you miss out when using the encoder without the app. You also won’t be able to input the weight, estimate your 1 RM, program fatigue, get audio feedback, etc.
Most people will never have a need to use the Vitruve Encoder without the app. But again, it’s nice to have the capability just in case you need or want to use it that way.
Strategies for Use
There’s a whole lot you can do with the Vitruve Encoder, including some pretty advanced VBT techniques. However, this can make it extra confusing for someone new to VBT.
That’s why I want to recommend a few beginner strategies that are easy to understand and will make a noticeable difference in your training.
I recommend starting with the first one, getting used to it, then adding in the second one, getting used to it, and then implementing the third:
- Real-time feedback: When you first get your Vitruve Encoder, the easiest way to dip your toes into VBT is to simply use the real-time audio feedback setting. Otherwise, continue with your normal training routine. This will get you used to:
- Hooking the encoder to the bar
- Using the app and logging your lifts
- Training with a focus on maximum intentional velocity (i.e. lifting as fast as possible). You’ll find that this will make you more motivated and engaged in your workout because you’ll be chasing a faster velocity on every rep and set – This is also a safer mindset than being focused on just adding more weight to the bar.
- Use the “Fatigue – Intra %” Setting: This is the easiest and arguably the most effective fatigue management strategy to use. Put the setting anywhere from 5-20%. If you’re not sure, I recommend 15%. This will prevent you from performing extra reps within a set that don’t contribute to your progress, but rather just make you more fatigued. This reduces the likelihood of injury and lets you recover faster, which means you can progress faster over time. And it’s so easy to implement: Just stop your set when the app beeps.
- Create your own Force-Velocity Profile for your major lifts: The default Force-Velocity Profiles for every exercise aren’t tailored to you. So it’s worthwhile to create your own profile for all of the exercises that you regularly use the encoder for. When you have a reliable profile, you can reliably estimate your 1RM. Since your 1RM varies day-to-day, this lets you use the optimal load (i.e. heavier or lighter than normal) for your work sets every workout. The key is making sure to create reliable Force-Velocity Profiles. It can be tricky, which is why I recommend doing this only after you get the hang of using the encoder and training with maximum intentional velocity.
Use Code KING for 5% OFF – VITRUVE VBT Device »
Build Quality
Overall, the build quality of the encoder is great. I’ve used it quite a bit and have had no issues so far.
String durability
The “string” – which is sometimes referred to as a “rope” on Vitruve’s website – is made of strong braided thread; it’s basically a type of fishing line. This makes it very strong and durable. I haven’t noticed any fraying, stretching/deformation or any other type of deterioration in the time I’ve used it.
Additionally, Vitruve has tested the string’s durability with a machine that simulates reps. They’ve done over 30,000 reps with no signs of damage.
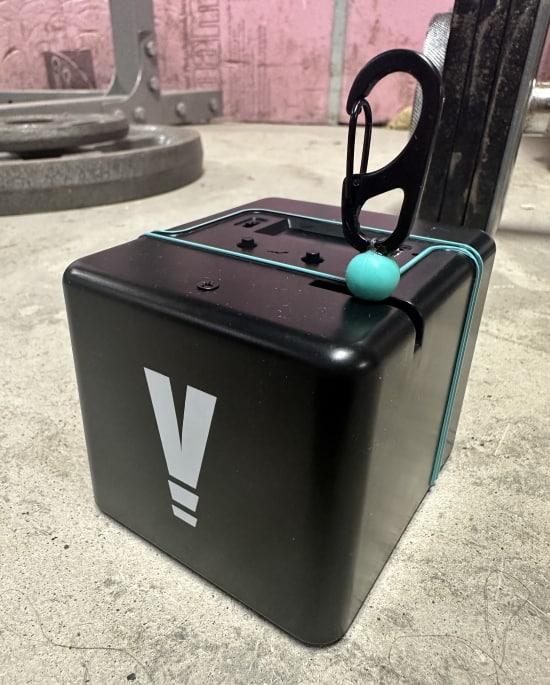
One personal anecdote I’d like to add is that one time I accidentally left the string attached (via the magnetic roller hook) to my barbell after finishing my workout. Then moved the bar back to the storage rack. This caused the string to rapidly snap back. I was startled when this happened and was afraid I might have damaged something. But the string and the encoder shell were completely fine. I noticed that there was a small rubber ball affixed to the start of the string, which is designed to absorb impact and prevent damage in this scenario.
Outer shell durability
The outer shell is made of ABS, which is a durable type of plastic. It’s known for its high tensile strength resistance to impacts. This is important for protecting the encoder inside.
I’ve dropped the unit it a few times (albeit on rubber flooring) without incident.
While the ABS plastic shell will easily hold up to normal use and some accidental impacts, it is not unbreakable…
When can it break?
There are a few practical scenarios where you could break the outer shell and/or the encoder itself:
- If you drop it from high enough onto a hard enough surface.
- Dropping a weight plate on it.
- Dropping a loaded barbell on it during exercise. This is most likely during Olympic weightlifting movements. That’s not to say you can’t use Vitruve for Olympic lifts. But if you do, you need to be mindful of where you position the encoder and where you drop the barbell (accounting for how the bar may bounce when dropped).
Battery Life & Charging
The Vitruve Encoder sports an impressive battery life of UP TO 25 hours. You can use it for multiple workouts before having to charge it back up. However, you need to understand that the battery uses more juice during reps. So it will drain faster, the more reps and sets you do.
Additionally, having the “automations” setting activated will drain the battery 30% faster.
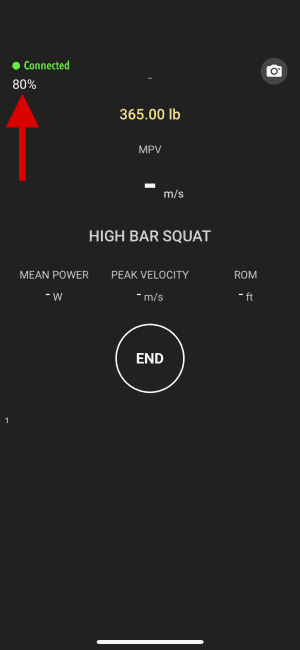
You can see the remaining battery percentage in both the app and on the OLED screen.
You charge the device with the included Micro USB Type-B cable. It takes about 2 hours to go from no battery to a full charge. There is a red OLED that blinks while it’s charging. This OLED turns off once charging is complete.
Who Is the Vitruve Encoder for?
There are a few different types of people who should consider buying the Vitruve Encoder:
- Powerlifters (recreational and competitive) or other athletes who are serious about implementing VBT into their training and want a scientifically validated device to do it with.
- Any lifter who’s geeky with their training and likes having access to more data on their lifts.
- Any lifter who wants an objective way to manage fatigue during workouts.
- Coaches who want to integrate VBT into their athletes’ regimens. For these people, it’s best to opt for the encoder with the Vitruve TEAMS app designed for managing multiple athletes.
Shipping & Tax
Great news! The Vitruve Encoder ships for free worldwide. On top of that, the tax is included within the price listed on the site, regardless of your location.
So the price you see is the price you’ll pay when all is said and done.
Overall Rating
Vitruve Encoder
The Vitruve Encoder is an excellent choice for any athlete (or coach) looking to build strength through velocity based training. It is one of a handful of VBT devices that’s been scientifically validated for reliability. The price is competitive. And the app is intuitive and easy to use (especially when you activate the “automations” setting). This is something you’ll actually use consistently because it’s easy to use and it works.
Product Brand: Vitruve
4.8
Pros
- Scientifically validated for reliability (reliability is essential for VBT to work)
- Lightweight, portable and storable
- Long battery life (up to 25 hours)
- Predict your 1RM for the day before your work sets
- Real-time audio and visual feedback on every rep
- Different settings for managing fatigue or targeting velocity zones
- The “automations” setting puts the app virtually on autopilot (less time on your phone, more time focused on training)
- Track strength progress over time
Cons
- Must be careful if using it for Olympic lifts so you don’t drop the bar on it
- Currently, the Android app isn’t as advanced as the iOS version
- Requires learning at least the basics of VBT to get the most out of it
Use Code KING for 5% OFF – VITRUVE VBT Device »
FAQ
Is the Vitruve Encoder worth it?
If you want to get a reliable and reasonably priced Velocity Based Training (VBT) device, then yes, the Vitrue Encoder is worth buying.
What is the minimum velocity that the Vitruve Encoder can record?
Vitruve’s website mentioned that they’ve recorded velocities as low as 0.13 ft/s (0.039 m/s) on bench press and 0.32 ft/s (0.096 m/s) on deadlift. That’s extremely slow for those lifts and I’ve never reached such low velocities during my actual training. However, I have tried testing how slow I could record a rep by simply pulling the string slowly with my hand and I had similar results to what they found (I was able to get a bit slower: 0.06 m/s on deadlift).
What is the maximum velocity that the Vitruve Encoder can record?
The fastest speed the Vitruve Encoder can record is about 19 ft/s (5.79 m/s). This is much faster than you’d ever need for any exercise. To give you an idea of how fast this is, the average velocity of a punch is 13 ft/s (3.96 m/s).
What features does the paid Vitruve TEAMS app have that the free app doesn’t?
The paid Vitruve TEAMS app has several advanced features designed specifically for strength coaches. The free app lacks these features since it’s designed for individual athletes/lifters.
Here are all of the extra features you get with the TEAMS app:
1. The ability to manage multiple athletes, which is a must for most coaches.
2. More metrics are available including peak power, peak force, mean acceleration and peak acceleration.
3. An “online training” feature is available, which allows an athlete can use the free app and all the data will be sent to the TEAMS app.
4. It allows API access for integration with 3rd parties. Vitruve is already integrated with Teambuildr.
5. Coaches can give the Vitruve Wellness Test to their athletes before a training session. Studies have shown that tests like this can provide accurate insights into the physical and mental state of athletes so adaptations can be made to their training ahead of time.
6. There is a leaderboard feature that lets athletes compete against each other. This increases motivation, competition and fun in the weight room, which coaches and their athletes will appreciate. This is only available on the Gold or Platinum tiers of the TEAMS app subscription.
7. Export data in bulk for a given period. The higher the subscription tier, the longer the date range you can export.
When does it make sense to connect the encoder to the app via WiFi instead of Bluetooth?
It doesn’t make sense to use WiFi to connect the encoder to the app. Vitruve only supports wifi because their previous VBT device from their old brand (Speed4Lifts) only worked with wifi. Bluetooth connects much faster and is more robust. There is no point to use the WiFi anymore.
What are the physical buttons on the encoder and how do you use them?
If you’re using just the encoder (no app), this is where using the physical buttons below the OLED screen would come in handy. After your set, you can click the left button to review the data for each previous rep in the set. You can click the right button to review the data for each subsequent rep in the set. If you click the right button when you’re already viewing the final rep in the set, that will end your set. If you’re using the app, which will be almost everyone who buys the Vitruve Encoder, you don’t need to worry about using the OLED screen with the physical buttons – Everything will be displayed and logged in the app.
Is the Vitruve Encoder portable?
Yes, the Vitruve Encoder is portable. It weighs just 13.5 oz and measures just 3.5” L x 3” W x 2.8” H. This makes it easy to carry in your gym bag. I recommend transporting it in the included neoprene pouch for extra protection.
When should you use the velcro strap or the roller hook?
I recommend using the roller hook for any barbell exercises since its built-in magnet quickly snaps to the steel bar. The velcro strap is more useful for connecting to your person such as around your wrist on dumbbell exercises. You can use the velcro strap to connect to the barbell, but it’s not nearly as convenient as the roller hook.
How durable is the Vitruve Encoder?
The encoder is pretty durable since it has an outer shell made of ABS plastic, which is strong and impact-resistant. It holds up great to regular use and short accidental drops. But it’s not indestructible. Avoid dropping plates or the bar on it and be sure to carry it in the included neoprene bag if you transport it in your gym bag to prevent damage to the physical buttons, on/off switch and OLED screen.
How durable is the string?
The string is very durable. It’s been mechanically tested and can withstand more than 30,000 reps with no signs of wear.
Can you safely use the Vitruve Encoder for Olympic lifts without dropping the bar on it?
If you’re doing Olympic lifts, you have to be careful not to dump the barbell on the encoder, which could break it. This means being smart about where you position the encoder and where you drop the bar.
Is there a web portal?
Currently, there is no web portal. However, one is being planned for the future.
What does the OLED screen show?
During every rep, the OLED screen on the encoder shows the Mean Propulsive Velocity, Peak Velocity, Range of Motion and rep count. It also shows the percentage of remaining battery life if you’re reviewing the reps after your set using the left and right physical buttons on the encoder.
What is the battery life?
A full charge lasts around 25 hours during regular use. However, the battery is used 30% faster when you have the automation setting activated to automatically detect the start of a set.
How do I see the remaining battery life?
The remaining battery percentage is displayed in the app in the top left corner of the real-time training view.
How long does it take to charge?
It takes about 2 hours to charge from no battery to a full charge.



This is a really good article. Thank you very much. I am in the market for a new VBT Device with Push going out of the market and Vitruve seems like it is great.
Regards,
Mike
Thanks Michael! Yes, and this will be more accurate/reliable than the Push device as well.
Thank you so much for this really good article Alex! It helps me understand the encoder much better. Do you have any experience testing jump such as CMJ?
Wow this is the greates review i’ve ever seen, great job.
I would like to ask if Vitruve is suitable to monitor jump height since there is the displacement metric (ROM).