It’s a rare day in the fitness world when something comes along that’s truly new and effective. It’s usually just a worthless fad, a gimmick or a repackaged version of something that’s been around for years…
…This time is different. Enter velocity based training (VBT).
The concept of velocity based training itself has been around for years. However, it involves measuring bar speed and that requires specialized equipment. Until just recently, this equipment cost thousands of dollars and took up a lot of space. Accordingly, it has only been accessible to high level athletes with access to well equipped training facilities.
A lot has changed with technology in just the last half-decade. Now the average lifter has access to the technology needed to do velocity based training. People are quickly adopting the technology and learning how to use it in their workouts.
Most importantly, they are seeing results. That includes me. This is why I’m so excited to let you know about velocity based training — Today, I’ll teach all you need to know about it:
- What it is
- What the benefits are
- Who should (or shouldn’t) use it
- HOW to implement it into your training the right way
- And more — take a look at the table of contents below…
Table of Contents
What Is Velocity Based Training?
Let me start by clearing up a common misconception: Velocity based training (VBT) is NOT the same as “speed training,” meaning training solely to become as fast and explosive as possible by moving lighter loads very rapidly…
…At first, I thought this is was what velocity based training was all about. And so, I really didn’t care about VBT. I’m not an athlete. My main goals are strength and hypertrophy. Speed is way down the list.
Luckily, I was wrong. VBT is about using the metric of velocity to train for any type of goal. It’s not about the end goal of developing speed. I should note that you can use velocity based training if your main goal is developing speed and explosiveness. It’s a great tool for that. But you can use it for much more — including my goals of strength, muscle and power.
Let me get back to explaining exactly what VBT is. Here’s my crack at a definition:
Velocity based training is a form of autoregulation training that uses the speed of the exercise to program the optimal weight for each set, in real-time.
“Speed” in the context of the above definition can be more narrowly defined as the average concentric velocity (i.e. avg. meters/second of positive rep over each set) of each set of any given exercise.
This is in contrast to programming based on the amount of weight lifted (i.e. percentage of your one rep max) or how heavy the weight feels (e.g. rating of perceived exertion scale).
How do you know what your bar speed is? Good question. You can measure the speed (velocity) of your lifts with a velocity based training device. More on VBT devices later.
VBT stems from the fact that every athletic ability, or trait, is most effectively trained within a particular velocity range. Those traits include:
- Absolute strength
- Circa max strength
- Accelerative strength
- Strength-speed
- Speed-strength
- Starting strength
I’ll discuss these six traits in detail later.
For now, I just want you to understand that there is a different velocity range for each trait. For example, you might do a squat with an average bar speed between 0.5 to 0.75m/s – a velocity range associated with accelerative strength/muscle growth.
Focusing on trying to move the bar at a certain velocity instead of trying to use a certain weight is a great way to increase the effectiveness of your workouts…
…Why? Because it will help you determine the optimal training load for a particular day. You see, your workout performance varies from workout to workout. In fact, it even varies from hour to hour.
One study, for example, found that the strength of lifters can differ as much as thirty-six percent throughout the day – around eighteen percent higher and lower than their previously tested 1 repetition-max (1RM) .1
Various physiological stressors influence your performance: the quality and quantity of the sleep you had the night before, whether or not your glycogen stores are full and the ‘freshness’ of your central nervous system are just a few of them.
If you do not take your physical (and mental) readiness into account, the amount of weight you use during your training is most likely to be off.
Fortunately, by measuring the speed of the movement and adapting your loads based on that, you can still work out with the right amount of weight for that day.
I’m going to tell you more about VBT and how to add it to your training in just a minute. But first, let’s look at the two other common ways lifters select a training load: percentage based training and subjective autoregulation (and why they are flawed).
VBT vs. Percentage Based Training
Percentage based training means you’ve already planned out the weights you will be using during your workouts. This is usually done by first testing (or estimating) your one rep-max and calculating the amount of weight you will use based on that. For example, you might plan to do three sets of seven reps at 80% of your one-rep-max.
The big advantage of percentage based training is:
- It takes the guesswork out of your training. No matter how you feel that day, you just do what the program tells you to do.
While this can be beneficial for lifters who frequently goof off during their workouts, it has a few downsides compared to VBT:
- It does not take your personal circumstances into consideration. After all, you lock yourself into using a particular weight. If you’ve had a busy and long day at work, or you’re just not feeling optimal that day, the weight could be too heavy, while on a good day, the weight might be too light.
- It does not take individual differences into consideration. Every lifter is different, and we should consider that when designing a workout program.
Let me expand on that last point about individual differences with an example about muscle fiber type: Lifters whose muscle fiber make-up is primarily slow-twitch dominant might be able to perform twelve-to-fifteen-plus reps on an exercise using 80% of their one-repetition-max. Fast-twitch-dominant lifters, on the other hand, might only be able to do eight or fewer reps with the same 80%.
Muscle fiber types even vary (significantly) for each muscle group. That’s why most lifters can do more reps with 80% of their maximal weight on a leg extension than on a leg curl. The quads are generally more slow-twitch dominant while the hamstrings are usually more fast-twitch dominant.
If you do not take factors like those into consideration, you’re missing out.
VBT vs. Subjective Autoregulation
Another common way to guide your training is with subjective autoregulation.
Subjective autoregulation means you make some of your workout decisions (e.g. adding/removing weight, increasing/decreasing volume, more/less rest between sets) while you’re training based on subjective indicators
There are three types of autoregulation that rely on subjective indicators:
- Rating of Perceived Exertion (RPE). This is based on a numerical rating scale. Mike Tuchscherer’s version of the RPE scale is the most popular one for powerlifters and bodybuilders. It ranges from 7-10 (sometimes 5.5-10 or 6-10). A 10 is max effort, meaning can’t do any more reps at the end of your set. A 7 is a weight where every rep moves quickly when applying as much force as possible (and still have about 3 maybe 4 reps left in the tank at end of set). Anything below 7 isn’t included since it’s likely warm up weight.2 In practice, the RPE scale works like this: You have a predetermined target rating for a given set. You choose a weight that you think will match that RPE. If it ends up matching your expectations, then you keep things the same. If the actual RPE is higher than the target, then you reduce the weight (or volume, or increase rest, or…etc.) for the next set. If the actual RPE is lower than the target, then you increase the weight (or volume, or decrease rest, or…etc.) for the next set.
- Reps in Reserve (RIR). This refers to a rating system based on how many additional repetitions you would be able to perform at the end of a set (if you continued). Usually this is between 0 and 3 or 4 RIR. 0 means max effort; you wouldn’t be able to do any more reps. 4 means you would have 4 reps left in the tank. It works the same as described in the RPE description above. In fact, many times RPE and RIR can be used to reference each other (e.g. A 10 RPE = 0 RIR, a 7 RPE = 3 RIR).
- Descriptive Rating of Exertion (DRE). This is a qualitative subjective indicator — unlike RPE and RIR, which are quantitative. With DRE, sets are labeled from less difficult to more. An example of this is: moderate difficult, challenging, hard or pushing the limit. However, you can give them different labels if you want — the basic idea stays the same though. DRE is most useful when working with lighter weights and higher reps because it’s harder to get a dialed-in quantitative rating at these low loads. DRE is flexible and lets you give ballpark ratings that are still meaningful. Conversely, RPE and RIR work best for heavier loads and lower reps, where they’re more accurate.2
For example, when you feel great you might add ten pounds to the bar. But when you feel tired that day, or when your form starts to break down, you decrease the weight (or change other variables).
There are many ways you can implement subjective autoregulation into your training. Just a few of the factors you can change depending on your situation of that day are the number of reps and sets you do, the rest periods in between sets, and the total number of exercises you do.
The main benefit of subjective autoregulation training is that:
- It adds flexibility to your training. You can modify weight used, rest between sets, volume per exercise, etc. based on real-time factors in your workout, such as your performance and how you feel.
Subjective autoregulation has also been shown to be effective in multiple studies. For example, a review by Bad Schoenfeld and Menno Henselmans found that when lifters autoregulated their rest periods in between sets, they gained just as much or even more strength and muscle.3
Another study found that beginners increased their leg-press strength more when they used autoregulation compared to linear periodization. Their improvements in chest press strength, however, did not vary between autoregulation and linear periodization.4
However, like percentage based training, subjective autoregulation has a few flaws compared to VBT:
- First off, unless you have a few years of training experience, “listening to your body” can be tough. Even if you’re a seasoned vet, your judgments won’t necessarily be accurate or consistent from workout to workout.
- Many lifters take autoregulation to the extremes when relying on subjective indicators. Some lifters have a hardheaded balls-to-the-wall personality. They’ll tend to consistently overestimate their performance, which causes them to overdo things even on a bad day. Other lifters have a more cautious personality. They’ll tend to consistently underestimate their performance, which causes them to do less than they should even during their best workouts. These guys feel optimal that day, they decrease the training volume and/or training intensity too much (or even skip the workout altogether).
The Solution? Velocity Based Training
With velocity based training, you can get the best of both percentage based training and autoregulation (without their flaws).
- You’re not “locked” into using a predetermined percentage of your 1RM that may be too light or too heavy depending on the day. This is the case with percentage based training — it’s inflexible.
- You don’t have to rely on your perception of how difficult your previous set was to decide the weight for your next set like you do with autoregulation. Your perception of difficulty is by definition subjective. It can vary significantly between or even within workouts depending on environmental (e.g. music, temperature, others around you) and psychological factors (e.g. mood, ego).
- VBT allows optimal weight for any given set of an exercise. It’s flexible and objective.
The above advantages of velocity based training — combined with the greater accessibility to VBT devices — explain why it’s quickly rising in popularity.
Train 6 Different Traits with VBT
There are six different types of strengths, or traits, that you can develop with velocity based training. Each trait requires a different type/amount of stimulation, which is achieved by moving the weight within a specific average velocity range.
If you want to be able to intelligently apply velocity based training toward your goals, you need to start by understanding these traits. Specifically, how each trait relates to different velocities and loads.
1. Absolute Strength

The maximum force you can produce in a single voluntary effect without a time limit, so the maximum amount of weight you can lift in one rep.
The most well-known example of this is powerlifting, like your 1 rep max (1RM) on squat, deadlift and bench press. In the powerlifting world, we call this style of training the “maximal effort method”. This method of training is the best way to gain strength and can also lead to an increase in muscle mass.
In practice, training absolute strength can mean going full-on 100% intensity and doing your true 1RMs. However, it can be your near-max, too. That is, taking just enough weight off the bar so you can do another rep (i.e. 2 rep max; heavy double).
2. Circa Max Strength

Circa max strength literally means near your max strength. It is a slightly toned-down version of absolute strength.
You’re still lifting very heavy weight — around 80-90% of your one rep max. But it’s more sustainable. The quality of your reps will feel better. You’ll be able to knock out more total volume. And you won’t completely fry yourself out.
This is great for building strength. I personally find it’s my sweet spot (though I don’t always use it, and certainly not for every movement). It’s more sustainable than training in the absolute strength range, meaning that you can do it more frequently and over a longer-term with way less risk of injury, much faster recovery and generally more consistent strength progress.
You can, of course, build plenty of muscle here, too. You just need sufficient volume (i.e. more sets since reps will be pretty low, like 2-4 per set).
3. Accelerative Strength

This form of training is mostly associated with traditional bodybuilding/hypertrophy training. It involves movements done at a controlled pace with moderate weights.
The weight typically correlates with around 65-80% percent of your one repetition max. It generally works best with between 5-15 reps.
4. Strength-speed

This method includes movement in which the force output is a result of both high acceleration and a moderate/heavy mass to be moved. The most well-known example of this is Olympic weightlifting (and its variations). Besides that, strength-speed training is frequently used by powerlifters to improve their main lifts – we call it the “dynamic effort method”.
This method has been popularized by powerlifting coach Louie Simmons, who recommends using a load between 50-60% percent of your 1RM in lifts such as the squat, deadlift, and bench press while lifting the weight as fast as possible. He recommends only performing about three reps to maintain maximum acceleration (within the correct mean velocity range) during each rep.
Others recommend starting with a more inclusive 45-65% of your one rep max and say you can as high as eight reps — which would necessarily mean using lighter weight (compared to three rep sets) to ensure you’re still able to achieve the mean velocity range for speed-strength.
5. Speed-strength

The ability to produce rapid movements involving small external resistance. An example of this form of training is loaded sports movements, for example pushing a light prowler or running with a light sled. Another kind of speed-strength is explosive lifting with minimal loading. Plyometrics and other types of jumps and throws also fall under this category.
Training speed-strength usually involves lifting around 25-45% of your one rep max for anywhere between 3-8 reps.
6. Starting strength

Starting strength is your capacity to instantly apply high amounts of force at the start of a movement. For example, let’s say you’re sitting in a “ready to jump” position in a chair. Without first swinging your body back (to make use of the stretch reflex), you jump up from this dead stop position. That is an example of starting strength. Another example is a 100-meter sprinter coming out of the blocks.
Starting strength is best trained with very light weight for low to moderate reps — something like <25% of your one rep max for 3-8 reps.
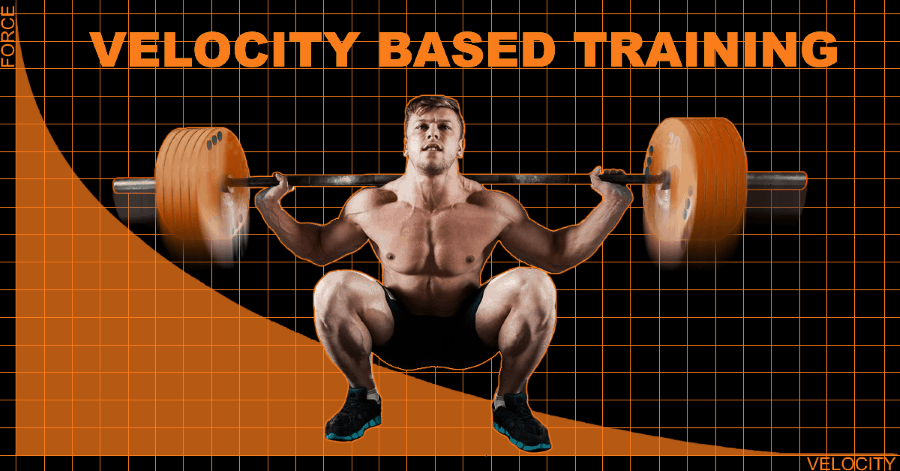
Speeds, %1RM and Rep Ranges for Different Forces
In the above section, I defined the six different training traits, or types of strength. I also gave you an idea of the %1RM and rep ranges that typically correlate to each trait. Now, let’s take a look at the optimal training speed to train each of them:
| Trait | Mean Velocity | Approx % 1RM | Approx Rep Range |
|---|---|---|---|
| Absolute strength | <0.35 m/s | 90-100% | 1-2 |
| Circa max strength | 0.35 – 0.5 m/s | 80-90% | 2-4 |
| Accelerative strength (hypertrophy) | 0.5 – 0.75 m/s | 65-80% | 5-15 |
| Strength-speed | 0.75 – 1 m/s | 45-65% | 3-8 |
| Speed-strength | 1 – 1.3 m/s | 25-45% | 3-8 |
| Starting strength | >1.3 m/s | <25% | 3-8 |
Here’s a graph of the Force-Velocity curve, which shows a simplified version of the data in the above chart.

Now, you may be wondering, “How do I actually measure these velocities in the gym?” Good question. You do it with a special velocity tracking device. There’s a bunch out there, and I’ll talk about them in the next section.
Velocity-Based Training Devices
We’ve just seen the general velocity guidelines for training each trait. But this information by itself it pretty useless. To use those numbers and make velocity based training work, you need a device that measures the speed of your lifts.
There are multiple options on the market – and we can globally put them into two categories: wireless and wired velocity trackers.
Wired velocity trackers
The 2 most well-known wired velocity based training devices include:
- Tendo Unit
- GymAware
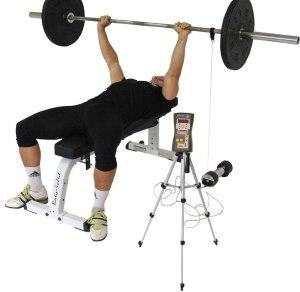
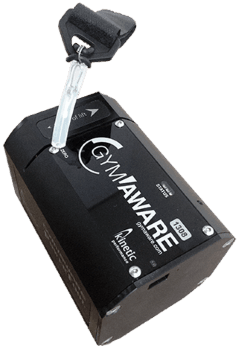
Both of these have been around for many years. They’re both super accurate but are prohibitively expensive for the average individual lifter. The Tendo Unit is around $1600 and the GymAware is around $2200. And while the GymAware is relatively small, the Tendo Unit is far from compact. Both of these units make the most sense for coaches who will be using them to train athletes.
Wireless velocity trackers
The four most well-known ones are:
- Beast Sensor
- PUSH Band
- Atlas Wristband 2
- Strenx by Gymwatch
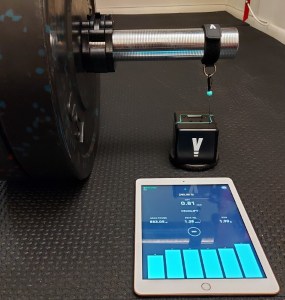
I own the Beast Sensor. However, I haven’t used it since upgrading to the more accurate VITRUVE VBT device, which is a linear position transducer (LPT) that uses an encoder.
That said, I did enjoy using the Beast Sensor and it is/was one of the better accelerometer-based VBT devices. You can read about it in my Beast Sensor review. However, one of the downsides is that you have to do a fair amount of editing reps after each set (i.e. deleting “ghost reps”). More importantly, the velocity and movement data just aren’t nearly as accurate on accelerometer-based VBT devices compared to LPTs that use encoders.

With the Beast Sensor, you do get the benefit of the device being wireless and not needing to tether a cord to the barbell. But the accuracy is the most important factor when it comes to doing VBT effectively. That’s why I now recommend anyone getting into VBT to get an LPT like VITRUVE.
Who Should (or Shouldn’t) Use Velocity Based Training?
Before we take a look at who can benefit from using velocity based training, let me first explain for whom velocity based training is not. Velocity based training is NOT for you if:

- You don’t like to track and evaluate your lifts and base your workouts on that
- You are a beginner. If you’re new to the gym, you’re better off nailing the basics first like proper exercise technique, getting enough sleep, and following a good diet plan. Velocity based training can not replace the basics. So if you don’t have those in place yet, it is better to nail them first
- You’re easily frustrated and don’t want to invest a few sessions in learning the proper usage of the device.
That said, velocity based training IS for you if:

- You already have the basics nailed and are looking for an edge to reach your fitness goals
- You want to track your workout progress with the aid of a tracking device and base your workout decisions on this highly valuable training information
- You want a more reliable way to determine the amounts of weight to use
- You are a performance athlete (or serious recreational lifter) whose primary focus is improving your athletic ability (like power and strength). Velocity based training allows you to precisely measure the speed at which you perform your power and explosive exercises.
Practical Guidelines for Velocity-Based Training
Here are some basic guidelines and principles to get a better grasp of how VBT works in practice:

- Get used to using your VBT device before you worry about choosing your specific program strategy and structure. Find the best way to attach it to the weight or yourself for different exercises. Play around with the different settings in the app. Train the different traits by testing out all the different training modes for a range of exercises. Find what the kinks are — all devices have some. Learn how to avoid these kinks beforehand (e.g. for the Beast, don’t let the bar bounce when unracking the bar for squats) or how to fix them after the fact (e.g. for the Beast, check the app after each set; if it picked up any “ghost reps” from extra movement, delete them). Do all of this testing during each workout for about two weeks. You shouldn’t do it for every exercise or set. That would slow down your workouts too much. Do it enough to get past the initial learning curve. Your goal should be to develop an efficient “workflow” of moving from set to set and exercise to exercise, ensuring accurate recording of reps and inputting training data while minimizing the time spent managing the device and the app.
- Many exercises can be used to train any of the six traits. However, some exercises work better if not exclusively with certain traits. For example, Power Cleans or other Olympic-style lifts are best done with strength-speed, speed-strength and starting strength forces. Whereas, isolation exercises such as biceps curls generally make the most sense when done with the accelerative strength force.
- Regardless of which trait you’re training, always try to move the weight as fast as possible — while still maintaining good form and control of the weight. Of course, the actual bar velocity will be slower if you’re training for absolute strength vs. if you’re training for speed-strength. But the idea is to be explosive and move the bar as fast as possible (while maintaining control), regardless of weight.
- Try to do every rep at about the same speed. This won’t always happen, especially on some sets if you’re training max strength or circa max strength. But it is a good goal to strive for.
How To Implement Velocity-Based Training
First, Decide How Specific Your Strategy Will Be
Less Specific: Use General Velocity Guidelines
This refers to the velocity ranges for each trait, which I explained earlier and showed in the chart.
These are good guidelines. But they’re just that — guidelines. As I explained in the section directly above, the precise velocity range for a given trait will vary on the person and the exercise…
…Also, as explained above, you need to create a velocity profile in order to figure out these more accurate individualized velocity ranges are — That can be a bit of an undertaking, especially if you’re new to VBT.
As such, I recommend most people just rely on the general guidelines. At least when you’re first starting out with velocity based training.
More Specific: Create a Customized Velocity Profile
The velocities ranges I outlined earlier are really just general guidelines. Technically, the velocity ranges for each trait are at least slightly different for different people and for different exercises.
A velocity profile is your specific set of velocity ranges for the different traits on all relevant lifts. This ends up correlating to your %1RM for the given day for each lift.
It is so specific to you that you can basically think of it as your velocity “fingerprint.” It is also remarkably consistent over time. It may change somewhat over time — but not by a lot.
If you’ve been doing VBT with the general guidelines for several months and want to get that additional marginal benefit, then you can look into creating a velocity profile — you’ll also be better equipped to do this, since you’ll be much more experienced with the concepts behind VBT. Plus, you’ll have a general idea of how your ranges vary for different traits on different exercises.
Next, Determine the Scale & Scope to Which You’ll Use Velocity Based Training within Your Routine
Use VBT on All or Most Lifts
You can implement velocity based training into (almost) every exercise.
The main benefit of this is:
- You get all your workout data. Nothing is missed. Even if you don’t care about tracking velocity for some of the exercises, you still get data like total tonnage. Total tonnage is a great metric for seeing progress over time. However, if you don’t track all the exercises, your tonnage data won’t be accurate.
However, it might be impractical to use:
- if you train with very short rest periods between sets
- on training methods in which you move between various exercises like circuit training and superset
- on isolation exercises (you can use VBT on isolation exercises, but it can be impractical)
Use VBT on Main Lifts
I primarily use it on my main lifts — the ones I focus on improving. Tracking my speed on those lifts gives me highly valuable information about my progress on a workout-to-workout basis.
The main benefit for me of using VBT only on my main lifts (and not on my accessory lifts) is that
- I can finish my workouts with fewer interruptions. This means faster workouts with greater mental focus throughout.
- I am able to put in a disproportionately small amount of time and effort in managing the device and app because I use it for only a few key exercises. This gives me a disproportionately large benefit — almost as good as if I tracked all exercises, but without the additional time/effort. Think of the 80/20 rule (i.e. Pareto Principle).
The downside, however, is that:
- I have no real-time feedback to base the weight selection on during my accessory lifts. And I will have less total data to track my workouts.
Use VBT Periodically (Every X Weeks)
Another way to implement VBT is by using it periodically to test your progress on specific lifts. While it is less accurate than using VBT every workout, it still gives you feedback on how you’re doing.
For example, you might test your velocity changes every four weeks on a 225lb squat. You can use this information to base your next workout block on.
This really isn’t velocity based training as much as it’s using velocity to track progress. Still, it’s a useful way to implement velocity tracking devices if you don’t want to commit to using one every workout.
Use VBT on Warm Ups to Predict Performance on Work Sets
You can actually use velocity tracking on your warm up lifts to predict your work sets or even your 1RM for the day. Some people actually use this in powerlifting meets to pick the right weight for each attempt. This way, you avoid missing lifts and maximize your top lift.
…However, there is a catch: This requires already having a velocity profile. So, if you compete, then you’ll probably want to eventually create a velocity profile so you can get this major edge.
Lastly, Designate a Trait for Each Exercise in Your Program
This relates to how you set up your program to work in the context of velocity based training.
And it can be done within the context of a new program or your current one. If you’re newer to VBT and decided to take this approach, then just retrofit your current routine to this.
It’s the same basic idea as if you were setting up a percentage based or RPE based program. For example, look at how we’d set up the programming for a strength-oriented exercise within a percentage based or RPE based program:
- With percentage based training, you would give a higher %1RM with lower reps per set (e.g. 4×4 @ 85% 1RM)
- With percentage based training, you would give strength-oriented exercises a higher RPE rating with lower reps per set (e.g. 4×4 @ RPE 8)
Now, let’s apply this to velocity based training. To help with this, we’ll refer to our handy-dandy VBT trait guidelines chart:
| Trait | Mean Velocity | Approx % 1RM | Approx Rep Range |
|---|---|---|---|
| Absolute strength | <0.35 m/s | 90-100% | 1-2 |
| Circa max strength | 0.35 – 0.5 m/s | 80-90% | 2-4 |
| Accelerative strength (hypertrophy) | 0.5 – 0.75 m/s | 65-80% | 5-15 |
| Strength-speed | 0.75 – 1 m/s | 45-65% | 3-8 |
| Speed-strength | 1 – 1.3 m/s | 25-45% | 3-8 |
| Starting strength | >1.3 m/s | >25% | 3-8 |
Okay, so let’s continue using the example above — you’re applying VBT for an exercise you want to use for strength purposes (we were using 4×4 above):
- With velocity based training, you would follow the guidelines for circa max strength and aim for a weight that you can lift at a mean velocity of 0.35 – 0.5 m/s for 4 sets of 4 reps.
Now let’s say you want to train power — or more precisely, strength-speed — for the next exercise in the workout. In that case:
- You would follow guidelines for strength-speed and aim for a weight that you can lift at a mean velocity of 0.75 – 1.0 m/s for, let’s say 4 sets of 6 reps.
And I’ll give just one more example. Let’s say you want to use the next exercise primarily as a muscle building movement. In this case:
- You would follow guidelines for accelerative strength (hypertrophy) and aim for a weight that you can lift at a mean velocity of 0.5 – 0.75 m/s for, let’s say 4 sets of 10 reps.
Hopefully you get the idea from the above examples, but here’s my recap anyway:
- Assign a trait to each exercise depending on your training objective/goal for each exercise.
- Use the mean velocity range that corresponds to the trait as your target for that exercise.
- Use a target rep range that falls within (or near) the approx. rep range shown in the table above.
- Choose a number of sets that makes sense within the context of the rest of your workout — also consider the trait (e.g. lighter loads generally mean more sets and vice versa).
Alternative: Use the Same Weight Every Workout and Try to Increase Velocity Over Time Until You Reach a Goal
I wanted to mention one programming strategy that utilizes velocity tracking, but isn’t velocity based training per se, because you’re not using velocity to determine the optimal load for each set in real time.
It’s a simple strategy: You have a weight/set/rep scheme for each lift that you choose at the beginning of your program. You test it to get a baseline mean velocity. You pick a goal velocity. Then, you track it each week with the goal of trying to increase the mean velocity of that weight. Again, you don’t increase weight, sets or reps to achieve progress — you just lift faster. Once you hit your goal mean velocity, you can increase the weight or volume.
I like this approach if you’re looking for a less involved — almost passive — way to effectively use velocity tracking in your training.
Conclusion (and a Gift for You)
The fitness industry has undergone a lot of changes over the last several years. And to be honest, I’m not too big of a fan of many of them. But velocity based training is an exception. And with the aid of velocity based training devices like VITRUVE, VBT is accessible to the average lifting enthusiast.
If you liked this post and want to start doing velocity based training, then I’ve got a gift for you: a 10% discount on a purchase of the VITRUVE VBT device. All you have to do is enter the coupon code KING for 10% off at checkout. Here’s the VITRUVE product page.
If you have any questions about velocity based training, let me know in the comment section below and I’ll personally help you out.
And if you think your gym buddies might be interested in velocity based training as well, do them a favor by sharing this article!
References:
1. Researched Applications of Velocity Based Strength Training (↑)
2. The Autoregulation Book of Methods (↑)
3. The effect of inter-set rest intervals on resistance exercise-induced muscle hypertrophy. (↑)
4. Flexible nonlinear periodization in a beginner college weight training class. (↑)

Thanks for a great article. It would be very interesting to see an actual program with exercises, reps and velocities.
Thanks, Lars! I’m actually planning on adding a VBT program template to this page in the relatively near future. Be sure you’re signed up to my newsletter list to get a notification for when I do this.
For VBT, are the defined zones same for all resistance based exercises or different for different exercises? If they’re different, how can I find information on that?
Hi Bruce,
Sorry for the delay in responding. The defined velocity zones I use in this article are just a basic starting point. However, in reality, the actual zones for the different training qualities will vary in BOTH of the following ways:
So the zones for your bench press would probably be different than for your squat. And the zones for your squat would likely differ from my squat. So there’s a lot of room for variation, but the zones above give you a place to start–you can make plenty of progress using just these guidelines, and then over time, tailor the zones as you see fit based on your performance.
For a more efficient, accurate and mathematical approach to figuring out your velocity zones for different exercises, you’ll want to look into creating Load-Velocity Profiles for the different exercises. I may create a post on this in the future, but here’s some resources you can look at now:
If you can take the time to understand all of this info and if you have a decent understanding of math/spreadsheets, you’ll be well on your way to using VBT with even greater efficacy. Enjoy!