In this Ironmaster Super Bench Pro review, I’ll explain why this is one of the best adjustable benches for the money. I’ll tell you everything you need to know to decide if it’s is right choice for your home gym.
The Ironmaster Super Bench Pro comes from the makers of the Quick-Lock Dumbbells, which are undoubtedly one the best adjustable dumbbell sets on the market.
I want to clarify that this review is for the Ironmaster Super Bench PRO. This is the latest and greatest version of the original Ironmaster Super Bench, which has been one of the most popular adjustable benches on the market for years.
The Super Bench Pro came out in December 2018. It is similar to the original Super Bench in terms of basic function and design. However, there are some MAJOR positive changes in this redesign, which addressed the most common criticisms customers had about the original.
In this Ironmaster Super Bench Pro review, I’ll discuss the differences between the original Super Bench vs the Super Bench Pro, all of the bench’s specs and features, its unique design, and alternative benches to consider.
Before I start, I’ll include a summary of my Ironmaster Super Bench Pro review for anyone looking to make a quick decision on buying this bench:
| Model | Pros & Cons | Rating |
|---|---|---|
Pros:
| Rated 4.6 out of 5 in Adjustable Benches |
Table of Contents
Key Specs & Features
Below, I’ll list out the key specs and features of the Ironmaster Super Bench Pro. I’ll keep it brief here and expand in later sections:
- Flat/Incline/Decline (FID) adjustable weight bench
- 1000 lb weight capacity rating in flat position; 600 lb capacity in incline and decline positions.
- 3” x 3” 11 gauge and 2” x 3” 12 gauge steel frame (with thicker steel in key places)
- Unique pop-pin arc adjustment mechanism
- Removable seat pad has two height options and is always perpendicular to the back pad
- 11 back pad adjustment settings from 0 to 85 degrees
- 10.5” wide back pad
- 17.2” tall in flat position
- No gap on flat or decline positions (because the seat is removed, leaving just the back pad)
- 44” total pad length in all positions
- 20.75” x 47” footprint
- Weighs 68 lbs with seat on; 64 lbs without seat
- Wheels for easy transport; no lift handle
Check Current Price – Ironmaster Super Bench Pro »
Design & Function
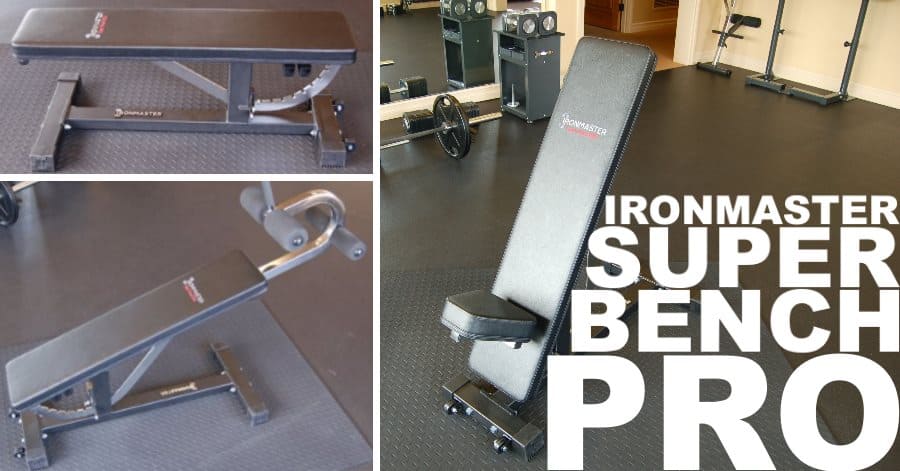
The Ironmaster Super Bench Pro has a unique and innovative design. Since it’s so different than most other adjustable benches on the market, it deserves its own section describing how it works:
The entire length of the bench is made up of the just the back pad. The seat does not factor into the bench length like on all other adjustable bench designs.
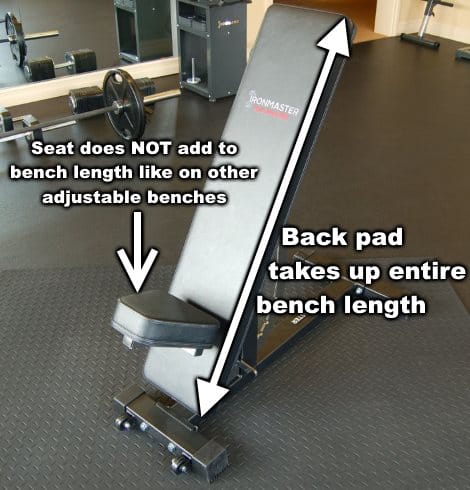
There is a unique adjustment arc mechanism that attaches to the bench/back pad at two different points; all other benches with adjustment arcs attach at one point.

There is a large support column under the back pad. This column connects the back pad to the frame and acts as the pivot point when adjusting the angle. So, when adjusting to any incline setting, the front end of the bench always dips below the height of the bench in the flat position (17.2”).
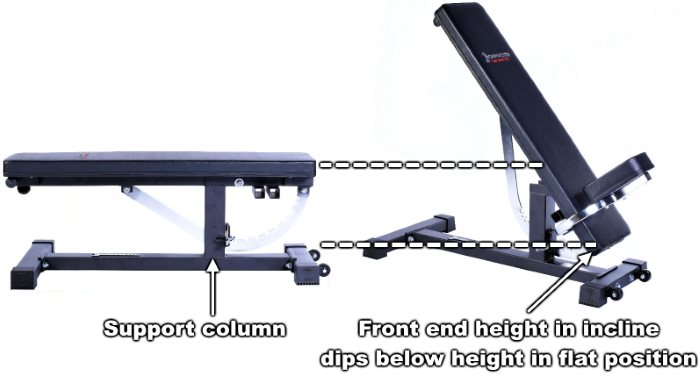
The above-described design is what allows the Ironmaster bench to have no gap between the seat and the back pad in the flat or decline position. There’s no gap because it’s only the backrest at these angles; no seat.
There is of course a seat, but it’s detachable. You take it off for flat and decline exercises.
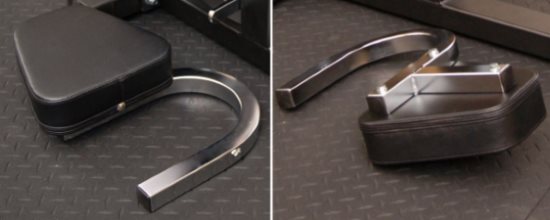
It inserts into one of two steel tubes on the back of the back pad. The reason for two tubes is to give you two different height options for the seat.
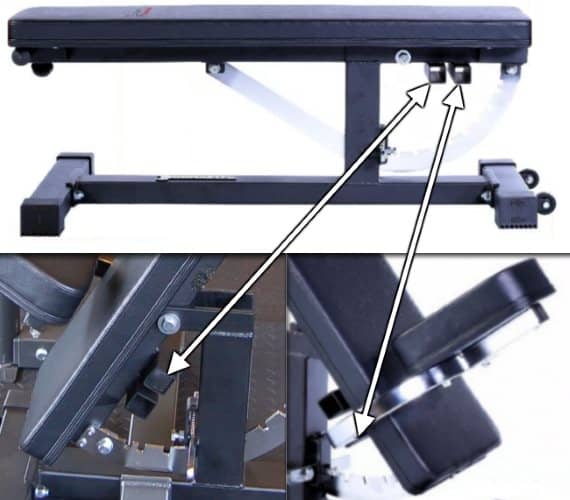
Decline positions are achieved by removing the detachable seat and lying on the bench in reverse, such that you use the incline positions for decline. However, this does require buying the optional decline leg holder attachment.
Ironmaster Super Bench Pro vs Original Super Bench
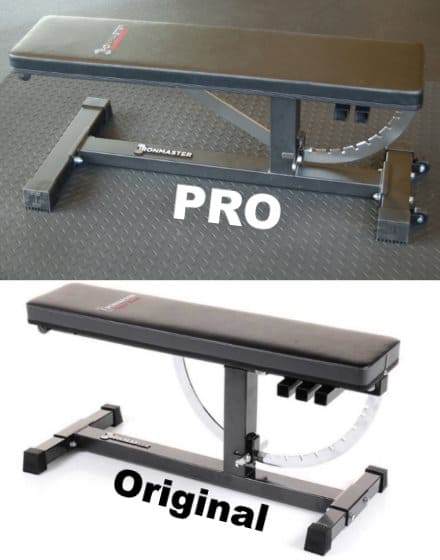
As mentioned earlier, the main changes in the Super Bench Pro were made to address the common complaints customers had about the original Super Bench.
Here are the main differences between the Pro and the original:
- The Pro is at a better (i.e. lower) height of 17.2″ in the flat position, which is within IPF specs. The original is 20” high, which left many users unable to fully plant their feet on the floor for exercises in the flat position.
- The Pro has a swoosh-shaped adjustment arc, whereas the original has a half-circle shaped arc. The swoosh design allows the bench to be shorter while still providing enough support under the back pad.
- The pro comes standard with a pair of wheels. You have to pay $30 extra for the wheels on the original.
- The pro has better stability thanks to a wider footprint with larger steel tubing for the feet.
- The pro was built with a corner tightening knob to fine tune the fit of the attachments on the bench. You can now achieve a tighter and more secure fit.
- The Pro has an upgraded pad with higher density foam. The original received a lot of complaints about the padding being too soft and not supportive enough.
Back Pad
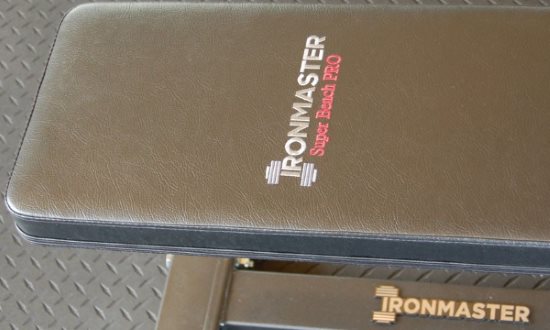
The back pad upholstery cover is the typical vinyl you’ll find on most adjustable benches. It has a basic superficial texture that you can see in the image below. This is better than a completely smooth vinyl in terms of preventing your back from slipping from sweat.
If I had a magic wand, a grippy vinyl texture would be awesome. However, that’s something you only see on some flat benches. Currently, the Vulcan Prime is the only adjustable bench on the market with grippy vinyl; and it’s a flat to incline bench (i.e. not FID). Since this is such a rare feature in this segment of the bench market, it would be unfair to knock the Super Bench Pro for not having it. Still, I can dream! 😀
The back pad is 10.5″ wide. If you’re used to the benches typically found in big box gyms, you’ll be perfectly content with this. In my experience, the typical bench width in commercial gyms is around 10″.
Personally, I wish the width was closer to 12″ wide. For flat barbell bench in particular, this width provides more shoulder support and stability. It’s also within the IPF’s equipment specs of 11.5″ – 12.5″ pad width for competition benches; which is important for anyone who competes.
That said, I understand that some lifters prefer narrower pads, especially on dumbbell and/or incline work. And other lifters wouldn’t have a major preference either way.
The back pad length is 44″. This is the same length as the total pad length in every position. This is because the seat length does not increase the total pad length like it would on any other adjustable bench design.
The 44″ back pad length is long enough for anyone but the tallest of lifters to comfortably bench on. It’s shorter than IPF specs (48″+), but that’s not something that would affect your training even if you were competing. Once you position yourself on a bench, under the bar, your body can’t tell whether the bench is 44″ or 48″ plus. You’re not even using the entire length anyway.
Having a relatively short bench can actually be desirable if you’re training in a small area. A shorter bench means more room to move or position the bench where you need it, and more room to use and store other equipment.
The pad is 2.5″ thick. In terms of the padding material used inside, it is significantly denser than the original Super Bench. This was a deliberate change to address complaints of the pad being too soft and compressible on the original.
The Pro’s firmer padding will give your upper back plenty of support. There’s no chance of “bottoming out” into the baseboard of the pad, even if you’re bench pressing serious weight.
Seat
The seat has a tapered shape so you can comfortably hang your thighs off the edge even if you’re using a narrower stance. No need to straddle a wide seat.
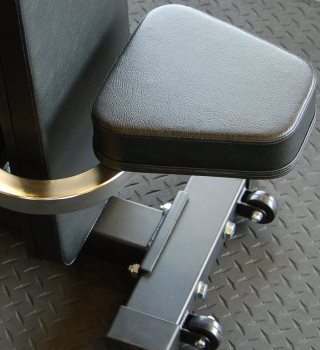
The seat angle is always perpendicular (90 degrees) to the back pad.
The seat’s angle relative to the back pad does not change. However, its angle relative to the floor DOES change based on the back pad angle.
When the back pad is at a high incline, the seat angle relative to the floor will be at a low incline. Your body position on high incline and upright presses requires only a minimal angle to keep you in place; not to mention, a high seat angle on a high incline press would be very uncomfortable.
Conversely, when the back pad is at a low incline, the seat angle relative to the floor will be at a high incline. This is exactly what you want because your body will want to slide on low to moderate incline presses if there’s nothing keeping you in place. The high angled seat in these positions will keep you firmly in place.
The only downside is that you can’t adjust the seat pad angle independent of back pad angle. For example, some people might wish to make the seat angle a bit less steep on low incline presses. But that’s not possible. At worst, this might mean being slightly uncomfortable at certain incline angles, but it won’t affect performance…
…However, many other adjustable benches have the opposite problem — except it actually can negatively impact performance. These other adjustable benches do have independently adjustable seats, but it’s very common that their maximum seat angle is much lower than you need to keep your butt in place on low to moderate angled presses. You end up having to use extra leg drive and core activation to keep from slowly sliding down. This will never be a problem on the Ironmaster Super Bench Pro.
As mentioned earlier, the seat is detachable. It’s meant for incline exercises only. You remove it for flat bench or decline use.
When attaching the seat to the bench, you can put it into one of two height settings so that your butt is closer to or further from the floor.
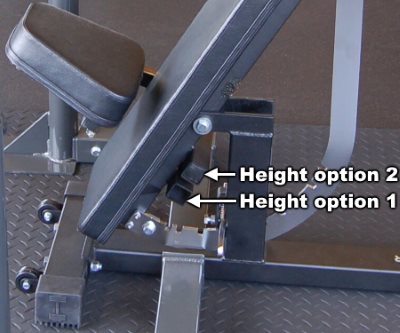
In the upright position, these seat height options translate to 12.5″ or 14.5″ off the floor. The main critique some lifters have with this is that even the highest setting is too low in the upright position. If you’re above average height, your knees will be a bit above your hip crease. You can still perform exercises like this, but it’ll feel a little awkward and can reduce leg drive on seated shoulder press.
It would have been cool to have a third height option on the Pro like they have on the original Super Bench. However, it appears that a third option on the Pro would prevent the bench from adjusting to the highest incline settings. The highest seat setting on both the Pro and original appear to be at the same spot on the spine of the bench. The only reason you get a higher seat height on the original Super Bench is because its entire frame is so much taller (20″ vs 17.2″ on the Pro).
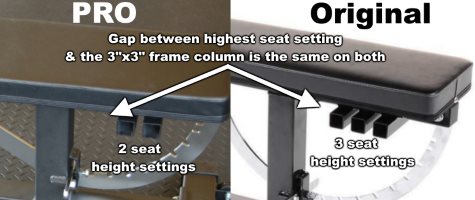
Ultimately, there’s a trade-off of an excessively low seat height in the upright position for a shorter (better) bench height in the flat position. But it’s totally worth it.
If you can only choose one — proper flat bench height with an excessively low seat on upright, OR excessively tall flat bench height with proper seat height on upright — then proper flat bench height/low seat wins every single time. Period.
Luckily, this is only an issue in the upright setting. The seat height increases as the bench incline angle decreases.
Frame
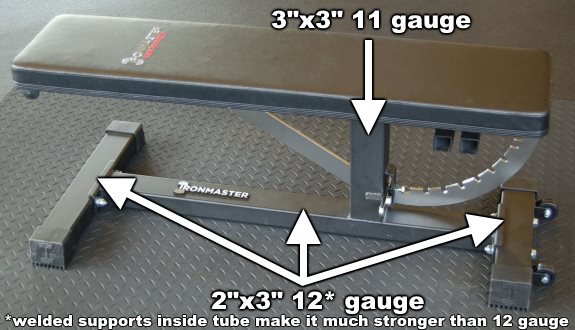
The frame uses 3″ x 3″ 11 gauge steel tubing in the most structurally important part of the bench i.e. the vertical frame column that connects to the back pad.
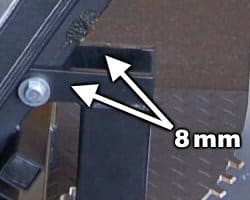
The pivot bolt plate at the top of the 3″ x 3″ column uses significantly thicker 8 mm (0 gauge) steel.
The rest of frame uses slightly smaller and thinner 2” x 3” 12 gauge steel tubing. BUT, it’s not regular old 12 gauge steel. There are actually welded supports inside the tube at the two bolt areas, which make the entire base of the frame much stronger than 12 gauge. This was a smart design hack: It provides all the strength needed, while keeping the weight of the bench — and therefore its price — lower.
This frame is slightly beefier than the original Super Bench. Specifically, both the front and rear feet are 2″ x 3″ on the Pro vs just 2″ x 2″ on the original. This of course means the frame is slightly stronger. Beyond that, it’s also more stable because of the larger areas of contact in the front and rear.
This is in addition to the Pro’s frame footprint being larger in both length and width compared to the original (47″ L x 20.75″ W vs 44″ L x 18.75″ W), which I mentioned in the earlier section on “Stability.”
The spine — or the part of the frame connected to the back pad — is made of approximately 2″ x 2″ (50.2 mm x 50.2 mm to be exact) 12 gauge steel.

The spine also has reinforced backer plates welded to the spine at the top and bottom of the back pad (top one is visible in the photo above). Four bolts go through each backer plate to secure the back pad to spine.
These backer plates add significant strength to the spine, and they provide the wide base needed to ensure back pad doesn’t wobble on the spine.
Check Current Price – Ironmaster Super Bench Pro »
Weight Capacity Rating
The Ironmaster Super Bench Pro has two weight capacity ratings:
- 1000 lb weight capacity rating on the flat position
- 600 lb capacity on incline (and decline, sort of…I’ll explain about decline in a bit)
Why the difference?
First off, the bench is strongest in the flat position. More specifically, it is strongest when you’re laying on the flat bench with your legs on the logo-end of the bench and your head on the opposite end.
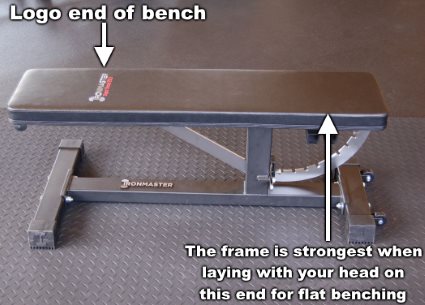
This puts the weight of the bar and your body directly over the large 3″ x 3″ vertical frame column. Also, the spine of the bench is laying flat against the top of this vertical frame column, providing more support than if the bench was angled.
NOTE: You can lay on the flat bench in the opposite direction (i.e. head on the logo-end of the bench). It will be slightly less strong than if your legs were on the logo-end. Practically speaking, though, it doesn’t matter which end you flat bench on unless you’re a large, world-class bench presser…
…However, I do recommend laying with your legs on the logo-end of the bench simply because you’ll have a better foot position. First off, there are no wheels to get in your way (assuming you install the wheels on the non-logo end of the bench, as shown above). Second, the frame post on the logo-end is tucked further under the back pad than the post on the opposite end, meaning it’s less likely to interfere with your foot placement.
The primary reason the bench is rated 600 lbs for incline is because a lot of leverage can be applied to the end of the removable seat.
A secondary reason for the lower capacity on incline is that you can’t lay on the bench in the direction I described above (legs on logo-end). Rather, you necessarily have to lay in the opposite direction (head on logo-end) because of where the seat attaches. When you’re laying in this direction, there is no support column directly under your torso and the bar. It’s further away — under your lower back — and thus, the frame is slightly weaker because of the different leverages.
Why the lower 600 lb capacity on decline, then? You’d think it would be higher since you’re laying on the bench with your legs on the logo-end so the 3″ x 3″ vertical column will be directly under your center of mass. Plus, there’s no seat, which is the main weak point on incline.
Well, you’re right. The bench is stronger in decline than incline, in reality. However, for simplicity’s sake and to err on the conservative side, it’s lumped in with the 600 lb capacity.
So although the bench in decline is somewhat stronger than on incline, it still going to be weaker than the 1000 lb capacity in the flat position. This is because the spine of the bench won’t be laying flat atop the 3″ x 3″ column; it misses out the support gained from passively laying across a large surface area. Rather, the spine will be pivoted at an angle with more weight supported by a large bolt on the column.
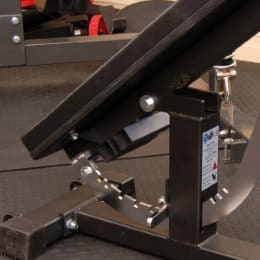
In reality, the capacity on decline is somewhere between 600 and 1000 lbs. Where exactly? I have no idea. Maybe 750 lbs on the lower decline settings if I had to toss out an uneducated guess (less as the decline gets steeper). It could be more, it could be less. Officially, though, it’s listed as 600 lbs.
To recap, the vast majority of lifters won’t have to worry about reaching the max capacity in ANY position. Even if you’re a very strong presser, flat bench won’t be a problem, and decline will probably be okay, too. The main potential issue for advanced/elite level pressers could be the capacity on incline settings…
…If you’re strong and/or heavy enough, you could max out the 600 lb incline limit. For example, a 250 lb guy incline pressing 350 lbs would put the bench at its limit. While such a feat is impressive and quite rare in the real world, it’s not unheard of. So if you’re already a big guy and a strong presser, you may want to consider a beefier adjustable bench like the Rep AB-5000.
For just about every other home gym lifter, though, a 600 lb capacity on incline is more than sufficient
And, just to throw it out there, it’s likely that the true capacity on lower incline angles is higher 600 lbs because you put less force put on the seat at low angles. Assuming this is true, you’d have to be even stronger to hit the 600 lb capacity on moderate to high incline presses, because the higher the angle, the less you can press. These are all just my thoughts — To be safe, it’s best to consider 600 lbs as the max capacity for all incline (and decline) angles.
Stability
Possibly the #1 most commonly praised attribute of the Super Bench (original and Pro) is its stability. Seriously, it comes up very frequently when looking at feedback from other customers, and it’s a point they stress.
This bench is solid in all positions. This is impressive, especially when you consider its minimal frame and high number of angle settings.
To be clear — when I’m talking about stability, I mean that the frame is stable against the floor AND the back pad is stable against the frame.
Rock solid stability is one thing you never get from cheap, low-end benches. And even some expensive higher-end commercial quality benches leave something to be desired. The Super Bench Pro is in-between these two price ranges, but you get all the stability you need.
Like I said above, BOTH the Super Bench Pro and the original Super Bench are stable benches. However, the Pro is actually more stable than the original for two reasons:
- It has a longer and wider footprint of 47″ L x 20.75″ W compared to 44″ L x 18.75″ W on the original. This also includes bench feet that are 50% wider (2″ x 3″ vs 2″ x 2″ tubing). All of this gives it a larger and more robust base.
- It is ~3″ shorter (17.2″ vs 20″). This gives it a lower center of gravity, and by extension, greater stability.
The Pro’s larger footprint compared to the original makes the biggest difference in terms of stability, particularly when it comes to using attachments. Any slight wobbling you might experience using the dip, chin up or other attachments on the original Super Bench will be greatly reduced or eliminated on the Super Bench Pro thanks in large part to its bigger base and wider feet.
11 Back Pad Adjustment Settings
The Super Bench Pro has an impressive total of 11 back pad angle settings, ranging from 0 to 85 degrees (0, 5,10, 20, 30, 40, 50, 60, 70, 80 and 85 degrees).
As noted earlier, the incline angles can be used as decline angles by laying on the bench in reverse and using the crunch sit up attachment to hold your legs. Practically speaking, you’ll be limited to -40 or -50 decline, since it gets increasingly difficult to get onto the bench at higher decline angles. Of course, there are very few reasons why anyone would want to use it at such steep declines, anyway.
The number and range of angles you can achieve on the Ironmaster Super Bench Pro is one of its most compelling features. It’s hard to find an adjustable bench with this many back pad angle options. I’ve seen one flat to incline bench with 12 settings (Vulcan Prime), but I haven’t seen any FID benches with more than 11 settings.
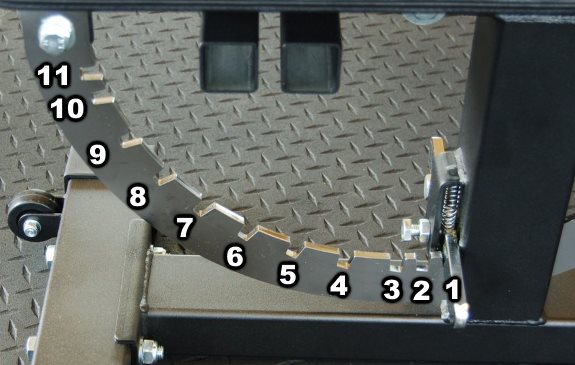
You’ll be able to find the perfect angle for any flat, incline or decline exercise you want to do.
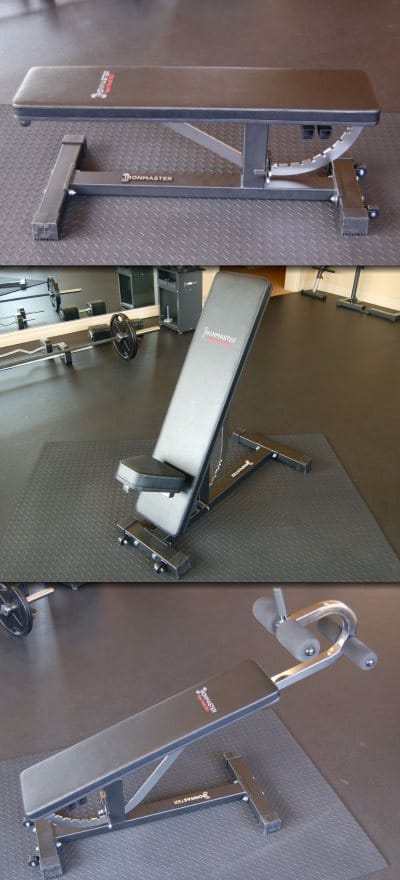
Check Current Price – Ironmaster Super Bench Pro »
Easy Adjustment
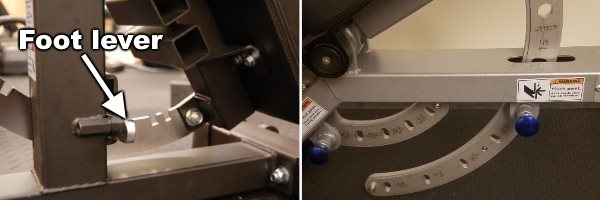
Adjusting the bench angle is super easy. It uses a foot lever instead of a pop-pin to adjust the adjustment arc. So you don’t even have to bend over to change the back pad angle.
Wheels & Rubber Feet
The Super Bench Pro has wheels so you can move it when you want to, and rubber feet so it doesn’t move when you don’t want it to.
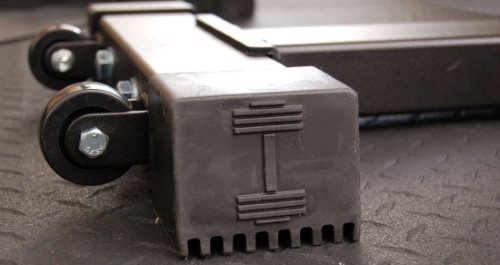
Wheels were an optional feature on the original Super Bench that cost an extra $30. Making them standard on the Pro was a very welcome choice. Nobody wants to deal with the nuisance of awkwardly moving a wheel-less bench around during the middle of an intense workout.
There’s nothing particularly standout about the wheels. They’re not overbuilt, but they’re not flimsy either. They’re regular bench wheels that work as intended.
One thing worth noting about the wheels, though, is that you can install them on either end of the bench.
NOTE: The Super Bench Pro does not have a lift handle. This is likely because the unique frame design doesn’t allow a handle to be put anywhere that makes sense. That said, you can easily lift the bench by the back pad since it’s a relatively light frame. Then, just push or pull the bench on the wheels to move it where needed.
The rubber foot pads wrap around the ends of both frame posts. So they don’t just protect the bottom of the frame post ends from the floor, but they also protect the top side from scuffs (e.g. scuffs from planting your feet on them while using on the bench, or a workout partner stepping on them while spotting you).
Other than protection from direct contact, these foot pads help keep the bench from accidentally shifting out of place during use. The rubber has natural anti-skid properties. The ribbed texture on the underside that you can see in the photo below also provides additional resistance against sliding.
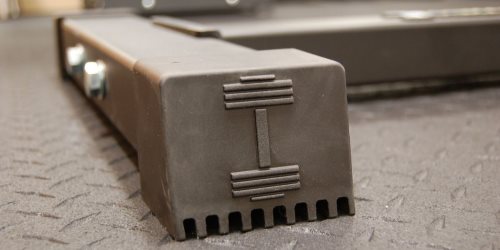
These rubber pads are load-bearing so they help more evenly distribute the weight through them. Also, if your gym floor is slightly uneven in places, these rubber pads will go a long way in reducing if not eliminating any wobbling compared to if it were just the metal feet on the floor. The pads can sort of mold into, or around, slight dips or bumps in the floor surface.
Last but not least, the pads have the super cool dumbbell icon from the Ironmaster logo embossed on the ends! A very nice touch.
Hidden Feature: Inversion Table!
The Super Bench Pro can double as an inversion table!
First off, this is not an advertised benefit and is not officially advised. But it’s one of the first things I thought of when looking at the bench design. And I’ve read customer reviews of others using it for this purpose.
It’s possible to use it this way because you can achieve high angles of decline with the entire bench being straight end to end (i.e. no seat forcing your head to bend).
So how exactly would you use it for inversion?
First, you’d need to have the optional decline/ab crunch attachment to use if for this purpose.
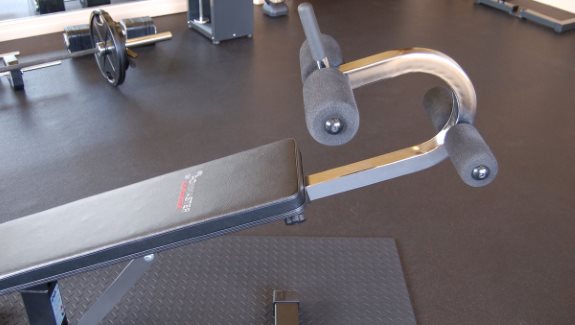
Then you position the bench at the desired decline angle and secure your legs in the decline attachment. Once positioned, allow your back to relax and stretch out. Hold the stretch for 1 to 5 minutes depending on your experience.
After finishing the stretch, do a sit up and grab hold of the handle on the decline/crunch attachment. Then carefully remove your legs from the rollers and dismount.
Higher decline settings give you more of an intense inversion effect. The caveat is that the higher the decline setting is, the harder it is to climb into the leg holder and secure yourself.
If you’re using it alone, there’s probably a limit to how much of a decline angle you can get into, since you essentially have to climb into the decline attachment. I found a video of a guy using the original Super Bench who was able to safely climb into and out of the 40 or 50 degree decline setting on his own:
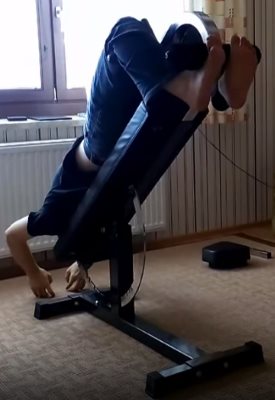
Decline positions higher than 40-50 degrees are likely possible if you have someone else there to help spot your body and give you a boost to get into at higher angle.
Or you can do what the guy does in the video below! (Not advised.)
In any case, 40 degrees is more than steep enough to get a good inversion effect — if you’ve ever tried it, you’ll know this. In fact, it’s recommended to start inversion stretching at just 20 degrees. Then, assuming you do enough sessions throughout the week, you can increase by 10 degrees per week.
If you plan on doing inversion therapy as a serious part of your training, it probably makes sense to get a dedicated inversion table since it’s easy to achieve higher angles safely, by yourself. But if you want to use it in a less regimented manner, then the Ironmaster Super Bench Pro is more than capable.
DISCLAIMER: Only do inversion training if you don’t have any relevant medical issues (e.g. blood pressure issues, heart conditions, glaucoma, retinal detachment, osteoporosis, back fractures or certain other back issues, among other conditions). As always, consult your doctor.
Light in Weight, but Not in Quality
The Super Bench Pro is lightweight at just 68 lbs (64 lbs without the seat) due to its unique design that eliminates the need for a traditional, bulkier frame. Also, it can get away with thinner gauge steel in certain parts of the frame since it’s meant for home gym/light commercial use. Whereas, if it were built for commercial use, it would need thicker gauge steel in these areas, which would add a lot more weight.
Its lightweight build makes moving it around your home gym a very low effort task; the included wheels help with this, too.
Storable
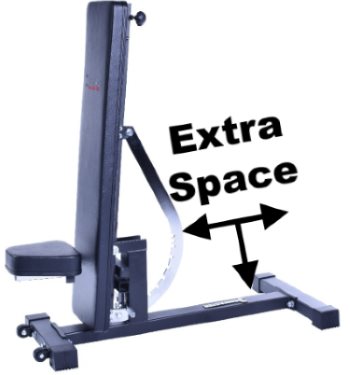
You can put the back pad in the upright position to save some extra space when not in use. The frame base will still be on the floor, but the back pad will be totally out of the way.
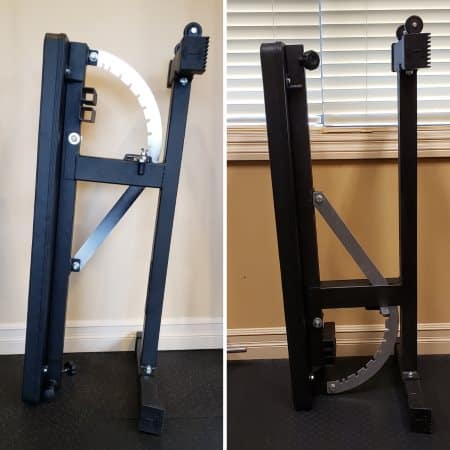
You can save even more space by putting the bench in the flat position and standing it on its end. The great thing about this is that it’s completely self-supporting. You don’t have to lean it against a wall. And it works regardless of which end you install the wheels on:
Warranty
The Super Bench Pro has a warranty that you’d expect for a well-crafted piece of equipment.
It covers the frame and structural components for 10 years and normal wear items (e.g. such as rubber, upholstered parts, surface finishes) for 1 year.
Check Current Price – Ironmaster Super Bench Pro »
Lots of Attachments Available
A whole suite of optional attachments is available to greatly expand the number of exercises you can do on it.
This is a big selling point for some people who want to save money and/or space by building upon a modular system; as opposed to buying separate pieces of equipment to achieve the same capabilities that will inevitably cost more and take up significantly more room in your home gym.
As I touched upon earlier, ALL attachments fit more securely in the Super Bench Pro than in the original Super Bench. This is thanks to the addition of the corner tightening knob. You turn the knob to create a tight fit between the attachment tube and the tube on the spine of the bench that it inserts into. This eliminates any play between the two tubes that would otherwise occur with just the pop-pin.
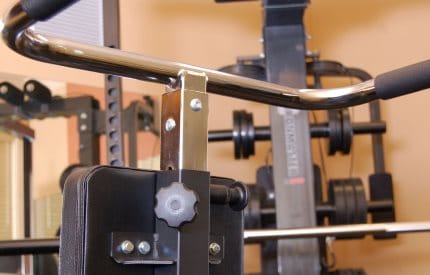
All attachments are made of approximately 1.75″ x 1.75″ (45 mm x 45 mm to be exact) steel tubing. They’re sized to fit flush inside the approximately 2″ x 2″ (50.2 mm x 50.2 mm to be exact) tube on the underside of the back pad. Most of the attachments use 13 gauge steel, though a few use thicker 12 gauge tubing.
The fleet of attachments currently available for the Ironmaster Super Bench Pro includes the following:
Decline/Crunch Sit Up Attachment
The Crunch Sit Up Attachment is the #1 attachment I’d recommend to anyone buying the Super Bench Pro.
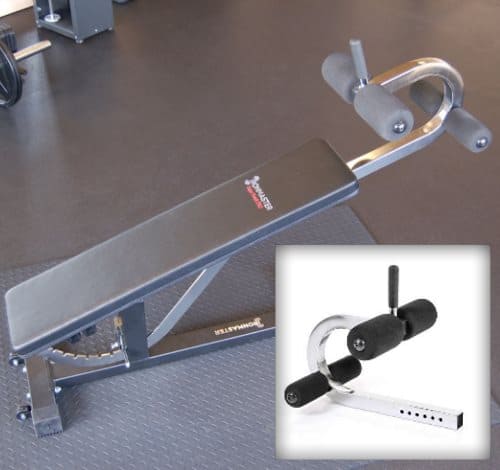
It allows you to access the decline positions of the bench, be that for ab work or decline pressing. After all, the Super Bench Pro is an FID bench, so you’ll want to be able to use the ‘D’ part of that.
Technically, you can decline press on the Super Bench Pro without this attachment, but only at very low decline angles. And even at low decline angles, I’d be more comfortable being locked in with a leg holder.
In terms of how it works, it inserts in the center tube of the frame at the end of the bench. It has five holes that allow you to install it closer to or further from the edge of the bench. This ensures that both taller and shorter lifters can find a comfortable position.
The knee holder part is positioned a bit higher so your knees are higher than the surface of the bench. This minimizes stress on the lower back while still keeping your legs locked in.
There’s also a “grab handle” between the knee holders, which makes it much easier to climb in and out of the leg holder when you’re at steeper decline angles.
The last notable benefit of the Crunch Sit Up Attachment is one that I mentioned earlier — It allows you to use the Super Bench Pro as an improvised inversion table!
Dip Bar Handle Attachment
The Dip Bar Handle is a very economical and practical attachment to buy for the Super Bench Pro.
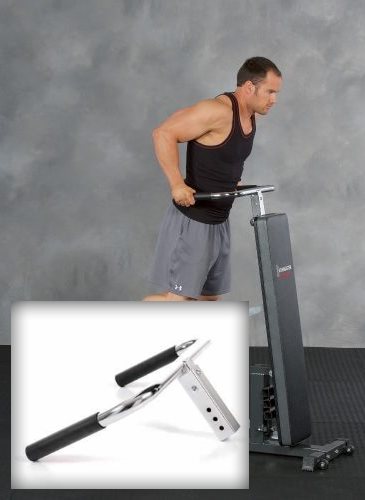
If you don’t have a squat/power rack with a dip bar option, then getting this is a no-brainer if you’re going with the Super Bench Pro. If you already have a dip option on your rack, then you can skip this one.
Although the Dip Bar Attachment is made for just one main exercise — dips — it is one of the most powerful exercises you can do for building your upper body (chest, triceps, front delts). I credit weighted dips for a lot of my chest gains in my first couple of years of training.
The bar has 1.5″ thick handles with a rubberized coating for better grip. This diameter is not too narrow and not too thick. It’s just right.
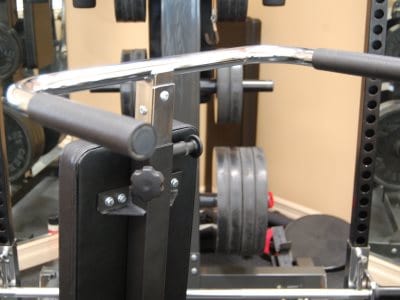
The handles are spaced 23″ apart. This is a good width for most people. Having handles that taper from narrow to wider would have been ideal. However, that would require longer handles, which would throw off the leverages of the unit, making it less stable.
In terms of performance, the Dip Bar Attachment functions very well. It’s very strong with a 350 lb weight capacity. This lets just about any lifter do dips, including weighted dips with a lot of extra weight added on.
Many owners of this piece praise it for its stability. Any wobbling is minimal and usually only occurs if doing rapid reps, in which case you could put a couple of plates on the front of the bench frame. If you’re doing dips at a normal tempo, you probably won’t notice any wobble at all.
There are three height settings, allowing you set the handles between 50″ to 52.5″ above the floor. Some people say that having a couple more height settings would be ideal so that the max height would be higher. The reasoning is that if you’re using a weighted dip belt, the weight plates will bump into the adjustment arc…
…However, that critique is from people who used the dip attachment with the original Super Bench, which has a larger adjustment arc. The Super Bench Pro has a more “tapered” adjustment arc that doesn’t stick out as much, which may negate this problem. Even if it doesn’t, you can make the chain on the dip belt shorter and use shorter 25 lb or 35 lb plates instead of 45s. People have had success doing that even with the original Super Bench.
One cool thing I found out about the dip attachment is that you can keep it installed on the Super Bench Pro even in the flat position. It will be about 1.5″ above the floor.
In other words, you can store the dip bar on the bench at all times, except if/when you put the bench into decline or want to install another attachment. This is a small convenience that can save a bit of extra space and effort.
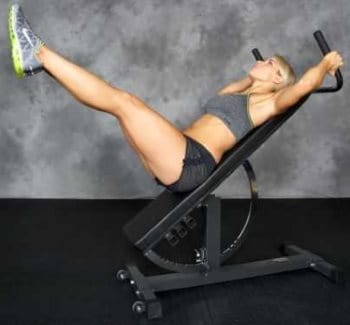
The final thing I want to mention is a surprise feature of the dip attachment: It doubles as a handle for doing knee/leg raises if you turn it upside down, as shown below:
Chin Up Bar Attachment
The Chin Up Bar Attachment is an excellent value if you don’t already have a chin up bar on your power rack, or elsewhere in your home gym.
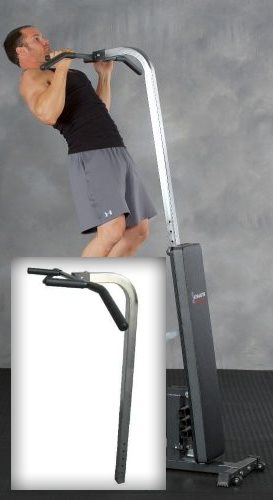
The Chin Up Attachment consists of:
- A four foot long chrome tube that curves at the top.
- A multi-grip chin up bar at the end of the curved part of the tube. The handles include:
- Parallel handles spaced 18″ apart; allows you to do hammer grip pull ups
- A curved chin up bar measuring 48″ from end to end; allows you to do wide grip, medium-width and close grip pull ups/chin ups.
- Neoprene rubber handle grips on the parallel handles and the curved bar.
- NOTE: There is no handle grip rubber on the innermost portion of the curved bar, so I recommend wrapping that part with athletic tape if you want to do narrow grip pull up work without worrying about grip slippage.
The handles are 1.25″ in diameter. This includes the neoprene covering. The part of the bar without the neoprene is closer to 1″ thick.
You install the attachment by inserting the tube into the spine of the bench. You lock it into place with the pop-pin in one of five available height settings, then tighten as needed with the corner knob. Each setting is spaced 2″ apart, giving you a minimum height of 81.5″ and a max height of 89.5″. Having this many settings in this height range makes it so pretty much anyone find an ideal height setting, whether you’re short or tall and have low or high ceilings.
INSTALLATION TIP: Insert the attachment when the bench is at a lower incline setting. Then raise the chin up bar into position by rotating the bench to its highest incline setting (upright). This is MUCH easier than starting with the bench upright.
When you see a long attachment like this that uses just a bench to support itself and your weight, your main worry is that it might be wobbly and unsafe…
…Luckily, that’s not the case. In fact, the most common feedback I’ve heard from owners of this attachment is that it’s very stable. Surprisingly stable, even. As long as you use good form, it will be solid. If you start cheating by using momentum, then it’ll rock a little bit, but you’ll still be okay. Just don’t use it for kipping pull ups. It’s not meant for that.
The weight capacity on this is 300 lbs, which will let all but the heaviest and strongest lifters out there do weighted pull ups with a good amount of weight.
If you have a squat or power rack already, that means you probably have a chin up bar already on that. However, if you don’t have a rack already, specifically due to lack of space, then this attachment is by far the best option if you want a chin up bar…
…The reason is that it takes up literally no extra floor space when in use. Whereas, the next best option — a power tower (aka VKR or Vertical Knee Raise rack) — takes up a significant amount of room and is more expensive.
Of course, there are also door frame chin up bars, which are cheaper. But even the best of those aren’t nearly as strong and can be dangerous.
There are wall-mount or ceiling mount chin up bars that are strong, stable and in the same price range as the Ironmaster Chin Up Attachment. However, the downside with those is that you have to bolt them into the wall or ceiling, which isn’t viable for many home gym lifters.
Preacher Curl Attachment
The Preacher Curl Attachment converts your bench into a dedicated preacher curl station. If you do bodybuilding-style training and love hitting biceps, you’ll definitely want to consider this attachment.
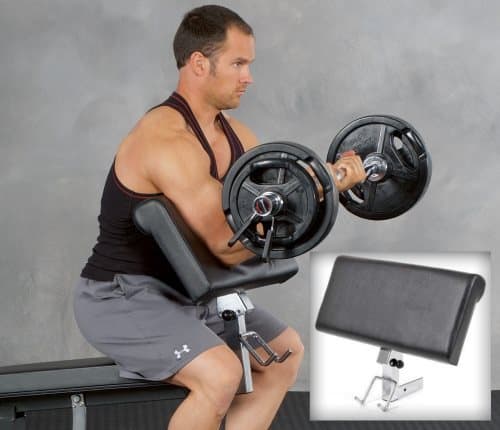
The Preacher Curl Attachment consists of these main components:
- A 24″ wide x 12″ high pad with 2″ thickness.
- An L-shaped steel tube that inserts into the spine of the Super Bench Pro.
- A robust steel base plate bolted to the back of the pad. A steel bracket is welded to the base plate. The bracket is then connected via a bolt and pin to the L-shaped tube. Together, this forms a small but strong and stable frame for the pad.
- See below for more about the pin and bracket
- A two-pronged steel hook below the pad, welded on the L-shaped tube. This is to hold the curl bar between sets.
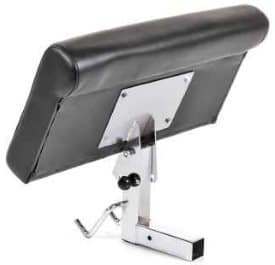
The Preacher Curl Attachment boasts the following key benefits:
- You can adjust the angle of the pad itself, which is something most preacher curl stations do not have. This is possible because there’s a single bolt securing the bracket to the L-shaped tube, allowing it to rotate forward or back. You lock the bracket in place at the desired angle by inserting the removable pin in one of the holes.
- You can even more precisely adjust the pad angle (indirectly) by changing the incline angle of the Super Bench Pro. This also gives you a way to adjust the pad up or down to the ideal position for your height.
- A thick pad that’s shaped for comfort and adequately sized to ensure proper arm positioning for all lifters.
- The pad itself is stable, and so is the entire setup when it’s installed on the bench.
While this attachment does well in most areas, it does have room for improvement. The common complaint is with the bar holder. While it is sufficient for holding the bar between sets, changing weight on it is tricky. The hooks are close together, so the bar will tip over if one side of the curl bar is weighted too much when adding or removing weights.
There are a few ways to prevent this:
- Add/remove plates to both sides at the same time
- Add/remove plates from one side at a time, while using one hand to stabilize the bar
- Simply put the bar on the floor to change weights, then put it back on the hooks
This is an annoyance, but shouldn’t necessarily be a deal-breaker since it doesn’t affect performance.
It’s the trade-off you get for having a compact attachment instead of a dedicated preacher curl station with a large frame and wide rack to hold the bar.
All that said, does it make sense to buy one for your Super Bench Pro? Ask yourself — Do you know that you want to do preacher curls? If you’re not sure, then you probably don’t need it.
If you do want to do preacher curls, then it’s just a matter of deciding if the $99 price is worth it for this attachment or if it’s better spent on an attachment that lets you do more than one exercise. That decision comes down to your budget and how you weigh your training goals.
Let’s say you’re dead-set on getting a preacher curl station in your home gym, but you’re still considering a dedicated preacher curl station vs the Preacher Curl Attachment for your Super Bench Pro…
…I’ll tell you why I think the Ironmaster preacher curl option is the smartest choice (assuming you’re also getting the Super Bench Pro):
- It’s way more space-efficient than a dedicated preacher curl station. It takes up zero floor space while in use. And it takes up only ~2 square feet of space in storage, which is nothing. You can store it anywhere: in a closet, on a shelf or rack, in a corner, under your bed, wherever. Whereas, a dedicated preacher curl station will take up about 3 feet of length and width, whether it’s in use or not.
- It’s better quality than dedicated preacher curl stations at or near its price ($99). There are many cheap preacher curl stations that cost slightly less or slightly more. To achieve such low prices, these cheap dedicated stations have to cut corners; specifically on the most important part: the pad! First off, the Ironmaster preacher curl pad is properly sized, meaning you won’t have to compromise on performance. Second, it has quality padding, upholstery cover and stitching. This makes it durable and comfortable. Whereas, the pads on the cheap dedicated preacher curl stations are often undersized or oddly shaped, which makes them less effective and uncomfortable. Their upholstery materials are also likely to degrade prematurely. Of course, there are quality preacher curl stations that are better than the Ironmaster attachment. But they cost much more and take up lots of space.
Hyper Core Attachment
The Hyper Core Attachment is an innovative add-on that gives you the functionality of a dedicated hyperextension machine at a fraction of the size and at a lower cost.
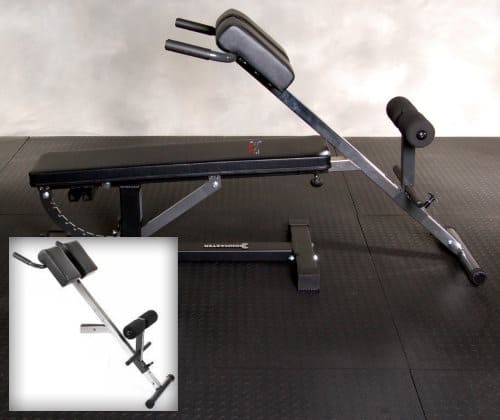
The Hyper Core Attachment is a must-have if core work is an important part of your training. It allows you to do all of the following exercises:
- Hyperextensions for lower back
- Back extensions for glutes
- Side crunches for obliques
- Roman chair sit ups for abs (by sitting the other way i.e. butt against pad)
- Reverse hyperextensions for glutes and hamstrings (by using it “upside-down” i.e. hands grasping on foot holders, legs over the bench)
The attachment has an adjustable leg holder that allows you to move it up or down to the proper position for your height and the exercise you’re doing.
All feedback I’ve seen from customers on this piece is stellar. The most common remark is that it is very stable. That’s exactly what you want when your torso is leaning forward over the floor while you’re elevated!
When you have a home gym, space is always at a premium. The only items you want to take up a lot of space are ones that are versatile.
While there are a few great accessory exercises you can do with a hyperextension, it’s not nearly as versatile as, say, an adjustable bench or power rack. As such, it wouldn’t be practical for many home gym owners to have a dedicated hyperextension machine, which takes up a decent amount of room.
However, the Hyper Core Attachment allows you to do these core exercises while taking up a minimal amount of space. It only adds 23″ to the length of the Super Bench Pro when installed. More importantly, you can easily remove it and store it upright against a wall or in a closet so that takes up relatively little space.
It’s worth noting that the angle of the Hyper Core when used with the Super Bench Pro will be 41 degrees. This is slightly less than the 45 degree angle achieved on the original Super Bench. The reason for the discrepancy is that the Super Bench Pro is a few inches shorter than the original. Practically speaking, the 4 degrees won’t make much of a difference, but you should know about it before buying.
The last thing to know about the Hyper Core Attachment is that you can also use it with the Cable Seat Attachment instead of the Super Bench Pro:
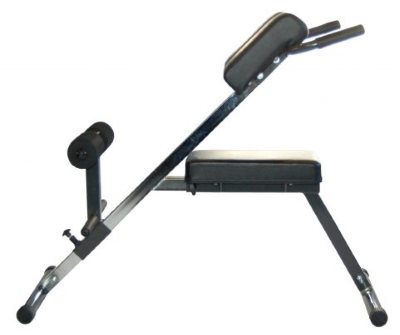
This seat attachment is something you might get if you do a lot of hyper work and wanted a standalone machine so you don’t have to install and uninstall from the bench every time.
If you do use the Hyper Core Attachment with the Cable Seat Attachment, you do get the full 45 degrees. So if you already have the Cable Seat Attachment for use with the Cable Tower Attachment, then it might be worth it to use the seat with the Hyper Core to get that slightly better angle.
However, I wouldn’t buy the Cable Seat Attachment for the Hyper Core specifically to get the extra 4 degrees. The price isn’t worth the marginal improvement. You’ll still get an excellent training effect at 41 degrees when installed on the Super Bench Pro.
Dumbbell Spotting Stand
The Dumbbell Spotting Stand includes a base that connects to the bench frame and two vertical posts with dumbbell “saddles” at the top that hold the dumbbells vertically.
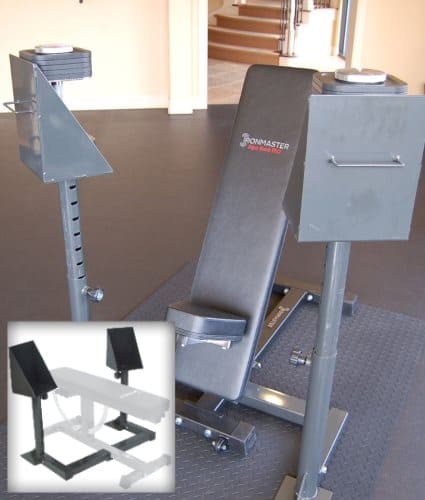
Having a dumbbell spotter stand like this makes it SO much easier and safer to rack and unrack the dumbbells, particularly on heavy pressing exercises.
If you’ve ever done dumbbell pressing exercises with extra heavy dumbbells, you understand just how difficult and potentially dangerous it can be to get the dumbbells from the floor to your knees and then up to your shoulders, just to be able to start the movement. It’s a shaky and energy-consuming process that ultimately detracts from your performance on the actual lift. Worst case, it could cause a rotator cuff injury if you lose control.
Similarly, putting the dumbbells down after your set can be challenging. If you lose control, you have to dump the dumbbells on the floor to avoid injury. But that can damage the dumbbells or the floor.
The dumbbell spotter stand is the perfect solution to these problems.
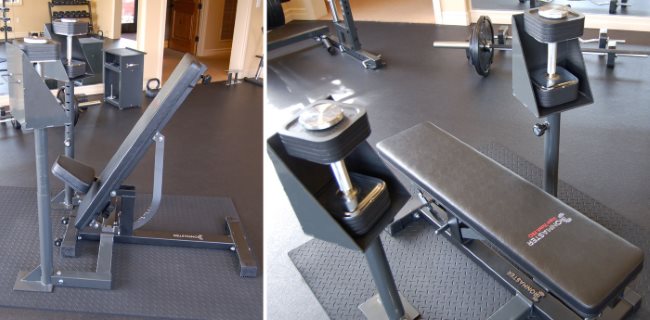
The saddles position the dumbbells so that you can get them to the starting position — at shoulder level — with minimal movement and effort. The stands are adjustable in height. You can move them higher for shoulder press, and lower for incline and flat dumbbell bench press.
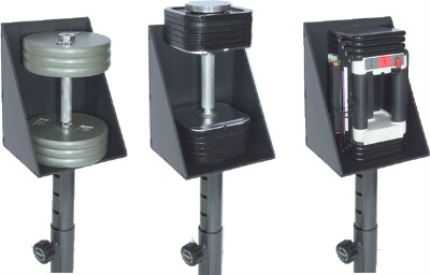
The Ironmaster dumbbell spotting stand was designed with the Ironmaster Quick-Lock adjustable dumbbells in mind. However, they’ll work for any dumbbells that can be balanced vertically:
Barbell Adapter for Spotting Stand
The Barbell Adapter lets you convert the spotting stand base (used for the dumbbell spotting stand) into a barbell spotting rack. It allows you to rack and unrack a barbell for any pressing exercises.
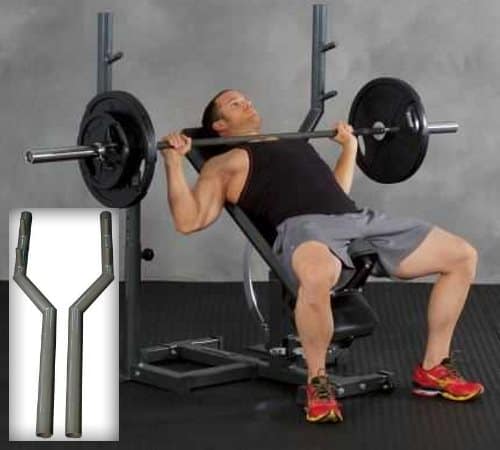
This is an awesome attachment to have if you don’t have any type of squat rack (i.e. power rack, half rack, squat stands) that you could use to press inside of. If you do have a squat rack you can press in, then it probably makes sense to skip on this particular attachment.
Note that the barbell adapter requires already having the spotting stand base. The spotting stand base is included in the Dumbbell Spotting Stand, or you can buy the Spotting Stand Base separately.
Cable Tower Attachment (NOT Compatible w/Pro)
Unfortunately, there is one cool attachment that works with the original Super Bench only: the Cable Tower Attachment. It isn’t compatible with the Pro bench because of the Pro’s shorter height.
HOWEVER, you can actually use the Cable Tower Attachment as a standalone unit if you also buy the Cable Tower Seat Attachment.
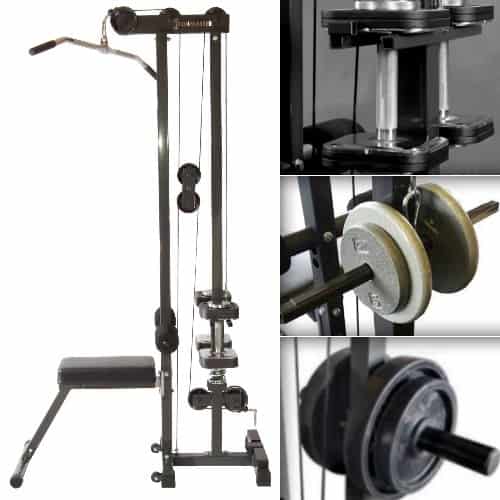
As you can see in the image above, you can load three different types of weights onto the weight carriage:
- Ironmaster dumbbells, and most other dumbbells for that matter
- Standard weights plate (~1″ hole diameter)
- Olympic weight plates (2″ hole diameter)
The ability to use both standard and Olympic plates is common for similar cable units. However, the inclusion of a weight holder that holds dumbbells is unique. If you already have the Ironmaster Quick-Lock adjustable dumbbells, this can be an attractive feature, especially if you’re trying to preserve space and utilize the same equipment for multiple purposes.
The Cable Tower Attachment has the high pulley on one side with the low pulley on the opposite side. This isn’t necessarily good or bad. It’s just notable since most other high/low cable systems have both pulleys on the same side.
Having the pulleys on opposite sides indirectly allows for a more minimal footprint. All other systems I’ve seen with both pulleys on the same side require the base of the frame to extend past the seat so that the low pulley is actually usable. That’s not a problem if space isn’t a big deal for you. But if you want a compact tower that’s easy to move and store out of the way, it is a big issue.
In terms of exercises you can do on this cable tower, it includes everything you can do from a low pulley or high pulley position (you can’t move the pulleys up or down to get mid pulley positions). This includes but is not limited to:
- Lat pulldown
- Floor-seated cable row
- High pulley row
- Triceps pushdown
- Biceps curl
- Low face pull
- High face pull
- Single arm lateral raise
- Upright rows
- Straight-arm shoulder raise
- And more…
In terms of price, it’s on the higher side at $429. Plus an extra $99 for the cable seat attachment. If it worked with the Super Bench Pro, it would make it a lot easier to justify. Currently, there are other standalone high/low cable options on the market for significantly less like the Valor Fitness CB-12.
That said, the Ironmaster Cable Tower is still a great choice if:
- Space efficiency is a priority for you: The tower itself has a tiny footprint. And you can easily detach it from the Cable Tower Seat. You can then move the tower out and the seat out of the way with ease. The tower is light and it even has wheels on it for easy mobility. You can move it completely out of the way into a small corner of the room when not in use. You can’t do this with any other system.
- You have the original Super Bench: If you already have the original Super Bench, then the cable tower makes a lot of sense.
- NOTE: Technically, you could buy the original Super Bench now and use it with the Cable Tower Attachment. I would NOT recommend that. The Super Bench Pro has other major benefits over the original Super Bench that outweigh the ability to connect to the Cable Tower.
Negatives
Below are the main cons of the Super Bench PRO compared to other adjustable benches. NOTE: I’ve already discussed most of these items earlier in this review, so this part is just a recap.
Narrower Back Pad
It has a relatively narrow back pad. It’s 10.5”, which is acceptable, but definitely below my ideal range for an adjustable bench: 11.5” – 12”. On the bright side, this 10.5” width is an improvement over the original Super Bench which was a half-inch narrower at just 10”.
Ultimately, this bench can still be an excellent choice even with the 10.5” width depending on how much you value its other positive features and how much you care about back pad width.
Lower Max Capacity (on Incline Settings Only)
As discussed earlier, the Super Bench Pro has a lower max weight capacity of 600 lbs on incline and decline settings. If you’re a 200+ lb guy who can incline press 300+ lbs (or any other combo approaching 550-600 lbs total), you’ll probably want to consider an alternative adjustable bench.
Low Seat in Upright Position
Even when using the higher of the two seat height settings, you’ll still feel a bit too low on the higher incline and upright positions. This is because the seat-end of the bench necessarily dips further below the 17.2” pivot point as the incline angle increase.
At the upright incline setting (85 degrees), the seat will sit at 12.5” or 14.5” above the floor, depending on the seat height setting. There’s no way around this flaw due to the design. While inconvenient, this shouldn’t be a deal-breaker.
Crunch Sit Up Attachment Sold Separately
In order to use the higher decline settings for ab work or decline chest work, you need the crunch sit up attachment. Almost everyone buying this bench probably wants this attachment to have access to these exercises.
Unfortunately, it does not come included in the base price of the Super Bench Pro. You have to buy it separately.
Luckily it’s one of the lower-priced attachments at $69. Assuming you do want it, you’ll have to remember this extra expense when you’re looking at the bench price in comparison to your budget.
Speaking of bench price, I’ll talk about that in the section below.
Price
At $369 with shipping included for the continental US, the Ironmaster Super Bench Pro is definitely among the best adjustable weight benches available for home gym lifters. It’s not the best overall, but its price plus some of its unique features and extensive accessory options will make it the best adjustable weight bench for many lifters.
Since there’s no gap on flat or decline, you don’t really need a second dedicated flat bench (unless you want one with a wider pad). So that’s even more value in the form of savings.
One last note about price — There are discounts if you bundle the Super Bench Pro with two or more attachments or other Ironmaster products such as their Quick-Lock adjustable dumbbells. Higher order totals give you a higher percentage discount. So if you’re planning on getting multiple attachments anyway, it might be a good idea to get them upfront if your budget allows, rather than buying them separately in the future.
Super Bench Pro Alternatives
You should consider alternative adjustable weight benches if:
- The 600 lb max capacity on incline settings is insufficient for you now or in the foreseeable future.
- The 10.5” back pad width is too narrow for your shoulders or your personal preferences based on using other benches.
Possible alternatives include:
Rep AB-5000
I recently bought the Rep AB-5000 and I can confidently say it’s the cream of the crop when it comes to FID adjustable weight benches.
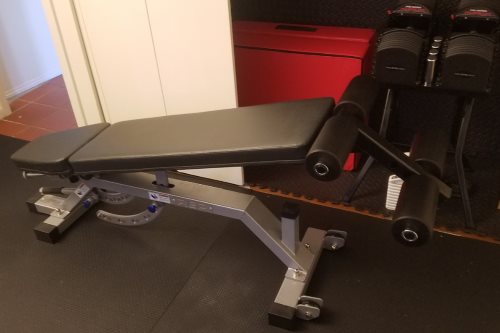
It matches or exceeds the Ironmaster bench in several key features:
- Has a wider back pad (12″) than the Super Bench Pro (10.5″)
- Has a stronger weight capacity (1000+ lbs in all positions) than the Super Bench Pro (1000 lbs on flat; 600 lbs on incline/decline)
- Has a zero gap experience on all positions (achieved via a sliding seat), whereas the Super Bench Pro has a zero gap experience on flat and decline, but not on incline
- Has a beefier decline/sit up attachment than the Super Bench Pro, with denser and more durable pads
- Both adjustable benches can eliminate the need to buy a dedicated flat utility bench since they both have no gap in the flat position
- Both adjustable benches have similar heights which are within IPF specs (AB-5000 is 17.5”; Super Bench Pro is 17.2”)
- Both adjustable benches have multiple decline positions achieved in a similar way i.e. by laying on the bench in reverse and using a decline leg holder attachment
So while the AB-5000 beats the Super Bench Pro overall, that doesn’t mean it’s right for everyone. Specifically, it falls short compared to the Super Bench Pro in a few ways that will make all the difference for many lifters:
- It’s significantly more expensive at $499 + $89 for the decline/sit up attachment + ~$80 S&H. That’s still a great value for what you get, but it’s still a major jump in price. If you compare pricing on both benches and their decline attachments, the AB-5000 is almost $250 more. Many lifters either don’t have the budget for that, or they value the savings on the Super Bench Pro more than the better specs/features on the AB-5000.
- It doesn’t have any attachments beyond a decline attachment. If you have a small workout space, you may greatly value the Super Bench Pro’s many attachments, which allow you to expand your exercise selection while maximizing space efficiency.
- It’s significantly longer than the Super Bench Pro by a full 12 inches (57″ vs 47″ in footprint length). This isn’t a negative in and of itself. But if you have a very limited space to begin with, it makes the Super Bench Pro more attractive.
Rep AB-3000 + Any Decent Flat Utility Bench
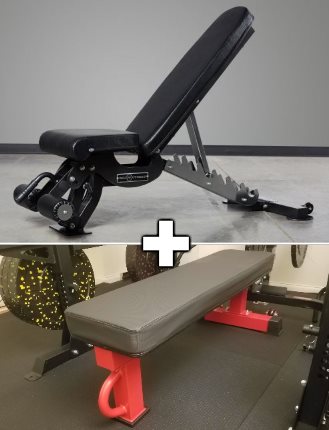
The Rep AB-3000 is a decent all-around FID bench. It does the basics very well.
In terms of how it excels over the Super Bench Pro, it does so in just a couple of key ways:
- It has 1000 lbs capacity in all positions
- The back pad width is a full inch wider at 11.5 inches.
Other than these two features, I like the Ironmaster Super Bench Pro much more. Of course, the only reason I’m bringing the AB-3000 up as an Ironmaster alternative is if the Ironmaster is insufficient for you in either of these ways…
…In which case, the AB-3000 is a possible replacement. However, I would strongly suggest also buying a dedicated flat bench to complement the AB-3000, since it has a 2” gap that will get in the way when doing flat bench press.
Luckily, the cost of both the AB-3000 and a good flat bench is comparable to the $369 price of the Ironmaster Super Bench Pro. The AB-3000 is very competitively priced at $249 + S&H and a good flat bench will run you anywhere from $90 to $200.
My top flat bench picks would be:
- Rep FB-5000: $149 + S&H. I own this one and it’s great — Read my Rep FB-5000 review if you’re thinking of buying it.
- Vulcan Prime 3×3 Flat Bench: $200 with free US shipping. I also own and am a fan of this bench — Read my Vulcan Prime 3×3 Competition Bench review for more details.
- Rep FB-3000 Flat Bench: $94 + S&H. This is an excellent value, but you do lose out on the grippy vinyl you get with my above two recommendations.
All in all, the combined price of the AB-3000 plus whichever flat bench you get, will be anywhere from $343 + S&H to $449 + S&H. This is still in the same ballpark as the Ironmaster Super Bench Pro, which is $369 shipped (or $438 shipped with the crunch sit up attachment).
Conclusion: Should You Buy the Ironmaster Super Bench Pro?
Overall, the Ironmaster Super Bench Pro is a solid, feature-filled bench in its own right. Even more so when coupled with its ability to be expanded with other attachments. And the price is attractive, too at $369 with free US shipping. Even if you add an extra $69 for the Crunch Sit Up Attachment, your total is $438 shipped.
You won’t find a higher quality and more feature-rich adjustable weight bench under $500, let alone under $400.
The Rep AB-5000 is better overall, but you have to pay significantly more — I paid a total of ~$670 for mine after all was said and done ($499 for the bench, $89 for the leg holder and $82 for shipping). It was worth it for me, but I understand that’s out of the budget for many lifters.
The Ironmaster Super Bench Pro is the lowest priced FID bench you can find that’s what I would consider high-end home gym/light commercial quality. There are cheaper benches out there, but you lose features and construction quality the further down in price you go.
Put differently, the Super Bench Pro is the best bang for your buck bench for most serious home gym lifters. This goes doubly if you’re in the market for a flat bench as well, since the Super Bench Pro’s no gap design in the flat position can replace the need for a separate flat bench.
Finally, the Super Bench Pro is the best adjustable bench for anyone with a small home gym space who’s trying to maximize the capabilities of their gym while taking up a minimal amount of space. Let me explain why:
- As I just mentioned, the Super Bench Pro doubles as an adjustable bench and a (gapless) flat bench.
- The bench itself is more compact than most other adjustable benches (44″ back pad length; 47″ footprint length).
- There’s a myriad of compatible bench attachments that greatly expand the number and types of exercises that can be done using the bench as the base. All of these attachments were designed with space efficiency and storability in mind.
As long as the 10.5″ back pad isn’t a deal-breaker, and you’re not a super big/strong guy who might push the 600 lb limit on incline, then you should very seriously consider buying the Ironmaster Super Bench Pro.
Check Current Price – Ironmaster Super Bench Pro »
Overall Rating
Ironmaster Super Bench Pro
The Ironmaster Super Bench Pro is a well-designed FID adjustable weight bench at a good price. It gives you a no-gap experience in the flat position. It's lightweight but that can be beneficial if you're looking for an easier-to-maneuver bench as opposed to a tank.
Product Brand: Ironmaster
Product In-Stock: InStock
4.6



Brilliant write up, Alex. Really appreciate the time you took to review this product with an insane amount of detail. It will definitely help me determine which bench to purchase.
Keep up the good work, man!
Thanks, Das. I’m happy you found it so useful. Enjoy whichever bench you end up buying!
Echoing what DAS said, really appreciate this timely review. These are the exact two benches that I am considering right now with the deciding factor being which will last longer.
Do you think there is a difference in quality and durability of the frame and especially the upholstery that warrants the price difference? The Ironmaster Super Pro is home/light commercial while the AB-5000 is commercial grade. Do you get what you pay for and is it worth it?
Hi Shaun,
Comparing the frames, you definitely get higher quality with the frame on the AB-5000. It uses bigger, thicker and heavier tubing that makes the frame significantly more robust. You get 1000 lbs capacity at every angle, whereas the Super Bench PRO is 1000 lbs for flat but 600 lbs for incline (mostly because of the seat, but partly because of the overall frame). That said, if you don’t think you’ll ever need to exceed 600 lbs on incline (the vast majority of lifters won’t get close), then the frame
Regarding the upholstery, they’re going to be similar quality. If we were comparing the original version of the Super Bench to the AB-5000, then it’d be a different story — since the padding is notably compressible. However, the pad on the Super Bench PRO was upgraded to include dense padding. And the AB-5000 also has high-density padding (possibly a bit denser).
The AB-5000 was worth it for me. I’m very happy with mine. But if the frame and incline capacity on the Super Bench PRO is sufficient for your needs, it’s a very solid choice…and you’ll save a couple hundred dollars, which is always nice.
It comes down to how you weigh these factors (and also the other pros/cons discussed in the review) vs your budget.
Still having a hard time deciding between the two (ignoring price). The Rep has a 1 year warranty, the Ironmaster a 10 year warranty which is a huge difference. The Rep is larger, heavier and more difficult to move around but that makes it more sturdy than the Ironmaster.
Another thing I read is that on incline or decline settings, the back pad itself has some side to side or back and forth play due to the adjustment mechanism. Did you find this to be the case?
Hi Shaun,
I actually just called Rep because the 1 year didn’t sound right to me, since I know their ab-3000 bench has a 10 year warranty. They confirmed to me that the AB-5000 also has a 10 year warranty; they just forgot to put it on the product page.
As for the back pad on the AB-5000, no, there is absolutely no side-to-side or back and forth play on it. It’s as solid as a rock. The seat has a little wiggle, but that’s basically eliminated if you tighten the pop-pin after adjusting (you would only ever feel any wiggle on the seat it if you actively put your weight from side-to-side, which is something nobody actually does during use….thus making it a total non-issue).
One issue with the AB-5000, though, is its availability. It’s been out of stock for a month or two, and when they re-stock, it’s usually sold out in like a week. I’m not sure when they’re restocking.
Thanks for clearing that up, they should really update the page. That’s the other thing, they are never in stock! Does the Ironmaster have any side to side or back and forth play on incline/decline settings? So the only thing that makes the Ironmaster “home / light commercial” is the lighter gauge steel /max weight compared to the “commercial” Rep?
Great review! I have the original super bench and am seriously looking to upgrade to the pro. The only negative is the fact that some of the attachments like the leg extension/leg curl won’t fit the pro because of its shorter hight, so will have to rebuy. But I still think it’s worth it to have a better leg drive on the flat bench.
I agree, the lower bench height is a MAJOR upgrade that definitely makes upgrading to the new bench a worthwhile choice.
*** UPDATE – MARCH 2020 *** The Super Bench Pro now has a leg extension/curl attachment that is compatible with it: The Leg Attachment PRO for Super Bench PRO.
Fantastic review. I’m very interested in this bench because the only other good option available in Europe is the extremely expensive Rogue AB-2…
Dollar for dollar, the Ironmaster is a better value for sure.
Alex,
many thanks for your review, really appreciate your time and efforts! I’ve used the super bench for a couple of year now, it really exceeded my expectations. I’m considering buying the SB Pro for my new home gym (will keep the SB to have a second working station at my parents house). I’d like to complete it with the leg extension/curl attachement but wanted to make sure it could fit my height (6ft2) Do you have any review for it?
kind regards
The Ironmaster Super Bench PRO has more clearance on the Leg Attachment Pro than with the original Super Bench and its leg attachment. This is because the bench gets tilted to the 10 degree position for the PRO leg attachment to plug in and it is about 2” higher than the flat position of the original Super Bench. This gives you enough ground clearance for someone up to at least 6’6” tall.
Many thanks for your prompt reply Alex,
will consider buying that!
kind regards
Stefano
Have you tried using the Ironmaster Pro attachments on the REP AB 5000 bench?
Hi Tim, unfortunately that wouldn’t work because the Ironmaster Pro attachments are 45 mm x 45 mm and the opening on the Rep AB-5000 is approx 43 mm x 43 mm.
Yves,
Bonjour,
c’est une excellent texte, très précis et détaillé. Un travail d’expert! Il devrait servir de canevas ou de guide pour tous ceux qui font de telles évaluations.
Suite à cette lecture j’ai décidé, même si le REP AB 5000 est nettement plus cher d’acheter ce dernier pour mes 70 ans.
Je vis au Québec, quel serait l’endroit où je pourrais avoir le meilleure prix pour ce banc ?
Hi Yves, thanks for the comment. I had to run it through Google Translate since I don’t speak French — But I believe you’re asking where you can buy the REP AB-5000 in Quebec.
You can try contacting Rep Fitness directly to see if you can arrange a shipment. Usually they only ship to the lower 48 US states, but according to their shipping FAQ, it may be possible to ship outside of this area if you arrange your own freight forwarder.
How does this compare with the rep ab3000?
Both are solid benches that will let you lift plenty of weight comfortably. However, the Ironmaster Super Bench Pro is more feature rich. On top of that, it also has the potential to add a bunch of attachment to expand your exercise selection, if desired. In terms of the specifics of each bench, I recommend you check out my adjustable weight bench guide, where I discuss both of these benches (as well as many others).
Thanks for the great in-depth review of Ironmaster superbench pro. Do you know if the Ab crunch attachment can work as thigh stabilizer in performing lateral pull down on a wall mounted cable pulley system? Thanks
Hi Alex.
Not sure if you know this or not. Ironmaster have this thing called Hybrid Bench Pad. Half the bench is 12.25” and the other half is 10.25”. It works for both super and pro.
Yeah, I know about that and think it’s great. It addresses one of the “cons” of the default pad being too narrow for some lifters. I’ll have to update this review at some point to include this information.
Thank you for the comprehensive review of the Ironmaster Superbench Pro. I like the design and price a great deal, but have one concern. I am 6’2” and I like to put my heels up on the seat of the bench when I am doing dumbbell presses. I am concerned that the relatively short length of the bench (44”) will make that difficult to do. My alternative choice is the REP 5100. What are your thoughts?
Thanks in advance,
Randy
I’m 5’11” and there’s no way I can fit my heels on a 44″ bench length unless my head comes off the other end. So, you definitely won’t be able to do that.
If that’s very important to you, then the 5100 is the better model to buy for sure. Just be aware that the main trade-off you’ll notice in terms of day-to-day use is that the 5100 is much heavier. So it’ll be more cumbersome to move around, which isn’t necessarily a big deal. But if you’re constantly moving it around, it can be a bit annoying. So, if I was in your position, I’d consider how much you care about bench length vs how much you care about bench weight.
UPDATE – Dec. 2021: Ironmaster recently released a new product that addresses this issue: the Head Extension bench accessory, which increases the bench length by 8 inches.
Any review about the leg curl pro attachment? I can’t find any video or hands on write up to say if it’s worth it.
When doing heavier inclined dumbbell presses I would usually grab the dumbbells from the rack, sit on the end of the bench with the dumbbells resting on my knees/lower thighs then rock back and lift/kick the knees to get the dumbbells in position. I’m wondering if the fixed right angle seat on the iron master bench would preclude this method of getting into position.
Thanks. Very nice review
I think you could still do it. It just might feel a bit more awkward at first since you can’t independently adjust the seat angle. Probably something you’d just have to get used to. You could always invest in the option Ironmaster DB stand that attaches to the bench and is made specifically for this application.
Hi there!
Fantastic in-depth review.
I have a question about the wheels. You write that it is possible to change whether they should be on the back or front.
How do you do that? Is it just the small wheels that are put on the back or do you just switch the back steel bar with the front steel bar(with the wheels attached)? 🙂
Hope my question made sense.
The wheels are welded on to the foot tube so they will always be on the longer foot tube, but you can install either foot on either end of the bench. So if you prefer to have the wheels on the head end of the bench, you will have the long foot and wheels on that end. Or if you want the wheels on the other end of the bench, you will have the longer foot with wheels on that end instead. The bench will work fine no matter which end has the longer foot.
Hi Alex,
Thanks for a great review. I am currently in the market to but an Ironmaster bench together with their dumbbells as well as several attachment products.
I was initially sure to go with the Pro version but since I am quite tall (6,3) and my favourite exercise is the incline dumbbell press I am starting to wonder if maybe the original SB bench is a better alternative for me. Any thoughts on that?
Greetings from Sweden,
Carl-Henrik
Hmmm… that’s certainly possible that the original Ironmaster Super Bench could be better for your tall stature since you like to do incline so much. What I would recommend you do is try to find a crate or something that is 14.5″ tall. Sit on it and pretend as if you were going to do seated upright shoulder presses — this will give you an idea of how the seat will feel in the highest incline position (upright). Note, of course, that the seat height increases as the incline angle reduces. But if the highest incline position definitely feels too low for you, I’d say go for the original.
This is the most comprehensive review out on this bench. Thanks!
It seems like the price went up, so it’s only a $60 difference between the iron master and the rep 5100 with the decline attachments. I’m not sure how useful an inversion table would be for me, so setting that aside, it seems like I would be choosing between usability (quicker adjustments, lighter and more maneuverable for the iron master, handle on decline attachment, lever adjustment) vs quality (nicer upholstery, ergonomics – higher seating on incline, wider or for shoulder support on the rep)? Is that the right way to think about it? Would this close price gap make a difference if you had to buy again today? Appreciate the help
I’d say the price difference definitely changes the decision making if you’re considering both benches. Ultimately, though it still depends on which features you care more about. That is, basically weighing those factors that you listed according to how much you care about each factor, and then weighing the now-reduced price difference.
One thing I will add, however, is that Ironmaster now has a Hybrid Bench Pad, which solves the narrow bench pad issue that I mentioned as a negative in this review. Of course, you have to buy this accessory separately ($89 currently), which changes the price equation again. But if the narrow pad was the main negative for you, it might make the Ironmaster the obvious choice.
Hypothetically, if I had no bench in my home gym right now and I was considering the Ironmaster Super Bench Pro vs the Rep AB-5100, I think I’d go for the Ironmaster bench WITH the Hybrid Bench Pad. The main reasons for me would that:
I picked up the ironmaster super bench pro and attached a rep fitness 12″ bench pad using 1″ lag screws. best of both worlds 🙂
That sounds like a great solution! Does the Ironmaster seat still attach properly with the thicker pad installed?
Very thorough review. The Pro V2 addresses many of the issues people have had with this bench. Comes standard with the hybrid pad, angle markings, grab handle, and high seat position. At $499 it’s getting up there in price, but there is still nothing else as versatile and pleasant to use on the market, IMO. One thing that isn’t often mentioned is that it’s made in Taiwan instead of China. That matters to me.
Great comment, Phil. That’s true, they fixed all those issues in V2. I talk about in my guide to the best weight benches where I named the Ironmaster Super Bench Pro V2 the Best Versatile Weight Bench.