UPDATE – March 2022: It appears that the Railtrainer Fitness company may have quietly gone out of business, as their email and website are no longer working. I and others have been unable to reach the owner for any details, which is unfortunate. While the Railtrainer V1 (reviewed on this page) was a great product overall, it appears many people were disappointed with the quality and functionality of the V2. I will update this page if I hear anything else.
This Railtrainer review will tell you all you need to know about this unique, portable and retractable pulley system.
If you’re looking for a smaller and significantly less expensive functional trainer alternative for your home gym, this innovative device may be just what you need.
Read on to find exactly how the Railtrainer works, its applications, specs, pros & cons, and whether or not it makes sense for your home gym.
IMPORTANT NOTE: This review will focus on the Railtrainer Quick Pin system (retractor + loading pin system). However, I’ll also have a section discussing the Railtrainer Quick Stack system (retractor + portable weight stack).
Both systems use the same retractor unit (i.e. the black box), which is the key component of both systems. The difference is the type of weight holder that the retractor is attached to. Most of what I’ll talk about in this Railtrainer review will apply to both Quick Pin and the Quick Stack.
I’ll use the term “Railtrainer” when I’m discussing anything that applies to both systems. Otherwise, I’ll specify if something is specific to the Quick Pin or the Quick Stack.
Table of Contents
What Does the Railtrainer Do?
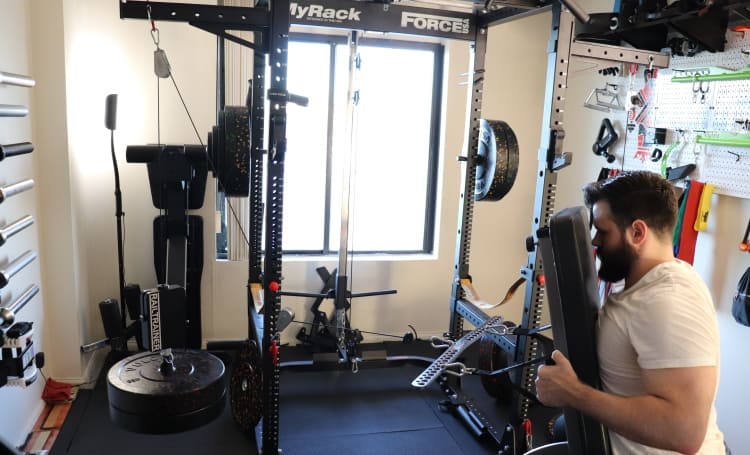
The Railtrainer can effectively turn a squat rack into a cable machine.
If you buy a single Railtrainer system, you get the equivalent of a single column adjustable pulley system in terms of exercise selection. If you buy two systems, you have an alternative to a full-sized functional trainer!
Railtrainer Features & Benefits
To really understand what makes the Railtrainer unique, we need to dig into the key features.
Small Size and Portability
The Railtrainer gives you all of the exercise variety of a full-sized cable machine in a fraction of the space and at. Sure, the machines offer more convenience, but many home gym lifters simply don’t have the room or budget.
Relatively Low Cost
Full-sized cable columns and functional trainers can range from several hundred dollars on the low end to a few thousand on the high end.
Each Railtrainer Quick Pin system costs $179 (minus 10% if you use code KING10). This price gets you the same fundamental capabilities as a full-sized cable column at a fraction of the cost (with the added benefit of a compact and portable size).
Retractability
You could argue that a simple DIY-style fixed pulley system — with a fixed-length cable, one or two pulleys and a loading pin — gives you the same benefits of small size and low cost. In fact, the cost is even lower ($30-50). Here’s an example of one:
…But the Railtrainer is different. It is a retractable cable pulley system.
The retractability feature is where this equipment shines! You see, different cable exercises require different cable lengths.
If you have just one cable length, you’re necessarily limited to only a few exercises. Or you have to awkwardly change your position. Or purchase several different cable lengths.
With the Railtrainer’s retractable design, you can set up for any exercise with ease because you can select any length.
How does the retractability feature work?
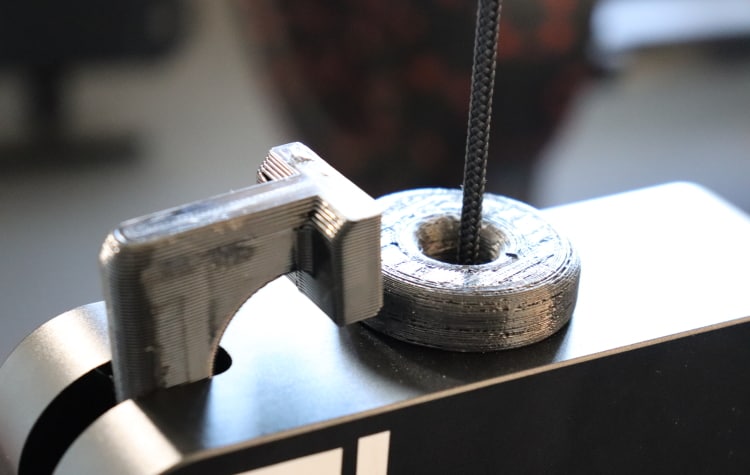
To understand that, we need to understand the Railtrainer’s basic design. The black Railtrainer box houses the “paracord” on the retractor inside of it. FYI, a paracord is not technically a cable, but you can think of it as one if that’s easier; but it’s actually the same super strong nylon string that’s used in parachutes. Later on, I’ll talk a little bit more about why they used paracord.
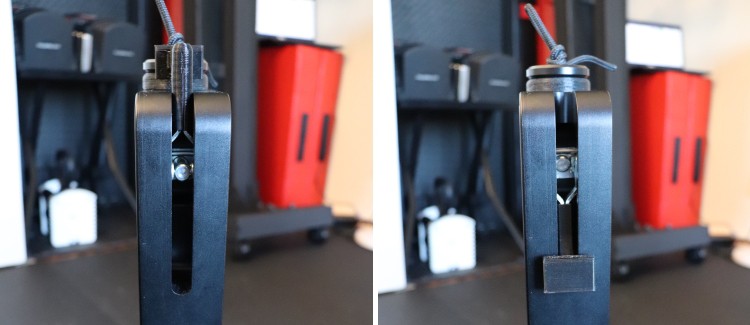
To extend or retract the paracord, you use the lever. The lever is connected to a toggle clamp inside the box. It clamps onto the paracord to lock it in place, or releases from it to allow for retraction and extension.
Pulling the lever up puts it in the unlocked position. You want it unlocked when you’re adjusting the paracord to the desired length. Once it’s at the desired length, you pull down the lever to lock it in place.
Unboxing: What’s Included?
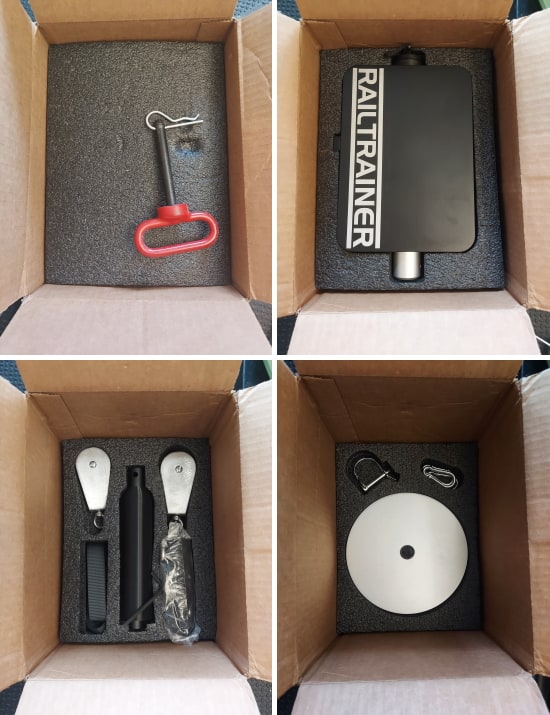
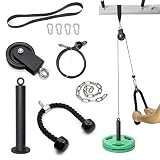
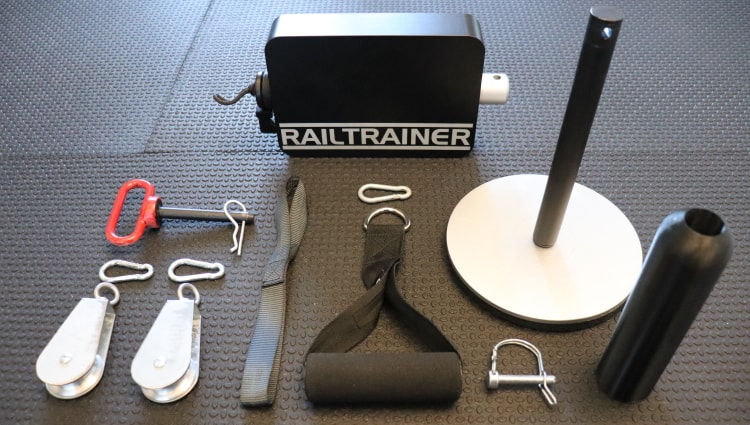
Here’s what you get in the box with each Railtrainer system:
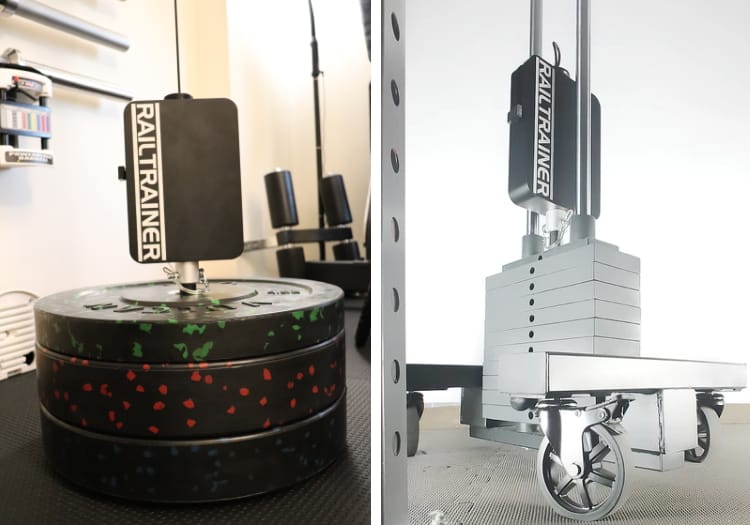
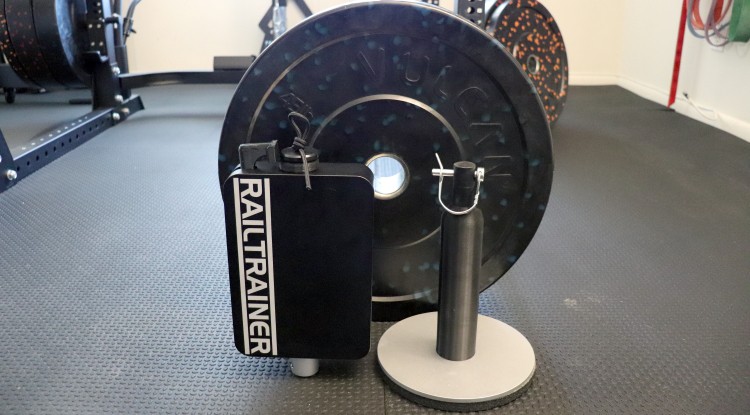
- The Retractor Unit: This is the centerpiece of the Railtrainer system. It’s a heavy black rectangular box made of anodized 6061 aluminum that houses the paracord and the retraction spool. On the top/side, it has a lever that locks and unlocks the paracord. On the bottom, it has a connection port for inserting the loading pin into. The connection port is made of the same type of aluminum.
- Loading Pin: The Railtrainer Quick Pin system comes with a loading pin. This includes the pin portion as well as the base. The pin screws onto the base. The base has foam on the bottom for protection when hitting against the floor. When ordering, you can select an Olympic or standard loading pin. If you order the Olympic pin, your package will arrive with a sleeve that slides over the main pin portion to allow a perfect fit for Olympic plates.
- If you buy the Railtrainer Quick Stack system instead, you get a 100 lb or 200 lb (whichever you choose) portable weight stack on wheels rather than a loading pin.
- Connector Pin: This pin locks the loading pin to the retractor unit when it’s in the connection port.
- 2x Pulleys: Each Railtrainer comes with 2 pulleys. Notably, these are “no gap” pulleys. This is a big improvement over most other fixed pulley setups, which have gaps on the sides. The no gap design ensures the paracord doesn’t fall off the track and get caught in the side.
- 1x Hitch Pin: The hitch pin is used for anchoring the pulley to the power rack. You insert it through the desired hole on the power rack uprights or on your spotter arms (you can put the spotter arms to the side for movements like cable crossovers). If you want a second hitch pin to be able to set the second pulley up on the spotter arm, you’ll have to buy it from a third party — Check out this ⅝” hitch pin and this 1” hitch pin on Amazon.
- 1x Soft Loop Tie Down Strap: The soft loop tie down strap is another way to anchor one of the pulleys. It is perfect for positioning the top pulley as high as possible, and in between the uprights. This is the same type of loop used for tying down motorcycles and ATVs when they’re being transported. They have a capacity of 3600 lbs, so durability is not an issue here.
- 3x Carabiner Clips: The carabiners are for attaching the pulleys to the hitch pins and the soft loop strap.
Key Railtrainer Specs
Here’s an in-depth breakdown of the specs for the key components of the Railtrainer:
- Max paracord length: 15 ft
- Max weight capacity: 200 lbs
- Pulley ratio: 1:1 (100 lbs loaded on is 100 lbs of resistance)
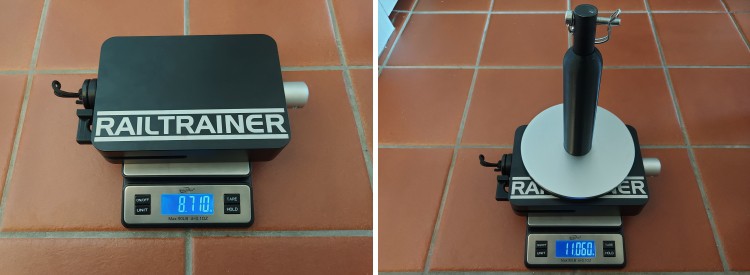
- Retractor unit dimensions:
- Black pox portion only: Height = 9 ⅛” Width = 6 7/16” Thickness = 2in
- Total height is 11.5”. This is the distance from the connection port at the bottom to the rubber bumper/disk stopper at the top.
- Retractor unit weight: 8.7 lbs, excluding the weight of the loading pin
- Loading pin weight: 2.3 lbs with the Olympic adapter; 1.9 lbs without the Olympic adapter
- Loading pin length: 8 ¾” of loadable length when you account for the space that the connection port takes up.
- 9 ¾” total length, excluding the base of the loading pin. 10 ½” total length including the base of the loading pin.
- Loading pin diameter: 1.96” with the Olympic adapter; 1” without the adapter to fit standard plates
How to Use the Railtrainer
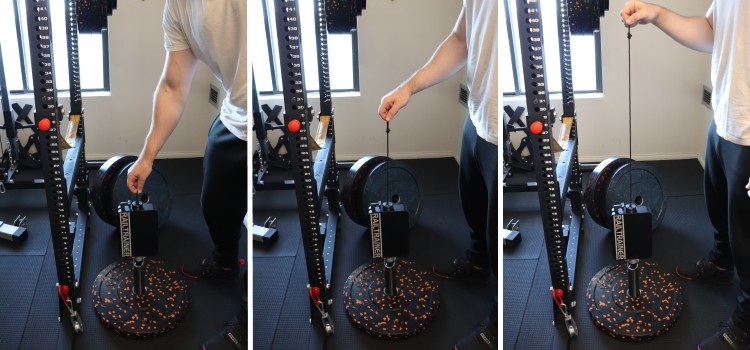
Now that you understand how the Railtrainer works and what makes it unique, let me lay out the steps for actually using it:
- Set up one or both of the pulleys in the desired position(s) on the power rack. You anchor the pulleys with either the soft loop strap (looped around the pull up bar) and/or the hitch pins (inserted into any of the power rack holes).
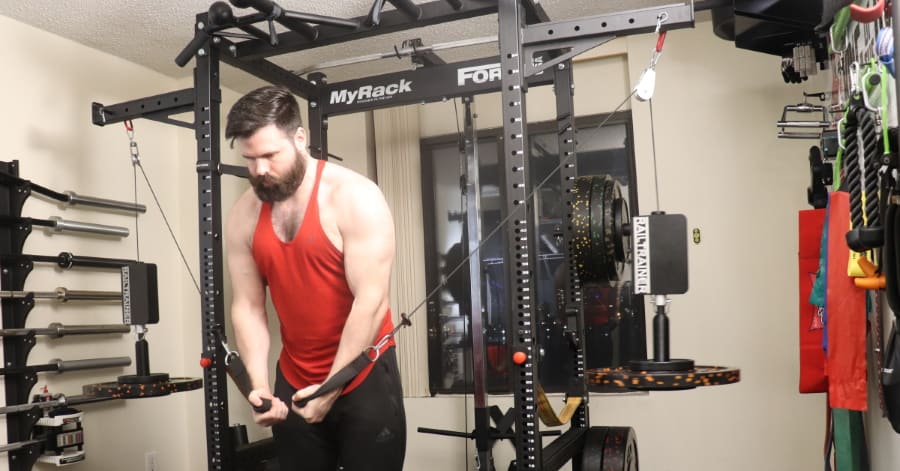
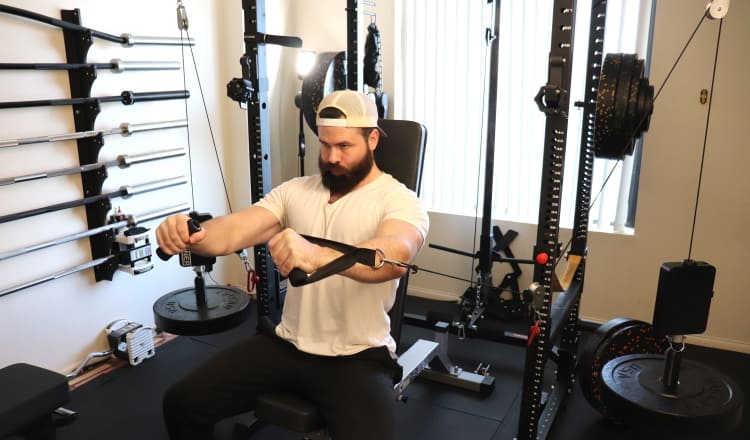
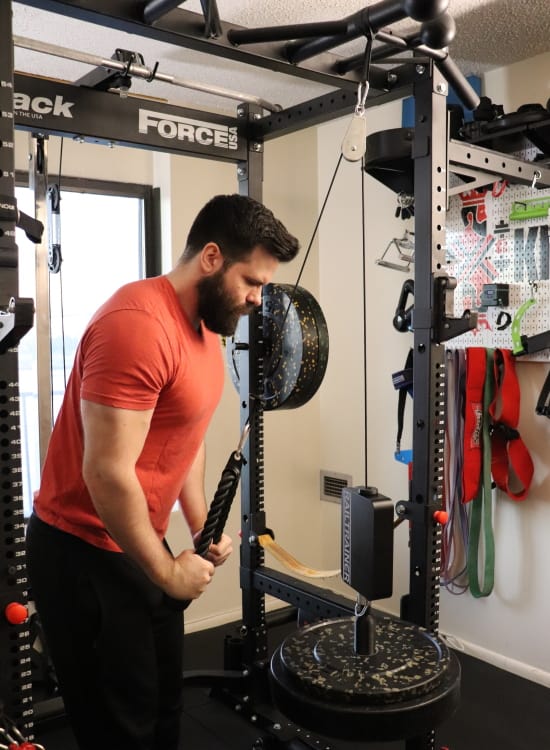
- You’ll use either 1 or 2 pulleys at a time or both depending on the exercise you’re doing. If you’re doing a high pulley exercise (e.g. triceps pushdowns), you need just one pulley. If you’re doing a low pulley exercise (e.g. low rows) or a mid pulley exercise (e.g. seated cable chest press), you’ll need to use both pulleys.
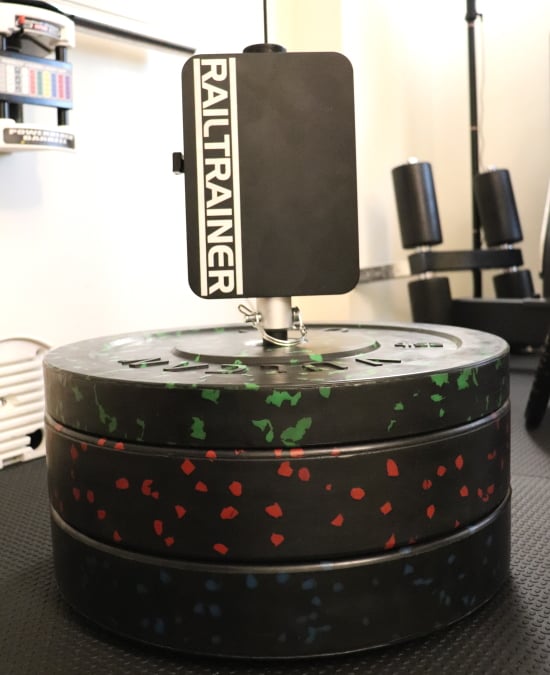
- Set the weight pin on the floor and load it with the desired amount of weight.
- Attach the Railtrainer retractor unit to the loading pin by inserting the top of the pin into the connection port. Then lock it in place with the connector pin.
- Ensure the lever on the retractor is in the up position to unlock the paracord.
- Extend the paracord length as needed. As you extend the paracord, thread it and the plastic disk stopper through the pulley(s). The disk stopper prevents the cord from going back through the pulley once it has passed through. Do not try to thread the rubber bumper (i.e. the piece below the disk stopper) through the pulley. The rubber bumper is there to protect the retractor from banging into the pulley at the top of the range of motion.
- Press the lever on the retractor down to lock the paracord at the desired length once it is through the pulley(s).
- Attach the D-handle (stirrup) attachment to the end of the paracord.
- Repeat the above steps if you have a second Railtrainer system and are setting up for bilateral exercises (e.g. cable flies).
- Begin the exercise!
I broke this down into several steps. It seems like a lot when I write it out like this. But it’s really a pretty quick and easy setup when you’re actually doing it.
Furthermore, the setup gets easier and faster the more you use it.
Quality of Operation
Smoothness
I’m pleasantly surprised with the smoothness of the pulleys during exercise. I expected more friction with this type of setup. Of course, it’s not as smooth as a commercial functional trainer, but it’s pretty good.
When using light weight on the Railtrainer, it’s actually noticeably smoother than when I use light weight on the plate loaded high/low pulley in my power back that’s on a fixed track. When using heavier weight, the smoothness is comparable between the two systems.
I think the use of metal pulleys helps with the smoothness. Surely, it will help in the long run because you won’t have to deal with plastic pulleys that can wear over time and lead to more friction.
Swinging
If you do an exercise at a fast tempo, you may experience some swinging. Sometimes you’ll need to stop to let it settle. However, this is not a problem unique to the Railtrainer. This happens with any type of pulley system that isn’t on a fixed track.
Note that mostly happens on light exercises. The heavier the weight, the less swinging will occur.
The best way to reduce swinging when it does happen is to use a more controlled tempo. As a side benefit, this will also improve your technique.
You can also reduce swinging slightly by using smaller diameter plates. So for example, if you’re doing an exercise with 45 lbs on the loading pin, try putting a 25 lb plate and two 10 lb plates on, instead of a single 45 lb plate. Of course, if you use bumper plates like me, where all the plates are the same large diameter, you can’t use this trick.
I’ve heard of some people going the extra mile to reduce swinging by putting a tiedown strap or resistance band in front of the rack as a barrier. Honestly, though, I don’t think this is necessary for most people. Just control the movement and you’ll be golden.
One last tip I’ll mention that I found helpful for reducing swinging on exercises like lateral raises is to extend the end of the cable 1-2 feet beyond where it comes out of the pulley, if possible. It seems like having a bit of extra distance cuts down on swinging, possibly because the extra distance means the pulley moves less side to side.
Exercise Possibilities with the Railtrainer
With the Railtrainer, you can do any exercise you could do on an adjustable height cable column. If you have 2 Railtrainer systems, you can replicate the capabilities of a double sided adjustable height cable column, aka a functional trainer.
That means you can literally do several dozen cable exercise variations. I won’t list them all, but here are some of the most popular ones, including some of my favorites. Note that some of these movements will require cable attachments other than the included D-handle attachment:
- Cable curls
- Cable concentration curls
- Triceps pushdowns
- Lat pulldowns
- Straight arm pulldowns
- Low rows
- Single arm rows
- Chest supported cable row
- Face pulls
- Standing cable chest flys
- Seated cable chest flys
- Standing cable chest press
- Seated cable chest press
- Cable Lateral raises
- Bent over lateral raises
- Cable front raises
- Cable upright rows
- Cable hamstring curls
- Cable pullthroughs
- And many more
Of course, it’s much faster to adjust the weight and pulley height on an adjustable cable column or functional trainer than on the Railtrainer, among other advantages. But the point is the exercise capabilities are the same.
Max Capacity
As I mentioned in the “Specs” section earlier, each Railtrainer retractor unit has a max capacity of 200 lbs.
That’s plenty of weight for most lifters. Realize that most functional trainers with weight stacks top out at 200 lbs per stack — and most of those use a 2:1 pulley ratio, meaning their actual max resistance is 100 lbs per stack. Whereas, the Railtrainer has a 1:1 ratio, meaning that a max capacity of 200 lbs means you can actually lift 200 lbs of resistance.
That said, I know some strong lifters may want to lift more than that on certain heavier exercises such as low rows or lat pulldowns. For these lifters, the best option would be to get a second Railtrainer system so you can do double pulley versions of these exercises. This lets you lift up to 200 lbs per side, or 400 lbs total!
For anyone wondering why it’s not rated for more than 200 lbs, there is a reason. The limiting factor is the locking mechanism in the machine. It clamps and kinks the rope to lock it in place. But when the rope is overloaded with enough weight, it will slip. They tested it up to 200lbs with no issues whatsoever.
They were able to put even 300lbs on it without any slipping. However, they noticed the rope stretching at weight, so they decided not to do further testing at the 300 lb level.
Construction Quality
I’m quite impressed with the construction quality. The retractor is super solid. It’s got a sturdy all-metal casing. It’s just under 9 lbs so you can feel it has a lot of heft and density to it when it’s in your hand.
The retractor’s casing assembly is completely secure. There’s no play or loose screws with the back panel.
I haven’t actually opened the retractor casing, since I wouldn’t want to accidentally mess something up. However, I’ve spoken with the owner. He told me that the internal components are all made in the USA in their local shop. This is great because these are the most important parts of the system. They control the retraction/extension, so having American-made build quality and quality control here is a big plus.
The American-made retractor (inside the casing) is manufactured out of polycarbonate plastic made using 3D printing and laser cutting.
They have plans for the near future to do 90% of the entire system locally. This means not just the retractor inside the box, but the aluminum casing itself and possibly other components.
Currently, the retractor’s casing is imported. Despite being imported, the quality of the casing is excellent. It is a solid block of aluminum that’s CNC milled. Their initial prototype used steel, but that ended up being too heavy.
Most of the various complementary components are sourced from China. This includes the pulleys, hitch pins, soft loop tie down strap, carabiners, D-handle, loading pin and coupler pin. All these pieces are fine and work as you’d hope.

The only thing I’m not a big fan of is the D-handle. It’s adequate, but not anything to write home about. I find it a bit too cushion-y. Of course, there are tons of other D-handle attachments out there that you can buy online if you want to upgrade.
The only other component is the paracord and that’s not imported. I’ll talk about the paracord a bit more, below.
About the Paracord
The paracord is made in the USA. It is an “accessory cord” from Sterling and has a 900lb breaking strength.
The Railtrainer company decided on using paracord after thorough testing. Initially, they started with an actual cable like you’ll find in any traditional cable pulley system. This included both aluminum and steel cables with different coatings. However, they found that the cable started breaking after a few hundred locks and unlocks.
They then moved to testing rope. They tested over 40 types of rope including kevlar rope, AmSteel rope and many others. They tested each rope by lifting and dropping the quick pin 10000 times with 200 lbs.
Eventually, they found that the Sterling accessory cord was the best option.
Warranty & Return Policy
The Railtrainer company offers an unbeatable warranty and return policy. They offer a lifetime warranty. Specifically, they state the following on their site: “If anything ever breaks or is damaged we will fix it. That is our promise to you. We stand behind the quality of our products, NO B.S. no legal loopholes.”
This is a very strong warranty language that you rarely see in the industry. It clearly shows that they’re confident in the quality of their equipment and they want you to be confident in buying.
Similarly, they also have a very impressive 90 day money back guarantee. So you can try it out for 3 months to decide if you actually want to keep it. If you’re not totally satisfied within 90 days, you can send it back and get a full refund with no questions asked.
You should be able to tell way before 90 days if you’re not happy with the system, but it’s great to have that extra time.
Compatibility with Different Power Racks
The Railtrainer works on most power racks. Ideally, it should be a power rack with ⅝” or 1” diameter holes, which is what the majority of home gym lifters have these days. My power rack happens to have holes that are just under ⅝”, but I was able to make it work by special requesting ½” hitch pins.
However, if you happen to have a power rack that doesn’t have holes that go through the uprights, then the Railtrainer will not work. An example of such a rack is the Hammer Strength commercial racks that have slots rather than actual holes that go through the uprights.
Railtrainer Review Summary: Pros & Cons
In this section of my Railtrainer review, I’ll compile all of the pros and cons of this retractable cable pulley system. I’ll include some items I’ve already covered in the review so far, as well as some I haven’t covered yet.
Pros
- The retractor is the #1 advantage of the Railtrainer Quick Pin system over any other loading-pin style pulley system. The ability to extend or retract the cable length by simply flipping a lever makes the Railtrainer more versatile in terms of exercise selection and faster to use in terms of pulley adjustment compared to any other option on the market.
- It is compact, portable and storable. The retractor box has a slim profile and the paracord can retract all the way back inside. When you’re done, you can quickly move it out of the way and store it just about anywhere.
- The cable motion is quite smooth for this type of pulley system. It’s not like a commercial cable machine, but it’s impressive for a home pulley setup. I believe this comes down to the use of the paracord combined with the use of steel no-gap pulleys.
- The retractor box is very well made. The most important part of the system — the retractor inside the casing — is made in the USA at the Railtrainer’s shop via laser cutting and 3D printing.
- You can’t beat the lifetime warranty and 90 day return policy. They’ll fix or replace anything that breaks. And you have 3 months to decide if you want to keep the system. If you’re on the edge of deciding whether or not to buy this equipment, this should give you the confidence to take the plunge.
- It’s easy to upgrade. If you have the Railtrainer Quick Pin system, you can easily upgrade to the Railtrainer Quick Stack system. You just buy the weight stack portion of the Quick Stack and it will work with your existing retractor unit.
- The retractor box can be used without added weight on some exercises. For some light cable exercises like bent over lateral raises, you can use the Railtrainer retractor without the loading pin since it weighs about 9 lbs on its own. This isn’t a huge benefit, but I do find it convenient in these instances.
Cons
- The loading pin can swing. It doesn’t happen often. But when it does, I fix it by letting the loading pin settle on the floor and then continue with a more controlled technique. This happens on any pulley system with a loading pin; not just the Railtrainer.
- Weight changes take a little time. You have to remove the loading pin, then swap plates. Of course, you run into the same issue on any pulley system with a loading pin.
- The coupler pin can flick against your fingers when you unlock it to detach the loading pin. It’s not extremely painful, just annoying. You can avoid this by being more deliberate when popping it off. Still, I’d like to see a better solution.
- 2nd hitch pin not included. Some exercises work well if you attach one of the pulleys to the spotter arm on the side of the rack and one to the bottom of the upright. This requires a second hitch pin. If you want to do this, you’ll have to buy it from a 3rd party (⅝” hitch pin or 1” hitch pin). They told me that including it would raise the price by another $20. I understand the decision, since not everyone will use this configuration. Still, I think they should sell the hitch pins separately so you can buy everything at once if you want.
Railtrainer Quick Pin vs Railtrainer Quick Stack
As I mentioned in the intro, this Railtrainer review is primarily focused on the Railtrainer Quick Pin system. That’s the system I own and have been testing, after all.
However, Railtrainer has another product: The Railtrainer Quick Stack. I don’t own this one, but it’s a totally unique concept that I haven’t seen anywhere else. So I want to talk about it a bit.
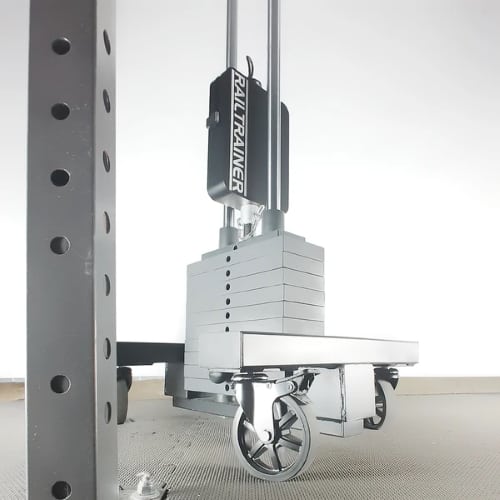
The Quick Stack uses the exact same retractor box as the Railtrainer Quick Pin. The key difference is that the Quick Stack has a selectorized weight stack instead of a loading pin.
This is such an exciting feature because it solves the biggest issue that occurs with ANY type of pulley system that uses a loading pin — You no longer have to disconnect the loading pin, take off and/or add plates, then reconnect the loading pin. Instead, you simply move the selector pin to a different setting in the weight stack.
The Quick Stack’s weight stack runs on guide rods. This eliminates the swinging that can occur with the Quick Pin’s loading. I consider this another major advantage.
The next unique part of the Quick Stack is that the weight stack is not a large full-height column like you’d find on a traditional functional trainer. Instead, it keeps with the theme of compactness by having guide rods that only go up a few feet. And there’s not a big frame around it.
The final unique part of it is that it’s portable. The weight stack is on wheels. You can lock the wheels in place when you’re doing your exercises. When you’re finished, you can unlock the wheels and roll the weight stack out of the way.
You can order the Quick Stack with either a 100 lb or 200 lb weight stack. If you already have the Quick Pin system and want to upgrade, you can buy just the weight stack portion of the Quick Stack; you don’t have to buy the full Quick Stack system only to end up with an extra retractor unit that you don’t need.
The Railtrainer Quick Stack does cost notably more than the Quick Pin. Specifically, the Quick Stack system with the retractor unit included costs $599 at the time of writing. Or if you buy just the weight stack to use with an existing retractor unit, it will run $399 for the 100 lb stack or $499 for the 200 lb stack.
Compare this to just $179 for the Quick Pin system. It’s a big difference, but this is to be expected. Selectorized weight stacks are always expensive.
Still, even if you get 2 Railtrainer Quick Stack systems to mimic full functional trainer capabilities, that puts you at $1200 dollars. That’s a lot. But it’s still less than most cheaper quality full-sized selectorized functional trainers, which range around $1000-1500. It’s several hundred dollars less expensive than most “decent” quality full-sized functional trainers like the Titan Functional Trainer or the Rep FT-3000, which go for around $2000.
Of course, the Quick Stack still doesn’t give you all the benefits of a full-sized selectorized functional trainer. But you do get most of the same benefits. Plus, you save hundreds of dollars. And if space is at a premium for you, it’s impossible to beat the Quick Stack in that respect because it has a much more compact size and is portable.
Is the Railtrainer Worth It?
Overall, I’m a big fan of the Railtrainer system and I regularly incorporate it into my training, despite already having a high/low pulley built into my power rack.
That said, I think it only makes sense for certain lifters to buy the Railtrainer. Allow me to explain who I think it’s best for.
First and foremost, the Railtrainer only makes sense for home gym lifters. Although it’s portable, it doesn’t make sense to bring this type of equipment with you to a commercial gym that will already have multiple commercial cable machines and functional trainers. The portability feature only applies to portability within your home gym.
Within the home gym owner segment of the market, the Railtrainer makes sense for those who:
- Want access to a wide variety of cable exercises. Cable movements are the most common group of exercises that home gym lifters don’t have access to, compared to commercial gym goers. If you do a lot of bodybuilding style training, cable movements will be a particularly high priority for you.
- Don’t have enough space and/or money for a functional trainer.
- Want a more effective and efficient user experience than you get with the fixed-length
- Are okay with a max weight capacity of 200 lbs per unit. If the main exercises you were hoping to do were low rows or lat pulldowns with more than 200 lbs, then this may not be for you. However, you could fix this by getting a second Railtrainer system and use both simultaneously yet independently (this allows you to do 200 lbs per hand). However, exercises for this type of equipment require much less than 200 lbs for the vast majority of lifters.
If you decide the Railtrainer is right for you, the next step is to figure out if you should get the Railtrainer Quick Pin or the Railtrainer Quick Stack.
See the previous section for more information comparing the Railtrainer Quick Pin vs the Quick Stack. But the decision comes down to weighing your budget vs your space concerns vs how much you value rapid weight changes.
Should You Buy 1 or 2 Railtrainer Systems?
If you’ve decided you’re going to buy the Railtrainer system, you should also consider if you want one or two units.
First off, do you have the budget for two? If not, then just get one. You can always buy the second one later.
The next thing to consider is where you want to double pulley movements or if you’re fine with just single pulley movements.
Double pulley exercises are any movements where you’re lifting two pulley systems at the same time. Here’s a few examples:
- Cable crossover
- Reverse cable crossover
- Cable flies
- Seated cable press
- Bilateral low row (one hand per side)
- Bilateral lat pulldown (one hand per side)
Single pulley exercises include any movements where you’re lifting just one pulley system. Here’s some examples:
- Cable curls
- Lateral raise
- Triceps pushdown
- Cable crunches
- Low row
- Lat pulldown
Having 2 Railtrainer systems gives you the greatest exercise variety, including some really awesome exercises that you just can’t replicate when you only have one unit (seated cable press and cable crossovers being my personal favorites).
Accordingly, I recommend getting 2 Railtrainer systems if it fits your budget.

Just saw the latest update. Sad to hear. Been looking for a system just like this! Nice, compact, versatile. Do you know of any alternatives to a system like this? Thanks!
Unfortunately, I don’t know of anything else that mimics a functional trainer (i.e. retractable cable that allows for adjustable height settings). But one cool high/low pulley system that just came out is the Bully Glyder by Buffalo Bully Fabrication — it mounts onto your power rack upright and glides up and down it: https://buffalobullyfab.com/shop/