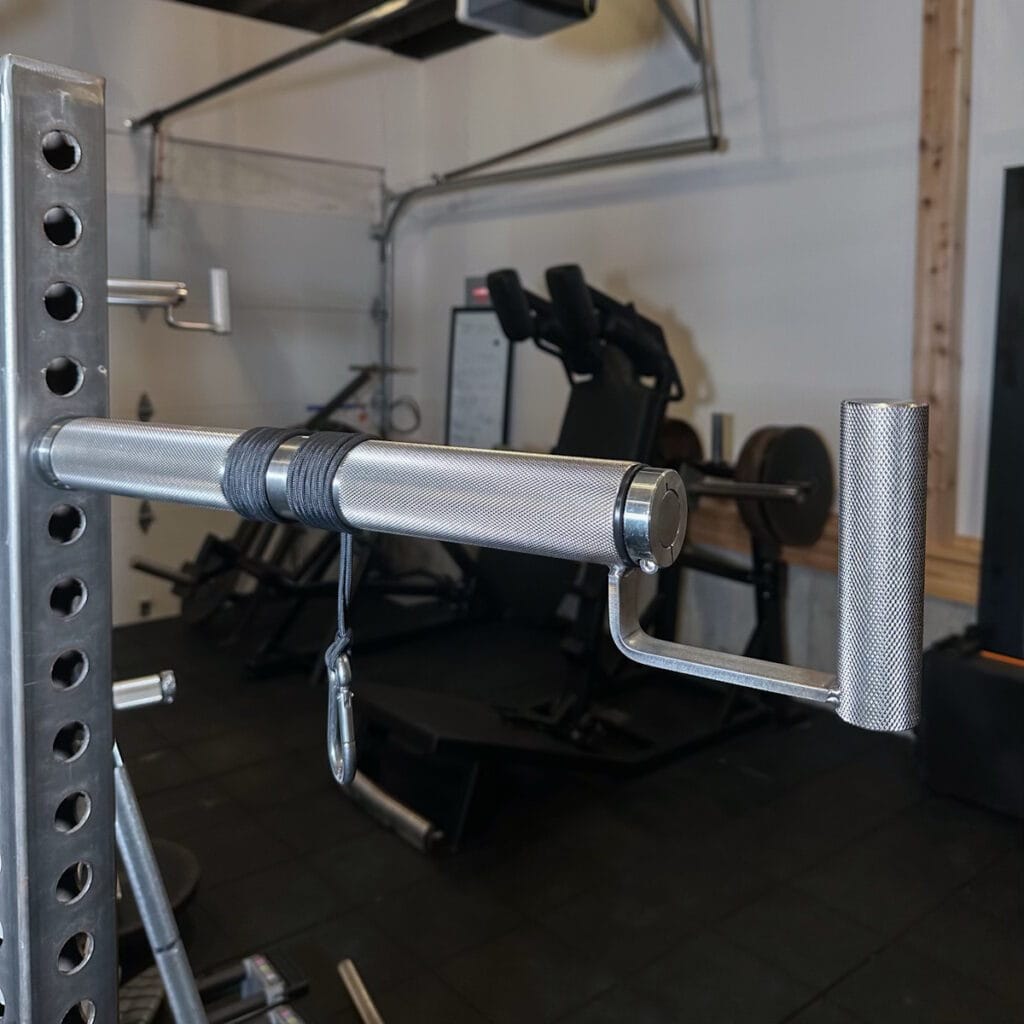
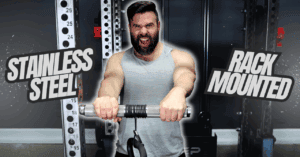
Rack-mounted. Stainless steel. Aggressive knurling. Smooth, consistent rotation.
That’s how I’d sum up the JD Gym Equipped Wrist Roller after months of use in my home gym.
| Model | Pros & Cons | Rating |
|---|---|---|
Pros:
| Rated 4.8 out of 5 |


I truly believe this is the best rack-mounted wrist roller on the market, and undoubtedly the most refined one.
That said, it does have a couple of quirks, and it’s absolutely not the right choice for everyone.
In this review, I’ll walk you through my long-term experience with it. I’ll tell you what it does better than the competition, where the design could be improved, how I actually use it in my training, and who I honestly think should (and shouldn’t) spend the money on this thing.
Table of Contents
JD Gym Equipped Wrist Roller Review Video
Watch my JD Gym Equipped Wrist Roller review video on YouTube:
Product Options & My Setup

Before I get into the specific configuration I own, it’s worth outlining the different versions JD Gym Equipped offers. That way you can see how my setup fits into the broader lineup and compare it to what would work best for your rack.
All versions of this wrist roller are:
- Made from 100% stainless steel
- Use paracord instead of a strap
- Available both as rack-mounted and as a non-mounted version (if you want something more traditional)
For rack-mounted setups, JD Gym Equipped offers multiple sizes:
- 3×3 uprights with 1-inch holes
- 3×3 with 5/8-inch holes
- 3×3 with 3/4-inch holes
- 2×2 with 7/8-inch holes
You can also choose between:
- Smooth polished
- Knurled
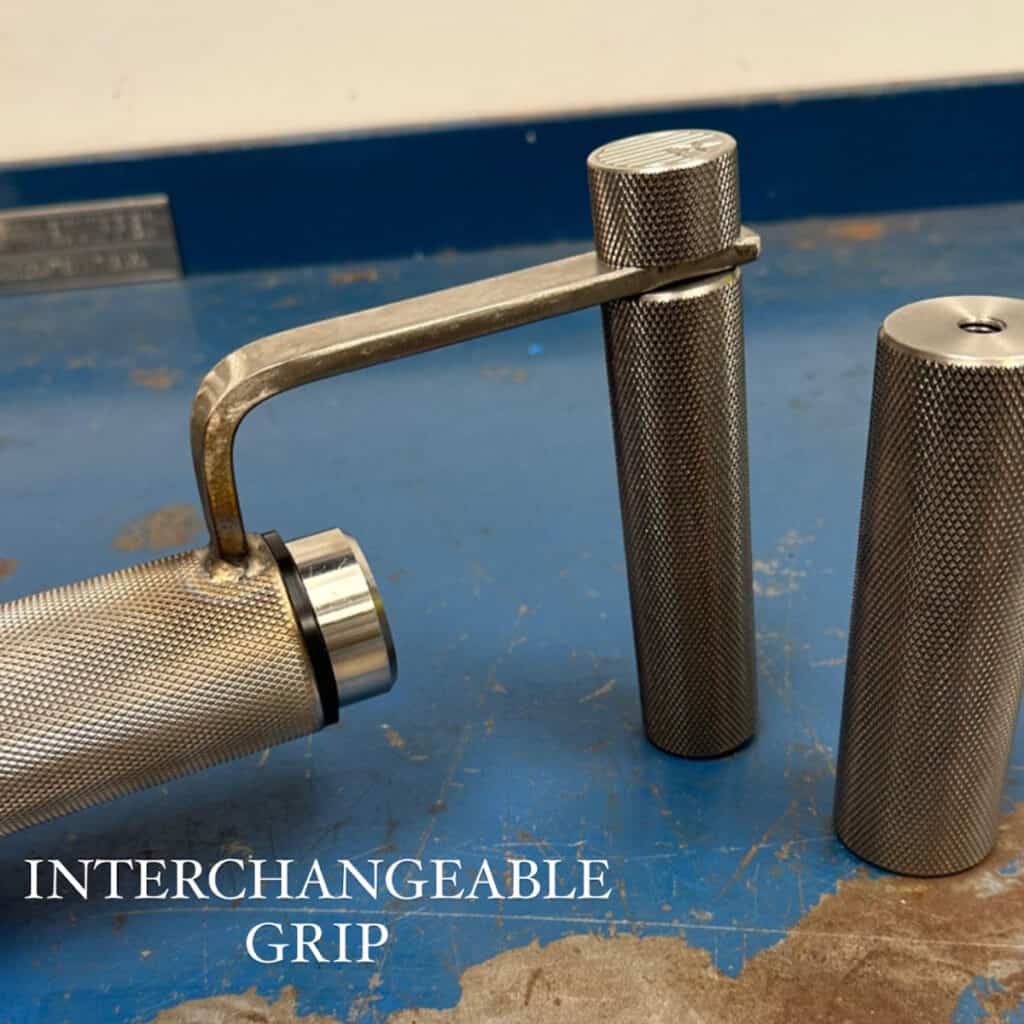
And you can optionally add a supination/pronation handle:
- 1.25″ diameter
- 1.5″ diameter
- Interchangeable handle (1.25″ and 1.5″ swappable grips)
My Configuration
My unit is:
- Knurled
- Rack-mounted for a 3×3 rack with 1-inch holes
- No pronation handle
I chose not to get the pronation/supination handle for a couple of reasons:
- I don’t currently train that pattern enough to justify the extra bulk.
- I preferred a more compact attachment for storage and general rack clutter.
However, one cool thing JD Gym Equipped does: if you decide you do want the handle later, you don’t need to buy a whole new unit. As long as you pay shipping both ways, Jesse (the guy behind JD Gym Equipped) will weld the handle on at cost, which is:
- $60 for the 1.25″ version
- $80 for the 1.5″ version
- $120 for the interchangeable handle option (1.25″ and 1.5″, swappable)
So you’re essentially paying for the upgrade and shipping. You don’t have to buy a whole new unit if you later decide you want this feature.
What I Paid
Normally, my spec’d version would run about $295 plus tax and shipping. I ended up getting mine for $270 out the door (no shipping, no tax!) via a HomeGymCon deal. I actually had my buddy pick it up for me since I couldn’t attend. So I got a bit of a break on the price, but I’ll talk value based on the “normal” price, not just my one-off deal.
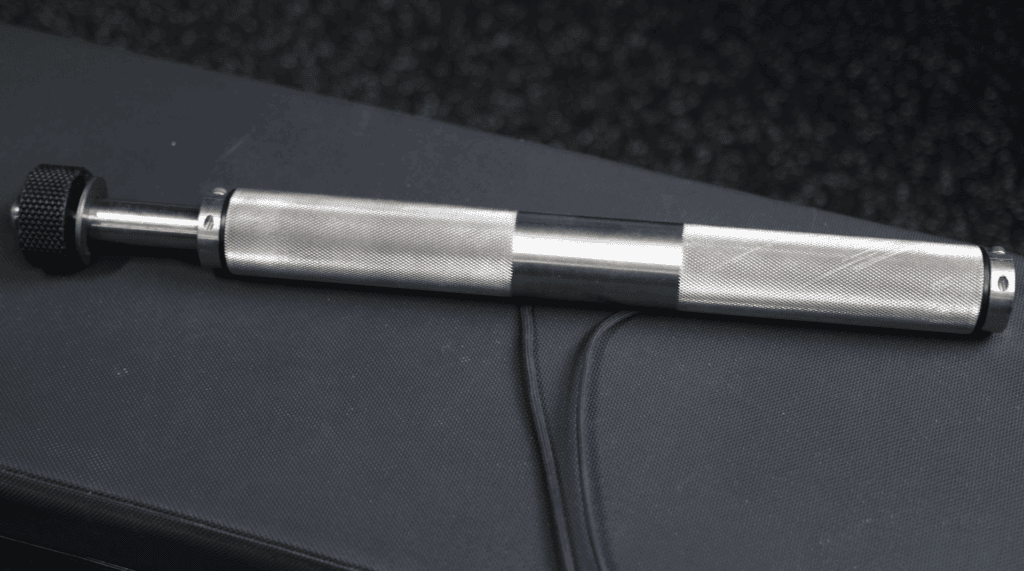
Build Quality: Where This Thing Really Shines
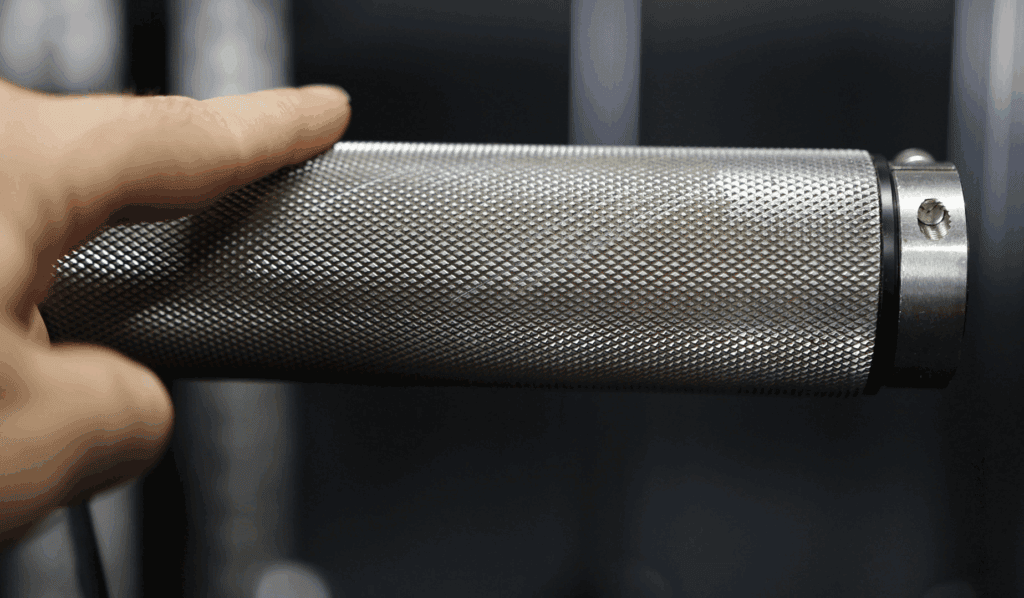
Note: The darker color you see here is chalk/debris/buildup and the lines you see going through are where I’ve scraped out a bit of the buildup. So it could use a cleaning, but the underlying finish is pristine!
Build quality is where this wrist roller immediately separates itself from cheaper options.
The stainless steel is legit stainless. After several months of regular use and minimal attention on my part, there’s been:
- No rust
- No weird spots or discoloration (only some buildup between knurling, which can be cleaned easily)
- No flaking or sketchy finish behavior
The machining is precise, and the knurling is extremely uniform. There are no flat patches, no inconsistent areas where the pattern suddenly changes. It looks and feels like it was machined with care, not cranked out as a generic accessory.
The Knurling: Awesome… and a Little Brutal at First
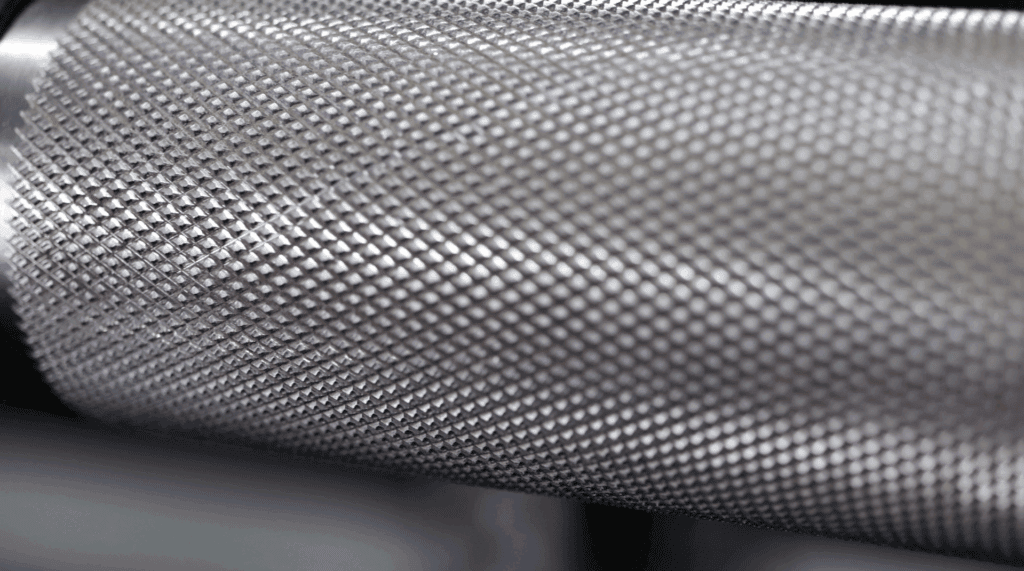
JD Gym Equipped uses a volcano-style knurl on this roller. I’d describe it as:
- On the aggressive side for an attachment like this
- Sharper in practice than it would feel on a barbell
If this exact knurling were on a barbell, it probably wouldn’t feel nearly as intense, because your hands stay more or less fixed on the bar. On a wrist roller, though, your hands are constantly moving, twisting, and re-gripping around the shaft. That means you feel every bit of sharpness with each rotation.
When I first started using it:
- The knurling actually limited how much I could comfortably do.
- My hands weren’t used to that level of bite in a dynamic movement.
- I was genuinely worried it might be too much for long-term use.
After about 2–3 weeks of using it twice per week, my hands adapted. A couple of things helped:
- Skin toughened up and calluses developed
- Any chalk I used likely filled in the peaks just a tiny bit, softening the feel slightly
At this point, the knurling no longer bothers me. But if you buy the knurled version, you should expect a “break-in” period of up to a few weeks where your hands hate you a little.
If JD Gym Equipped ever expands the line, I think a more moderate knurling option between completely smooth and full-aggressive would be very popular. A “medium” texture would still give plenty of grip without that initial shock.
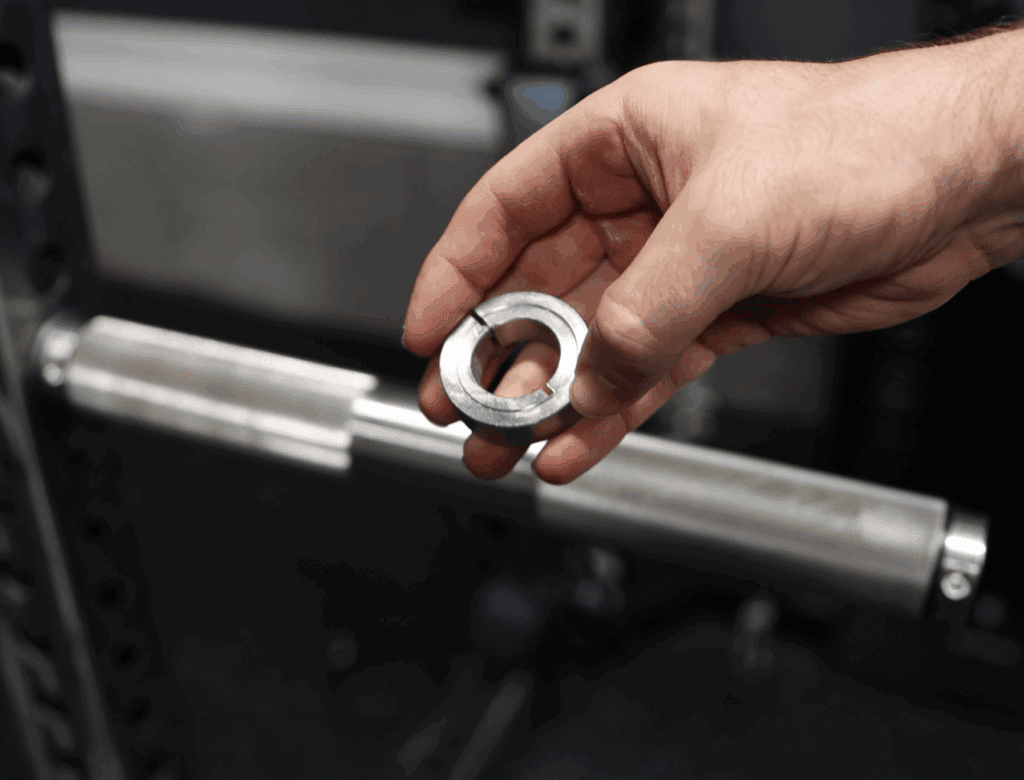
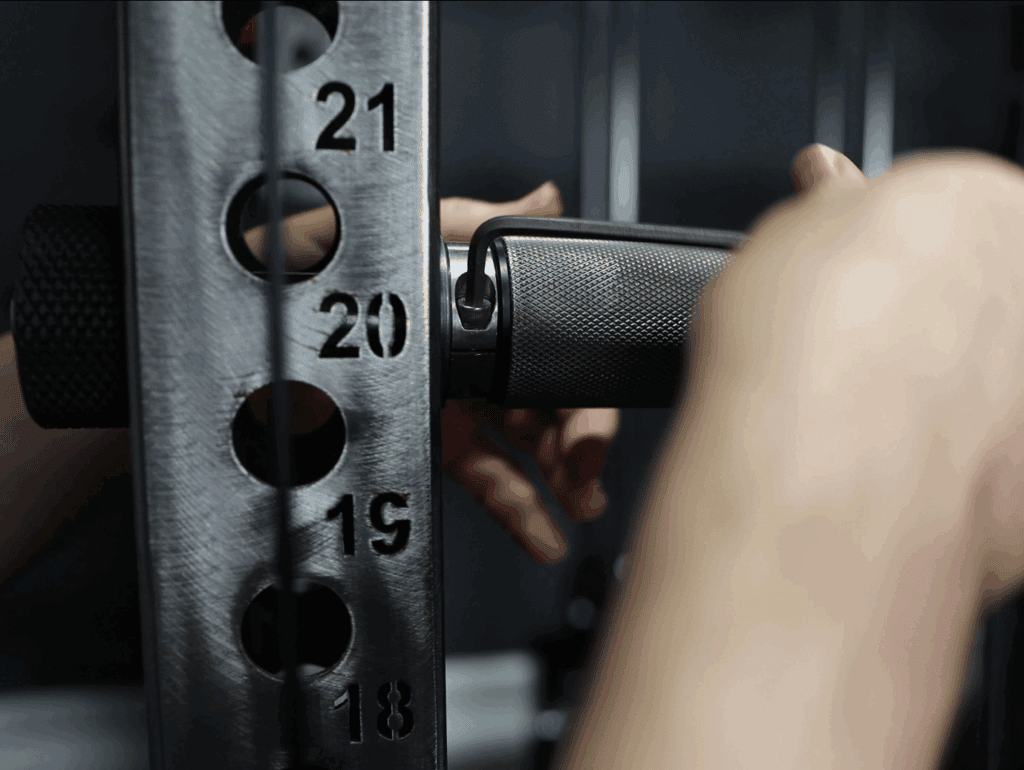
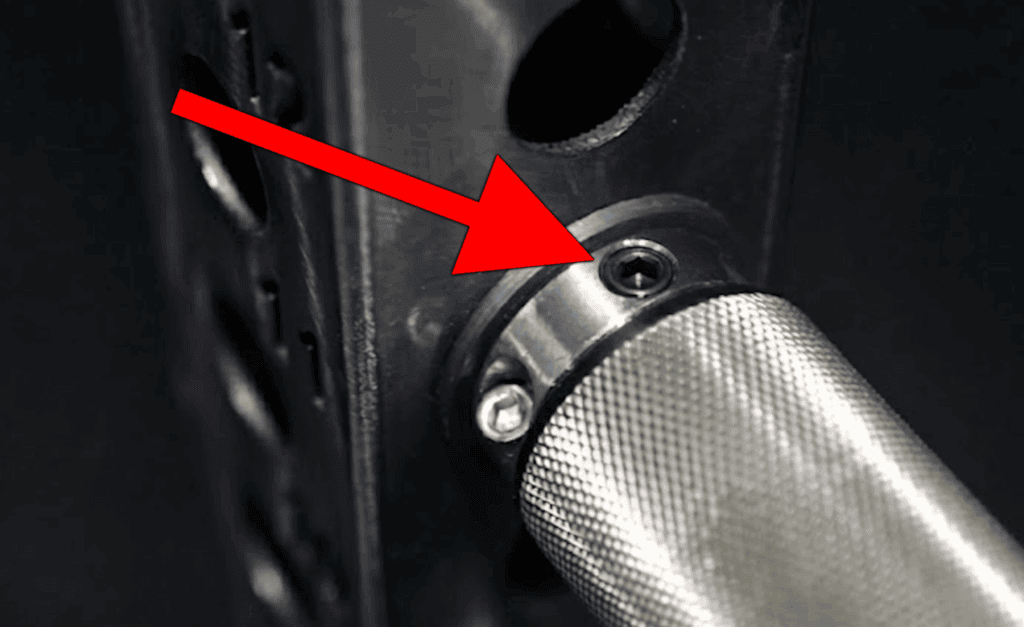
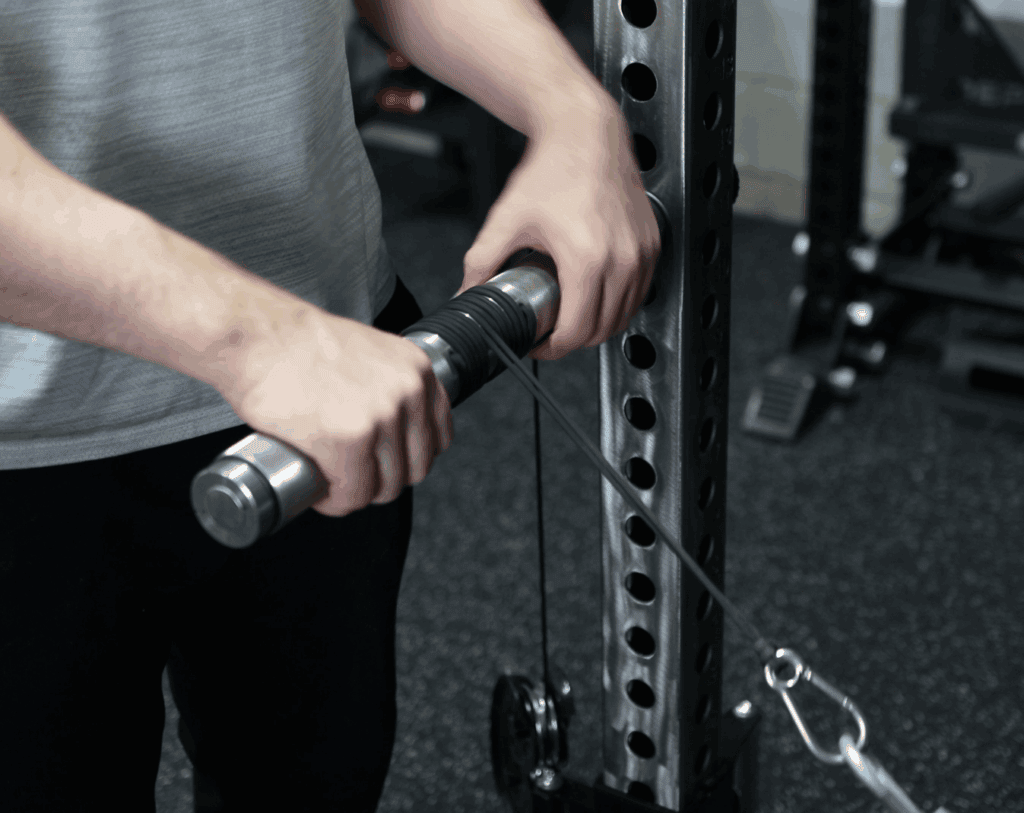
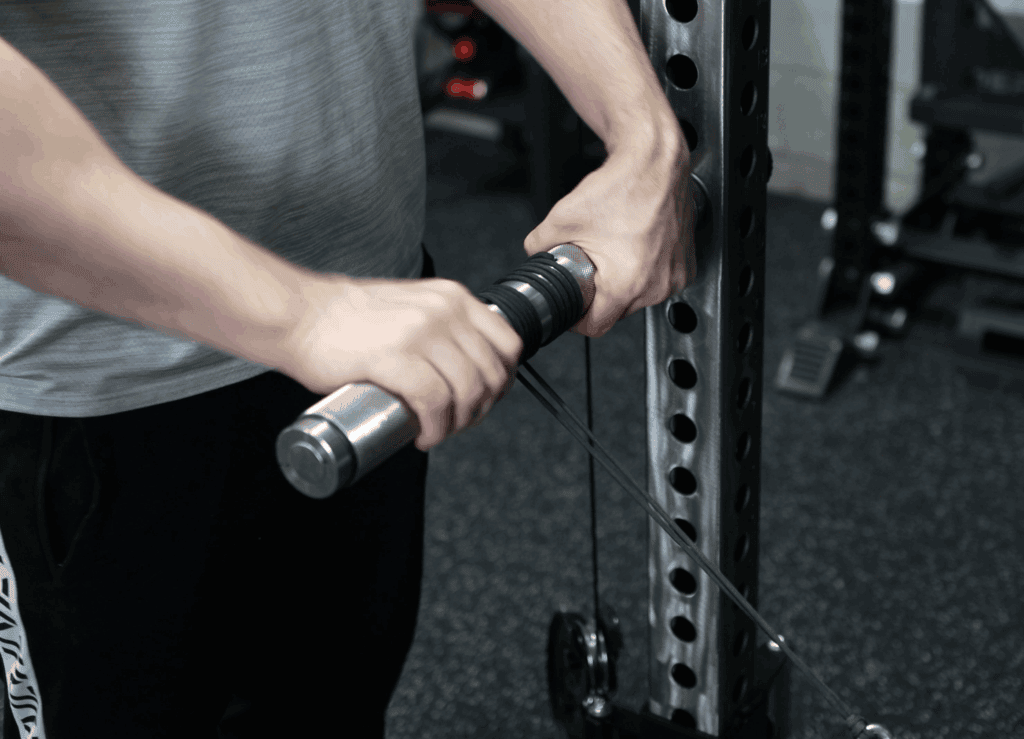
Mounting Nut & Rack Mounting Process
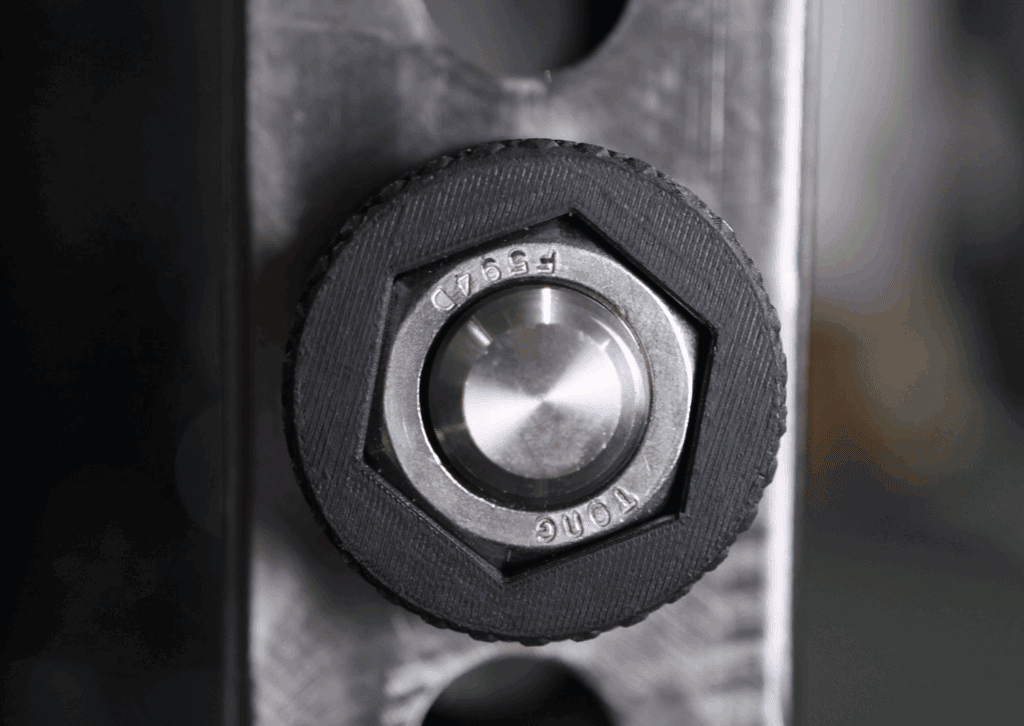
The way this thing mounts is simple and, overall, really well done.
The mounting nut is:
- A stainless steel hex nut
- Encased in a durable 3D-printed plastic cylinder
- Textured with its own knurled surface
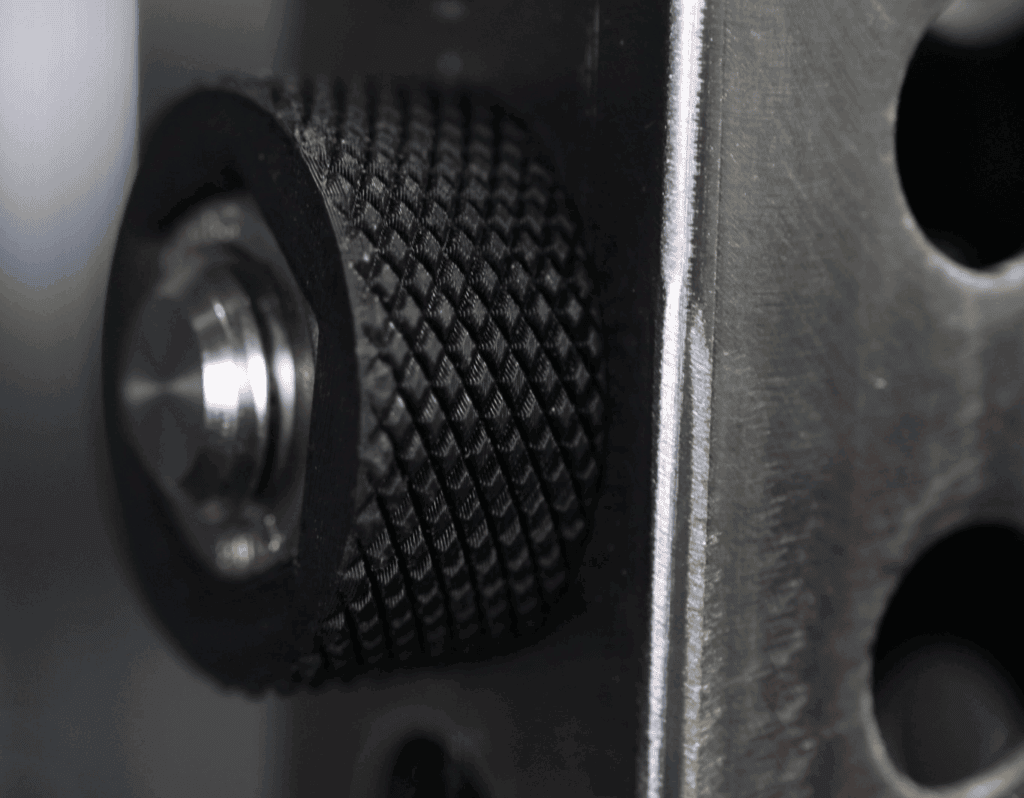
Functionally, that means:
- It looks good on the rack (not like a random hardware-store piece)
- It’s very easy to grip and spin by hand
- It keeps the roller tight and secure once it’s on
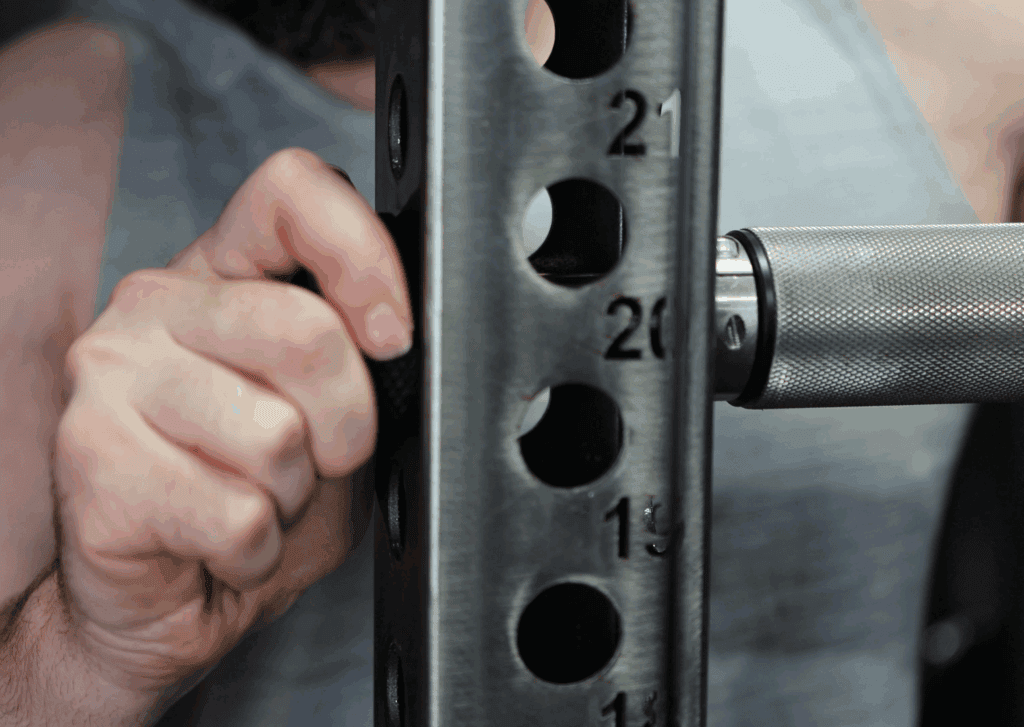
Mounting Is Fast & Tool-Free
To mount it:
- Slide the shaft through any compatible hole on the rack upright.
- Spin the mounting nut on the back side of the post.
- Tighten it by hand until it’s snug.
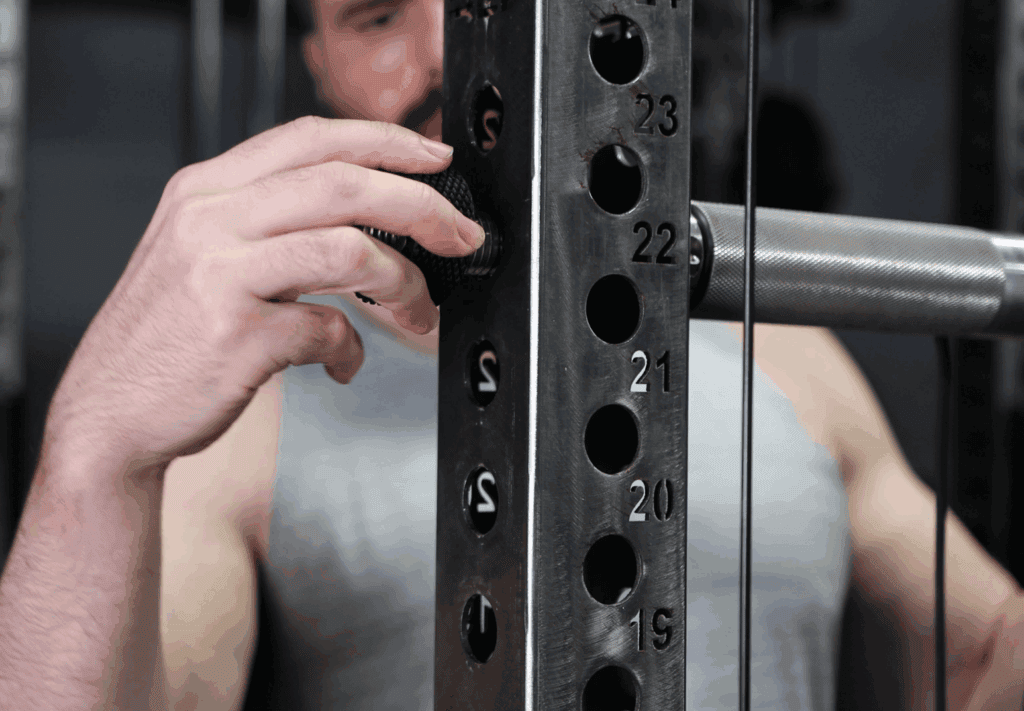
Adjusting height or switching sides takes just a few seconds. It’s genuinely one of those attachments you’re not annoyed to move around mid-workout.
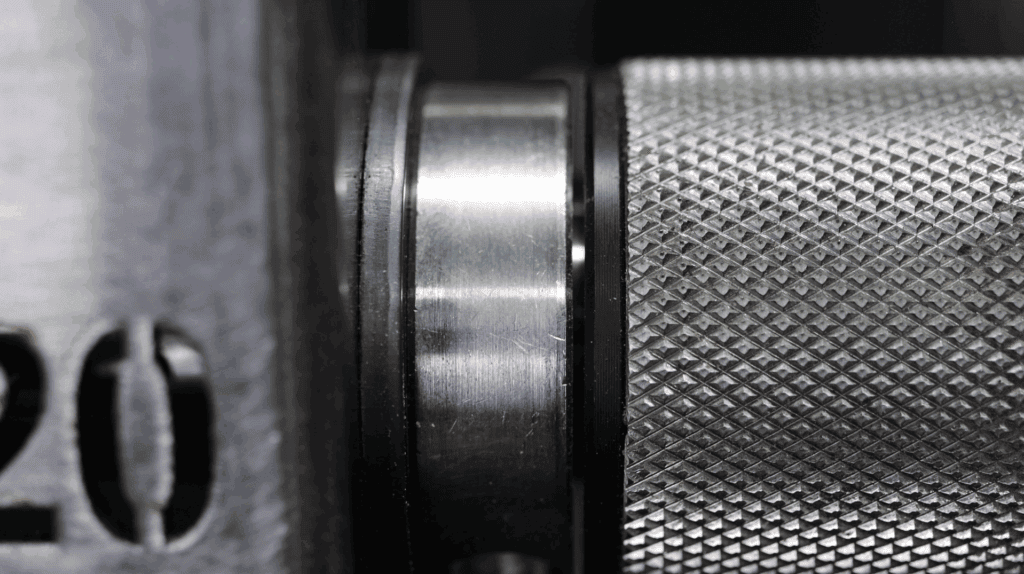
Important Detail: The Protective Face
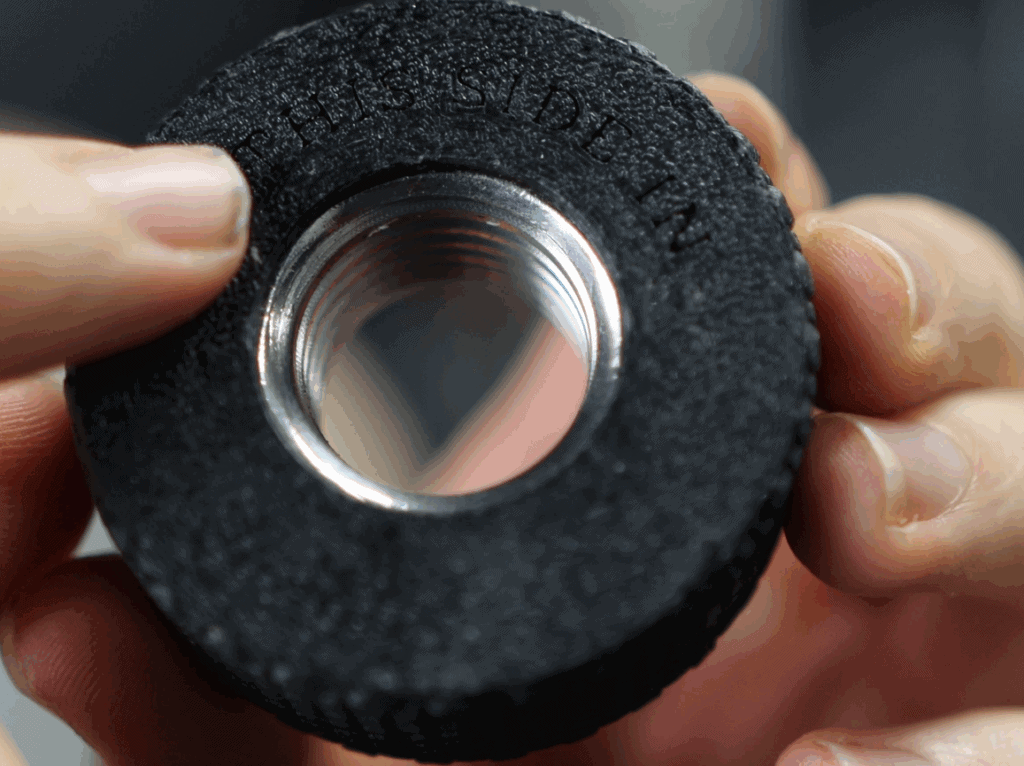
One side of the nut has a protective face that’s meant to go against the rack upright. If you flip it around backward (protective side facing out) you run the risk of scratching the finish on your uprights.
It’s a small detail, but worth calling out. Get that orientation right and your rack stays clean.
IMPORTANT: On a related note, make sure the plastic washer is on the roller-side of the rack upright. Otherwise you’ll have direct metal-on-metal contact, which will cause more damage than accidentally having the mounting nut on backwards. Yes, I did this by accident once. 🙁
The “Tilt Under Load” Reality

If you load it heavy enough, the roller will tilt down slightly, by just a couple of degrees. That’s just physics. You’ve got:
- A long lever arm sticking out from one upright
- A bunch of weight hanging off the middle of it
The main downside of the tilting is that it will cause the paracord to walk slightly off-center as you turn the roller. It’s not ideal, but it’s manageable. It’s only very noticeable at heavier weights. The lighter the load, the less the roller tilts and the less the paracord moves off-center.
No matter how tight you crank the nut, a fully horizontal position under heavy load isn’t realistic. It’s going to dip a bit. Early on, I tried to fight that.
I didn’t like the downward angle, so I kept tightening the nut harder and harder to keep the roller straight. That’s when I ran into the main design quirk with this attachment: the shaft collar migration.
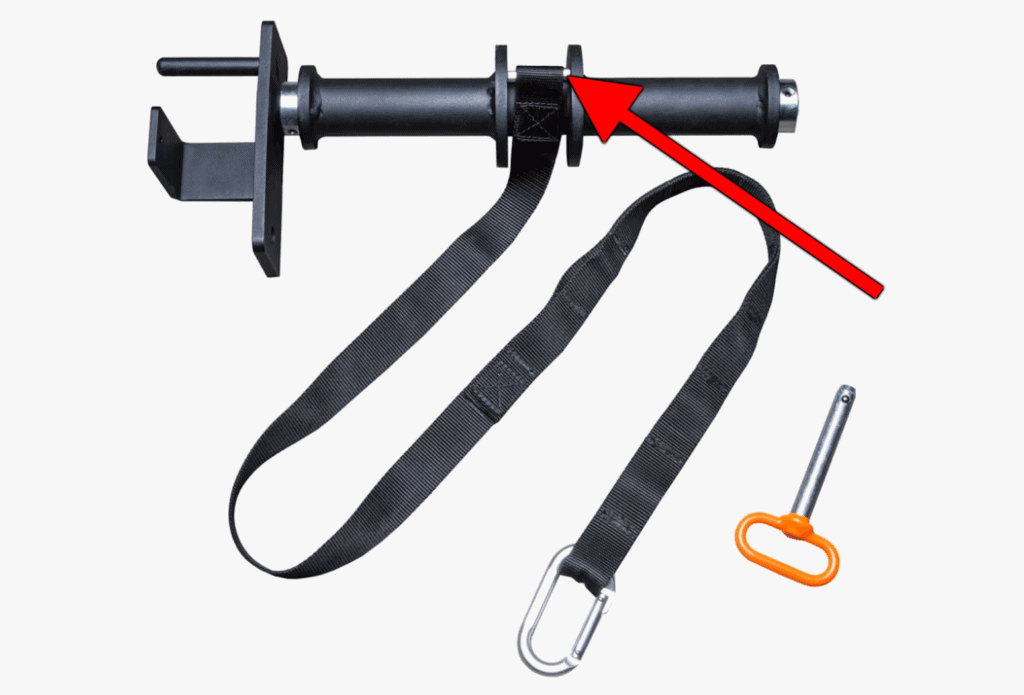
The Shaft Collar Issue (And How I’d Fix It)
The shaft that runs through the roller is held in place laterally by collars. There should be a small gap between the collar and the roller drum. If that gap disappears, things go sideways, literally and figuratively.
What Happened
By over-tightening the mounting nut to try to keep the roller “perfectly” level, I essentially:
- Pushed one of the shaft collars inward, toward the roller
- Eliminated the gap between the collar and the drum
One day, in the middle of a set, the roller just stopped turning. The weight was hanging in mid-air and everything felt locked up.

When I looked more closely, I saw the roller was now pressed flush against the collar.
The Fix
The fix in that moment was pretty straightforward:
- I grabbed an Allen key
- Loosened the collar
- Slid it back out a bit to reintroduce a small gap
- Retightened the collar in the new position
The problem is, if you slide it too far, you create a new issue: when there’s no load on the roller, it can overspin, and the paracord can unravel or loosen itself unintentionally. So the spacing really needs to be in that “just right” zone; not too tight, not too loose.
Replacement Collar & Ongoing Behavior
I reached out to Jesse at JD Gym Equipped, and he told me there had been a bad batch of collars. He sent me a replacement right away. The new collar definitely behaved better, but if I went back to cranking the mounting nut down too hard, the same basic issue could still happen.
At this point, my solution is:
- Tighten the mounting nut enough to be secure
- Accept the slight tilt under heavy load
- Keep an eye on the collar gap occasionally
Doing that, I haven’t had any more seizing issues.
How I Think JD Could Improve This
If I had to give JD Gym Equipped a single, high-impact improvement suggestion, it would be to make it impossible for the collar to migrate, no matter how hard someone tightens the mounting nut.
My proposed solution:
- Add a set screw to the shaft collar
- Machine a small recess in the shaft for that set screw to seat into
That tiny recess would give the set screw a positive “home,” so the collar couldn’t slide inward under force.
The roller could still be disassembled if needed by taking off the shaft collars; you’d just loosen both the set screw and the main clamping screw, then slide the collar off. But under normal use, the collar would be locked.
It’s a small change, but I think it would remove the only real mechanical headache I’ve experienced with this attachment.
Why Paracord (Not a Strap) Is a Big Deal
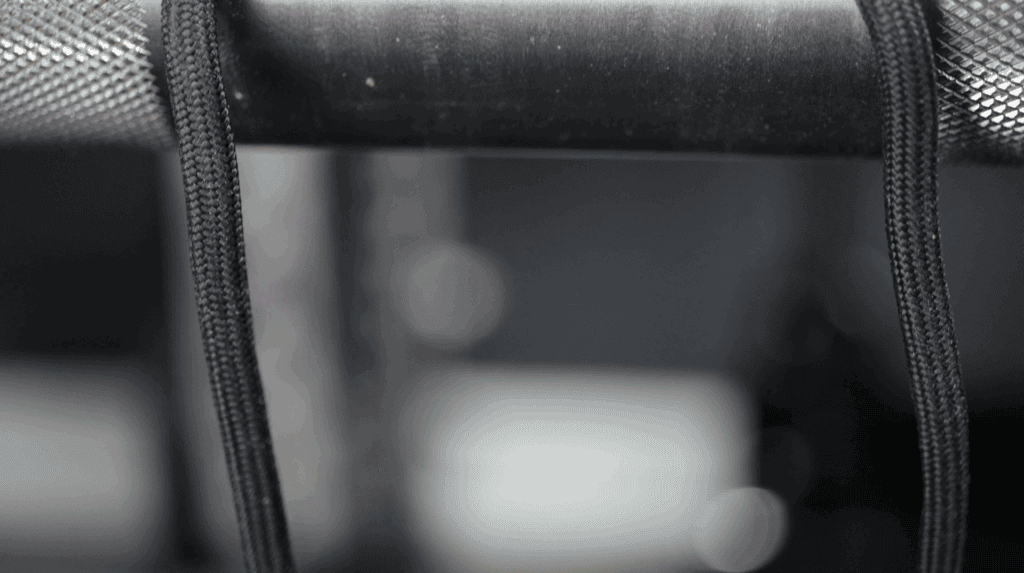
Most rack-mounted wrist rollers from the bigger brands use a flat strap instead of a cord. On paper, a strap seems fine. In practice, it’s not ideal.
The Problem With Straps
When you wrap a strap around a drum:
- It doesn’t build evenly
- The point where the strap feeds in starts to stack up
- You end up with a hump in the wrap
Every time you hit that hump in the rotation, you get:
- A spike in resistance
- A slight “catch” or stutter in the motion
- Less consistent tension across the ROM
I’m not saying strap-based rollers are useless. Far from it. You can absolutely still train very effectively with them. But they’re just not as smooth or consistent, from what I’ve heard from others.
The Paracord Advantage
The JD Gym Equipped wrist roller uses paracord, which wraps much more evenly around the drum. That alone is a big upgrade:
- No strap hump
- No obvious sticky spot
- Much more consistent tension from start to finish
The rotation feels buttery smooth and predictable in a way strap-based designs can’t really match.
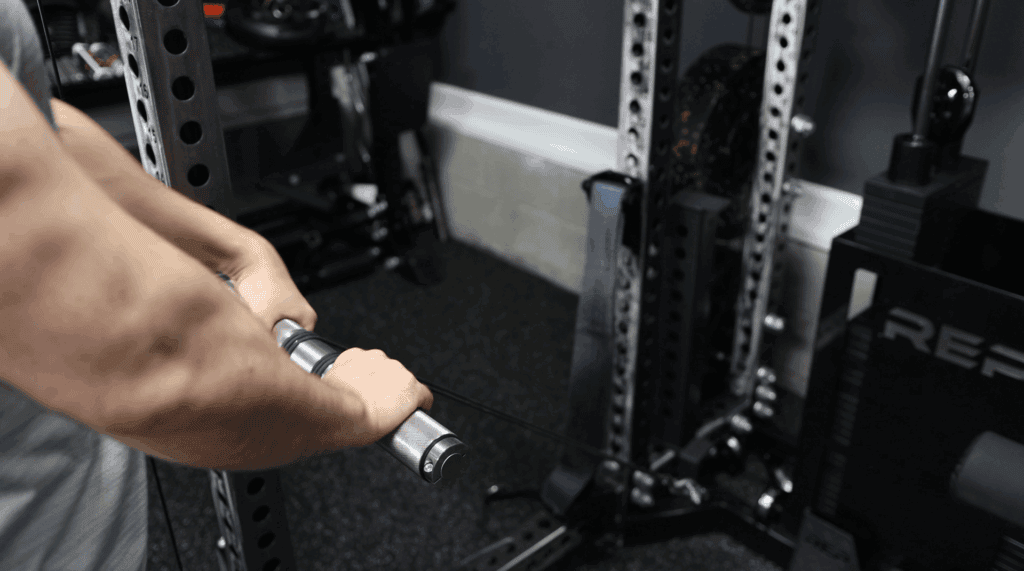
Centered Dual-Exit Channels: Small Detail, Big Effect
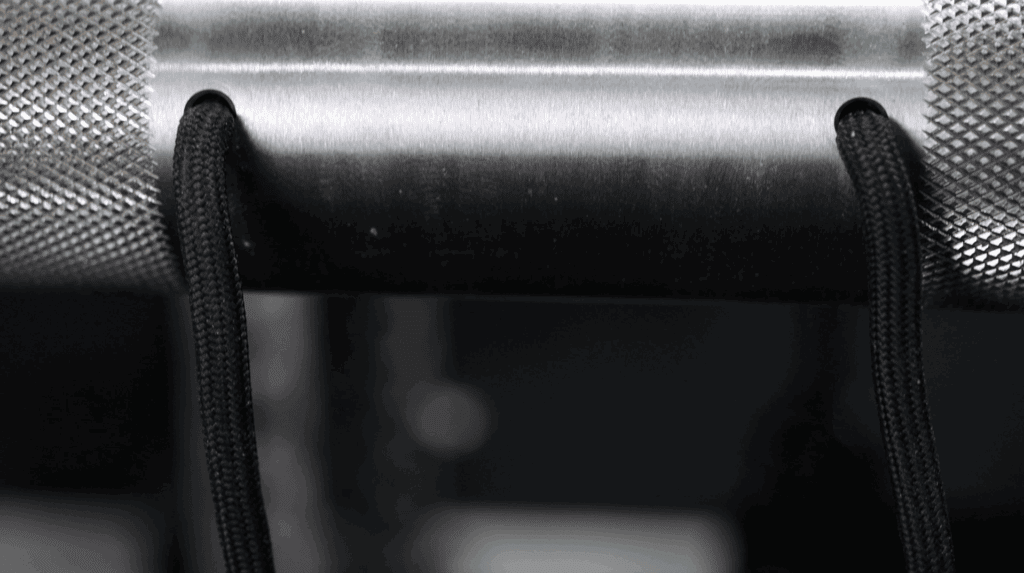
JD Gym Equipped didn’t just swap strap for paracord and call it a day. The paracord exits the roller drum through two centered channels, not a single off-center hole.
This matters a lot:
- If the cord came out of one hole, it would tend to drift toward that side as it wraps.
- That would shift the load off-center and encourage uneven wrapping or bunching.
- Over time, that could make the movement feel lopsided and less smooth.
With the centered dual-exit design:
- The load stays centered relative to the drum
- The cord winds evenly toward the middle (albeit with a bit of drift if/when the roller is tilted)
- You don’t get weird bunching or cord stack-ups on one side
- The resistance stays balanced and consistent across every revolution
For me, a huge reason this is a better design than other rack-mounted wrist rollers is the combination of:
- Paracord instead of a strap, and
- The centered dual-exit channels
Different Ways I’ve Loaded It
I’ve experimented with a few different loading methods. Some worked better than others.
1. Old Loading Pin (Not Great)
First, I tried using an older loading pin I already had from a traditional wrist roller setup.
- It worked okay
- But it was kind of annoying to load and unload
- The whole setup felt more fussy than it needed to be
I stopped using that pretty quickly. Now, if it’s the only practical option you have at hand, don’t let this be a dealbreaker. It’s still very much doable. But if you have better loading solutions, as I do, it’ll be a bit more enjoyable to use.
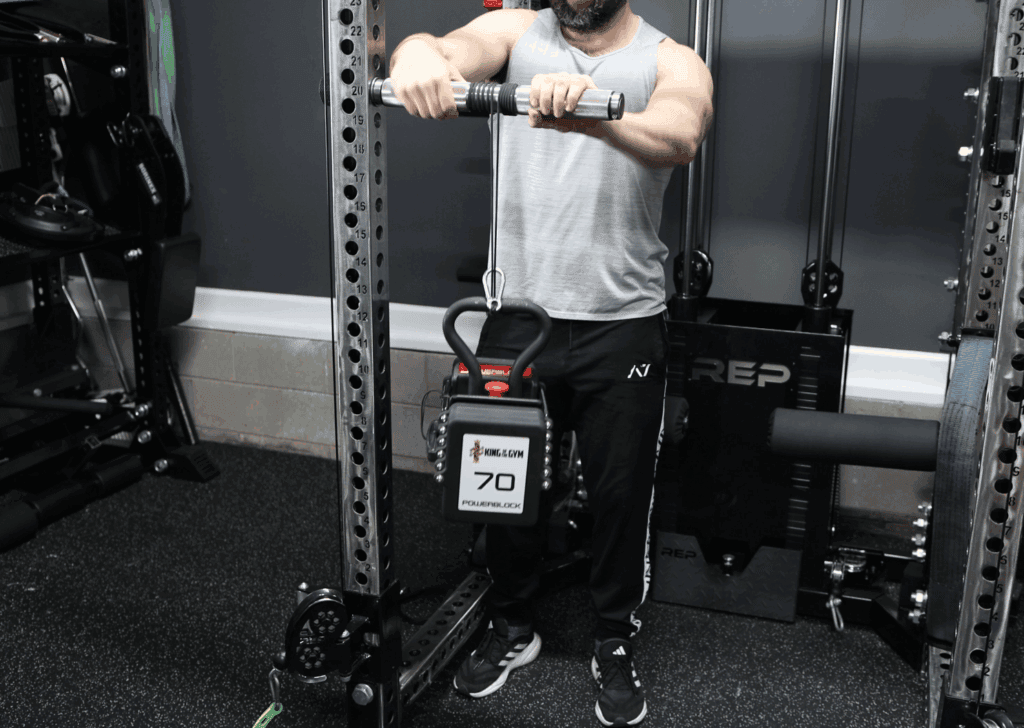
2. PowerBlock Kettlebell Handle (Clever but Imperfect)
Next, I used my PowerBlock kettlebell handle as a sort of selectorized loading pin. I’d:
- Loop the paracord around the handle
- Adjust the weight using the PowerBlock selector system
That setup was actually pretty nice:
- Very fast to change weight
- No need to mess with plates or collars
The downside:
- Once you lower the weight back down, the kettlebell doesn’t always nest perfectly back into the block.
- Definitely not a dealbreaker, but I found an even better solution…
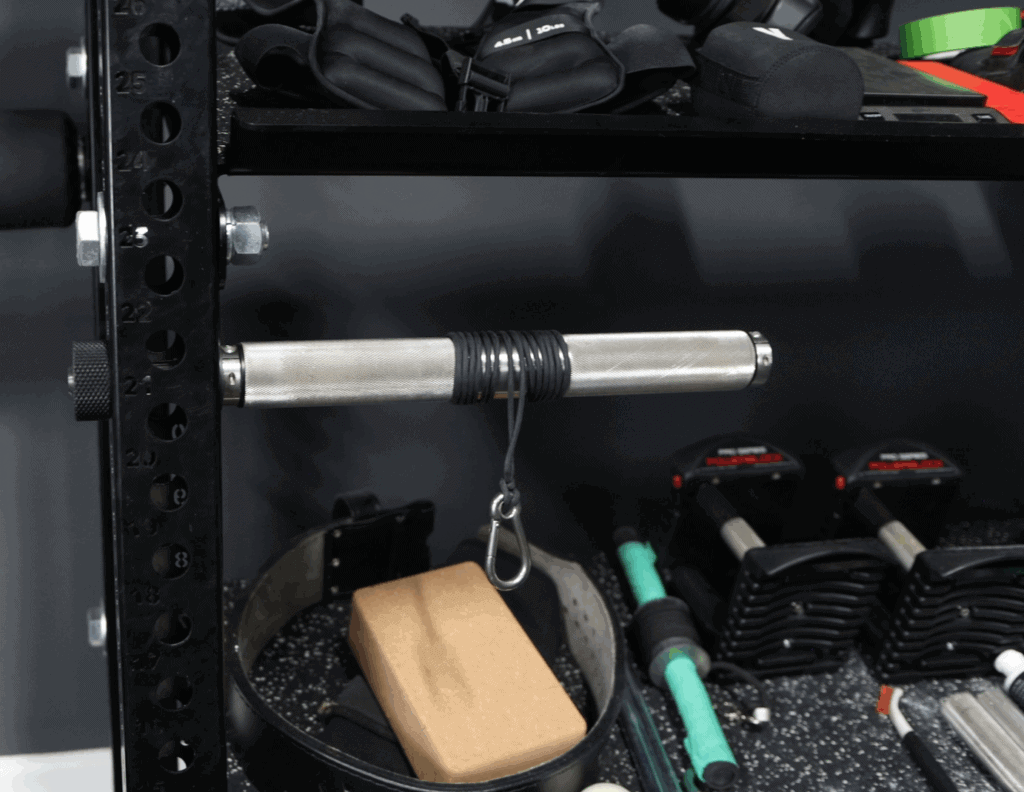
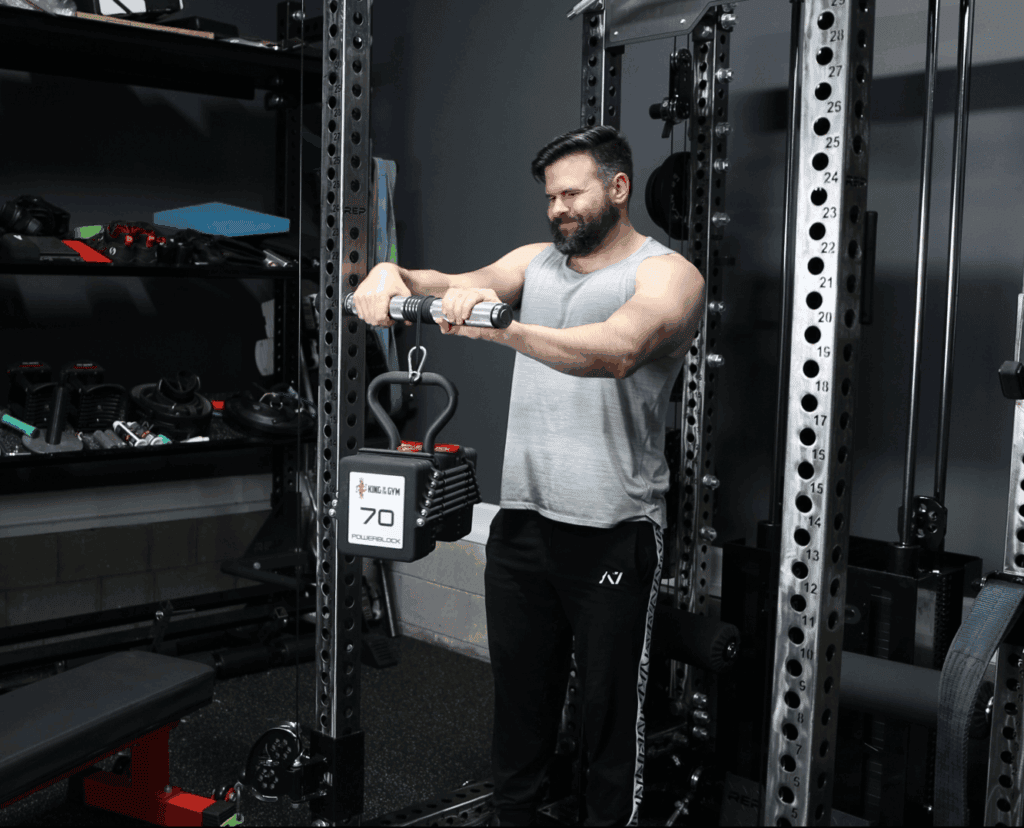
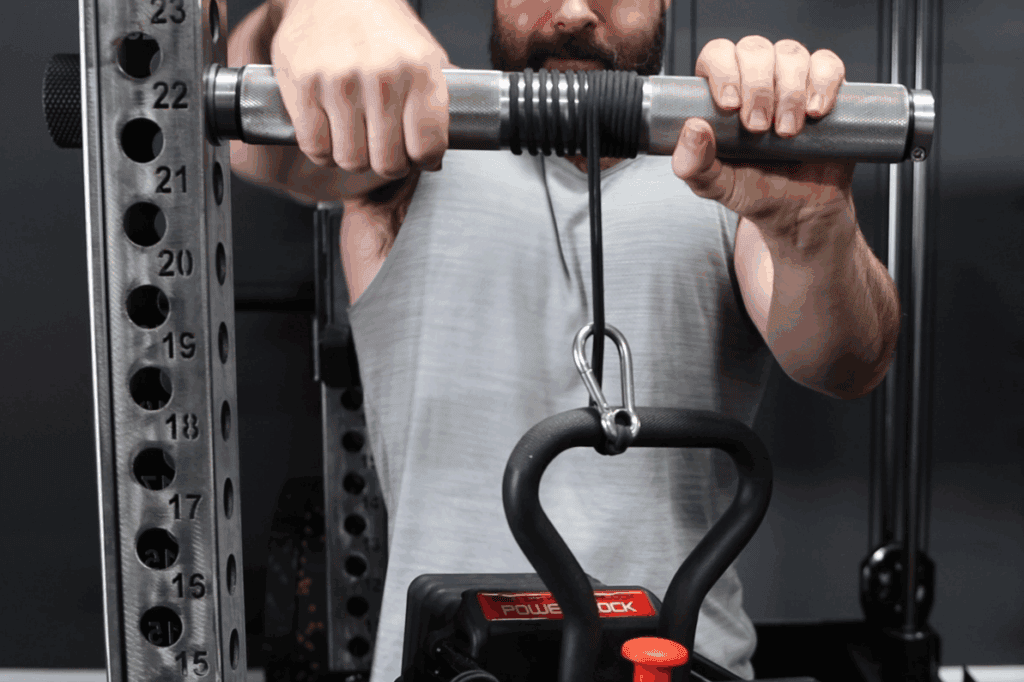
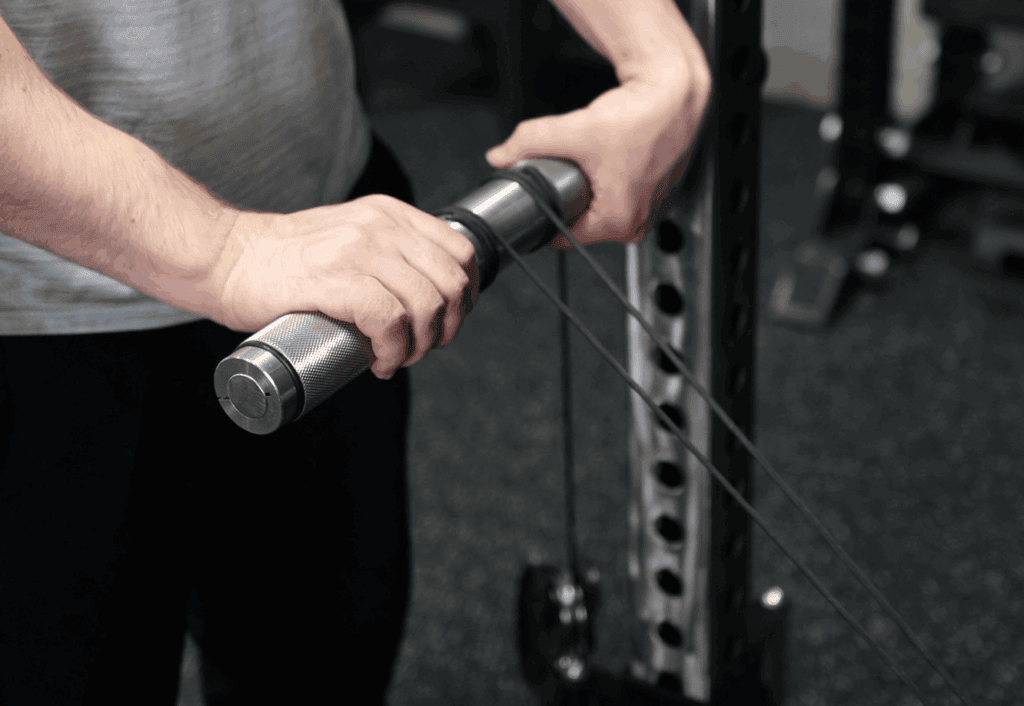
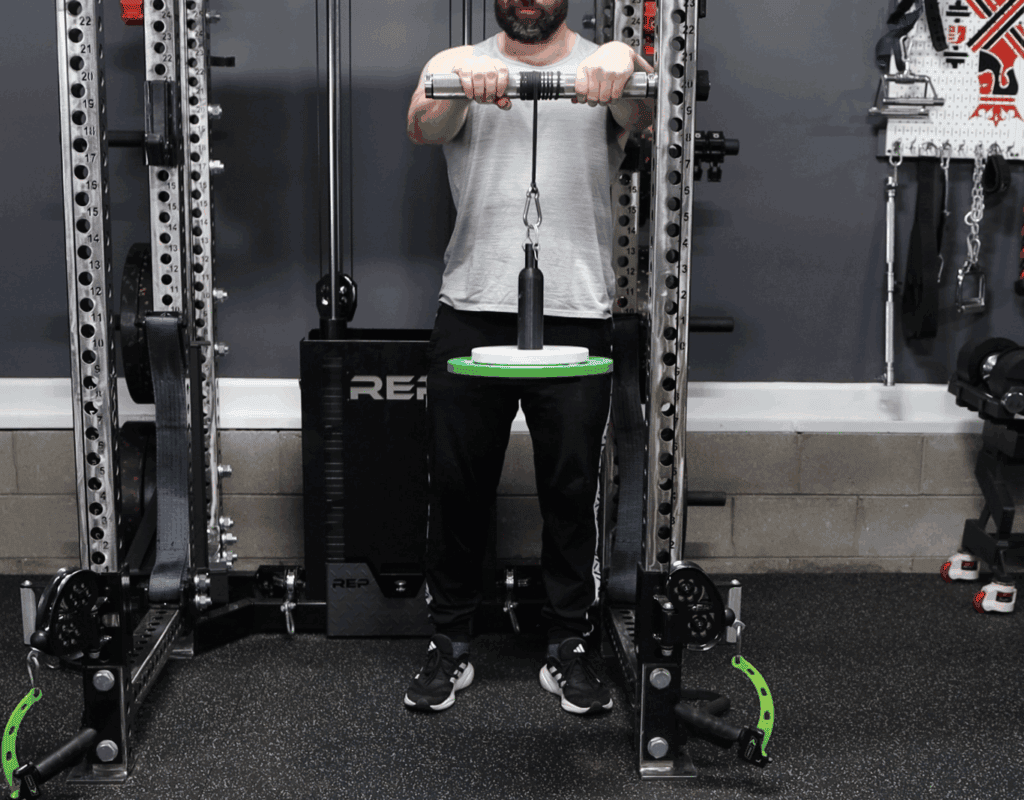
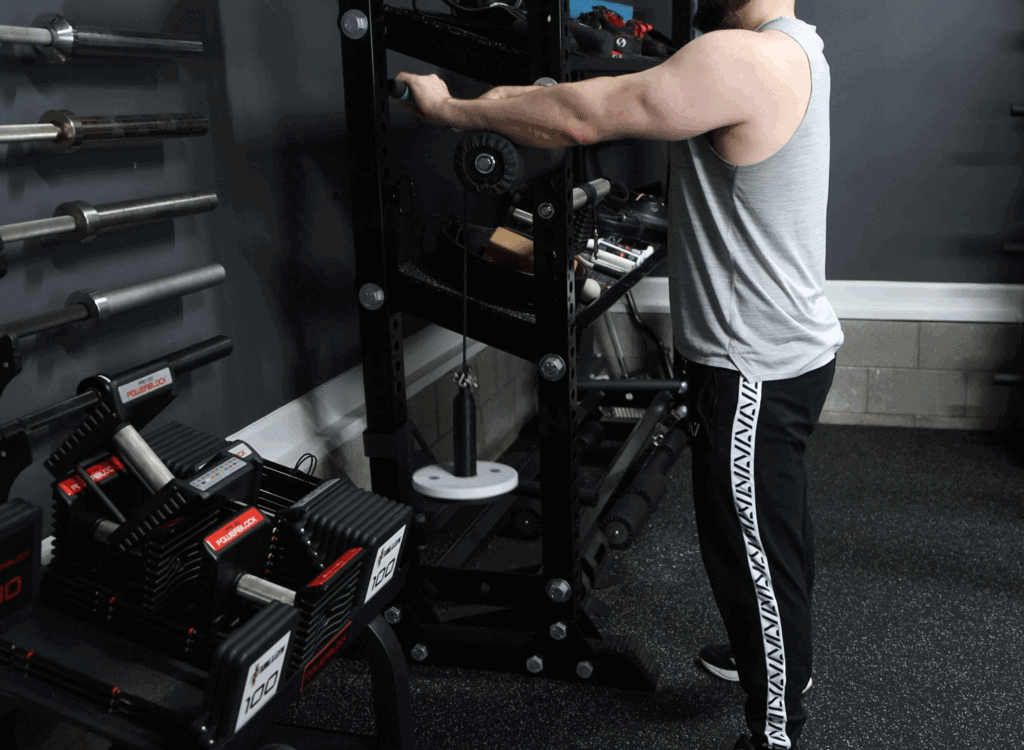
3. REP Ares 1.0 Cable Stack (My Favorite Setup)
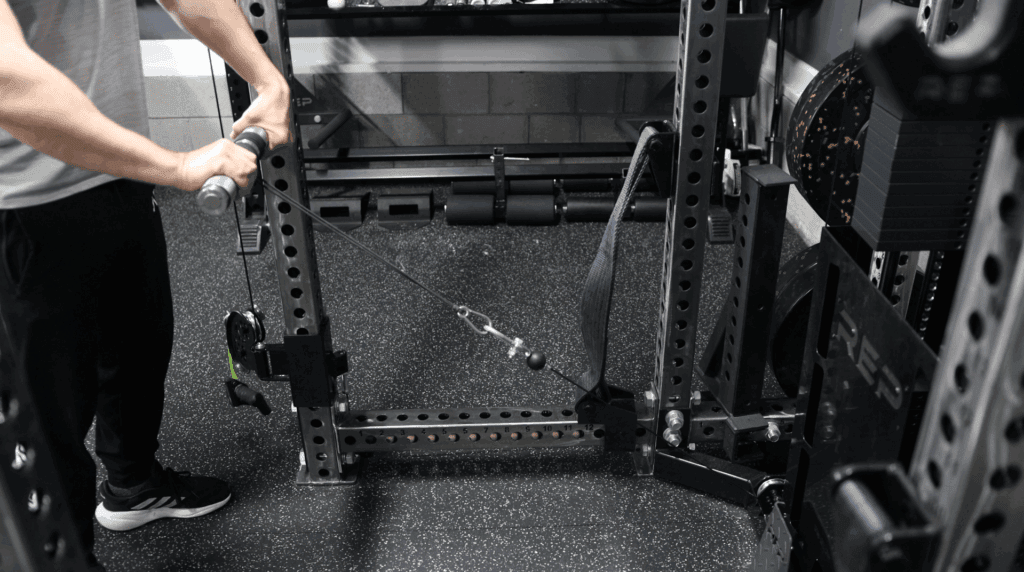
My favorite way to use this wrist roller is by pairing it with my REP Ares 1.0.
Here’s what I do:
- Mount the wrist roller on the inside of a front upright
- Use one of the low row cables
- Clip the paracord into the cable via a carabiner
On my rack, the cable comes out almost perpendicular to the roller in that position. It’s not mathematically perfect, but it’s close enough that the load feels very direct.
Why this setup is great:
- Completely selectorized; just move the pin on the weight stack
- No plates to add or remove
- Very fast to adjust between sets
- I can mount the roller lower than a typical loading pin setup, which I’ve found feels better for forearm work
The paracord does walk a bit to one side since the cable is slightly offset, but:
- It never overlaps or climbs onto the knurling
- I periodically switch which upright I mount it on to distribute any long-term wear
And to be fair, the cable can drift when using the loading pin method with heavy weight (possibly even a bit more than on this cable system) due to the roller tipping down slightly.
If you have any kind of cable stack you can line up with this roller, I’d highly recommend trying that kind of setup.
TIP: If you happen to have a Voltra, that’s also a top-tier excellent way to load the JD Gym Equipped Wrist Roller.
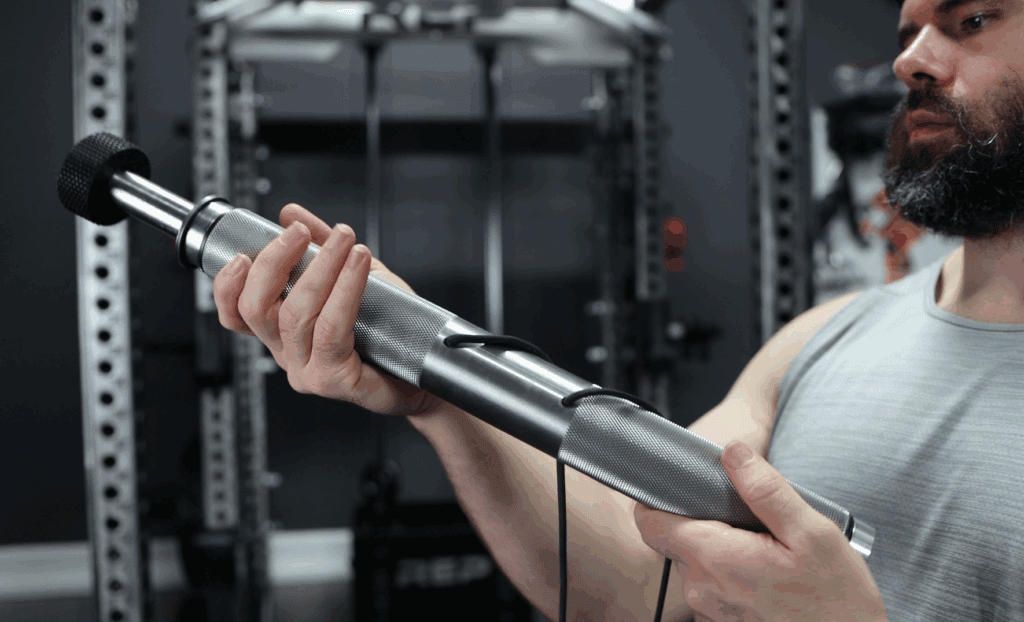
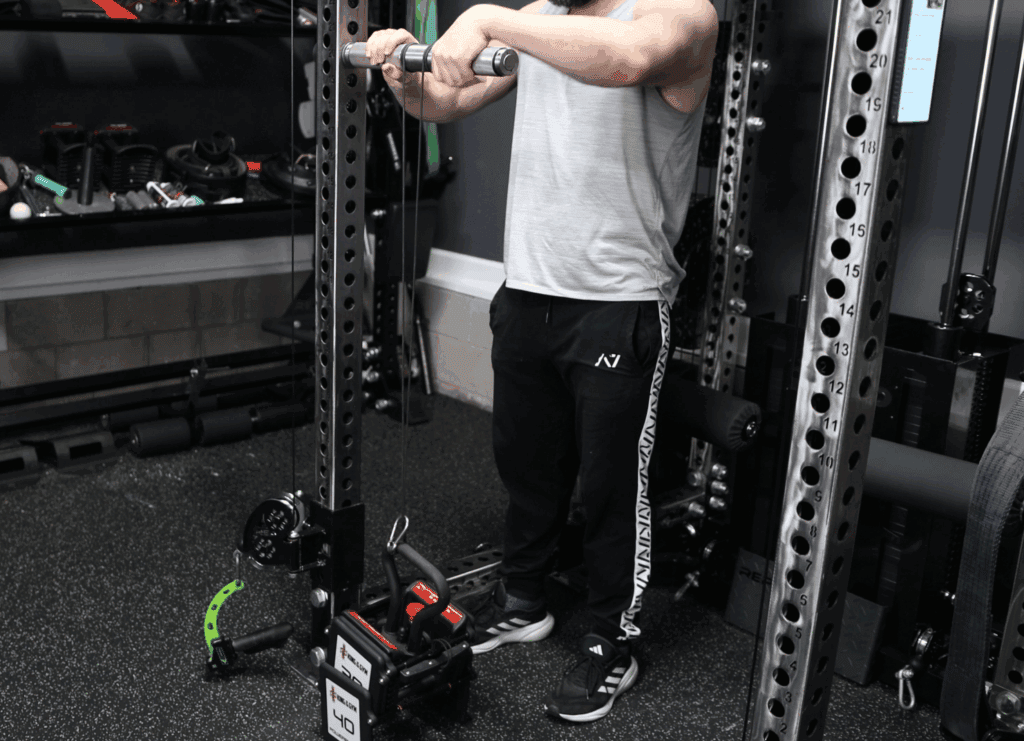
How It Actually Feels to Use
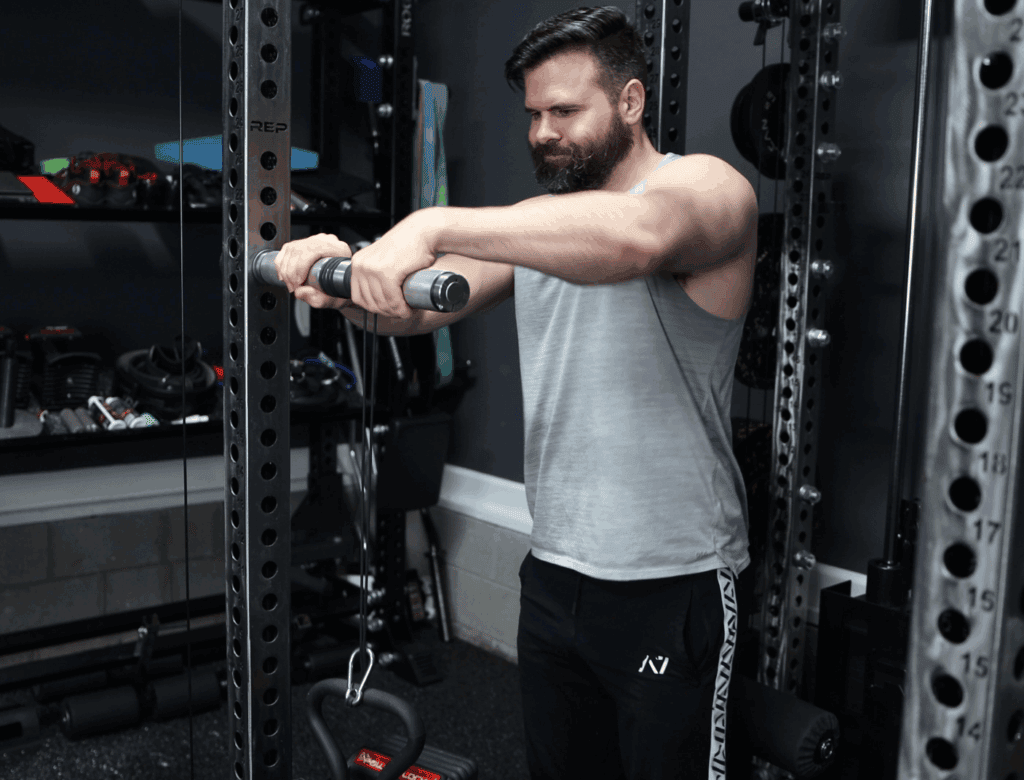
So, how does it feel in real training?
I’d summarize the feel in four words:
Aggressive, substantial, buttery smooth, consistent.
The stainless steel, the diameter, and the aggressive knurling combine to make it feel like a very serious, very premium piece of equipment when you grab it.
Grip vs Forearm Focus
By default, because it’s:
- Thick (larger diameter than a typical cheap wrist roller), and
- Rack-mounted (fixed in space)
…it tends to feel more grip-focused (as opposed to forearm-focused) if you’re not paying attention to your technique.
My natural tendency, especially early on, was to:
- Use shorter, choppier wrist movements
- Just “spin” the roller with small range-of-motion pulses
When you do that, the emphasis shifts more toward crushing grip and less toward pure wrist flexion/extension.
In contrast, a handheld (non-mounted) wrist roller practically forces:
- Larger wrist movements
- More exaggerated flexion and extension
- A very obvious forearm pump
Because it’s not fixed between uprights (and often smaller in diameter), the traditional non-mounted style roller is more intuitive for pure forearm work.
You Can Still Crush Your Forearms With This
All that said, you can absolutely get a great forearm pump with the JD Gym Equipped wrist roller. You just have to be a bit more intentional.
The key is:
- Use a full range of motion on flexion and extension
- Think “big, smooth rolls,” not twitchy half-rotations
- Control the eccentric as the weight goes back down
When I do that, my forearms are cooked. Grip is obviously working hard too, but the forearm pump is very real. Though, the forearm pump and burn still does take longer to kick in compared to a non-mounted wrist roller.
So I’d classify this as a hybrid tool:
- Great for grip
- Great for forearms
- But only maximizes forearm involvement if you dial in your technique
CONSIDERATION: If you’re looking for the easiest and most efficient way to target just your forearms and get a massive pump/burn very easily, and without having to think about it – then I recommend considering the non-mounted version of the JD Gym Equipped wrist roller instead. By having it free in your hands, you’ll naturally move your wrists in a way that’s more conducive to a pure forearm movement.
Stability, Overload, and Training Frequency
One of the biggest advantages of a rack-mounted wrist roller is how stable it is.
- There’s no wobbling around like a handheld roller
- You’re not trying to stabilize the handle in mid-air
- You can focus purely on output and range of motion
That stability makes it extremely easy to progressively overload the movement and build up to some serious weight.
But there’s a double-edged sword there:
- Because it’s so stable, it’s easy to do too much. It’s very easy to go heavy.
When I first got it, I was using it:
- About twice per week
- Typically 3–5 sets in each direction
- Often going close to failure
- Using relatively heavy weights
After a few months of that, I started to feel elbow tenderness, which was likely the beginning of medial epicondylitis. This was a direct result of stacking a lot of heavy direct forearm work on top of my other training.
It wasn’t the wrist roller’s fault; it was my programming.
These days, I’ve scaled back to:
- Around once per week
- Still as a finisher, but more controlled
- And I’ll take a full week off if my elbows or forearms feel beat up
The upside is that, even with that more conservative frequency, I’ve still:
- Improved my grip strength
- Increased my forearm strength
- And seen a bit of visible forearm size gain
So from a results standpoint, I’m happy with how it’s performed.
And thankfully, my elbow is pretty much back to normal, though I can start to feel it flare up if I push too hard.
Durability

From a durability perspective, the JD wrist roller has held up exactly how I’d want a premium stainless steel attachment to hold up.
After several months:
- The stainless steel still looks great
- The knurling is still crisp and hasn’t flattened out
- The rotation is still smooth
- The paracord hasn’t frayed or gotten fuzzy, even where it comes out of the holes in the roller drum
The only issue has been the collar migration situation if I get too aggressive when tightening the mounting nut. Again, this is something I think could be solved via a small set screw + recess design change.
Other than that, no complaints on the longevity front.
Pros & Cons
In the intro of this review, I laid out a condensed version of the pros and cons of this wrist roller. In this section, I’ll provide an expanded list with additional explanation.
Pros
- Premium stainless steel construction: 100% stainless steel. Not “mystery metal.” No rust, no discoloration, and machining that actually looks refined.
- Paracord + centered, dual-exit channels = elite smoothness: No strap hump, no binding, no uneven wrapping. Rotation is consistently smooth and predictable throughout the entire range of motion.
- Aggressive, high-quality volcano knurling: Uniform, crisp, and grippy. It feels like a serious piece of equipment in your hands.
- Multiple rack size options: Compatible with most popular rack upright and hole sizes.
- Optional pronation handle: Great for adding weighted pronation and supination work to your training, which is especially helpful for arm wrestlers. If you’re not sure if you want this, you can always add it later. JD will weld it on at cost (+ shipping both ways).
- Easy mounting and fast adjustments: Tool-free install, quick height changes, and intuitive to move around the rack.
- Extremely stable for progressive overload: Being fixed to the rack removes stabilization demands and lets you focus purely on output.
- Strong grip AND forearm training potential: A hybrid tool that can emphasize either depending on your technique and ROM.
Cons
- The shaft collar can migrate inward if the mounting nut is over-tightened: This can cause the roller to seize until you readjust the collar. It’s fixable, but a design improvement (set screw + detent) could solve it completely.
- Knurling may feel too aggressive for some people: There’s a short break-in period while your hands adapt. A medium knurling option would help.
- Slight downward tilt under heavy load is unavoidable: This is inescapable because physics dictates that a heavy weight on a long arm will dip a bit. Still, it’s slightly annoying.
- Premium price: It’s not a budget piece. Very high quality, but not cheap.
- Not ideal for pure forearm isolation: It naturally leans more grip-dominant unless you consciously use full ROM, in which case you can bias the forearms more.
Is It Worth It? Who It’s For (And Who It’s Not For)
This is the big question: should you actually buy this?
Even with the collar quirk, I’d still say this is the best rack-mounted wrist roller I’ve seen in terms of:
- Material quality
- Rotation smoothness
- Overall feel
- Thoughtful details like the paracord and dual exit channels
But that doesn’t automatically mean you should buy it.
You Probably Shouldn’t Get It If…
I don’t think this roller makes sense for you if:
- You’re on a tight budget
- Forearm and grip training are more of an afterthought than a priority
- You’re perfectly happy using cheaper tools like a basic wrist roller or wrist curls
- You don’t have a compatible rack/hole size (or don’t want to ask for a custom-ordered solution)
You can absolutely build impressive forearms and solid grip strength with:
- A cheap handheld wrist roller
- Dead hangs
- Towel hangs / towel twists
- Rice bucket work
- Basic wrist curls and extensions
- Farmers carries
This is more of a premium, streamlined way to accomplish the same overall goal.
You Should Strongly Consider It If…
On the other hand, I think this is a very smart purchase if:
- You’re truly serious about grip and forearm training
- You want a rack-mounted solution that’s actually smooth and consistent
- You care about premium materials and a refined feel
- Your rack is one of the supported sizes
- Bonus: you have a cable system (or Voltra) you can pair it with
For me, it’s become my go-to grip and forearm tool. It’s not my only option, and I still like what a skinny traditional roller does for pure forearm work. But in terms of overall training experience, the JD rack-mounted roller is at the top of the list.
My Rating
JD Gym Equipped Wrist Roller
The JD Gym Equipped Wrist Roller is a rack-mounted stainless steel forearm and grip trainer using a dual-exit paracord system for smooth, centered rotation. It’s available in multiple rack-size options with optional knurling and an add-on pronation handle, and features precise machining, a durable mounting nut, and a thick roller diameter for serious grip and forearm training.
4.8
Pros
- Premium stainless steel construction
- Rack-mounted design gives great stability
- Paracord with dual exit channels for smooth, consistent rotation
- Aggressive, uniform volcano knurling
- Optional pronation/supination handle
- Fast and secure mounting/adjustment
- Can fit most racks
Cons
- Shaft collar can migrate inward if over-tightened
- Knurling may feel too aggressive at first
- Slight downward tilt under heavy load is unavoidable
- High price point
Final Thoughts

The JD Gym Equipped Rack-Mounted Stainless Steel Wrist Roller is:
- Overbuilt in a good way
- Thoughtfully designed where it counts
- A pleasure to use once you dial in technique and loading
- Slightly flawed in one specific, fixable area (the shaft collars)
- And very clearly a premium, specialty tool, though not a basic necessity
If you’re the type of home gym owner who enjoys having higher-end pieces that make training feel better (not just “good enough”) and you actually plan to use it regularly, I think you’ll be really happy with it.
If you’re hunting for the cheapest way to train your forearms, this isn’t that. And it doesn’t pretend to be.
You can buy the JD Gym Equipped wrist roller here.
And if you have any questions I didn’t cover here, feel free to drop a comment below or in the comment section on my YouTube review.