Achieving better posture is a popular goal thanks to the explosion of interest in mobility and “prehab” focused training in recent years.
The reasons for wanting better posture vary from person to person:
The issue is that there’s a shortage of actionable advice for improving posture. What you will find, though, is plenty of advice that’s vague, oversimplified or just plain wrong…
…Until now! Read on to discover 13 highly actionable tips for improving your posture and mobility.
Table of Contents
1. Learn What Proper Posture Looks & Feels Like
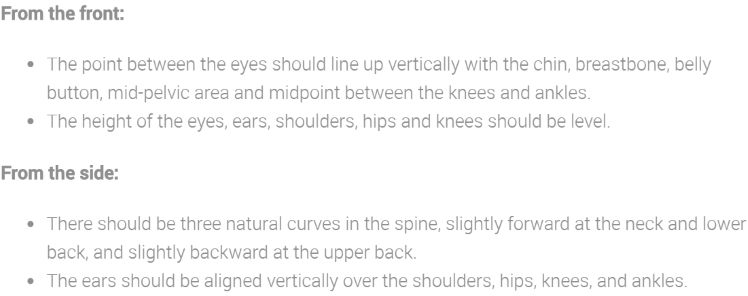
The perfect cliff note description version of identifying ideal standing posture is articulately prescribed by Canadian kinesiology expert and posture specialist Rob Williams:
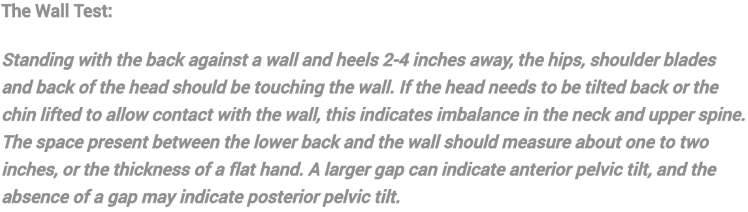
He also uses his “wall test” to allow clients to self-assess their own posture. This assessment can easily be utilized by you to see if this (plus the other 12 tips) actually improve your posture:
I am a nerd. I need things to be quantifiable and tangible. Although Williams’ Wall Test is a simple and cheap assessment tool, if you would like a more comprehensive home assessment, I would strongly suggest getting a Posture Grid.
If meeting with a medical professional or purchasing, basically, a wall mounted version of spinal battleship is out of the question, you could always make your own Plumb Line:
2. Posture Is a Habit
This is going to be the most important point on this list.
Habitually sitting and standing in more efficient positions is more important than improving your posture through training.
When you consider out sheer amount of time actually working, sitting, driving, texting, eating, reading, doing everyday living/working activities that are inherently performed in a little “internally rotated box” directly in front of you, that overall accumulated time trumps the time spent in the gym actually performing the lifts.
Improving your posture is the product of an overhaul of your habits towards posture in general. You have to realize that, much like anything worth doing, improving your posture habits will take time. It will be difficult, but it is very possible.
A great protocol to follow in regards to actively improving posture during the day is Kelly Starrett’s 20/20 rule. This involves keeping the abdominals braced at a 20% of max effort and keeping the shoulder blades retracted at 20% of a max effort all the time.
Although this is incredibly taxing to maintain this posture for 100% of your waking day, it is an excellent way to gauge if you are putting enough into your “posture practice.”
Combine the 20/20 rule with the above mentioned positional cues and you have the perfect series of modalities to emulate perfect posture. Even though this will be difficult, this is a heck of a lot easier than walking around with dictionaries on your head.
Obviously, this will be impossible to maintain these cues all day at first. Priority must be made towards for consciously engaging correct posture. Simply correcting your posture when you realize you are slacking is a good start.
Basically, if you find yourself being lazy, immediately fix and maintain your posture for as long as you possibly can. Over time, your awareness will improve and you will accumulate more and more time in a more optimal position.
Eventually you’ll exhibit better posture more frequently than poor posture. It’s at this point that you’ve effectively made “good posture” your default. Of course, this isn’t the time to quit. You should continue reinforcing your new habits and strive for even better posture.
3. You Don’t Have To Be In An Ideal Posture All The Time
It is a physical impossibility, due to fatigue accumulation, to be in perfect posture all the time. You just need to make an active effort to frequently change positions and avoid frustration.
4. Breathe with Your Diaphragm
Most people breathe incorrectly. Diaphragmatic breathing is key to improving posture.

Diaphragmatic breathing involves actively engaging the diaphragm during the inhalation phase and allowing the diaphragm to relax during the mechanical exhalation phase.
Too many people are chest breathers, meaning they rely too much on chest, rib and neck breathing muscles relative to the diaphragm.
How do you know which type of breathing you default to? Try this – Sit or stand up straight, take a deep breath and observe:
- Do your shoulders rise and does your chest expands? If so, this is chest breathing.
- Do your shoulders remain at the same height, and does your rib cage only expand subtly? Do you feel your lower torso expanding outward from within, in all directions. If so, this is diaphragmatic breathing.
If you can’t seem to get the technique of diaphragmatic breathing down, here’s some tips:
- Focus on the bottom area of your ribs.
- Breathe deep. Pretend like you’re trying to draw in air fill up a balloon that’s near the bottom of your stomach (that’s basically what the diaphragm is anyway).
- Allow your mid-section to expand and fill with air. Don’t simply push your gut out.
- Pretend you’re wearing a belt around your lower torso, sort of like a weight belt. When inhaling, imagine the internal pressure pushing outward 360 degrees against the belt.
- Don’t allow your shoulders elevate. Do this by relaxing your shoulders and traps; do not simply contract your muscles to prevent your shoulders from elevating.
If you’re a habitual chest breather, it can take a ton of practice to make diaphragmatic breathing your new default breathing pattern. However, as you already know, practice and posture go hand in hand.
5. Sleep Better
Postural Sleep Hygiene is probably the easiest thing to fix because it is the most passive cue on the list. Basically, we are trying to avoid sleeping on our stomachs and improve the quality of our mattress.
It is much better for your posture to sleep on your back (unless you have, or are likely to develop, sleep apnea), or on your back.
If you’re currently a stomach sleeper, it’s time to change! Trust me, once you do, you’ll not only contribute to better posture, but you’ll also:
- sleep better with fewer interruptions
- toss and turn less
- no longer wake up with a sore neck
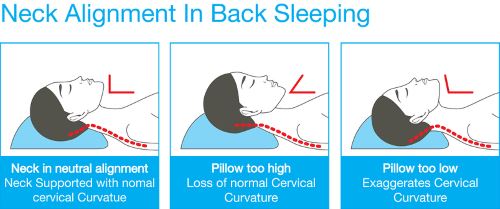
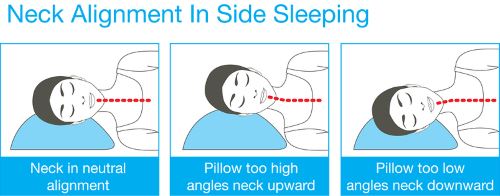
Depending on if you sleep on your side or back, you’ll still have to make sure your neck is positioned correctly on your pillow, as shown below:
Now you know the basic positions you should be in while sleeping. However, there’s one big factor consider that will determine whether or not you’ll be able to keep your spine as a whole (i.e. not just your neck; also, the thoracic spine and lumbar spine) in a neutral position with proper curvature…
…And that factor is: your mattress.
The negative health effects of a bad mattress are innumerable, and they extend beyond simply contributing to bad posture. Everything from aches and pains, to higher anxiety and general sleeplessness can all be signs of a bad mattress.
Chances are you need to upgrade your mattress if you consistently can’t fall asleep within 20-30 minutes due to tossing and turning and trying to find a comfortable position.

With everything available on the market today, it seems as though memory foam mattresses are the best for improving your posture.
If you’re looking for a very affordable but good quality mattress, I recommend the one I sleep on: the Zinus Sleep Master Ultima (queen size, 6-inch foam).
6. Cut Down on Repetitive “Bad” Movements
Earlier I mentioned the “internally rotated box” that many of our daily activities take place in.
Obviously, if the demands of our jobs require some of these tasks, there will be no way to avoid them. This is where the practice and awareness comes in that I mentioned previously. Other things like excessive texting and web surfing outside of work hours can definitely be cut down for most people.
The more time we spend out of the internally rotated box, the better.
7. Be Smart! Use Better Posture with Your Smart Phone
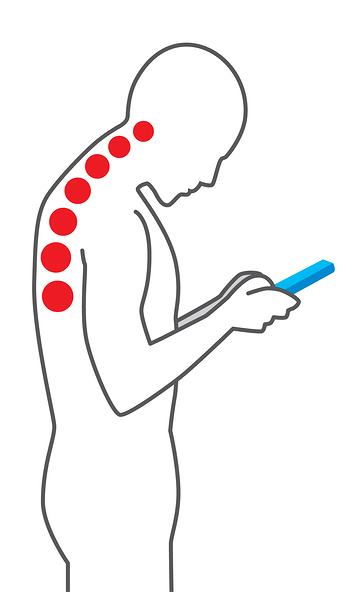
We live in a society where “text neck” is an actual medical issue. This is due to the posture in which most people use their smart phones.
The best course of action here is to just spend less time using your smart phone in general. If that is unrealistic, the next best course of action is to focus on a better posture while using your phone.
One huge key to making sure you’re utilizing smart posture with your smart phone is to simply hold your phone higher when you use it while keeping all the previous posture cues in mind.
Another common cause of excessive kyphosis is excessive laptop/computer use. Forward head posture due poor workstation set-up can cause a host of postural issues. Which is a perfect segue into our next point:
8. Improve the Ergonomics of Your Workstation
Although this tip mostly applies to those spending the majority of their workday behind a computer, anyone that spends any significant time in front of a computer screen can benefit from this section.
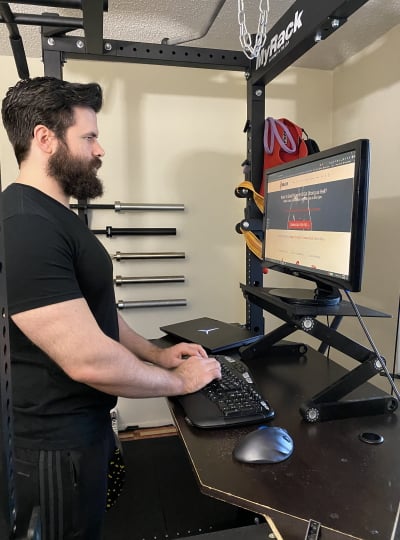
A standing desk will be your best option here.
Below is my DIY standing desk. As you can see, it is setup inside my power rack. It’s easy to disassemble when it’s time to workout.
However, if a standing desk isn’t a possibility for you, here is an excellent diagram showing the ideal seated desk ergonomic set up:
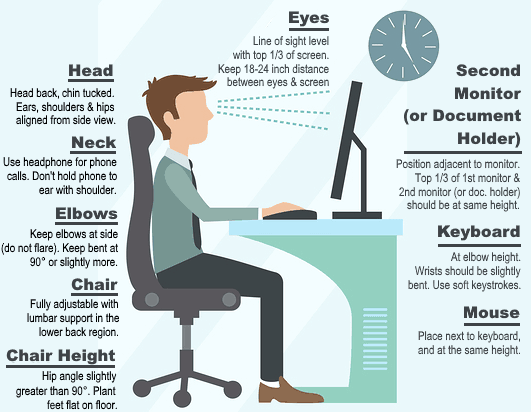
The above infographic is mine, but it was inspired by a similar one by Kelly Andrews, DC, in an article he wrote. In the same article, he perfectly describes the key points of seated ergonomics:

He also mentions a solid protocol for diagnosing back pain caused by poor posture during the work week:

Now, if the option is available for a standing workstation, this is by far the best option available. You’re going to limited here by your needs and price points. Luckily, there are tons of options out there to help you get exactly what you need/can afford:
iCraze Adjustable Laptop Stand:
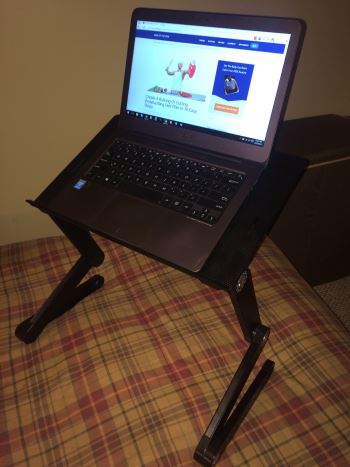
The positive points of the iCraze adjustable workstation are its adjustability and it its low price point. This is a station that can be used standing or laying down. I use mine in both positions. The only downside is that it is limited to laptop use.
Titan Fitness Deluxe Standing Desk:
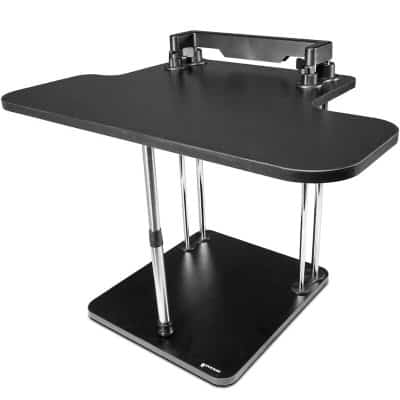
The Titan Fitness deluxe standing desk is more along the lines of a medium price point. It can support heavier laptops, standalone desktops towers and all-in-one computers. It also has an adjustable level for a keyboard and mouse.
VARIDESK Adjustable Standing Desk:

The VARIDESK adjustable standing desk is the Cadillac of standing ergonomic desks. As well as being extremely sturdy and made with very high quality, it also has enough room for 2 monitors and the wide keyboard area allows for more mobility around your workstation.
The only downside here is its higher range price point. But when you pay more, you get more.
9. Check Your Keyboard
An ergonomic design keyboard will ensure proper wrist and hand position in order to limit the occurrence of overuse injuries of the hand and wrist and will also ensure your shoulders, thoracic spine, cervical spine, and head remain in neutral/optimal position.
If you are straining with your hands and wrists, due to the high nervous activity and tactile responses of the hands in general, you will develop compensatory patterns somewhere else. Compensating for poor positioning is the bane of perfect posture.
There is a huge market for ergonomic keyboards. Here are a few that standout from the others:
Logitech Mk550 Wireless Keyboard:
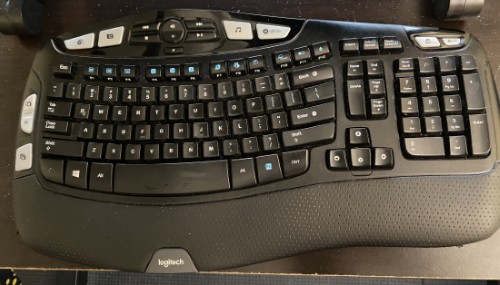
I’ve had the Logitech Mk550 keyboard for years now and I’m still happy with it. It feels great and has a user-friendly layout.
This keyboard will perfectly accommodate most of the population. The low/medium price point is very appealing here considering it also comes with an ergonomic mouse. And both are wireless.
Kinesis AC740-BLK Freestyle Ascent Keyboard:

The Kinesis AC740-BLK is a unique keyboard is built for comfort. It is the keyboard for heavy keyboard users. This keyboard has the flexibility to work for any frame size, from the biggest neanderthal-like brutes to the most petite dainty women.
You can separate the keyboard sides by up to 9 or 20 inches (depending on the model). Plus, you have the ability to rotate them clockwise or counterclockwise as needed to find the perfect position.
It’s body is low and there’s no difference in height between the front row and rear row of keys. This slim “no-slope” design completely eliminates excessive wrist extension.
Keys are placed in the most ergonomically strategic positions. They even thought to put a 10-key pad on the left with hot keys for:
- Navigate forward and backward
- Copy, cut and paste
- Delete
- Right click
- Fn (function)
Also noteworthy is that the right side of the keyboard has 4 well-placed keys for page up, page down, home, end. My previous laptop had a similar placement. I didn’t realize how useful these keys were until I got a new laptop that only lets me use these buttons by pressing fn + up/down/left/right. 🙁
You can even purchase the optional Ascent Multi-tent accessory, which allows you to adjust each half of the keyboard from a slight 20° angle all the way up to a fully vertical 90°. The benefit of this is that you can type with your wrists in a neutrally rotated position.
This keyboard is best for heavy computer who perform numerous repetitive keystrokes.
10. Muscle up Your Mouse
We live in a world plagued with hand/wrist/elbow/forearm issues. Most of this can be attributed to poor hand ergonomics of most commercially available mouse options that come with a prepackaged computer. What does an ergonomic mouse even look like? Here is an example of very popular model:
Logitech M570 Wireless Mouse:
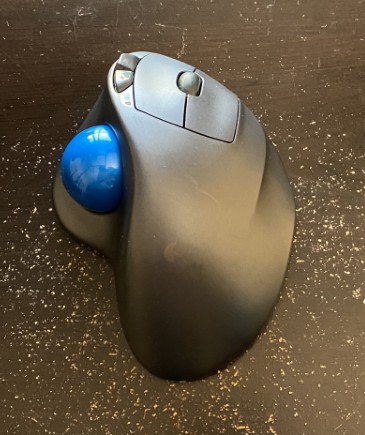
Not only is the shape of the Logitech M570 wireless mouse ergonomically perfect, the trackball on the top allows for on screen cursor movement without moving your arm. This means, holding a better posture will be much easier when not performing wide arching, broad mouse strokes to move the cursor across the screen.
The buttons on the mouse can also be programmed for common keyboard shortcuts and allow for easy backward/forward slideshow and browser navigation.
My experience with this mouse has been overwhelmingly positive. When transitioning from a normal mouse to this one, I immediately noticed less wrist and forearm strain.
11. It Doesn’t Hurt To Ask
So far, many of these points have discussed ways to improve posture outside of the gym. Some of us do work in environments where these ergonomic changes might not be well received. In any situation, it does not hurt to ask your boss or HR manager.
Unfortunately, I am sure some of you will be in situations where change will not well received. If this is the case, you can still implement the following:
- Get up every hour to stand up, walk around, and stretch.
- Improve your posture with your current workstation set-up.
- When you realize you aren’t in good posture, try to change positions frequently in order to not let your body get used to any one particular bad posture.
12. Left or Right Dominant? Just Be Dominant

This is probably the weirdest tip on the list. We do have a natural movement bias due to the natural set points of our anatomy.
We have some heavy organs set to the left, some organs set to the right, and even our dominant hand causes a great deal of muscular imbalance that can negatively affect posture.
Here are a couple of tips to practice offsetting these movement bias to help improve posture:
- Lean to the opposite side when standing.
- Cross your arms with the opposite arm on top.
- Cross your feet/legs with the other foot/leg in front/on top.
- Brush your teeth with the opposite hand.
- Shave with the opposite hand.
- Lean to the opposite you normally do when driving.
These are only a couple of tips to help correct natural movement bias. The biggest thing here is (and this is basically the entire take home point of the article) to make a new habit that eliminates movement bias that may be negatively affecting posture.
Some great reads on natural asymmetry and just overall improvements in movement have been published by Eric Cressey. I strongly suggest reading this article and this one.
13. Inhibit Overactive Muscles and Activate Weak Postural Muscles
Poor posture when sitting and standing absolutely annihilates a couple muscle groups. Getting sucked into the internally rotated box that I mentioned before wreaks havoc on the muscles of the upper body.
The pec minor and pec major all become overactive due to folding forward at shoulders and letting the muscles responsible for scapular retraction and external rotation go lax. The pecs take on more of a stability role and maintain tetany even when not in a seated texting or typing position.
Couple this with the hip flexors shortening, hamstrings going lax, and the muscles responsible for hip extension basically balling up into the contractility of a cold grilled cheese sandwich. These muscles get negatively affected by poor hip angle when seated for long periods of time.
Quick 4-Movements Mobility Drill Circuit
Here is an excellent video with four mobility drills to counteract the destruction that sitting does to your muscles.
Below, I’ll introduce several other great mobility drills and dynamic stretches, myofascial release techniques, and corrective exercises with a focus on activation and strengthening.
Mobility Drills with Dynamic Stretching & Mobilizations
Wall Hip Flexor Mobilization:
This drill “unglues” the hip flexors and improves overall hip extension.
Supine Bridge With Reach:
While also working on hip extension, this drill adds in a movement to get all of the muscles of the shoulder girdle moving properly.
Yoga Push Up:
Focusing on “lengthening” the spine and scapular control makes it an excellent tool for thoracic mobility.
Spiderman with Hip Lift and Overhead Reach:
This drill ties together all of the previous exercises into one fluid series of movements.
Myofascial Release Techniques
Another excellent way to release the tension in overly active muscles is with myofascial release techniques. Just keep in mind that it takes about two minutes to change the contractility/plasticity of soft tissue. So, try to work on these positions for at least that amount of time. When you hit a spot that causes discomfort, this is called a trigger point. Try to stay on these trigger points until you feel a change in the area or you throw up in your mouth. Whichever comes first.
Thoracic Extension on a Foam Roller
This one requires some time of rolling soft tissue device. Any basic foam roller will do the trick. However, I personally use and suggest the TriggerPoint GRID Foam Roller since it’s a bit denser than most foam rollers and will last longer.
Or, if you’re a bit of a masochist and enjoy a more intense hurts-in-a-good-way sensation, then a Rumble Roller is the tool for you. I have one of these, too. Even though I use the GRID roller more often, I can confirm that the Rumble Roller does indeed “hurt so good” :-D. Besides that, it’s an great tool overall–but not if you’re highly sensitive to pain.
To get set up for thoracic extensions, you want to start by laying on the floor laying supine with the roller under your upper back. You can now cross your arms over your chest and work on “prying” your upper back forward and backward with your hips staying in contact with the floor. Move slowly down your spine and focus on slowly increasing the ROM with every new position.
For some variation, you can extend your arms overhead or hold onto a dowel/broomstick to help create torque while you mobilize.
Your thoracic spine should be very mobile. This is the area is responsible for developing torque and power in most rotational sports (golf, baseball, tennis, etc.). It is also the area hammered the worst by poor posture.
Lacrosse Ball on Piriformis
For this drill, you want to take an almost bent figure four position on the floor. Once seated, place a lacrosse ball on the outside of your glutes on the side of the leg that’s crossed over. The goal here is to find and smash trigger points.
Fair warning: this will not be comfortable. Just take a deep breath, find a happy place, and dig out all of those nasty spots.
Lacrosse Ball on Pec Minor
This one is best done in a doorway with your body on the side of the doorway that allows your rolling sides arm to move freely. Being able to go through a range of motion while you tack and stretch the muscle greatly increases the effectiveness of the stretch.
Again, the idea here is to grind the ball into the nasty bits in there and increase the ROM in the moving arm.
Foam Roller on Lats/Teres Major
I call this one the “piriformis of the upper body” in terms of amount of pain felt while doing the exercise.
With the lats being the largest upper body postural muscles in the body, keeping an optimal tone/eliminating trigger points here is key better posture.
Corrective Exercises to Activate and Strengthen Inhibited and Weak Muscles
While muscles like the lats and pecs are prone to tightness and overactivity, there are others that become very lax and weak when being in poor posture for extended periods of time.
The lower traps, serratus anterior, mid traps/rhomboids, thoracic erectors, glutes, and hamstrings all fall into this category.
Here are several exercises that target all of these issues:
Scapular Wall Slide
This exercise is an excellent scapular stability tool. It takes an incredible amount of shoulder mobility and scapular stability to perform this correctly. Also, if your pecs are super tight, this can be a great stretch for them as well.
Forearm Wall Slide
Very similar to the Scap wall slide, this exercise also includes some strengthening aspects for many of the thoracic and scapular musculature.
Bird Dog
This modality is excellent for working on full body extension and really hammers the glutes and hamstrings. Being able to work one arm/opposite leg is excellent for improving some of those movement biases I mentioned earlier.
Band Pull-Aparts
All you need to know about this excellent exercise is contained in this video:
The band pull-apart can also be done in a “clock hands” fashion where the individual tries pointing each arm at the opposite numbers of a clock.
Conclusion
This list is imperative for anyone that takes their physical endeavors seriously. Whether it’s powerlifting competitively, bodybuilding, training hard in general, or just someone looking to better their overall quality of life, this information applies to every living person in our technological age.
Did you find anything in this list helpful? Did you learn anything new? Please let me know in the comments and share the article if you find it worthwhile!
FREE Posture Routine: Get my daily routine for better posture & mobility